Template:TC-Helicon to L1®: Difference between revisions
mNo edit summary |
m (fixed images) |
||
| (23 intermediate revisions by the same user not shown) | |||
| Line 7: | Line 7: | ||
|Model parameter 2= [[Compact#Channel_2|Compact Channel 2]] | |Model parameter 2= [[Compact#Channel_2|Compact Channel 2]] | ||
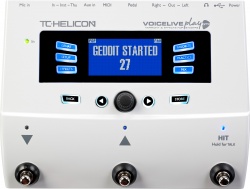
|TCH=[http://www.tc-helicon.com/products/voicelive-play-gtx/ VoiceLive Play GTX] | |TCH=[http://www.tc-helicon.com/products/voicelive-play-gtx/ VoiceLive Play GTX] | ||
|TCH Image=[[ | |TCH Image = [[File:Voicelive-play-gtx_top.jpg |link=http://www.tc-helicon.com/products/voicelive-play-gtx| 250px |title=TC-Helicon VoiceLive Play GTX ]] | ||
|TCH Additional Note = so I don't have to touch the {{{L1}}} once I'm set up. | |||
}} | }} | ||
</pre> | </pre> | ||
</noinclude> | </noinclude> | ||
<!-- | |||
{{Compact icon}}{{Model 1S icon}}{{Model II icon}} | {{Compact icon}}{{Model 1S icon}}{{Model II icon}} | ||
=== [[Compact]] === | --> | ||
<html><div style="float:right; padding-top:60px"></html>{{{TCH Image|[[File:Voicelive-play-gtx_top.jpg |link=http://www.tc-helicon.com/products/voicelive-play-gtx| 250px |title=TC-Helicon VoiceLive Play GTX ]]}}}<html></div></html> | |||
<noinclude>=== [[Compact]] ===</noinclude> | |||
The {{{TCH}}} has two outputs available (Vocal and Guitar) but I choose the LEFT output and run MONO so that I can make the connection with one cable. I don't use {{{Model parameter 1|Compact Channel 1}}} when I'm using the {{{TCH}}}. | The {{{TCH}}} has two outputs available (Vocal and Guitar) but I choose the LEFT output and run MONO so that I can make the connection with one cable. I don't use {{{Model parameter 1|Compact Channel 1}}} when I'm using the {{{TCH}}}. | ||
I prefer to use an adapter (XLR to ¼ inch jack) from the {{{TCH}}} left out - to {{{Model parameter 2|Compact Channel 2}}}. That way you don't have to work around the {{{L1}}}'s internal microphone Preset. | I prefer to use an adapter (XLR to ¼ inch jack) from the {{{TCH}}} left out - to {{{Model parameter 2|Compact Channel 2}}}. That way you don't have to work around the {{{L1}}}'s internal microphone Preset. | ||
[[ | [[File:Compact_Channel_2_Line_Level.png |link=Compact#Channel_2| 400px |Compact Channel 2]] | ||
There's MIX button on the {{{TCH}}} that brings up a screen where it's easy to control the relative volumes | There's MIX button on the {{{TCH}}} that brings up a screen where it's easy to control the relative volumes. Vocal volume is set. You can raise and lower the other inputs on the {{{TCH}}}. {{{TCH Additional Note}}}. And it's nice to use just one cable from the {{{TCH}}} to the {{{L1}}}. This also keeps the {{{Model parameter 1|Compact Channel 1}}} free in case I need to plug in another microphone. | ||
I use an adapter like this | I use an adapter like this | ||
<!-- | |||
* [http://www.musiciansfriend.com/accessories/planet-waves-xlr-female-to-1-4-female-adapter xlr female to 1/4 female adapter][[Image:XLRTo14female.png|right]] | |||
* [http://www.audiopile.net/products/Adaptors_Connectors/NEUTRIK/NA3FJ/NA3FJ_cutsheet.shtml NA3FJ Neutrik 3 Pin XLR Female to 1/4" TRS Female Locking Barrel Adapter] [[Image:NeutrikNA3FJ.jpg|right]] | * [http://www.audiopile.net/products/Adaptors_Connectors/NEUTRIK/NA3FJ/NA3FJ_cutsheet.shtml NA3FJ Neutrik 3 Pin XLR Female to 1/4" TRS Female Locking Barrel Adapter] [[Image:NeutrikNA3FJ.jpg|right]] | ||
--> | |||
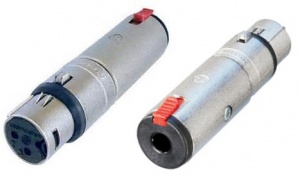
<table><tr><td>Neutrik NA3FJ XLR to ¼ inch jack Tip-Ring-Sleeve female</td><td> or </td><td>Planet Waves XLR female to ¼ inch jack Tip-Ring-Sleeve female</td></tr> | |||
<tr><td> | |||
[[File:NeutrikNA3FJ.jpg |link=http://www.audiopile.net/products/Adaptors_Connectors/NEUTRIK/NA3FJ/NA3FJ_cutsheet.shtml| 300px |NA3FJ Neutrik 3 Pin XLR Female to 1/4" TRS Female Locking Barrel Adapter]] | |||
</td><td> </td><td> | |||
[[File:XLRTo14female.png |link=http://www.musiciansfriend.com/accessories/planet-waves-xlr-female-to-1-4-female-adapter| 300px |xlr female to 1/4 female adapter]] | |||
</td></tr> | |||
</table> | |||
WITH | |||
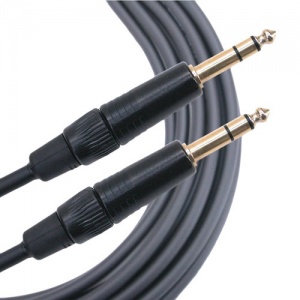
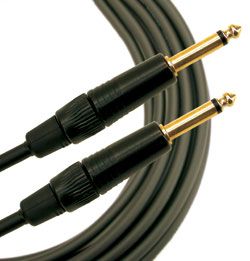
<table><tr><td>Balanced ¼ inch jack Tip-Ring-Sleeve cable</td><td> or </td><td>Unbalanced ¼ inch jack Tip-Sleeve cable</td></tr> | |||
<tr><td> | |||
[[File:TRStoTRS.jpg |link=http://www.audiopile.net/products/Mic_Instr_Cables/IP-101/IP-101_cutsheet.shtml| 300px |¼ inch jack Tip-Ring-Sleeve ]] | |||
</td><td> </td><td> | |||
[[File:TSUnbalanced.jpg |link=http://www.audiopile.net/products/Mic_Instr_Cables/GBNC/GBNC_SOON_cutsheet.shtml| 300px |¼ inch jack Tip-Sleeve ]] | |||
</td></tr> | |||
</table> | |||
OR a longer version of a cable like this: | |||
[[Image:XLR to TRS mp106.jpg]] | |||
[http://www.audiopile.net/MP-105 Source: Audiopile.net] | |||
Technical Description: | |||
The EWI MP-105 is a special application adaptor cable for converting XLR to 1/4 TRS. This cable is typically used to plug XLR cord into balanced 1/4" TRS panel jacks commonly found on mixing consoles and processing equipment. | |||
The Female XLR end is wired through to the 1/4" Male TRS end as follows: | |||
* Pin One FXLR to Sleeve of MTRS | |||
* Pin Two FXLR to Tip of MTRS | |||
* Pin Three FXLR to Ring of MTRS | |||
The 1/4" MTRS end is an EWI model P292S-BKG | |||
The FXLR end is an EWI model ES3FB-GDP | |||
The cable itself is constructed with 99.98% pure 22ga. high strand count copper conductors. | |||
TO | TO | ||
| Line 35: | Line 81: | ||
{{{Model parameter 2}}} | {{{Model parameter 2}}} | ||
<!-- | |||
[[Image:Compact_Channel_2_Line_Level.png]] | [[Image:Compact_Channel_2_Line_Level.png]] | ||
--> | |||
Latest revision as of 22:02, 28 March 2017
Usage:
{{TC-Helicon to L1®
|L1=[[Compact]]
|Model parameter 1= [[Compact#Channel_1|Compact Channel 1]]
|Model parameter 2= [[Compact#Channel_2|Compact Channel 2]]
|TCH=[http://www.tc-helicon.com/products/voicelive-play-gtx/ VoiceLive Play GTX]
|TCH Image = [[File:Voicelive-play-gtx_top.jpg |link=http://www.tc-helicon.com/products/voicelive-play-gtx| 250px |title=TC-Helicon VoiceLive Play GTX ]]
|TCH Additional Note =  so I don't have to touch the {{{L1}}} once I'm set up.
}}
Compact
The {{{TCH}}} has two outputs available (Vocal and Guitar) but I choose the LEFT output and run MONO so that I can make the connection with one cable. I don't use Compact Channel 1 when I'm using the {{{TCH}}}.
I prefer to use an adapter (XLR to ¼ inch jack) from the {{{TCH}}} left out - to Compact Channel 2. That way you don't have to work around the {{{L1}}}'s internal microphone Preset.

There's MIX button on the {{{TCH}}} that brings up a screen where it's easy to control the relative volumes. Vocal volume is set. You can raise and lower the other inputs on the {{{TCH}}}. {{{TCH Additional Note}}}. And it's nice to use just one cable from the {{{TCH}}} to the {{{L1}}}. This also keeps the Compact Channel 1 free in case I need to plug in another microphone.
I use an adapter like this
| Neutrik NA3FJ XLR to ¼ inch jack Tip-Ring-Sleeve female | or | Planet Waves XLR female to ¼ inch jack Tip-Ring-Sleeve female |
|
|
|

WITH
| Balanced ¼ inch jack Tip-Ring-Sleeve cable | or | Unbalanced ¼ inch jack Tip-Sleeve cable |
|
|
|
OR a longer version of a cable like this:

Technical Description:
The EWI MP-105 is a special application adaptor cable for converting XLR to 1/4 TRS. This cable is typically used to plug XLR cord into balanced 1/4" TRS panel jacks commonly found on mixing consoles and processing equipment.
The Female XLR end is wired through to the 1/4" Male TRS end as follows:
- Pin One FXLR to Sleeve of MTRS
- Pin Two FXLR to Tip of MTRS
- Pin Three FXLR to Ring of MTRS
The 1/4" MTRS end is an EWI model P292S-BKG
The FXLR end is an EWI model ES3FB-GDP
The cable itself is constructed with 99.98% pure 22ga. high strand count copper conductors.
TO
{{{Model parameter 2}}}