Difference between revisions of "DJ"
m (File:Bose F1 DJ.jpg) |
m |
||
| Line 3: | Line 3: | ||
|Application Image=[[File:Bose F1 DJ.jpg|300px]]<br>[[Image:BoseDJ2DavidSeel.jpg|300px|Bose DJ image by David Seel]]<br /><div style="font-size:10px;">Photo Credit: David Seel</div> | |Application Image=[[File:Bose F1 DJ.jpg|300px]]<br>[[Image:BoseDJ2DavidSeel.jpg|300px|Bose DJ image by David Seel]]<br /><div style="font-size:10px;">Photo Credit: David Seel</div> | ||
}} | }} | ||
| + | |||
| + | == Third Party Mixer to ToneMatch Mixer (T4S/T8S) == | ||
| + | {{:Mixer to ToneMatch Mixer}} | ||
| + | |||
| + | |||
== {{F1}} for DJs == | == {{F1}} for DJs == | ||
Latest revision as of 06:27, 2 December 2018


Third Party Mixer to ToneMatch Mixer (T4S/T8S)
Connect a third party mixer with left and right outputs to your ToneMatch Mixer[1]. You can use two of the main channels (T4S ToneMatch mixer channels 1, 2, 3, 4 or T8S ToneMatch mixer channels 1, 2, 3, 4, 5, 6, 7, 8.
- Main Channels 1, 2, 3, 4 (,5, 6, 7, 8)
If you connect the third party mixer to the main channels you can use:
- The Master Volume control
- The Pan/Aux to direct the signals to left and right outputs
- The trim controls to optimize the signal output from the mixer to match the inputs of the T4S
- The channel volume controls
- Presets (e.g., DJ / High Volume Music)
- zEQ (tone controls)
- ParaEQ (parametric EQ)
- Reverb
- Aux Outputs
- XLR to XLR cables OR XLR to 1/4" (6.3mm) Tip-Ring-Sleeve jack cables
- Aux Inputs 5, 6 (9, 10 (T8S))
If you connect the third party mixer to the Aux inputs you can use:
- The Master Volume control
- The Pan/Aux to direct the signals to left and right outputs
- XLR to 1/4" (6.3mm) Tip-Ring-Sleeve jack cables
Choose the channels that best suit your needs.
- Summary
- If you need signal processing use two of the main channels
- If you will do all the signal processing and manage the volume on the third party mixer, you can use the Aux inputs
F1 Model 812 Flexible Array Loudspeaker for DJs
B1s: How do I place them, single double, quad


- Although originally written about the Bose B1, this article is applicable to all Bose bass modules and subwoofers (B1, B2, Sub1, Sub2).
It Depends
- Where and how is the best way to place the B1; single, double, and quad?
The short but annoying answer is of course, "it depends" and the slightly longer, but still unsatisfying answer is, "results will vary from case to case in ways that even the best acousticians can't anticipate." But you'll often find recommendations on the web or even in technical journals by folks who have only considered a subset of the factors that contribute. The authors may not know about the other factors or, more likely, they may be hoping that those other factors can be ignored. The temptation to extrapolate beyond the part that one grasps is almost irresistible. Hope springs eternal. One wants to give a satisfying answer, even when it is out of reach.
This is not as hopeless as it sounds, because there is an important distinction between "what is best?", which we cannot answer, and "what do you recommend that I do?" which we should and can answer. We can also say some things about "what should I NOT do?" Here I will give you a random smattering of such recommendations and hope that they will suffice until I can give a fully organized wiki entry. It's a pretty long post, but I hope it will address most of the questions that have arisen. (It takes more time to make a shorter post. Smile ) If not, ask more questions and that will help me make the wiki entry more complete. Chris
Orientation, aiming and obstruction
Sound comes through the Bass Module grille only and then spreads out the same amount in all directions from that surface. So box orientation doesn't matter to the Bass Module sound. Sonically the Bass Module can rest on any one of its four sides and nothing will change. (Of course, for stacking, you want the "wide side down" in order to engage the nubs on the next Bass Module.) Once you pick a side to rest it on, you can aim the Bass Module in any direction you want, forward, sideways, even firing backward toward a rear wall. If you hear a change, it is because you've moved the grille relative to other Bass Modules or relative to boundaries. Don't shove the grille into a wall or into a big obstacle, because then the sound can't get out; leave at least 6 inches (15 cm) of space in front of the grille. The side of the box itself can be right against a wall, so long as the grille is not obstructed. We often start out placing our Bass Modules on the floor, sideways against the rear wall, so that the first reflections from the floor and rear wall will not change the tonal balance in the bass. (Room modes will change the tonal balance anyway, but at least we eliminate one source of variability this way.)
Arranging groups of Bass Modules that play the same signal
When multiple sources playing the same signal are spaced apart, they make an "array" which means that the tonal balance they radiate can be different in different directions. If you understand array theory, you can make this work for you, but in our case, it is safest to keep the spacings as small as we can, so that the array radiates the same in all directions. When we keep the spacing tight, multiple B1s will behave just like single B1s, only louder. What matters here are the spacings of the grilles, not the cabinets, because the grilles are where the sound comes from. The more specific suggestions that follow below rely partly on my own understanding of the theory and partly on consultation with Hilmar, who has both theory and a lot of experience to guide him.
Two Bass Modules
For two B1s (or B2s), we prefer to stack them on their wide sides, mostly because this takes the minimum floor space. But you can place them side by side or even face to face, leaving 12 inches (30 cm) between grilles (because this is 6 inches (15 cm) in front of each B1). Sonically, it doesn't matter which wide side is up and the two don't have to have the same side up. Sonically you can even have one B1 on its wide side and one on its handle side, although that looks funny. In fact, for two B1s, "looking good" places more restrictions on what you do than "sounding good." I've seen two B1s placed either side of an L1 on the PS1, and that should work fine acoustically. In any arrangement where the grilles fit completely within a 30 inch (75 cm) diameter sphere, your two bass modules will act like a single one, only louder. Note that spacing two B1s on the floor with the L1 Classic or L1 Model I Power Stand between them does not meet this criterion. That arrangement would reduce the mid-bass that radiates to the left and right sides.
Four B1s
For 4 B1s, we are most likely to stack all 4 on their wide sides, but sometimes we make two stacks of two, side by side. The stack of four takes up the least floor space, but it radiates a little less mid-bass upwards, which has not been a problem and might be beneficial. We don't lay all four in a line on the floor on their wide sides, since we expect this to weaken the midbass that travels left and right toward other band members or audience at the sides. You could probably lay all four in a line if you rest them on their handle sides, so that they make a short line. If you use the 2x2, keep the two stacks adjacent to avoid possibly weakening the mid-bass to the sides.
Locating the Group of Bass Modules
Where to locate the group: If the group of B1s is far from its L1, the lows will come from one place and the highs from another and this is harder for everyone to hear clearly. More than about 5 feet (1.3 m) of separation is probably beginning to compromise your spatial quality. It's best if you can keep the B1s adjacent to or within a foot (30 cm) of the PS1. Since our preferred arrangements are stacks of 2 or 4 B1s, we also like to aim those stacks sideways and place them against the rear wall if we can, because this minimizes unwanted array effects with the first reflections. But we don't hesitate to aim the stacks forward when the best appearance is more important. In this case, we keep the B1s as close to the back wall as the connectors allow, but being careful not to stress the cables by bending them too sharply against the wall. Although we prefer to keep the B1s as close to the rear wall as we can, there are times when this is just not an option. In such cases, we try to get 7 feet (2.1 m) or more from a rear wall as a second choice because, in the 2-7 foot (0.6-2.1 m) range, the reflection from the rear wall tends to reduce some of the bass frequency range in the audience (an interference effect). Sometimes we have no choice but to place B1s in that 2-7 foot (0.6-2.1 m) range and we just live with the minor reduction in bass, perhaps compensating with a bass tone control boost.
Other variations: It's okay to raise the B1s on short risers if you like, but I don't know of any reason why this would always sound better or worse, just different. Floors and walls are not perfect reflectors of bass[2], but I have no different recommendations to make due to this source of variation.
It Depends
Although the above suggestions describe our default arrangements, they don't always yield good-sounding results. The factor that we can't really control or understand easily is the room. Rooms often cause very uneven distribution of bass and there is no universal method of cure. Sometimes a different speaker placement seems to help, but what helps for one listener usually makes it worse elsewhere. It's easy to fool yourself and it's easy to fuss endlessly without finding a good solution. We try not to fall into that trap. If one or two alternatives don't cure the problem, we give up and move on.
There are only a few techniques that we think are likely to help. First, if there is too much bass, we might try to fix that with a tone control reduction before moving anything, since, if it works, we will have higher maximum bass output available to us (because the bass amp is working less hard to give the right amount of bass). If a bass control adjustment doesn't straighten out the problem we hear, we might move the stack closer to or farther from the nearest corner. Closer sometimes increases bass while farther sometimes reduces it. (That's the simplified theory, anyway.) But proceed with care: the change the musicians hear will probably be different from the change in the audience. Make sure you know who you are trying to improve the sound for. The last thing we might try is a different arrangement, say switching from a stack of 4 to 2x2. If these few alternatives don't give a clear improvement (and they usually don't), we think it's time to shrug our shoulders and get on with the show.
Who Wins?
Ultimately, we have to be willing to accept that often the room will "win" and we won't get the ideal bass response. This will be true for any bass system, not just specifically for the B1. There is no point in worrying about this--we do what little we can to avoid the worst and then concentrate on giving a good performance. If we do that, the L1 will make sure people enjoy the sound, even when the bass isn't all that we'd like it to be.
More Information
File:The-Subwoofer-Power-Alley-1.pdf
More Bass
L1 Model 1S or L1 Model II
B2 Switching
If you have a B2

The B2 bass module includes a switch allowing you to select the appropriate level of bass output for your application.
There are three settings:
| Switch Position | Application |
|---|---|
| + | Bass voicing designed for DJ/Music playback applications Similar to four B1s |
| Normal | Bass voicing ideal for bass guitar or live sound application when mic'ing a kick drum Similar to two B1s |
| - | Bass voicing which is perfect for acoustic guitar and vocal Similar to oneB1 |
- Note
- You must use the Bose B2 or B1 cable (or compatible four-conductor NL4) cable to ensure the correct operation of the B2 Bass Level Switch
- Bose B1 and B2 cables are NL4 cables
You can use cables that are functionally equivalent.
What you need as a 4-wire Speakon, i.e. all 4 pins of the NL4 plugs need to be connected. The pins are named 1+, 1-, 2+, and 2-. The connection is one-to-one, for example, 2+ on one plug goes to 2+ on the other plug.
The wires inside the cable are usually arranged in a square pattern. Very long cable work a little bit better if the two signal pairs are connected diagonally like this[3]:
| 1+ | 2+ |
| 2- | 1- |
- 2+ and 2-
The Power Stand detects resistors in the Bass Module across (2+ and 2-) that identify if the Bass Module is a B1 or B2.
- If B1, then adding a second B1 is detected and the Power Stand responds accordingly.
- If B2, the setting on the Bass Level switch changes the resistance and the Power Stand responds accordingly.
See Bass Line Out for more detail.
Model II Firmware Update
In order to get the full use of the B2 with a L1 Model II you will need to download and install the latest L1® Model II Power Stand Firmware Updates.
This includes a Firmware Update (must be installed first) and a System EQ update (installed second).

Base Module Cables (B1 and B2)
- Bose B1 and B2 cables are NL4 cables
You can use cables that are functionally equivalent.
What you need as a 4-wire Speakon, i.e. all 4 pins of the NL4 plugs need to be connected. The pins are named 1+, 1-, 2+, and 2-. The connection is one-to-one, for example, 2+ on one plug goes to 2+ on the other plug.
The wires inside the cable are usually arranged in a square pattern. Very long cable work a little bit better if the two signal pairs are connected diagonally like this[4]:
| 1+ | 2+ |
| 2- | 1- |
- 2+ and 2-
The Power Stand detects resistors in the Bass Module across (2+ and 2-) that identify if the Bass Module is a B1 or B2.
- If B1, then adding a second B1 is detected and the Power Stand responds accordingly.
- If B2, the setting on the Bass Level switch changes the resistance and the Power Stand responds accordingly.
See Bass Line Out for more detail.
L1 Model I or L1 Classic
If you are using a L1 Model I or L1 Classic use the R1 Remote and turn up the Low setting.
If you have a T1 ToneMatch Audio Engine these settings can be used in conjunction with all of the other suggestions below.
T1 ToneMatch® Audio Engine Settings
Preset

There are two T1® Presets specifically for DJ/KJ use with Prerecorded Music or more generally, backing tracks.
Category: DJ/Playback
Preset: Low Volume Music
- This is optimized for low volume music. The low bass is boosted to better match the physics/psychoacoustics of our own auditory system.

Category: DJ/Playback
Preset: High Volume Music
- This is optimized for higher volume music. Some of the bass is boosted and some of the upper mids are reduced to have a more natural sound at these higher volumes.

zEQ
Sample setting shown

Using More Than Two B1s with a Power Stand
You can have up to two B1 Bass Modules connected to an L1® Power Stand.
- You can add two more B1 Bass Modules powered by the PackLite® power amplifier Model A1
- You can purchase the Packlite® and two B1 Bass Modules as a PackLite® Extended Bass Package
- You can add as many PackLite® Extended Bass Packages as you like to a single L1®, although it is unlikely you would go beyond four B1 Bass Modules except for live music in a very large venue.
- If you have an L1 Classic you can use that to drive up to six B1 Bass Modules. For details see: Classic Extended Bass Package
External Subwoofers
Passive (unpowered) Loudspeakers
Using loudspeakers other than the B1 Bass Module with any of the L1® systems is not supported. However you can safely try your own external subs if the impedance is no lower then 4 ohms (typically a single 4 ohm loudspeaker or two 8 ohm loudspeakers in parallel). The output from the Power Stand is 250 watts RMS into 4 ohms.
L1® Classic and L1® Model I
For the sake of those attaching third party passive speakers (an unsupported application).
Output if no B1 Bass Modules detected
- 40-180 Hz Bandpass (that is: NO B1 EQ)
If one or two B1 Bass Modules detected (or resistors used across NL4 2+ / 2- pins to emulate detection)
- 40-180 Hz with different EQ curves. For details on how to do this see: Activating B1 EQ Curves
For more details about the Power Stand outputs see: PS1 Power Stand / Bass Line Out
L1® Model II
For the sake of those attaching third party passive speakers (an unsupported application).
Output if no B1 Bass Modules detected
- 40-200 Hz Bandpass (that is: NO B1 EQ)
If one or two B1 Bass Modules detected (or resistors used across NL4 2+ / 2- pins to emulate detection)
- 40-200 Hz with different EQ curves. For details on how to do this see: Activating B1 EQ Curves
For more details about the Power Stand outputs see: L1® Model II Power Stand / Bass Line Out
Active (powered) Loudspeakers
Using powered loudspeakers with any of the L1® systems is not supported.
PackLite® power amplifier Model A1
The PackLite® power amplifier Model A1 is part the L1® System. It can be used to power up to two B1 Bass Modules. This is connected to the Power Stand Bass Line Out.
Third Party (non-Bose®) Systems
If you want to use a powered loudspeaker system, you can use the Power Stand Bass Line Out as the signal source. Here are notes specific to the L1® you are using.
You will probably use an powered loudspeaker in the same way as you would connect an PackLite® amp.
Please see PackLite® power amplifier Model A1 for extensive notes that include ideas that can be applied to other systems.
Ongoing discussion
I need more bass article - discussion
Longer Cables for B1s
The Bose B1/B2 requires a NL4 connector with all 4 pins connected (that's why we call it 4-wire cable). Unfortunately, the Speakon connector comes in three different flavors, NL2 (2-pins), NL4 (4 pins), and NL8 (8-pins). Most salespeople are not aware of the differences.
A good source for the correct cables is
Audiopile.net NL413GA | NL4 Speakon equipped 13/4 Speaker Cable
- Note
- If you have an L1 Model 1S or L1 Model II - do NOT add a 10k resistor to the cable. That's only required with an L1® Model I or L1® Classic.
Consider getting 90 degree ends like this:
— Click image for details —
If you call Mark and tell him you want the cable for the Bose B1, you will get one that is made to our specifications. You can also any custom length cable at a very reasonable price.
- Hilmar-at-Bose[5]
T1 ToneMatch® Audio Engine Gain Staging
| If you have follow up questions to this article please post a note in the Bose forum: Bose Forum T1® - Set input trim on Channel 4/5 for DJ Console |
Gain Staging Channel 4/5 for DJ Application / Backing Tracks
These instructions apply if you are using
- a DJ Console or
- an analog source for backing tracks.
- If you are using a different input channel (1, 2, 3) the same principles apply.
Note: If you are using a stereo source use T1 ToneMatch Audio Engine Channel 4/5 using the Analog Inputs on the back. Note: If you are connecting by USB you do not have to set the trim control. When connecting by USB the trim light will be inactive.

This is typically a one-time operation. You can do this in silence until the last stage where you bring up the Master Volume.
Do this with the T1® Master Volume all the way off, and the Channel volume all the way off. You do not need to hear the music to set the trim.

Your first adjustment for any input to your T1 ToneMatch Audio Engine is the Trim setting. The exact position of the Trim will vary depending on signal strength of your input source. The correct setting for any particular source may be different from your other sources.

Set Up Your Source
Set up your DJ console to the highest output level you will use during a show - that is ⇒ the maximum, highest output recommended in the DJ console manual. Make sure that there is no sign of clipping.
Play some music. There will be no sound. That's okay for now.
Set Input Trim
Turn the Trim setting up until the Trim Light is solid green with occasional flickers of yellow. Use the Trim lights as your guide. (The exact position of the Trim knob is not important).

If you see flickers of red (below), turn the Trim down. You are definitely nearing or in compression. Turn the Trim down until there are no red flickers.

That's it for setting the trim for that Channel and you should not need to change it unless you change DJ Consoles.
Bring up the volume on Channel 4/5 to 12:00 o'clock.

Now you can bring up the Master Volume to the required volume for the situation.

Output Meter
- A really helpful feature on the T1 is to go to the Prefs/Output Level menu and see where you are relative to maximum output.

When you have turned up the Master Volume to reach the maximum output on the meter, you should be running at the maximum possible without clipping or distortion.
From this point on you can control the volume at the source (mixer or DJ Console).
If you have comments or questions about this article please post a note in the
Bose Forum T1® - Set input trim on Channel 4/5 for DJ Console
Connect an Analog Stereo Source to an L1®
Backing Tracks — This article covers connecting devices like CD, DVD, mp3, iPods to your L1®
Connect a DJ or VJ Console to a Model I
Connections / DJ VJ Computer to Model I— This article covers connecting devices like a DJ or VJ console to your L1®
Connect a Computer to T1 ToneMatch® Audio Engine Through USB
You can connection your computer to a T1® through USB. The default routing sends the USB from Computer to the Master buss. This works fine, and is the default setting. You will want to use your source computer to control the volume, equalization, effects if any. For more notes about USB see: T1 ToneMatch® Audio Engine / USB.
Settings USB from Computer to Channel 4/5
If you want more control then you will want to send USB from Computer to T1® Channel 4/5.
Video
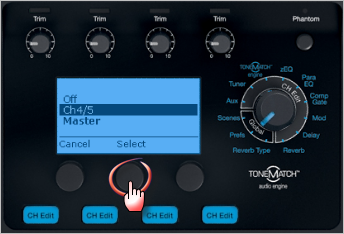
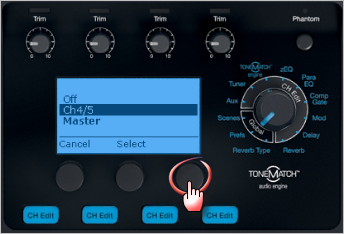
Step by Step
- Turn the Rotary Selector to Global section and Prefs
- Press the first button, Menu
- Turn the Menu to USB from PC, Press
- By default the USB from PC Left and Right channels are routed to the Master Output and you control all of the sound from the computer.
You can route one or both channels to Channel 4/5 and this gives you local control of Presets, zEQ, ParaEQ, Effects and volume.
Press the middle button Left to change the routing of the Left channel

- Turn to select Channel 4/5, Press
- If you want to route the the Right Channel to Channel 4/5
Press the right button Right to change the routing of the Right channel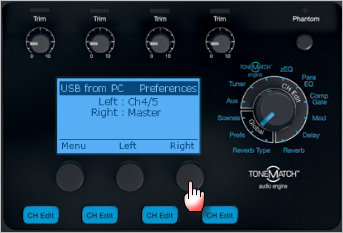
- Turn to select Channel 4/5, Press
- Here is the final result
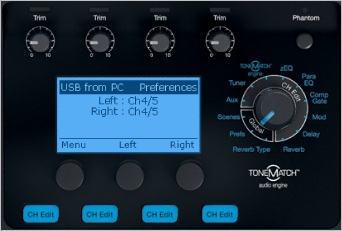


USB and Channel 4/5 Analog at the same time
You can connect the USB input to T1® Channel 4/5 for a stereo source (computer) AND an analog input to T1® Channel 4/5 at the same time. While it is unlikely you would play both sources simultaneously, you can raise and lower the outputs at the source. This allows you to control the sources applying ToneMatch® Presets, EQ, and volume using the Channel 4/5 Vol control.
See: Settings USB from Computer to Channel 4/5 (above) for USB setup and Analog Connection below.
Analog Connection

Connect a single T1 ToneMatch® Audio Engine to two L1®s
We have a comprehensive article on how to do this that covers analog and USB connections.
T1 ToneMatch® Audio Engine / Stereo Output to Two L1®s
{{#Click:T1 ToneMatch® Audio Engine / Stereo Output to Two L1®s|Image:USBtoStereoL1Model I.png|250px|run a single T1® to two L1®s}}
L1® Model II: Can I run a Stereo Source to the Power Stand
A ¼ inch Tip-Ring-Sleeve connector carrying a stereo signal should not be used with the analog input on the Model II.
Even though a ¼ inch Tip-Ring-Sleeve connector can carry a stereo signal this is not how this physical connection is used on the DJ Power Stand.
The analog input on the Model II is balanced, and will therefore subtract the Left and Right signals on a stereo cable and you will hear an L-R (Left minus Right) signal in the Model II.
You cannot 'get through the gig' this way if you are a DJ or if you need to run prerecorded music or have stereo inputs.


Using a Mixer


![]()


If you are using a mixer instead of a T1 ToneMatch Audio Engine use the mixer to create a mono output and send that to the Model II Power Stand Analog input.
- If there is a stereo/mono switch then use it and send the mono output to the Model II Power Stand Analog input.
- If there is a Left/mono output then use that and send it to the Model II Power Stand Analog input.
- If there is no way to create a mono output then pan all your mixer inputs all the way to one side (e.g. Left) and then take the mixer for that side (e.g. Left) output and send it to the Model II Power Stand Analog input.
Stereo setups
Live or PreRecorded / Stereo and *-Mono — The engineers at Bose conducted listening tests with four L1®s and eight B1s. Read about the results in this article.
Can I run two L1®s in Mono
Minimum Distance Running Two L1®s in Dual Mono
Phase cancellation can be an issue if you are running Dual Mono (two L1®s from the same mono source). This can be an issue when two or more L1®s are fed the same signal.
The minimum recommended distance for two L1®s running the same signal is 20-50 feet.
Only when fed the same signal, "Interference between line arrays would be more severe [than for non-line-array speakers]. In fact, the current Bose design rules for installing MA12 line arrays recommend ... a spacing between line arrays of between 6 and 15 meters! (20-50 feet)" The same applies to the L1. - Chris-at-Bose [6] (Clarifications added by the author of the quote.)
Note: During a conversation with Chris-at-Bose, he confirmed that the recommendations above are the same for the L1 Model II. ST 15:13, 30 August 2007 (GMT-7)
- ↑ T4S ToneMatch mixer or T8S ToneMatch mixer or T1 ToneMatch Audio Engine
- ↑ Floors and walls are not perfect reflectors of bass - see: B1 Bass Module / Walls
- ↑ Source: Hilmar-at-Bose
- ↑ Source: Hilmar-at-Bose
- ↑ B1 Cables
- ↑ See: Used 4 towers & 8 subs today in the Bose® Pro Portable PA Community
Connect two L1® Model Is to play the same source
If you are going to do this read see Dual Mono for some background.
If you are using a T1 ToneMatch Audio Engine
If you are not using a T1 ToneMatch Audio Engine
What is a Pad and when would I use one
"pad" is short for attenuation pad. This is a device used to lower the signal level between two other devices. You are most likely to need a pad when using a L1 Classic or L1 Model I and your source uses an XLR connection at line-level. For more details please see: Pad.

Mixer to Model 1S, Model II, Compact

Using a stereo mixer with an L1
- General principles for connecting a stereo mixer to the mono input on your L1 .

The inputs on the L1 Pro Input 3, L1 Model 1S, L1 Model II, and the Compact Channel 2 ¼ inch jack are MONO. Check to see if your mixer has a MONO output. If it does, then use that.
If your mixer does not have a mono output pan all your inputs to one side (e.g. LEFT) and take the LEFT output and connect that to your L1 .
For best results do NOT use any kind of Y-adapter to connect stereo outputs from a mixer to a mono input on an L1 . See Why Not Wye for details.
If you have questions or comments about this article please post a note in the Bose Forum - Technical Questions.
L1® Inputs
L1® Model 1S Analog Input
L1® Model II Analog Input
- Setting the Trim Control
- Set the Trim control on the power stand to the 0 (zero) position.
- Connect the audio source to the Analog Input
- Adjust the volume of the Mixer output to the reference or nominal output level.
- On analog consoles this may be marked as unity or 0 dB.
- On digital consoles this may be marked as -18 dBFS[1][2]. The exact value (-18 dBFS to -20 dBFS) may vary depending your location[3].
- Refer to the manual for the Mixer for details.
- If the Mixer does not have metering or indicators, set the output as high as you can without hearing distortion or seeing red indicator lights.
- While playing/singing as loud as you will during your performance, increase the Trim level so that the Signal/Clip indicator glows green or yellow. Occasional flickers of red are okay.
- If the Signal/Clip indicator glows solid red or you hear distortion, decrease the Trim level so that it glows only green or yellow.
L1® Compact Channel 2
The Compact is different from the Model 1S and Model II because it can accept stereo inputs on the Channel 2 1/8" and RCA inputs.
Stereo Inputs on Compact Channel 2
If have RCA outputs from your mixer you can connect to the Compact Channel 2 RCA inputs. It's likely that the RCA outputs on the mixer are recording outputs and you may have control the output level separate from the mixer master faders. Please see your manual for details.
If you have a way to convert the mixer stereo output to 1/8" stereo jack then you can connect to Compact Channel 2 1/8" stereo input.

Use a cable like this from your backing track source (iPod, Computer, CD / DVD player)
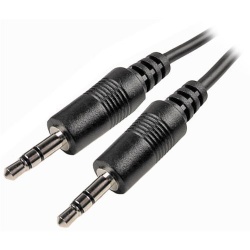
Click picture for details
or if your cable has RCA (phono) jacks you can use a cable like this.
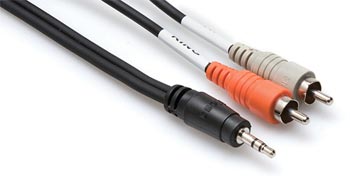
Click picture for details
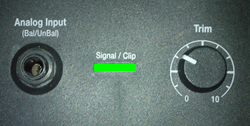
Mono Input on Compact Channel 2
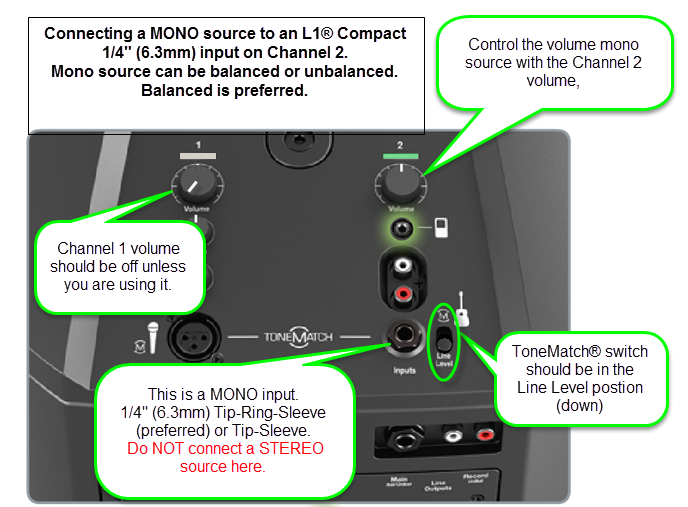
Start with the Volume set straight up and adjust so that you get a solid green signal. If you see red, turn the trim down.
The ¼ inch jack input accepts a balanced or unbalanced connection.


- Can a stereo signal be used with the ¼ inch jack input?
A ¼ inch Tip-Ring-Sleeve connector carrying a stereo signal should not be used with the analog input on the L1 Compact.
Even though a ¼ inch Tip-Ring-Sleeve connector can carry a stereo signal this is not how this physical connection is used on the L1 Compact.
The ¼ inch jack input on the L1 Compact is balanced, and will therefore subtract the Left and Right signals on a stereo cable and you will hear almost no signal in the L1 Compact.


- The 1/8 inch jack is STEREO not Balanced
The L1 Compact Channel 2: 1/8-inch jack is STEREO not BALANCED.
The written documentation is incorrect. It says:
- 1/8-inch stereo input - Balanced analog input for connecting audio sources such as portable mp3 players, satellite radio, laptop computers, video projectors, and smart boards.
Correction
- 1/8-inch stereo input -
BalancedStereo analog input for connecting audio sources such as portable mp3 players, satellite radio, laptop computers, video projectors, and smart boards.
Source Neil-at-Bose
General Principles
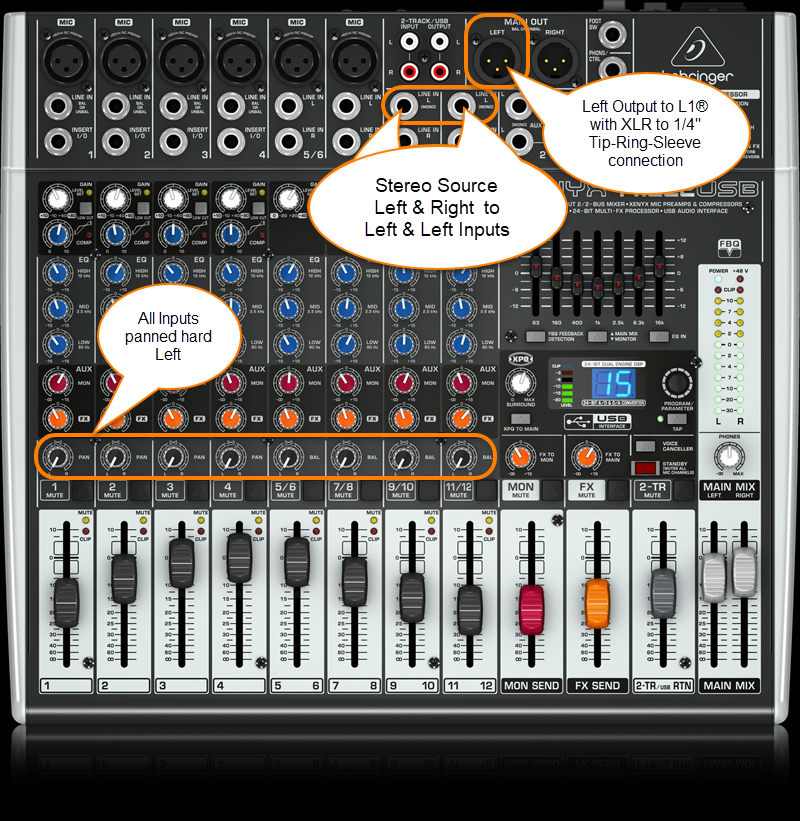
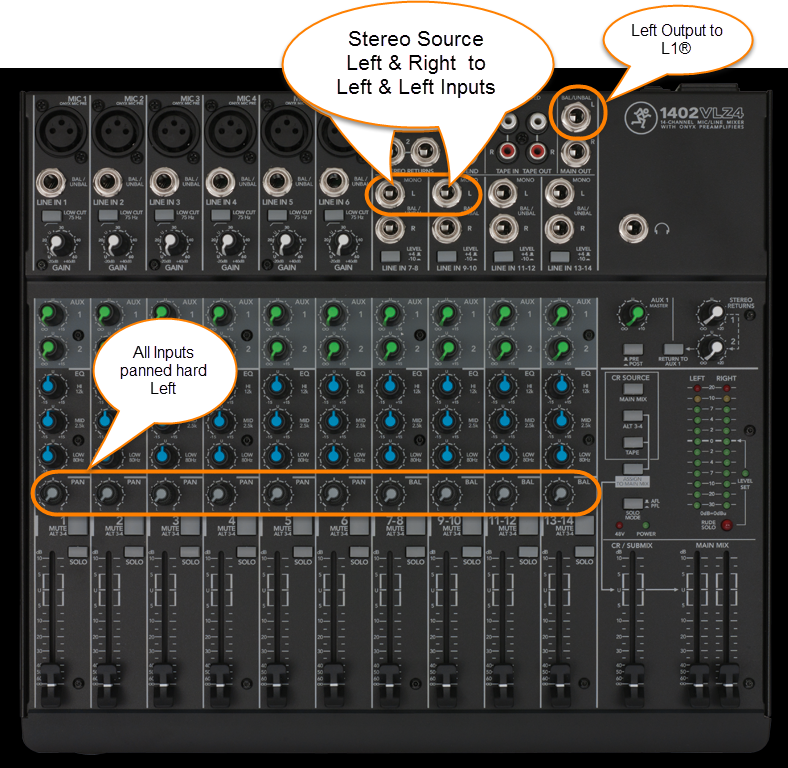
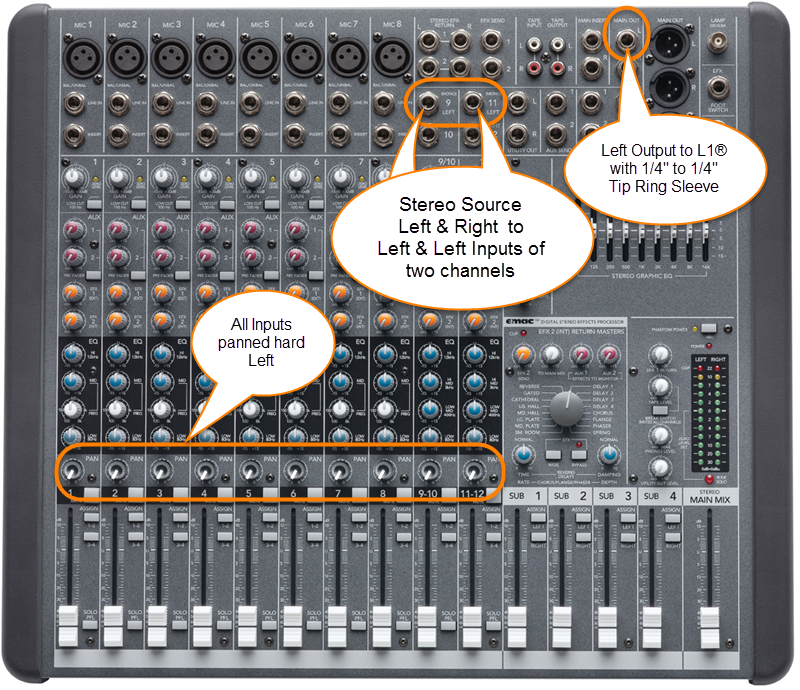
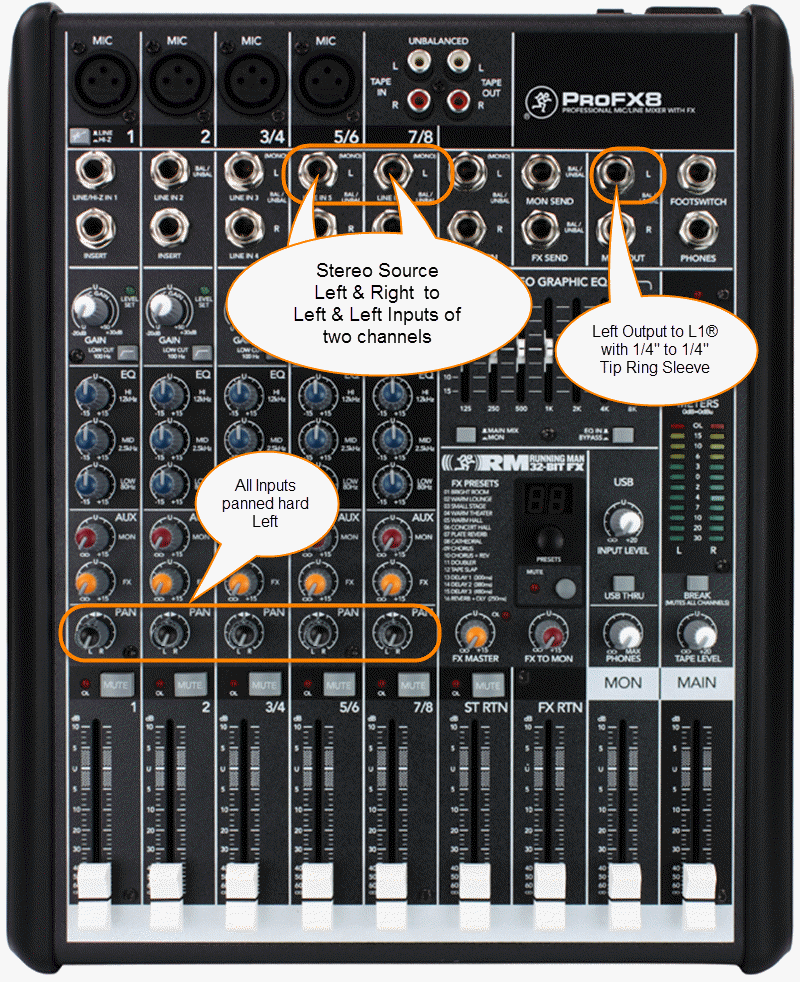
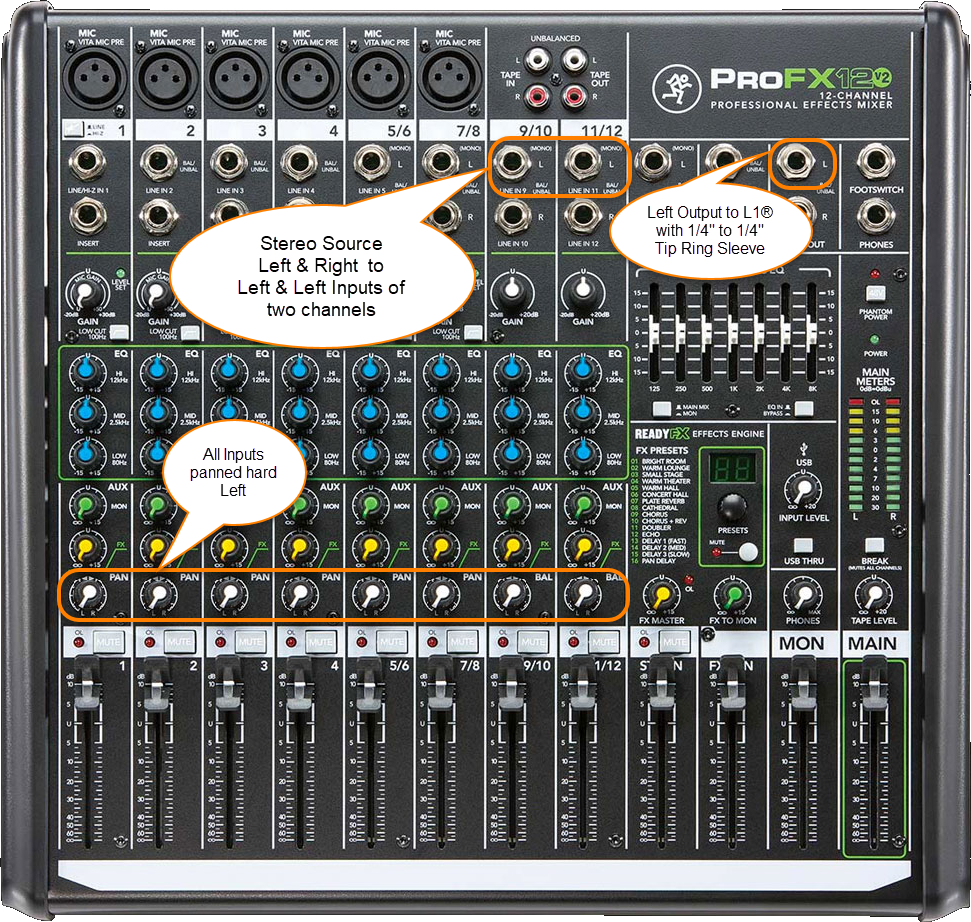
It's easy to make this work. You can pan all your inputs hard LEFT and take the LEFT output and connect that to your L1 . If you have a stereo source and two stereo channels, then you can
- Run the left side of the stereo source to the left input on one stereo channel,
- Run and the right side of the stereo source to the left side of another stereo channel.
- Pan any other inputs hard left
- Use the left output of mixer and connect that to the L1 Analog input.
Question: Is there a loss of quality when using only one output (e.g. Left only)?
No loss of quality. See Mixer Left Output Only
Connections
Where possible use a balanced connection between the mixer output and the L1® input.
XLR Mixer to 1/4 Tip-Ring-Sleeve L1®
The output side is XLR so you will also need a converter or cable that is XLR female to Balanced ¼ inch jack Tip-Ring-Sleeve.
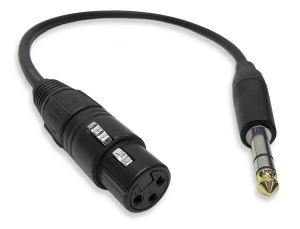
Female XLR to 1/4" Male TRS Balanced Adaptor Cable (audiopile.net)
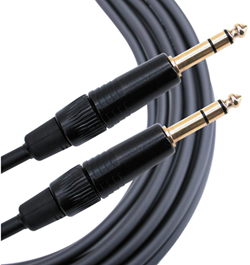
1/4 Tip-Ring-Sleeve Mixer to 1/4 Tip-Ring-Sleeve L1®
The output side is 1/4 inch (6.35 mm) Tip-Ring-Sleeve jack and the input on the Bose side is 1/4 inch (6.35 mm) Tip-Ring-Sleeve jack. Use a cable like this.
 .
.
1/4" TRS Balanced Patch Cable (audiopile.net)
Here are a some examples of how you can get a mono output out of your stereo mixer.
Specific Mixers
Allen & Heath ZED 10-FX
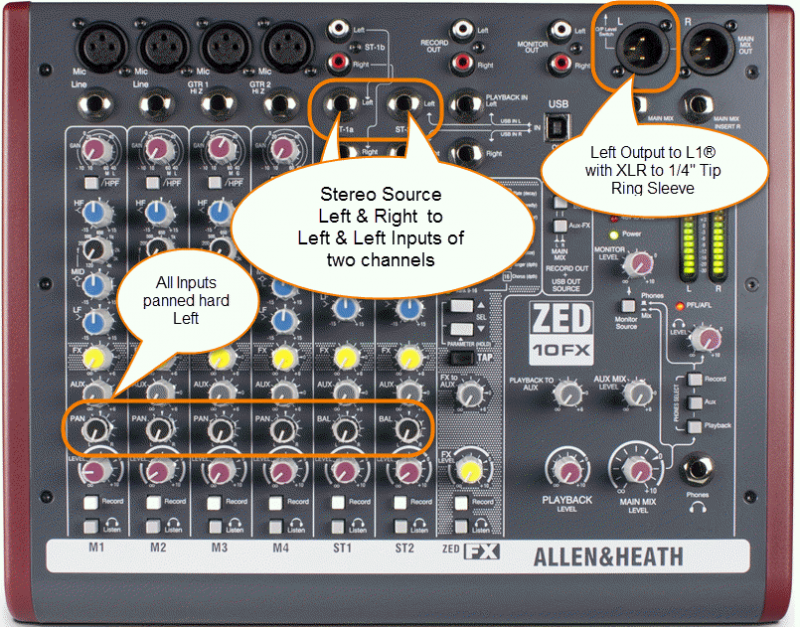
Use a cable like this:
The output side is XLR so you will also need a converter or cable that is XLR female to Balanced ¼ inch jack Tip-Ring-Sleeve.
Female XLR to 1/4" Male TRS Balanced Adaptor Cable (audiopile.net)
Allen & Heath ZED Sixty-14FX
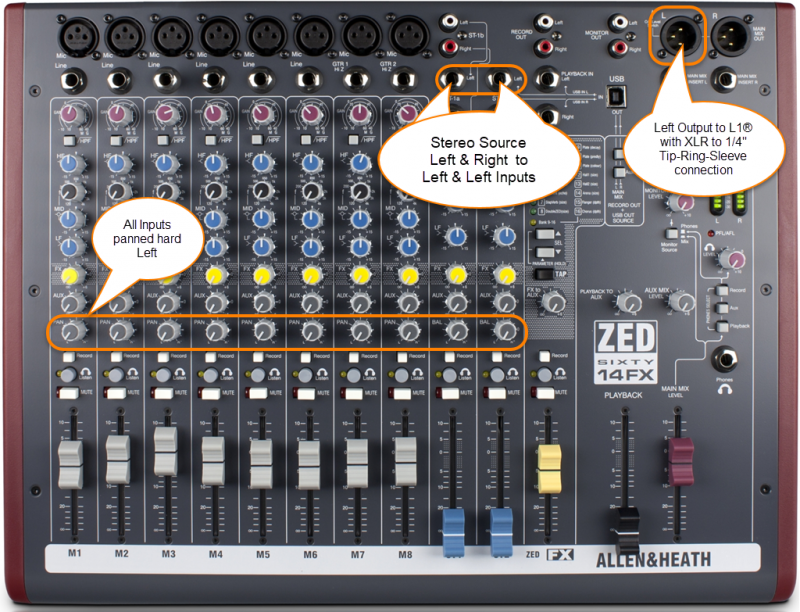
Allen Heath ZED Sixty-14FX web page
Use a cable like this:
The output side is XLR so you will also need a converter or cable that is XLR female to Balanced ¼ inch jack Tip-Ring-Sleeve.
Female XLR to 1/4" Male TRS Balanced Adaptor Cable (audiopile.net)
Alto Live 802
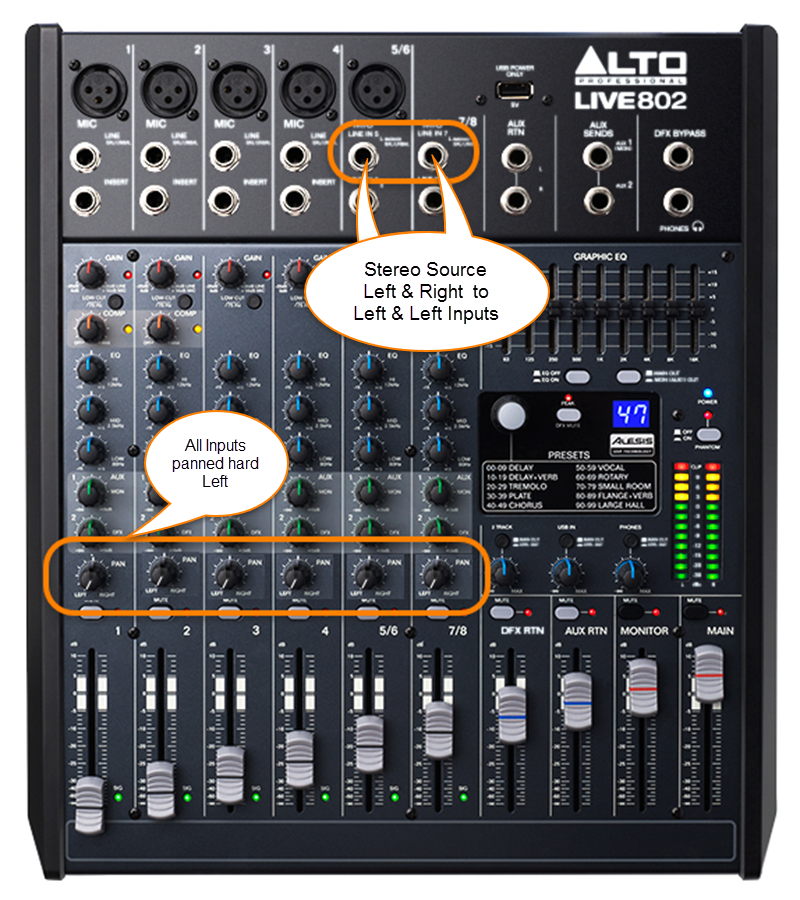
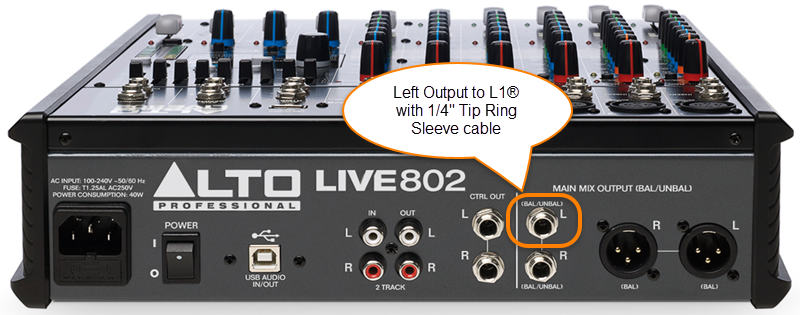
Use a cable like this:
The output side is 1/4 inch (6.35 mm) Tip-Ring-Sleeve jack and the input on the Bose side is 1/4 inch (6.35 mm) Tip-Ring-Sleeve jack. Use a cable like this.
.
1/4" TRS Balanced Patch Cable (audiopile.net)
Behringer Eurorack UB1222FX

Use a cable like this:
The output side is XLR so you will also need a converter or cable that is XLR female to Balanced ¼ inch jack Tip-Ring-Sleeve.
Female XLR to 1/4" Male TRS Balanced Adaptor Cable (audiopile.net)
Behringer Eurorack X1222USB
Use a cable like this:
The output side is XLR so you will also need a converter or cable that is XLR female to Balanced ¼ inch jack Tip-Ring-Sleeve.
Female XLR to 1/4" Male TRS Balanced Adaptor Cable (audiopile.net)
Behringer Xenix 1202FX
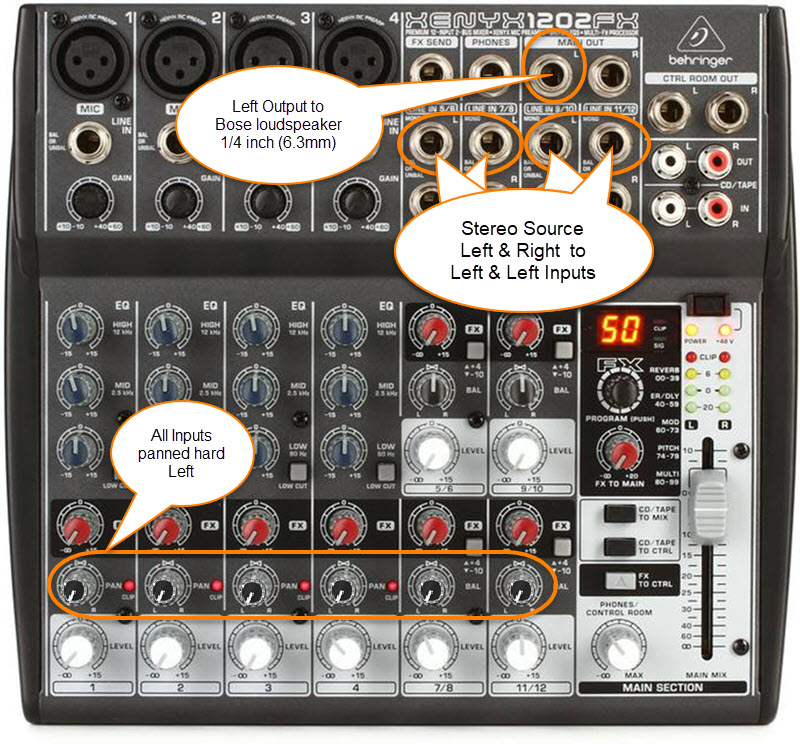
The 1/4 inch (6.3mm) outputs on this mixer are unbalanced mono.
Use a cable like this:
1/4 inch (6.35 mm) Tip-Sleeve
![]()
Mackie 1402 VLZ4
Mackie CFX-12
Mackie ProFX8
Mackie ProFX12

Mackie ProFX12V2
Presonus Studio Live 16.0.2
There is a Mono output.

Use a cable like this:
The output side is XLR so you will also need a converter or cable that is XLR female to Balanced ¼ inch jack Tip-Ring-Sleeve.
Female XLR to 1/4" Male TRS Balanced Adaptor Cable (audiopile.net)
If you don't have access to cable like the one above, you can use one of the ¼ inch jack Tip-Ring-Sleeve balanced outputs. You can pan all the inputs to the LEFT side and use the LEFT output.

Presonus Studio Live 16.0.2 Owners Manual
Yamaha MG10
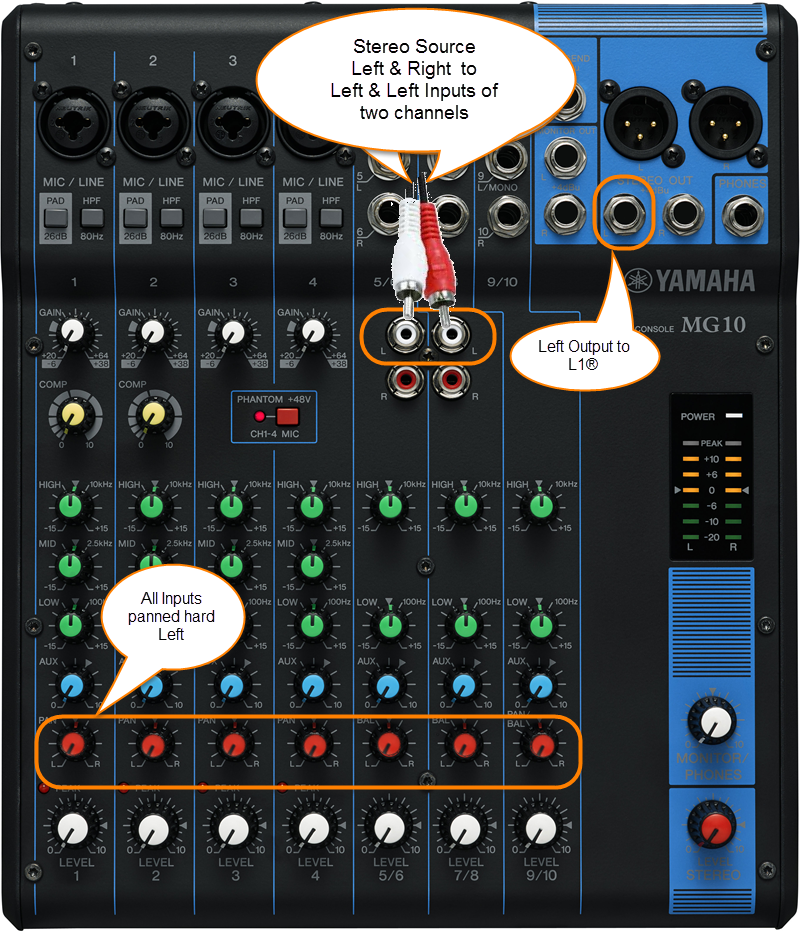
The output side is 1/4 inch (6.35 mm) Tip-Ring-Sleeve jack and the input on the Bose side is 1/4 inch (6.35 mm) Tip-Ring-Sleeve jack. Use a cable like this.
.
1/4" TRS Balanced Patch Cable (audiopile.net)
Yamaha MG10/2
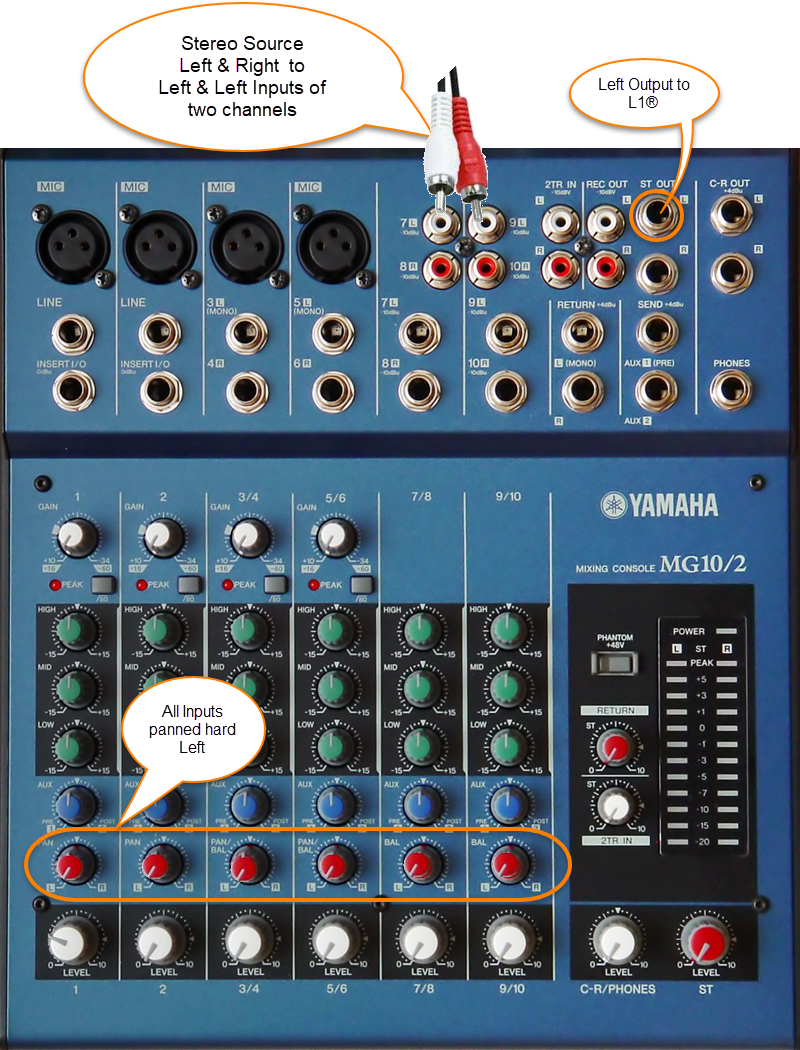
The output side is 1/4 inch (6.35 mm) Tip-Ring-Sleeve jack and the input on the Bose side is 1/4 inch (6.35 mm) Tip-Ring-Sleeve jack. Use a cable like this.
.
1/4" TRS Balanced Patch Cable (audiopile.net)
Yamaha MG12XU
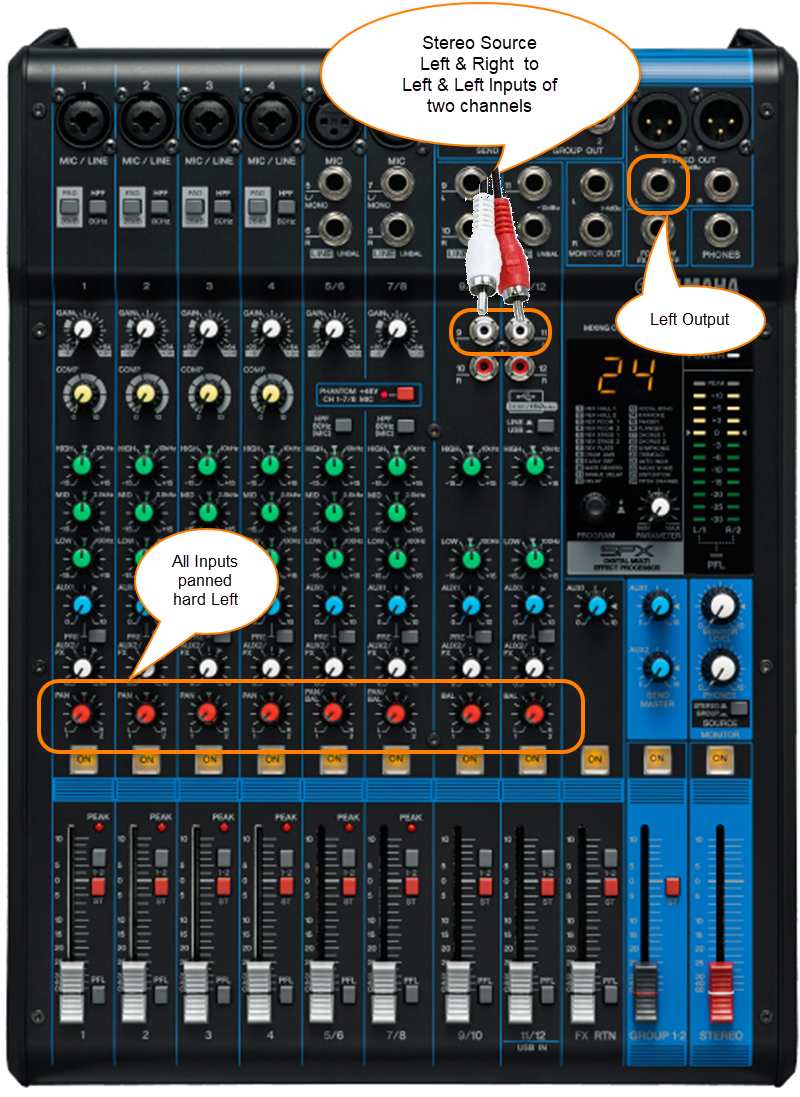
The output side is 1/4 inch (6.35 mm) Tip-Ring-Sleeve jack and the input on the Bose side is 1/4 inch (6.35 mm) Tip-Ring-Sleeve jack. Use a cable like this.
.
1/4" TRS Balanced Patch Cable (audiopile.net)
Yamaha MG82CX
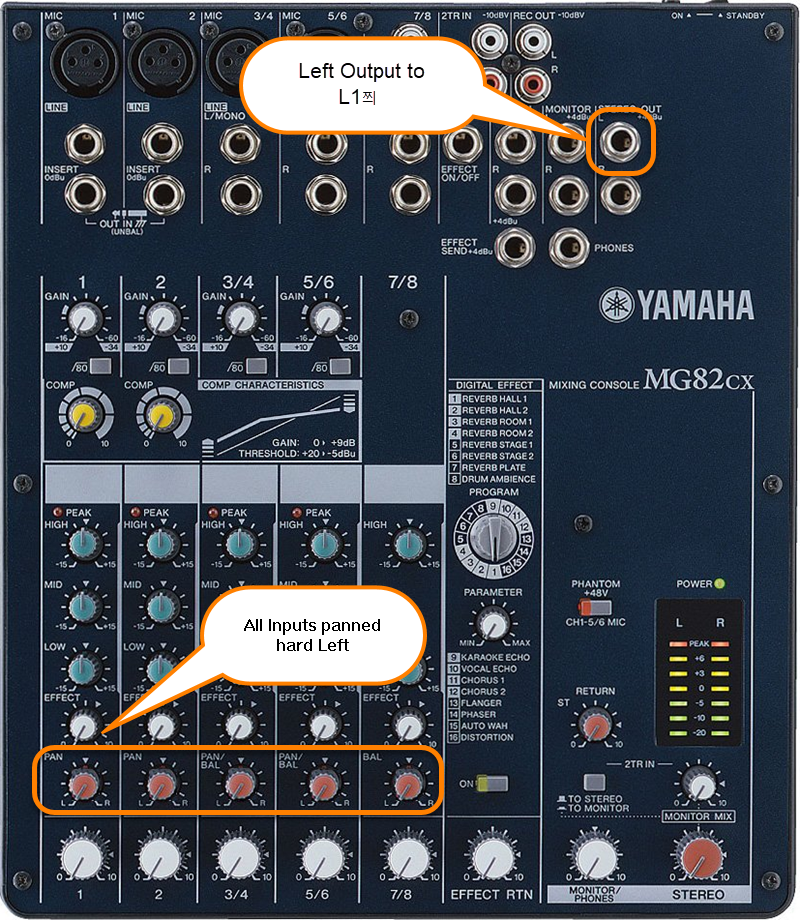
The output side is 1/4 inch (6.35 mm) Tip-Ring-Sleeve jack and the input on the Bose side is 1/4 inch (6.35 mm) Tip-Ring-Sleeve jack. Use a cable like this.
.
1/4" TRS Balanced Patch Cable (audiopile.net)
Mixer to L1 Model I and L1 Classic
¼ inch jack inch to ¼ inch
|
If your mixer has ¼ inch jack outputs, these are almost certainly at line-level and should work well with any of the ¼ inch jack inputs (Channels 1, 2, 3, 4) on a L1 Model I or L1 Classic. Any of the cables show at the right should work. |
¼ Inch Tip-Sleeve (unbalanced) to ¼ Inch Tip-Sleeve (unbalanced)
¼ Inch Tip-Ring-Sleeve (balanced) to ¼ Inch Tip-Sleeve (unbalanced)
¼ Inch Tip-Ring-Sleeve (balanced) to ¼ Inch Tip-Ring-Sleeve (balanced)
This should also work, but likely no better than a simple ¼ Inch Tip-Sleeve to Tip-Sleeve cable. This is because the ¼ Inch input on the Bose System is Tip-Sleeve (unbalanced) anyway. |

XLR to XLR

This is the same kind of cable you would use to connect a microphone.
The XLR inputs for Channels 1 and 2 are intended for microphone level inputs.
XLR (balanced) to XLR (balanced)
- If your source (mixer or CD/DVD player) has XLR outputs, check to see if you have the option to set it to a microphone level output. If so, use that setting.
- If your source has XLR outputs at line-level (most likely) then you will probably need a Pad between the source and the L1 Model I (or L1 Classic) Power Stand.
- You may be able to make things work without the Pad by turning down the output from the source and turning down the trim at the Power Stand. If it sounds okay then you are probably fine. If you cannot get enough a good sounding signal without an excess of noise then try a Pad.
L1 Model II
A ¼ inch Tip-Ring-Sleeve connector carrying a stereo signal should not be used with the analog input on the Model II.
Even though a ¼ inch Tip-Ring-Sleeve connector can carry a stereo signal this is not how this physical connection is used on the DJ Power Stand.
The analog input on the Model II is balanced, and will therefore subtract the Left and Right signals on a stereo cable and you will hear an L-R (Left minus Right) signal in the Model II.
You cannot 'get through the gig' this way if you are a DJ or if you need to run prerecorded music or have stereo inputs.
Using a Mixer
![]()
If you are using a mixer instead of a T1 ToneMatch Audio Engine use the mixer to create a mono output and send that to the Model II Power Stand Analog input.
- If there is a stereo/mono switch then use it and send the mono output to the Model II Power Stand Analog input.
- If there is a Left/mono output then use that and send it to the Model II Power Stand Analog input.
- If there is no way to create a mono output then pan all your mixer inputs all the way to one side (e.g. Left) and then take the mixer for that side (e.g. Left) output and send it to the Model II Power Stand Analog input.
T1 ToneMatch Audio Engine
- You can run ¼ inch jack line level inputs to T1® Channels 1,2,3.
- You can probably run XLR line level inputs to the T1® Channels 1,2,3. No Pad required.
- T1 ToneMatch® Audio Engine inputs will accept a wide range of signals. We have not encountered a normal use where someone needed a pad - even using +4dbU console outputs[4]
- If you have the option to run ¼ inch to ¼ inch, you could use T1® Channels 4/5. This would leave more channels available for use with microphones and instruments with lower output levels.
- ↑ dBFS
- ↑ dBU vs dBFS
- ↑ dBFS Analog Levels
- ↑ MikeZ-at-Bose talks about T1® inputs in T1® Audio Engine Questions
DJ Mixer vs General Purpose Mixer
The discussion is live: DJ Mixers vs "Band" mixers and at least for now, open to some controversy.
Related Reading
- Read about specific mixers in Mixers
- Mixer to Share Presets
Specific Mixers
There are several articles related to using specific mixers with the L1 Model I and L1 Classic. Here is a list of what is available: Mixers and connection recommendations
Protecting the L1® components - Cases
SKB Cases

Note: JohnL[1] tells us that SKB now sells the "1SKB-5009BL" as the SKB L1 and L1 Model II Case

Note: hned [2] tells us (Feb 2007) "These cases, now identified as UPC# 0789270500907, feature new TSA-accepted and recognized locking latches that are made of unbreakable fiberglass-reinforced nylon."
- Sources for this SKB case 2SKB-5009:
- casesbyskb.com $199 last checked: 12:15, 6 April 2007 (GMT-7)


SKB site with details
Pelican Storm Case

Adaptations from other sources

From Tom Munch[3]
Wal-Mart carries a Contico gun case for $21 & change every fall (during hunting season). I have had very good luck with my 5+ cases. I thought the latches would have failed by now (bought them in the fall of 2004), but they just keep going strong.
Contico makes several cases that you can see at the website here.
More from Tom: Tom Munch talks about good cases
Keyboard Case

This is a keyboard case from guitar center. I've searched high and low and I don't think you'll find a more perfectly sized off-the-shelf solution. I made the dividers out of 1/8 inch sheets of something or other wrapped in contact paper. Over two years and not a scratch on the radiators.
Odyssey Flight Zone Keyboard Case for 76 Note Keyboards - with wheels
Thanks to L1® User Jimmie Malone for the picture, text, and link.
Fishing Rod Case
Hi All, I have been waiting to add this for a while or at least until I could make sure they would hold up. Here is the issue with all hard shell transport cases for the L1™s I have seen so far. First, according to the airlines, they surpass the checked luggage requirements of most major airlines (50lbs or less and 62" measured length+width+height).
I first tried airline travel with the box the are shipped in and got charged $100 by Delta (different airlines have different fees). I then looked at gun cases and all of their variations. The airlines approve gun cases that hold up to 2 rifles. The thing is that I'm not carrying rifles and don't want to try tricking the airlines. It's destined to fail. Those that meet airline regulation were flimsy.
So, here is my solution. Fishing rod cases. The ones in the photos I got from Bass Pro Shop/ Outdoor World for $36 each. I duct tape them together to form one case. It weights 48lbs and is under the oversized baggage restriction anyway you want to measure it. The have been on 6 trips with my by airline and have held up perfectly.
Bass Pro Shops Plano Airliner Telescoping Rod Case
As far as the Model 2 powerstand, I have been using the shipping box it came it. Same with the B1.
That's what I've got for you.Jed-at-Bose[4]

Discussions about Cases
Discussion on the Bose® Musicians Community Message Boards
- SKB Cases For Secure Radiator Transport
- Good Cases Excellent discussion with many suggestions, links, and pictures of different ways to protect the L1®.
- Hardigg Stormcase cases
Photos in the slideshow can be editted here:Edit slideshow