Difference between revisions of "Microphone Feedback"
(continuing to edit...) |
m (I have merged all the content from this page into Feedback / Microphone - please make any new edits on that live page - thanks) |
||
| (6 intermediate revisions by 2 users not shown) | |||
| Line 1: | Line 1: | ||
| − | + | #REDIRECT [[Feedback / Microphone]] | |
| + | |||
| + | |||
| + | <!-- | ||
| + | |||
| + | Ken, | ||
| + | |||
| + | Please make edits to the original article [[Feedback / Microphone]] | ||
| + | |||
| + | and see comments in the discussion page for your temporary page for rationale [[Talk:Ken's Main Page (temporary)]] | ||
| + | --> | ||
| + | |||
| + | Thanks ST | ||
| + | |||
| + | Please see comments in [[Talk:{{PAGENAME}}|discussion for this article]] [[User:ST|ST]] 12:24, 4 January 2009 (EST) | ||
== Gain Staging == | == Gain Staging == | ||
| − | Take two minutes to watch this video by clicking on the picture. | + | Take two minutes to watch this video by clicking on the picture below. |
| − | If you are using an {{Classic}} or {{Model I}} follow the instructions exactly as | + | * If you are using an {{Classic}} or {{Model I}} follow the instructions exactly as shown in the video. |
| + | * If you are using the {{T1}}, the principles are the same as shown on the video: simply substitute the trim on the T1 for the trim on the Classic or Model I. {{T1 icon}} | ||
{{Get Plugged In Microphone}} | {{Get Plugged In Microphone}} | ||
| Line 12: | Line 27: | ||
* If you are using vocal effects like reverb, chorus or delay, turn them off until you can get sufficient [[Gain Before Feedback|gain before feedback]] to get performance level volume. Then add the effects back into the signal chain (one at a time) so you can be aware of the individual impacts that each effect is having on feedback. | * If you are using vocal effects like reverb, chorus or delay, turn them off until you can get sufficient [[Gain Before Feedback|gain before feedback]] to get performance level volume. Then add the effects back into the signal chain (one at a time) so you can be aware of the individual impacts that each effect is having on feedback. | ||
| − | * Get close to the microphone. No other technique has a big an impact on feedback. Each halving of distance is approximately another 6 dB of [[gain before feedback]]. This means that the difference between working a microphone at 2 inches, and 1/4 inch is 18 dB, which is more than twice as loud. | + | * '''Get close to the microphone''' when you want to be loud. No other technique has a big an impact on feedback. Each halving of distance is approximately another 6 dB of [[Gain Before Feedback|gain before feedback]]. This relationship in physics is known as the [[Inverse Square Law]]. This means that the difference between working a microphone at 2 inches, and 1/4 inch is 18 dB, which is more than twice as loud. While good mic technique often involves "working" the microphone at different distances, singers must be mindful of the fact that small changes in distance from the mouth result in very dramatic changes in sound level. |
[[Image:Ferrin_eat_mic.jpg|Charlie Ferrin at Bose: Nov. 9, 2007]] | [[Image:Ferrin_eat_mic.jpg|Charlie Ferrin at Bose: Nov. 9, 2007]] | ||
| Line 26: | Line 41: | ||
* Use the high-frequency tone control for the microphone channel carefully. Feedback could occur when this is set too high. | * Use the high-frequency tone control for the microphone channel carefully. Feedback could occur when this is set too high. | ||
| − | + | * Wherever possible, acoustic instruments should use pickups instead of microphones. Pickup systems provide much higher [[Gain Before Feedback|gain before feedback]] than microphones. | |
| − | |||
| − | |||
| − | |||
| − | |||
| − | |||
| − | |||
| − | |||
| − | |||
| − | |||
| − | |||
| − | * Wherever possible | ||
| − | |||
| − | |||
| − | |||
| − | |||
| − | |||
| − | |||
| − | |||
| − | + | === Techniques specific to the {{L1 family}} === | |
| + | * All players should be playing / singing through the {{L1}} closest to them. | ||
| + | * If you are using a {{T1}} it is often possible to use the parametric EQ section to notch the frequency that is causing feedback. You can find details in the article: [[Using the T1® to Control Microphone Feedback]] | ||
| − | |||
| − | + | == Other Resources == | |
| − | + | * [http://www.shure.com/stellent/groups/public/@gms_gmi_web_ug/documents/web_resource/us_pro_mics_for_music_sound_ea.pdf Shure® article on mic technique] Shure Educational Publication 2006 39 pages - pdf format | |
| − | |||
| − | |||
| − | |||
| − | |||
| − | |||
| − | |||
| − | |||
| − | |||
---- | ---- | ||
| − | |||
| − | |||
[[category:Feedback]] | [[category:Feedback]] | ||
[[category:Performance]] | [[category:Performance]] | ||
[[category:Reference]] | [[category:Reference]] | ||
Latest revision as of 16:12, 7 January 2009
Redirect to:
Thanks ST
Please see comments in discussion for this article ST 12:24, 4 January 2009 (EST)
Contents
Gain Staging
Take two minutes to watch this video by clicking on the picture below.
- If you are using an L1 Classic or L1 Model I follow the instructions exactly as shown in the video.
- If you are using the T1 ToneMatch Audio Engine, the principles are the same as shown on the video: simply substitute the trim on the T1 for the trim on the Classic or Model I.
Gain setup for a vocal microphone
Techniques For Reducing Feedback
- If you are using vocal effects like reverb, chorus or delay, turn them off until you can get sufficient gain before feedback to get performance level volume. Then add the effects back into the signal chain (one at a time) so you can be aware of the individual impacts that each effect is having on feedback.
- Get close to the microphone when you want to be loud. No other technique has a big an impact on feedback. Each halving of distance is approximately another 6 dB of gain before feedback. This relationship in physics is known as the Inverse Square Law. This means that the difference between working a microphone at 2 inches, and 1/4 inch is 18 dB, which is more than twice as loud. While good mic technique often involves "working" the microphone at different distances, singers must be mindful of the fact that small changes in distance from the mouth result in very dramatic changes in sound level.
- Use a directional microphone. Hypercardioid is better than cardioid, which is better than omnidirectional. All sound waves impinging on the microphone from a direction other than the intended signal is "noise" and will lower the threshold of feedback.
- Use as few open microphones as possible. When a microphone is not in use, if possible, turn it off.
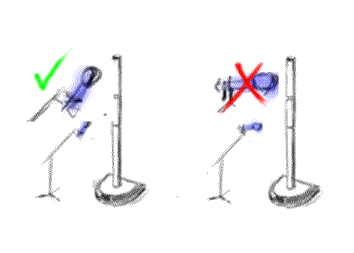
- When stand mounting a directional microphone, tilt the microphone up ten or twenty degrees off the horizon so that it is less sensitive to direct sound from the speakers.
- Use the high-frequency tone control for the microphone channel carefully. Feedback could occur when this is set too high.
- Wherever possible, acoustic instruments should use pickups instead of microphones. Pickup systems provide much higher gain before feedback than microphones.
Techniques specific to the L1 family of products
- All players should be playing / singing through the L1 closest to them.
- If you are using a T1 ToneMatch Audio Engine it is often possible to use the parametric EQ section to notch the frequency that is causing feedback. You can find details in the article: Using the T1® to Control Microphone Feedback
Other Resources
- Shure® article on mic technique Shure Educational Publication 2006 39 pages - pdf format


