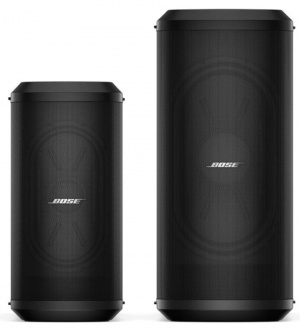
Unique RaceTrack woofers integrated in the Bose Sub1 and Sub2 modular subwoofers deliver powerful bass, have an optimized center of gravity, and save a lot of space. This slim design means you get the full impact of a conventional subwoofer without the cumbersome size, freeing up room in your vehicle and on the stage, and making every carry in between — home to car, vehicle to venue — much easier.
Cardioid Mode
Cardioid Mode
Stack two Sub1 or Sub2 subwoofers in Cardioid Mode for focused, directional performance with reduced rear-firing bass energy (-10 dB SPL). This steers the bass out front, and reduces feedback. This is particularly useful when you have resonant instruments on the stage (e.g., kick drum, upright bass). See the tutorial in the video below starting at 4:05.
Why have a LEVEL control on the Bose Sub1/Sub2? This can also apply to other subwoofers as well.
Answer
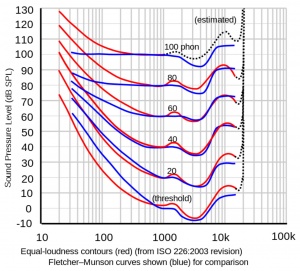
At lower volume, the Equal Loudness contour[1] shows that humans don't perceive bass as well as mid-highs. You can compensate for this by turning up the Sub1/Sub2 LEVEL Control.
Other times bass may seem excessive
At higher volumes
Due to boundary effects (proximity to walls and corners)
On a resonant stage
You can compensate for this by turning down the Sub1/Sub2 LEVEL Control.
Recommended Settings
Set the Sub1/Sub2 Level control at 12:00 o'clock[2].
Raise/lower the volume of the L1 Pro32 as required.
Adjust the Sub1/Sub2 Level control to balance bass level with the mid-high level from the L1 Pro 32.
Sub1 and Sub2 have extruded aluminum heat sinks mounted to the backside of the I/O panel. This pulls heat out of the electronics and transfers some to the air moving through the acoustic volume of the sub and helps to cool.[3]
Start with the Volume on S1 Pro and Sub, as shown. Adjust as necessary from there.
The picture shows a stereo setup. The signal flow is from left to right.
Recommended cable
Use an XLR to 1/4 inch (6.3 mm) Tip-Ring-Sleeve cable for best results.
If you use an XLR to XLR cable, the signal may be too hot for the S1 Pro system.
Alternative Connection
Can I connect the S1 Pro Line Out to the Sub?
The method described above is preferred, but you can use the S1 Pro system as the sound source (e.g., microphone and guitar and backing tracks via Bluetooth)
Note the following:
The S1 Pro system will sound the same as without the subwoofer (62 Hz - 17 kHz)
The Sub1 or Sub2 will cover from 40 Hz (Sub1) 37 Hz (Sub2) to 150 Hz
You will be able to push S1 Pro system harder (louder) if you route the signal as described at the top of this article