T4S/T8S ToneMatch® Mixer
Contents
- 1 Introduction
- 2 Documentation
- 3 Inputs
- 4 Gain Staging
- 5 Firmware Updates
- 6 Mounting Options
- 7 USB A Playback
- 8 USB B from PC
- 9 USB to PC
- 10 Aux Inputs
- 11 Aux Outputs
- 12 Reverb on Aux 1
- 13 Scenes
- 14 Factory Settings
- 15 Mono Output
- 16 Connect a T4S ToneMatch mixer to an S1 Pro System as the only powered loudspeaker
- 17 Connect a T4S ToneMatch mixer to an S1 Pro System as a Monitor
- 18 Connections
- 19 T4S Settings
- 20 S1 Pro Settings
- 21 Connecting a Mixer to an S1 Pro system
- 22 Headphone Output
- 23 Reverb Settings
- 24 Delay Tap Tempo
- 25 Comp/Gate
- 26 Nick-at-Bose talks about where to start
- 27 MikeZ-at-Bose talks about the Compressor settings
- 28 Can I use more than one compressor function
- 29 Related Reading
- 30 T8S ToneMatch port connection to L1 Pro[1]
- 31 T8S no ToneMatch port connection to L1® Model 1S or L1 Model II
- 32 T8S Analog Outputs
- 33 Comparison to T1® ToneMatch audio engine
- 34 FAQs
Introduction
Introduced January 23, 2018
Documentation
T4S/T8S ToneMatch® Mixer Owner's Guide
T4S T8S ToneMatch Mixer Service Manual
Register
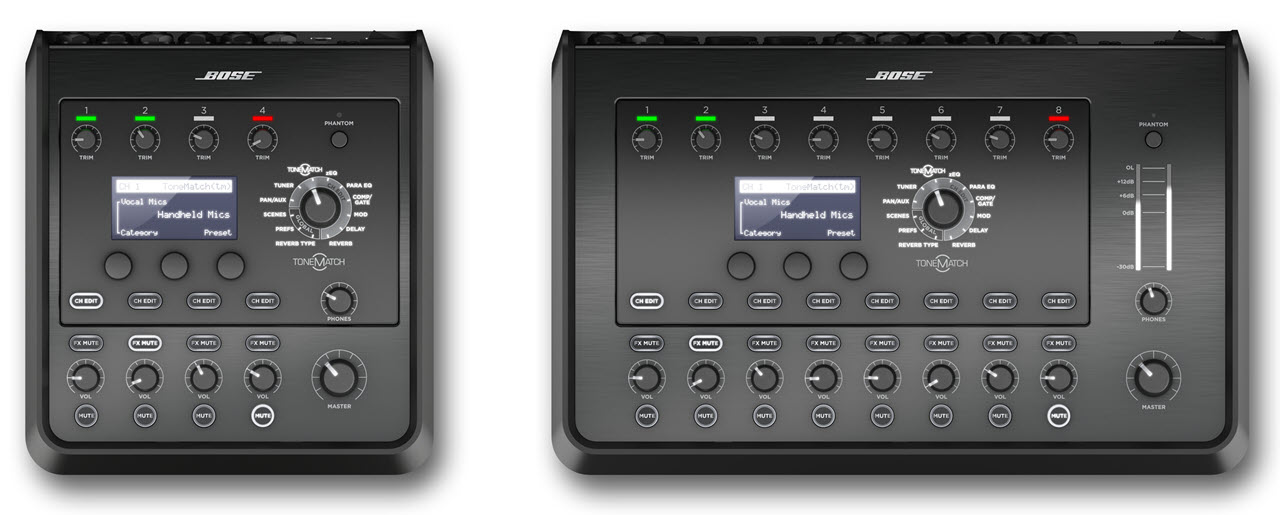
Inputs
T4S ToneMatch mixer

- Channels 1, 2, 3, 4 XLR inputs are balanced.
- Channels 1, 2, 3, 4 ¼ inch (6 mm) jacks are balanced
- They will accept 1/4 inch (6.35 mm) Tip-Sleeve jack Tip-Sleeve connections and the connections will be unbalanced.
- Channels 5 and 6 are balanced, but will accept 1/4 inch (6.35 mm) Tip-Sleeve jack Tip-Sleeve.
If you use a 1/4 inch (6.35 mm) Tip-Ring-Sleeve from a balanced source, the connection will be balanced.
If you use a 1/4 inch (6.35 mm) Tip-Ring-Sleeve from an unbalanced source, the connection will be unbalanced.
If you use a 1/4 inch (6.35 mm) Tip-Sleeve from a balanced or unbalanced source, the connection will be unbalanced.
If you have a balanced source then using a balanced connection (XLR or 1/4 inch (6.35 mm) Tip-Ring-Sleeve) is preferable.
T8S ToneMatch mixer
- Channels 1, 2, 3, 4, 5, 6, 7, 8 XLR inputs are balanced.
- Channels 1, 2, 3, 4, 5, 6, 7, 8 ¼ inch (6 mm) jacks are balanced
- They will accept 1/4 inch (6.35 mm) Tip-Sleeve jack Tip-Sleeve connections and the connections will be unbalanced.
- Channels 9 and 10 are balanced, but will accept 1/4 inch (6.35 mm) Tip-Sleeve jack Tip-Sleeve.
If you use a 1/4 inch (6.35 mm) Tip-Ring-Sleeve from a balanced source, the connection will be balanced.
If you use a 1/4 inch (6.35 mm) Tip-Ring-Sleeve from an unbalanced source, the connection will be unbalanced.
If you use a 1/4 inch (6.35 mm) Tip-Sleeve from a balanced or unbalanced source, the connection will be unbalanced.
If you have a balanced source then using a balanced connection (XLR or 1/4 inch (6.35 mm) Tip-Ring-Sleeve) is preferable.
Gain Staging
The first thing you do when connecting a sound source to your ToneMatch mixer is set the input trim. This is gain staging. Then you can set the ToneMatch Preset for your source. We'll do both in the short video below.
At the beginning of the video, I'm doing a factory reset so we don't bump into any old settings. You do not have to do a factory reset before you set the input trim on your ToneMatch mixer.
- The trim controls across the top will be different
- The trim controls across the top of your ToneMatch mixer will likely be different. This is because the output levels of your input sources will likely be different. This is normal.
- Mixing - Use the volume controls not the trim controls
- Once you have set the input trim, you should not have to change it until you change the input source (e.g. different microphone, singer, or instrument). Do not use the trim control to change the channel volume. Use the channel volume control.
- Scenes
- Saved Scenes do not capture the trim, channel volume, or Master Volume settings.
Set Up Your Source
Set your source at the maximum that it will be when performing.
- Microphone
- Sing directly into the microphone using close microphone technique (lips just brushing the windscreen). Sing as loudly as you will sing during your performance. You want to set the Trim to work at your maximum volume.
- Instrument
- Turn your input as high as it is likely to go during performance.
Trim Controls
The ToneMatch Mixer[1] trim controls for Channels 1-4 (1-8 for the T8S ToneMatch mixer) provide a significant gain increase when you reach the upper limit. This increase in gain is normal operation.
Most sources like typical microphones and piezo pickup systems can provide enough level without the need to add significant gain from the trim control. Certain sources like passive acoustic guitar pickups require additional gain and in these cases it can be necessary to set the trim level to the upper range of the control. When the trim control is set this high you may notice the gain change. This is normal operation. If you want to run the trim control at lower settings we recommend using a preamp or simple stomp box level booster.
The trim for Aux input channels 5/6 (9/10 for the T8S ToneMatch mixer) do not exhibit the same behavior as the trim controls for Channels 1-4 (1-8 for the T8S ToneMatch mixer). The Aux inputs are designed for line level sources and do not have the same gain staging as channels 5/6 (9/10 for the T8S ToneMatch mixer).
Firmware Updates
Turn the Rotary Selector to Prefs.
Turn the left-most button (Menu) to Versions.
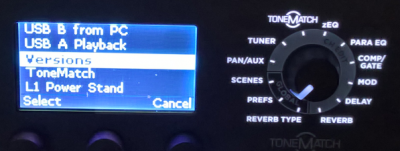
Press the left-most button to select Versions to see the current firmware version

The latest version for the T4S/T4S/T8S Firmware is version 1.2.3 (Released for customer download August,2024)
Update for Firmware version 1.2.3 released August 2024
Download the file that is appropriate to your operating system. If you download these, you have all the files you need to do the update process: ToneMatch Updater software, instructions, and the Firmware file (*.bos)
- Windows
ToneMatch Updater for Windows with firmware version 1.2.3
Contains updater and firmware *.bos files for both T4S and T8S
OR
- Mac
ToneMatch Updater for Mac with firmware version 1.2.3
Contains updater and firmware *.bos files for both T4S and T8S
If you have trouble with the file above on your Mac,
- Download the ToneMatch Updater Program first.
- Download T4ST8S123.zip - the firmware only (*.bos) files for the T4S and T8S. Extract these to the same folder as you have the ToneMatch Updater program.
- Run the ToneMatch Updater Program.
- Note
- Performing the firmware update will reset the USB A playback level all the way down (Mute)
If you need to update your firmware see:
T4S T8S Firmware Update Instructions
Mounting Options

Please this discussion in the community T4S/T8S ToneMatch Mixer Mounting Options.
USB A Playback
Attach a USB Type-A flash drive to play any WAV/MP3 files stored to the flash drive.
Turn the Rotary Selector to Prefs, then in the Menu select USB A Playback
Using the menu, select the folder that contains the WAV/MP3 files; select the file you want to play, and adjust the level by rotating the Level control.
- Note
- Routing settings for USB from PC are also applied to USB A playback. See USB B from PC below

USB drives Bose has tested with the T4S and T8S ToneMatch mixers
- Verbatim Nano 8GB - USB 2.0 (49820)
- Toshiba TransMemory 32GB U303 - USB 3.0 (THN-U303W0320E4)
- SanDisk Cruzer Blade 64GB - USB 2.0 (SDCZ50-064G-B35)
- SanDisk Cruzer Blade 32GB - USB 2.0 (SDCZ50-032G)
- SanDisk Ultra Flair 16GB - USB 3.0 (SDCZ73-016G-G46)
- Intenso Alu Line 16GB - USB 2.0 (specific model # unclear)
- PNY 64GB - USB 2.0 (FD64GATT4-EF)
- Kingston DataTraveler 50 32GB - USB 3.1 (specific model # unclear)
- PNY Attache 16GB - USB 2.0 (FD16GATT03-GE)
- The following devices have been reported to work by T4S/T8S owners.
Sandisk Extreme 64Gb formatted FAT 32
- Notes
- Some customers have reported that you can only have 64 files in a folder. More than 64 will not be recognized.
- If you have .wav files that won't play, try converting them to .mp3 files.
- Note
- Routing settings for USB from PC are also applied to USB A playback. See USB B from PC below.
T4S/T8S USB A Playback
- Why do USB A playback settings for volume and mute change when I change Scenes?
- Scenes are a snapshot of all the ToneMatch mixer settings at the time when you save the Scene including settings for USB A Playback.
- Exceptions
- Trim and Volume controls are not included in the Scene.
- If you are playing a song via USB A playback, the song will continue to play when you switch Scenes
- If you have Scenes with different settings for USB A Playback volume, switching from Scene to Scene will load the different settings for USB A Playback
- Example
- Scene: User Scene One
- Setting USB A Playback volume: Mute
- Setting USB A Playback volume: Mute
- Scene: User Scene Two
- Setting USB A Playback volume: 25%
- Setting USB A Playback volume: 25%
- Scene: User Scene Three
- Setting USB A Playback volume: 50%
If you switch from User Scene Three to User Scene Two while using USB A Playback, the volume will change from 50% to 25%.
If you switch from User Scene Three to User Scene One while using USB A Playback, the volume will change from 50% to Mute.
If you switch from User Scene Two to User Scene One while using USB A Playback, the volume will change from 25% to Mute.
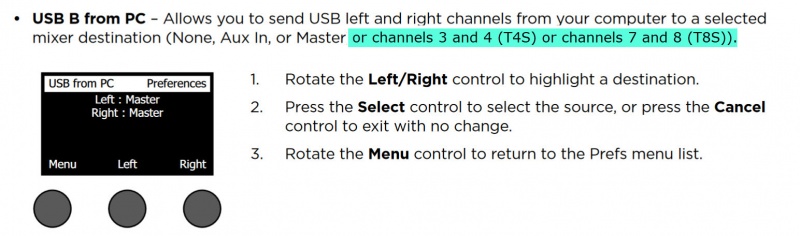
USB B from PC
Documentation Update
USB B from PC and USB A can be directed to:
- None
- Aux In
- Channel 3 or 4 (T4S) ⇐ New
- Channel 7 or 8 (T4S) ⇐ New
- Master
Settings for USB B from PC are also applied to USB A Playback.
USB B from PC to Aux
If you have questions or comments on this video please see this discussion in the Bose Pro Portable PA Community
USB B from PC to Channels
If you have questions or comments on this video please see this discussion in the Bose Pro Portable PA Community
- Note
- Routing settings for USB from PC are also applied to USB A playback. See USB A Playback.
USB to PC


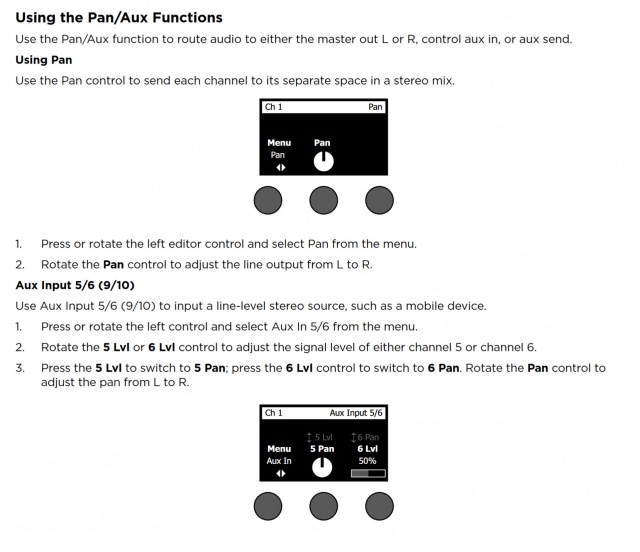
Aux Inputs
Bose engineered the T4S/T8S ToneMatch mixers to have four (T4s) / eight (T8S) full-function channels and two Auxiliary inputs. The Aux inputs 5/6 (T4S) or 9/10 (T8S) are routed directly to the Main Output.
You can use the Pan and Level adjustments accessible through the PAN/AUX menu. There are no changes to routing, or signal processing available. Only T4S/T8S channels one through four (T4S) / channels one through eight (T8S) can be routed to the Aux Outputs.
The Aux inputs are useful for sources that have their own volume and signal processing (e.g. EQ or effects). They are similar to an effects return channel on other mixers. Use the Master Volume to raise and lower the volume of the Aux inputs in sync with the other channels. To change the volume of the Aux inputs relative to the other inputs you can use the AUX/PAN Level (soft menu), or on the source device.
Related discussions: n/a
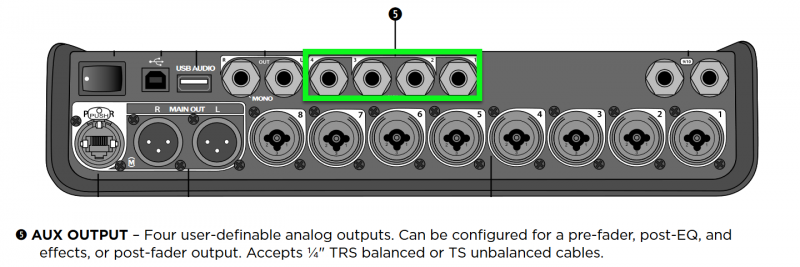
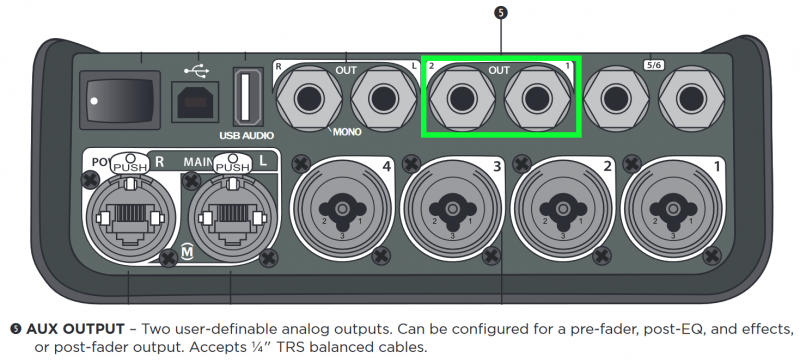
Aux Outputs
This is an overview of using the Aux Outputs on the T4S and T8S ToneMatch® mixers. You can use the Aux outputs for monitors, remote speakers, or recording.
The steps are the same for the T8S and T4S.
T4S
- Setting up monitors example
Connect your monitors to the T8S Aux Outputs. On the T8S you have four Aux Outputs. You can direct any channel to one of the Aux Outputs to create a monitor mix. As you assign a channel to an Aux Output, you can set the level and make the Aux send from the channel:
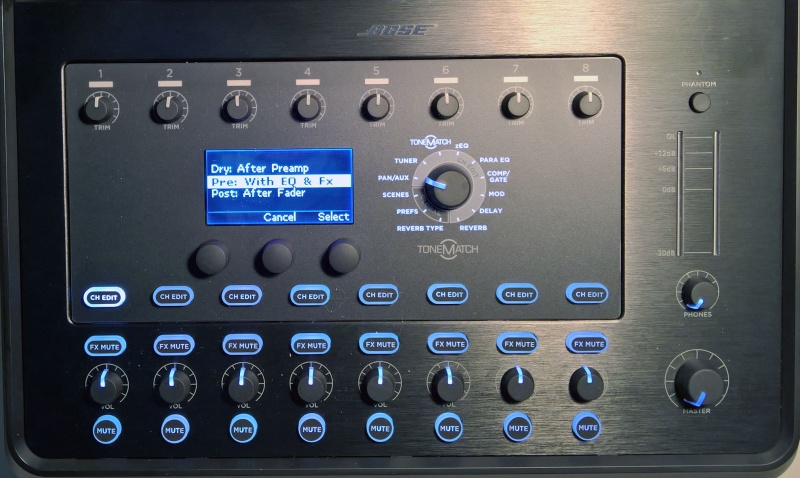
- Dry : After Preamp
- The only control that has an effect on the signal is the channel trim.
- Pre : With EQ and FX
- All settings for Preset, zEQ, ParaEQ, effects are sent through to the Aux output. The volume is controlled by the Level setting in this menu. Volume is not affected by the channel volume control. Reverb available for Aux 1 output only.
- Post : After Fader
- Same as Pre (above) except the volume is controlled by the channel volume control.
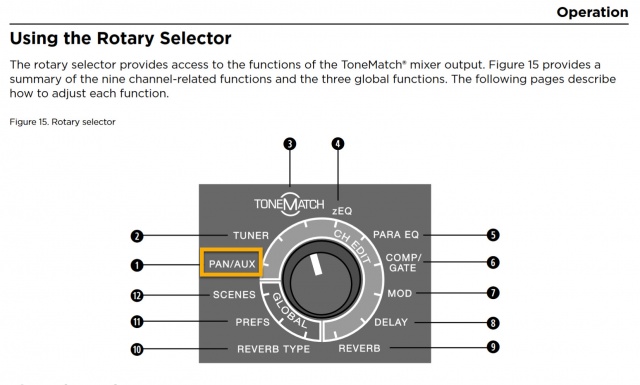
Select a Channel you want to direct to one of the Aux outputs. In the image below the Channel 1 CH Edit button is selected.
Turn the Rotary Selector to PAN/AUX
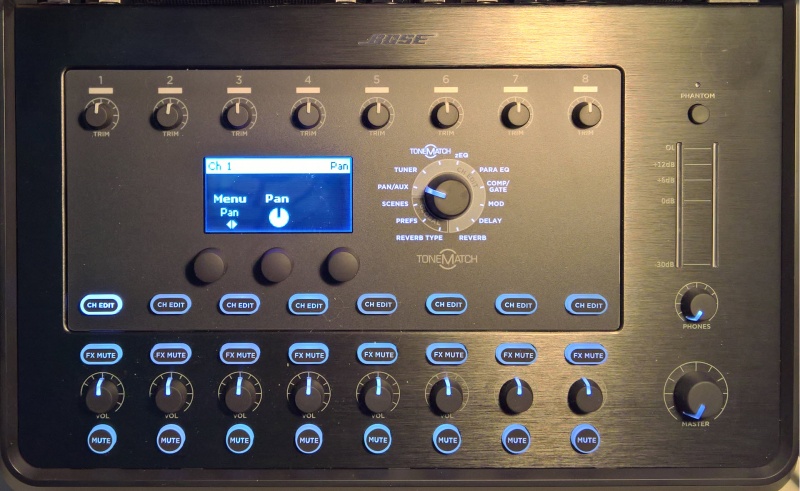
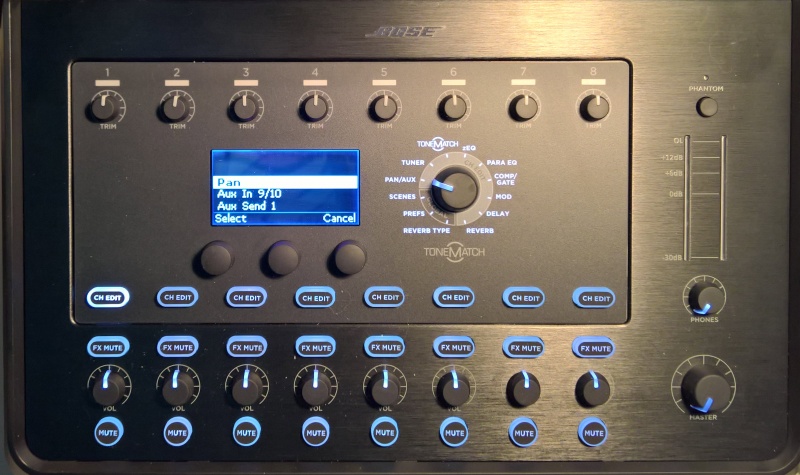
Turn the left most button under the display Menu to see your options. You can choose Pan, Aux Input, or one of the Aux Outputs
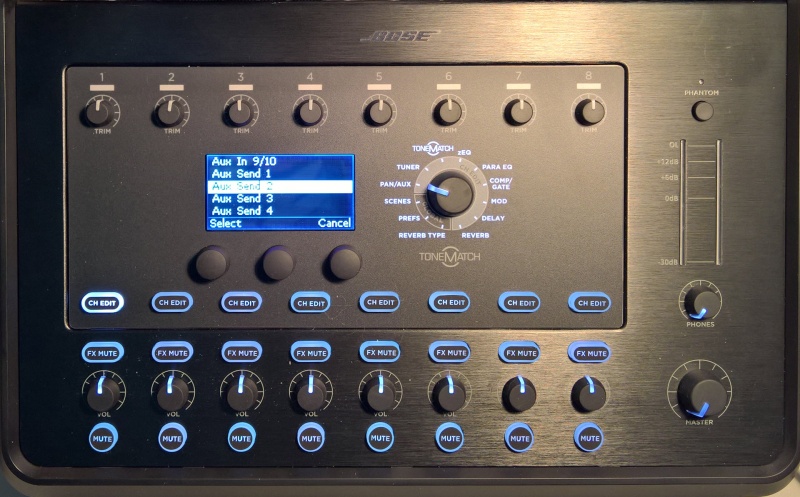
This is how it looks on the T8S when you turn the menu far enough to see all four Aux Outputs. On the T4S there are two Aux Outputs.
In this picture, we have chosen to direct Channel 1 to Aux 1. The level is 50% and the Tap is set to Pre
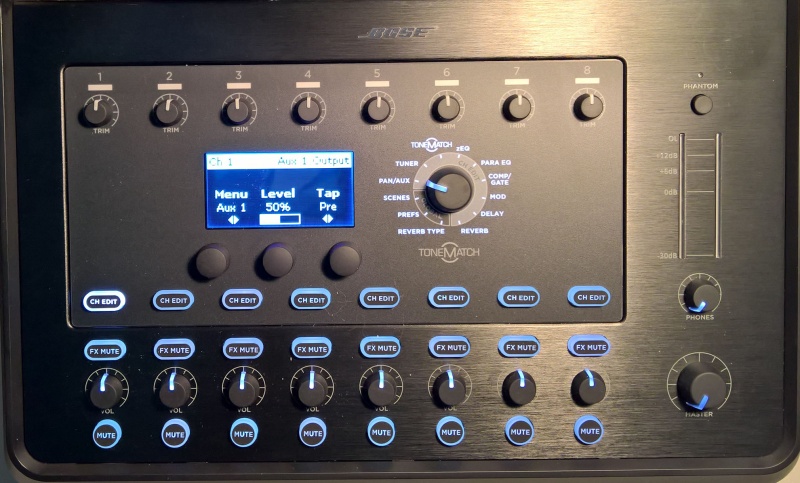
In this picture, Aux 1 is selected and you can choose if you want the Tap point to be Dry, Pre, or Post
Please see T8S Aux Send Channel Inputs to Different Aux Outputs for a detailed example.
Reverb on Aux 1
There are two reverb systems in the T4S/T8S ToneMatch® Mixers
- Main reverb for channels 1 through 4 (T4S) and 1 through 8 (T8S)
- Turn Rotary Selector to Global/Reverb Type
- Menu: Main (that's the default)
- Set the Type, Time, and Balance
- For each individual channel (CH EDIT Button)
- Turn Rotary Selector to Reverb
- Menu: Main (that's the default)
- Set Mix, Bright
- Aux 1 Reverb
- Turn Rotary Selector to Global/Reverb Type
- Menu: Aux 1 (you have to turn the Menu button to see it)
- Set the Type, Time, and Balance
- For each individual channel (CH EDIT Button)
- Turn Rotary Selector to Reverb
- Menu: Aux 1 (you have to turn the Menu button to see it)
- Set Mix, Bright
No Reverb on Aux 2(,3,4)
- Question
- Why is there no Reverb on the Aux 2, 3, 4 output of the T8S?
- Answer
The T8S mixer has lots of different effects units and normally they are unique to each channel. That means that the T8S mixer has 4 individual dynamic processors, 4 modulators (chorus flanger, phaser, tremolo), 4 EQs, 4 parametric EQs, 4 delay processors. The only exception is the reverb, which is shared by all channels.
The output of the shared reverb processor contains the reverb portions of all 8 channels. If we send that to an Aux output, you'd hear the reverb portions of all 8 channels and not only the channel that you are interested in. In most cases, this is probably not what you want. That is why we cannot use the main reverb processor for the Aux Outputs.
Aux is also a per-channel control. That means if you turn up Aux 1 send the of a channel, you expect to hear signals from channel 1 and only from channel 1. This thinking applies to each of the channels and aux sends.
We have a separate reverb processor for Aux 1. If you use it, you hear reverb in Aux 1, and only Aux 1.
If we shared Aux 1 reverb with the other Aux channels, you would hear the reverb from all the Aux channels in every Aux output. That is why there is no reverb on Aux 2, 3, 4 output of the T8S
- Workaround
Try using Digital Delay instead of Reverb for your vocals.
Digital Delay
Time: 100 ms
Mix: 15% - vary up to 30%
Fdbk: 0% - vary up to 10%
You should have better intelligibility and move the vocals out in front of the backing tracks.
Unlike Reverb, Digital Delay processing can be routed to ToneMatch Mixer[1] Aux outputs.
Scenes
Documentation Update
Definitions
The following is a update to T4S/T8S ToneMatch Mixer Owners Guide
- Additional information
A scene remembers the setting for Global EQ
A scene does not remember or change the settings of the other scenes.
- Correction
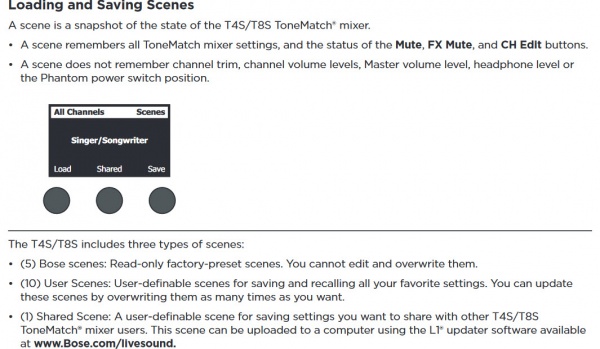
The T4S/T8S includes three types of scenes:
- (5) Bose scenes: Factory-preset scenes. You can edit and overwrite them.
- (6) User Scenes: User-definable scenes for saving and recalling all your favorite settings. You can update these scenes by overwriting them as many times as you want.
- Firmware version 1.1.0 One of the User Scenes is a Shared Scene: A user-definable scene for saving settings you want to share with other T4S/T8S ToneMatch® mixer users. This scene can be uploaded to a computer using the L1® updater software.
Factory Settings Scene
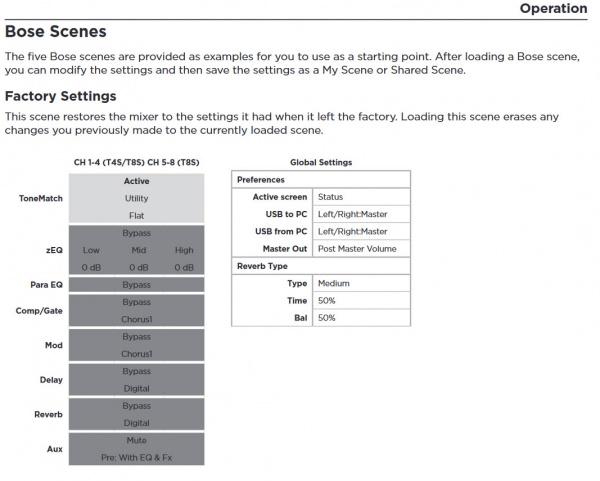
- From the owner's guide
- This scene restores the mixer to the settings it had when it left the factory. Loading this scene erases any changes you previously made to the currently loaded scene.
- Notes
- Loading the Factory Settings scene does not affect any other stored scenes.
- Loading the Factory Settings scene is not the same as doing a T4S/T8S Factory Reset.
Factory Settings
Documentation Update
The ToneMatch Mixer[1] Factory settings are incorrect in the documentation.
T4S/T8S ToneMatch® Mixer Owner's Guide
T4S T8S ToneMatch Mixer Service Manual
Please see the notes below.

Mono Output
On the back of ToneMatch Mixer[1]s, there is an indication below the Right output (MONO).
- Please note
- There is no hardwired summed mono output on the ToneMatch mixers. Any input signal that is panned hard Left will not be heard through the Right output. To get a mono output please see below.
General Information
As you move the pan control away from the center, the sound level increases slightly in one direction and decreases in the other. If you pan inputs hard to one side (e.g., Right) and the Right output will be slightly louder (theoretically, up to +3 dB louder) than if you had panned the inputs up the middle. And panned hard Right - there will be no signal at the Left Output.
T4S ToneMatch® mixer
- Pan all inputs hard RIGHT
- Connect your L1® to the RIGHT ToneMatch® port
OR
- Use the ¼ inch (6mm) Right Output to a powered loudspeaker (e.g. S1 Pro, L1® Compact, F1 Model 812). For best results use a ¼ inch (6mm) jack Tip-Ring-Sleeve cable.
- Note
- Anything panned hard LEFT will not be heard at the RIGHT Output.
T8S ToneMatch® mixer
- If connecting to the ToneMatch port to an L1 Pro (any model)
- Pan all inputs hard LEFT
- Note
- Anything panned hard RIGHT will not be heard at the ToneMatch Output to the L1 Pro
- If using the analog outputs (XLR or 1/4 inch (6.3 mm) Tip-Ring-Sleeve)
- Pan all inputs hard RIGHT
- Use the ¼ inch (6mm) Right Output to a powered loudspeaker (e.g. S1 Pro, L1® Compact, F1 Model 812). For best results use a ¼ inch (6mm) jack Tip-Ring-Sleeve cable
OR
- Use the XLR Right Output to powered a loudspeaker (e.g. S1 Pro, F1 Model 812). or L1® Compact with XLR to ¼ inch (6mm) jack Tip-Ring-Sleeve.
- Note
- Anything panned hard LEFT will not be heard at the RIGHT Output.
Mono using Aux Output
You can create a summed mono output by directing your input channels (1-4 or 1-8) to an Aux Output. See Aux Outputs for details.
T4S to S1 Pro
Connect a T4S ToneMatch mixer to an S1 Pro System as the only powered loudspeaker
- Note
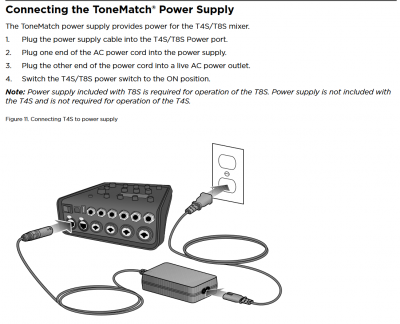
- To use the T4S ToneMatch mixer with an S1 Pro System you need a ToneMatch Power Supply unless you are also connected to an L1 Model 1S or L1 Model II.
Connect a T4S ToneMatch mixer to an S1 Pro System as a Monitor
If you are using the S1 Pro System as monitor while using an L1 or L1 Pro as the main system, you can connect as shown in the rest of this article OR create a separate monitor mix using the T4S Aux Outputs. Everything else in this article is still applicable. For more details see: T4S Aux Outputs
- Mono

- Stereo

If you have questions please join the conversation in the Bose Portable PA Community
Connections
- Leave the T4S and S1 Pro turned off until you have things connected
- Connect the T4S power supply to the T4S (T4S power supply sold separately)
- Connect the T4S Right Output to S1 Pro channel 1 or 2
- Recommended cable
Use a 1/4 inch (6.35 mm) Tip-Ring-Sleeve cable for best results.

You can use and 1/4 inch (6.35 mm) Tip-Ring-Sleeve to XLR cable, but you will have to turn down the volume on the S1 Pro System to avoid clipping the input.

T4S Settings
- Set the Rotary Selector to PAN/AUX
- Press the CH EDIT button for each channel you are using and pan the input hard RIGHT
Note: Steps 1 and 2 above are one-time-only. You don't have to change this unless you get another S1 Pro and want to run in stereo - Connect all your sound sources to the T4S
- Turn on those sound sources that have power switches
- Turn off the T4S Master Volume
- If any of your sound sources require phantom power, press the T4S phantom power button
- Turn on the T4S
- Turn on the S1 Pro
- Bring up the channel volume on the S1 Pro to about 11:00 o'clock
- Control the volume using the T4S Master Volume
If you see the S1 Pro channel 1 light turning solid red occasionally, turn down the volume on the T4S
Or if you see the S1 Pro channel 1 light turning solid red frequently, turn down the volume on the S1 Pro
S1 Pro Settings
- Turn off the reverb
- Set both tone controls to the center position
- Set the channel volume off
- Turn on the T4S
On the S1 Pro System, for each channel you are connecting to the T4S/T8S ToneMatch® Mixer use these settings while you are setting up.

- Reverb OFF
- Bass at 12:00 o'clock
- Treble at 12:00 o'clock
- ToneMatch switch OFF
You can adjust the Reverb, Bass, and Treble after you get your basic sound working.
- S1 Pro+
You can also connect to the Channel 3 Aux input. For best results, use a 1/4 inch (6.3 mm) Tip-Ring-Sleeve cable.

Gain Staging
- Using a Bose device as the source
When connecting a ToneMatch Mixer[1] or an S1 Pro System Line Out to an S1 Pro System channel 1 or channel 2
Set the volume control to 10:00 o'clock with 1/4 inch (6.3 mm) Tip-Ring-Sleeve
- The signal strength from a ToneMatch Mixer[1] or an S1 Pro System Line Out is sufficient to achieve the maximum usable volume from the S1 Pro System
- Control the overall volume from the ToneMatch Mixer[1] or the first S1 Pro System. If you use an XLR cable, set the volume control to 9:00 o'clock

- Using a third-party source (not a Bose device as the source)
For each channel you are using on the S1 Pro System
- Turn the channel volume off
- Connect your sound source
- Adjust the volume of the source device output to the reference or nominal output level.
- On analog consoles this may be marked as unity or 0 dB.
- On digital consoles this may be marked as -18 dBFS[2][3]. The exact value (-18 dBFS to -20 dBFS) may vary depending your location[4].
- Refer to the manual for the source device for details.
- If the source device does not have metering or indicators, set the output as high as you can without hearing distortion or seeing red indicator lights.
- While playing/singing as loud as you will during your performance, bring up the channel volume until you see solid green on the channel indicator light. Occasional flickers of red are okay. If you see solid red or you hear distortion, turn down the volume.
Combo Inputs
- S1 Pro Channels 1 and 2 have combo inputs that accept
- XLR (balanced mono)
- Microphone or Line-Level inputs
- 1/4 inch (6.3 mm) Tip-Ring-Sleeve connection (balanced mono)
- Line-Level inputs
- 1/4 inch (6.3 mm) Tip-Sleeve connection (unbalanced mono)
- Line-Level inputs and instruments (e.g. guitars, keyboards, guitar processors, loopers)
- When using a third-party device (e.g., mixer or another line-level source) should I use the XLR or 1/4 inch inputs?
- The S1 Pro 1/4 inch Tip-Ring-Sleeve inputs are best suited for line-level balanced inputs. This is a better match for the signal level.
- The S1 Pro XLR inputs are best suited for microphones.
When the S1 Pro Channel input lights hit red or you hear distortion, the signal is clipping and you've reached the maximum usable volume. From the source, if the XLR outputs are line-level and the 1/4 inch Tip-Ring-Sleeve outputs are line-level, it won't matter which type of cable you use. They'll both get the job done, although the volume control setting will be lower with the XLR connection. That doesn't indicate more headroom. The maximum usable volume is the same either way.
Alternate Connection
You can use an XLR cable (mic cable) from a Line Level Source (e.g., L1 Pro, S1 Pro+) to S1 Pro or S1 Pro+ channels 1 or 2 (XLR inputs), but the signal may clip, overload, or be too high to control the volume. To attenuate (reduce) the signal, use a -20 dB or -30 dB Pad
XLR Cable

![]()
Click image for more information about Pads
Connecting a Mixer to an S1 Pro system
Article from Bose Connecting an S1 Pro to a mixer
Headphone Output


- The headphone output is on the right side of the ToneMatch mixer. It is compatible with stereo headphones using a 1/4 inch (6mm) tip-ring-sleeve, stereo jack.
- On the face of the ToneMatch mixer, is the PHONES volume control. It is beside the headphone output. This controls the volume you hear in the headphones.
- The headphone output is the same as the Main outputs (Left and Right) except the volume is controlled by the PHONES volume control instead of the MASTER volume.
- The CH Mute buttons affect both the Main outputs and the headphone output. There is no independent preview/cue/solo function for the headphones independent of the Main outputs.
Headphone Output as Monitor Output
- The headphone output is the same mix (stereo) as the two ToneMatch ports, and two analog master outputs. This is convenient if you want the same mix in the monitors as the main outputs. This is not useful if you need separate mixes for the monitors.
- The headphone output is convenient because it has a separate level control
- Notes
- The headphone output jack is 1/4 inch (6.3 mm) Tip-Ring-Sleeve (stereo).
- This is NOT compatible with a 1/4 inch (6.3 mm) Tip-Ring-Sleeve balanced input. That includes ANY 1/4 inch (6.3 mm) Tip-Ring-Sleeve input on an S1 Pro system, L1 Compact, L1 Model 1S, L1 Model II, or any L1 Pro.
- If you use a 1/4 inch (6.3 mm) Tip-Ring-Sleeve cable, you will get a very low, or distorted signal
- If you want to use the headphone output as a monitor send
- Use a 1/4 inch (6.3mm) Tip-Sleeve cable, NOT 1/4 inch (6.3 mm) Tip-Ring-Sleeve
- If you use a 1/4 inch (6.3mm) Tip-Sleeve cable, you will send only the Left channel. Anything panned hard Right will not be heard.
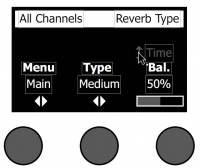
Reverb Settings
Adding Reverb to a Channel
The Reverb function applies a user-adjustable amount of reverb to the selected channel. To select the type of reverb, see “Selecting a Reverb Type” below. Note: To mute the Reverb effects, press the Mix control. Press it again to unmute.

- Press or rotate the Menu control and select which output (Main of Aux) to send the reverb to.
- Rotate the Mix control to adjust the desired mix of dry signal (0%) to wet signal (100%).
- Rotate the Bright control to equalize the high frequencies of reverb applied to the selected channel
Setting Global Reverb Type
- Selecting a Reverb Type
The Reverb Type function allows you to select the type of reverb that is applied to all input channels. The decay time (Time) and balance (Bal) are adjustable. Balance controls the ratio of early-to-late reflections.
Note: To mute the Reverb, press the Type control. Press it again to unmute.
- Global Reverb Settings are different from the T1 ToneMatch Audio Engine.
|
|||||||||||||
| Menu | Main or Aux 1 (apply following settings to Main or Aux) | ||||||||||||
| Type | Plate, Small, Medium, Large, Cavern | ||||||||||||
| Time | Expressed as a percentage of the time range for each reverb type
|
||||||||||||
| Balance | Percentage (ratio of early/later reflections) | ||||||||||||
|
|||||||||||||
- Note
- The Time settings are different from the T1 ToneMatch Audio Engine. There are no direct mappings of the time values in the T1 to the T4S/T8S because they use different units of measure.
If you are trying to get the same results as you had with a T1 ToneMatch® Audio Engine make sure you have Firmware version 1.1.4 or later. Fine tune the settings by ear.
|
|
| Type | Plate, Small, Medium, Large, Cavern |
| Time | Milliseconds from 0.20 - 9.79 seconds |
| Balance | Percentage (ratio of early/later reflections) |
Delay Tap Tempo
You can set the time parameter of the delays by tapping the middle button under the display.
- Press CH EDIT for the channel you want to change
- Turn the Rotary Selector to DELAY
- Choose the type of delay you want (Digital, Analog, Tape)
- Use the Right-most button under the display to set the Mix / Feedback
- Turn the middle button under the display to set the Time

OR you can push the middle button in time to the rhythm you want for the display. This will change the tempo of the delay and display the tempo in BPM (Beats Per Minute)

The maximum delay is 500 milliseconds. This is 120 BPM (Beats Per Minute). If you tap anything slower than that, it won't register. If you are working at a tempo slower than 120 BPM, try tapping eighth notes.
Here is an interest site and conversion calculator BPM Tempo Time Calculator
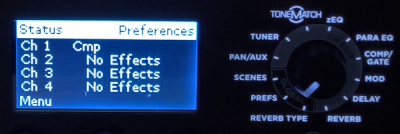
Comp/Gate

Using compressor/gate functions
The Comp/Gate function provides access to gate, compression, limiter, de-esser and kick drum presets with adjustable parameters. Note: To bypass the Comp/Gate settings, press the Type button. Press it again to activate.
1. Rotate the Type button to access the list of Comp/Gate effects and highlight your choice:
- Compressor 1: Light
- Compressor featuring a preset low-compression ratio with variable threshold and gain parameters. Works well as a general-purpose compressor for most instruments and microphones that require minimal level control.
- Compressor 2: Medium
- Compressor featuring a preset moderate compression ratio with variable threshold and gain parameters. Works well with basses, guitars, keyboards, and vocals requiring subtle level control.
- Compressor 3: Heavy
- Compressor featuring a preset high compression ratio with variable threshold and gain parameters. Works well with loud instruments – like horns and drums, as well as strong vocals that require more aggressive level control.
- Limiter
- Hard limiter featuring a preset ratio (8:1) with variable threshold and gain parameters. Works well with very loud instruments, such as drums, to prevent signal peaks from overloading the channel.
- De-Esser
- Side-chained compressor featuring a preset compression ratio with variable threshold and gain parameters. Designed to reduce sibilance on vocals.
- Noise Gate
- Noise gate with a fast preset attack time, variable threshold, and variable speed (release time). Well-suited for eliminating unwanted noise from microphones and instruments.
- KickGate 1: Regular
- Gate featuring a preset attack time, and variable threshold and tightness (release time) parameters. This is a Bose® proprietary technology designed specifically for kick drums. This robust gate provides maximum gain before feedback, making your kick drum as loud as possible through an L1™ system.
- KickGate 2: Fast
- Same as KickGate 1 – but adjusted for faster tempos. Select this setting if you are using a double bass drum pedal.
2. Press the Select button to select your choice, or press the Cancel button to exit the list with no change.
3. For Comp1-3, Limiter, De-Ess:
- Rotate the Thresh button to adjust the input threshold (trigger) level from -50dB to 0dB.
- Rotate the Gain button to adjust the gain from 0dB to 30.0dB. The gain bar above the button shows the amount of gain reduction. This display helps in setting the threshold.
For Gate:
- Rotate the Thresh button to adjust the input threshold (trigger) level from -90dB to -30dB.
- Rotate the Speed button to set the gate closing speed to any value from 0 (fastest) to 100% (slowest).
For Kick1-2:
- Rotate the Thresh button to adjust the input threshold (trigger) level from -20dB to 0dB.
Nick-at-Bose talks about where to start
- Question
- What are the recommended compression settings for the tone match?
Right now I'm using medium compression but need understanding what threshold does.
- Nick-at-Bose[5]
This is a great question. I'll start out by saying compression is a huge topic and there isn't necessary a best setting, though there can definitely be wrong settings.
Sometimes, maybe often times, the best setting is Bypassed.
"Threshold" is a setting that is entirely dependent on the source material. A more negative number will result in more compression. The closer the Threshold number is to 0 (which is the top of the scale in digital terms), the less compression there will be.
The top meter on the screen shows how much gain reduction is occurring. Roughly, each hash mark is about 2 dB of reduction. (No metering would indicate no compression, which means the signal is below the Threshold setting.)
Here's where I would start:
- Use the Light Compression setting
- Leave the Gain at 3.0 dB
- Set the Threshold so that on the louder parts of the performance, the meter at the top of the screen is hitting between the 1st and 3rd hash marks (starting at the right side of the screen). This would then mean that for the softer and mid-volume parts, there may be no compression happening at all. That's perfectly fine and probably desired.
Source: Nick-at-Bose
MikeZ-at-Bose talks about the Compressor settings
MikeZ-at-Bose talks about the Compressor settings in the T1 ToneMatch Audio Engine[6]
Light is about 2:1, fast attack and release.
Medium is about 3.5:1, fast attack and release.
Heavy is about 6:1, fast attack and release.
All have 'soft knee' transitions.
Hope this is helpful. When tuning the compressors I relied much more by ear to determine the settings than by numerical values.
A couple of comments on the settings.
When doing general compression like is done in the T1, I found fairly fast attack and release times to be the most versatile. Slower times need more fine tuning and are more prone to artifacts when used heavily.
The threshold is the most important control on any compressor, in my opinion. Careful adjustment of this is super important. You need to make sure you are compressing the parts of the instrument that you want to compress (peaks, 20% of the time, 100% of the time etc.)
Can I use more than one compressor function
- Question
- Can you add more than one effect on a given channel under the "comp/gate" channel parameter on the rotary dial?
The is one compressor per channel, and it can do only one function at a time (compressor, limiter, noise gate, de-esser, kickgate). For most signal sources, this should not be a limitation as most of the applications where you would use these effects are mutually exclusive.
The other effects (Mod, Delay) and Reverb operate the same way. You can only choose one function within the family of the effect.
Related Reading
The Truth About Compressors and Limiters
T8S ToneMatch port connection to L1 Pro[1]
T8S to Single L1 Pro[1]
There is a single ToneMatch port on the T8S ToneMatch mixer. You can use this
- To connect to an L1 Pro[1] ToneMatch Port using a ToneMatch Cable or Network Cable
- Note: The maximum length of the network cable is 50 feet.
- Note: This is the mixer LEFT output. Anything panned hard RIGHT will not be heard.
All of the Analog outputs (XLR or 1/4 inch (6.3 mm) Tip-Ring-Sleeve) still function while using the ToneMatch Port.

To run stereo, connect the second powered loudspeaker to one of the T8S ToneMatch mixer RIGHT Outputs (XLR or 1/4 inch (6.3 mm) Tip-Ring-Sleeve) to the second L1 Pro Input three. You can use an XLR to XLR cable. However, you may need to turn down the channel volume level to match the input sensitivity to the signal level.

- Alternate connection
- ToneMatch port on the T8S ToneMatch mixer to ToneMatch Power Supply for power and use the Analog Outputs (XLR or 1/4 inch (6.3 mm) Tip-Ring-Sleeve) to the L1 Pro Input three. DO NOT USE an XLR to XLR cable. The output of the T8S ToneMatch mixer outputs is too hot for the L1 Pro XLR inputs.
T8S ToneMatch mixer to Two L1 Pro[1] Stereo
ToneMatch Port and 1/4 inch (6.3 mm)

1/4 inch (6.3 mm) Tip-Ring-Sleeve
This assumes that you are powering the T8S with the ToneMatch Power Supply.

XLR
- Connect your audio sources (instruments or microphones) to the inputs on the ToneMatch mixer
- Connect the T8S power supply from the Power port of the T8S to a power outlet
- Connect an XLR cable from the Main Out R port of the mixer to the right-side L1 system
- Tip: If connecting to channels 1 or 2 on the second system, set the ToneMatch selector for that channel to OFF
- Connect an XLR cable from the Main Out L port of the mixer to the left-side L1 system.
- Tip: If connecting to channels 1 or 2 on the second system, set the ToneMatch selector for that channel to OFF.
T8S ToneMatch mixer to Two Single L1 Pro[1] Mono Daisy Chain
Connect the T8S ToneMatch mixer to the first L1 Pro[1]
Then connect the output of the first L1 Pro[1] to the second L1 Pro[1]
To connect two L1 Pro systems (daisy chain) to use the second system as an extension of the first
- Use an XLR female to 1/4 inch (6.3 mm) Tip-Ring-Sleeve to connect the L1 Pro Line Out to a second L1 Pro (any model) input three
- Turn down the volume on the second L1 Pro
- Set the level you want on the first L1 Pro
- Set the volume on the second L1 Pro to suit the application
- Note: Running two L1 Pros daisy chained in close proximity offer little tangible benefit and can cause issues with multiple source interference. See Dual Mono for details.
- Note
The Line Out is post-fader. That is, it is the combined signal of all inputs and ToneMatch processing, EQ and Reverb. That includes inputs, 1, 2, 3, Bluetooth, and ToneMatch Port (used for T4S/T8S ToneMatch® Mixers).
The Line Out is pre-System EQ. That is, the signal at the Line Out is flat. It is not affected by the setting of the System EQ switch. [3]
This applies to any two L1 Pro systems (L1 Pro8, L1 Pro16, L1 Pro32).

- Second L1 Pro Louder than the First
Because the output level of the first L1 Pro Line Out is post-fader (see above) is higher than the original source. If you set the volume controls on the second L1 Pro to the same settings as the first L1 Pro, the second one will be louder. To get the levels the same,
- Turn down the volume on the second L1 Pro
- Set the level you want on the first L1 Pro
- Set the volume on the second L1 Pro to suit the application. Do that by ear.
- Dual Mono
When you run the same sound through two L1 systems, you should consider the consequences, both good and bad. See Dual Mono for details.
T8S no ToneMatch port connection to L1® Model 1S or L1 Model II
Bose engineered all the ToneMatch mixers (T1®, T4S, T8S) to offer the same excellent quality audio whether you use the ToneMatch cable (T1® or T4S) or a balanced cable (T8S) for audio.
If you are using good quality balanced cables there should be no difference between using any combination of XLR and 1/4 inch Tip-Ring-Sleeve connections.
The benefit of using the Cat-5 cable for the T1® or T4S is convenience because you don't need to use the T1®/T8S power supply. Unfortunately, the Model II Power Stand can not supply enough power to operate a T8S. This is why a ToneMatch Power Supply is included with the T8S.
T8S Analog Outputs
The outputs on the T8S are analog. The RJ45 port is for the ToneMatch Power Supply that is included with the T8S. The RJ45 port cannot be used to connect to an L1® Model II or L1® Model 1S.
Bose engineered all the ToneMatch mixers (T1®, T4S, T8S) to offer the same excellent quality audio whether you use the ToneMatch cable (T1®, T4S) or a balanced cable for audio (T8S).
There are two balanced 1/4 inch (6mm) Tip-Ring-Sleeve outputs (Left and Right). These are convenient for connecting to the L1® Model II or L1 Model 1S Power Stands as well as F1 Model 812s.
There are two balanced XLR outputs (Left and Right). These are convenient for connecting to other powered loudspeakers with XLR inputs.
Total number of inputs - Comparing T8S with two T1®s
- With the T8S and two L1® Model 1S or L1® Model II you have
- 8 - Combo inputs
- 2 - Aux inputs 1/4 inch (6mm)
That's 10 inputs in total.
- With the T1® with two L1® Model II or L1® Model 1S
First T1®
- 3 - Combo inputs
- 1 - Aux input 1/4 inch (6mm). Channel 4/5 is a single channel with two inputs.
- 1 - Aux input on the L1® Model 1S or L1 Model II Power Stand
Second T1®
- 3 - Combo inputs
- 1 - Aux input 1/4 inch (6mm). Channel 4/5 is a single channel with two inputs.
- 1 - Aux input on the L1® Model 1S or L1 Model II Power Stand
The total is
- 6 - Combo inputs
- 4 Aux inputs 1/4 inch (6mm)
That's 10 inputs in total. If you want to count Channel 5 on the T1®s you're up to 12 inputs, but channel 4/5 is really a single channel with two input jacks for combining a stereo signal.
Comparison to T1® ToneMatch audio engine
- Note
- The T4S/T8S ToneMatch® Mixers are compatible with the L1 Pro System[1]s (announced October 2020).
The T1 ToneMatch Audio Engine requires two connections to the L1 Pro System[1]s: one for power, one for audio. Please see: T1 Compatibility With L1 Pro Systems
- Here's a quick rundown of the additions and changes
- Stereo outputs and processing
- T4S: Two digital ToneMatch outputs and parallel analog 1/4" Tip-Ring-Sleeve
- T8S: Two XLR analog outputs two analog 1/4" Tip-Ring-Sleeve
- Pan
- Combo inputs
- T4S: Channels 1, 2, 3 and 4 all have combo XLR-1/4" inputs
- T8S: Channels 1, 2, 3, 4, 5, 6, 7 and 8 all have combo XLR-1/4" inputs
- Auxilliary inputs (routed to Main with Level and Pan controls)
- T4S: Aux Channels 5 and 6 are 1/4" Tip-Ring-Sleeve
- T8S: Aux Channel 9 and 10 that are 1/4" Tip-Ring-Sleeve
- Headphone jack
- 6mm (1/4"-20) threaded insert at the bottom for use with mounting hardware,
- Tap-tempo delay
- Aux Outputs
- Dedicated Reverb on Aux 1
- T4S: Additional Aux out - Aux 2
- T8S: Additional Aux outs - Aux 2 Aux 3, Aux 4
- Dedicated Reverb on Aux 1
- 3-band Parametric EQ per channel
- Master out 6-band EQ
- Higher signal output (approximately +10 dB) and this provides greater compatibility with the F1 Model 812 Flexible Array Loudspeaker
- USB playback (WAV/MP3) from thumb drives
- New industrial design
- New magnetic cover
Removed/Changed
- Removed the L1® Cylindrical Radiator® stand and the mic stand adapter (replaced by the common 1/4"-20 insert)
- Removed the preamp outs based on customer feedback that they were seldom used
- There are eleven scenes available in the T4S/T8S ToneMatch® Mixers:
- Five Bose Scenes (that can be overwritten) and
- Six user scenes
- The T1® has eleven user read/writeable Scenes and five Bose read only Scenes.
- T1 Scenes backed up to a computer can not be restored to a T4S/T8S (different architecture for reverb)
- New Reverb engine
- Global Reverb Time parameter is expressed in percentage compared to the T1® in seconds (details)
- Channel 4 (T4S compared to T1)
| T4S ToneMatch Mixer | T1 ToneMatch Audio Engine |
|---|---|
|
Channel 4
|
Channel 4
|
Aux Inputs Channels 5/6
|
No equivalent |
FAQs
T4S/T8S ToneMatch Mixer FAQs
What is the T4S/T8S ToneMatch Mixer?
Take control of your music with T4S and T8S ToneMatch mixers, compact 4 and 8 channel interfaces designed for performers. Engineered with powerful DSP engines and intuitive user controls, they offer studio-quality EQ, dynamics and effects processing. Sound great with integrated Bose® ToneMatch processing and zEQ, especially when connected to a Bose L1 or F1 system for full end-to-end tonal control. Play confidently on stage with these rugged ToneMatch mixers using tactile controls, easy-to-read LED displays and scene recall. ToneMatch mixers, the ultimate on-stage companions for performing artists.
What are the key features of the T4S/T8S ToneMatch mixers?
Powerful Audio Processing
Elevate your performances with updated, studio-quality effects and advanced digital audio processing. Never run out of options with channel-independent EQ, dynamics and effects. Get your perfect sound fast with Bose ToneMatch processing for natural-sounding vocals and instruments, while zEQ focuses your tone for effective adjustments on the fly. When used with Bose L1 and F1 systems, the T4S/T8S mixers allows full end-to-end optimization of your sound.
Seamless Live Control
The T4S/T8S integrates with your performance using illuminated, tactile controls and indicators for spontaneous sound adjustments, even on dimly-lit stages. Jump into settings with the fast-learning, intuitive control interface. Additional features like tap tempo delay, built-in chromatic tuner, master out EQ, and recallable scenes makes it easy to be ready to play. The T4S/T8S is the ultimate on-stage companion for performing artists.
High-Density Connectivity
For it’s size, the stereo T4S/T8S mixer gives you unprecedented connectivity with control. Four (T4S) or eight (T8S) main channels feature high-quality audio preamps with XLR-combo jacks for microphones or instruments, and switchable phantom power. Additionally, the T4S/T8S offers two (T4S) and four (T8S) Aux sends, two Aux inputs, two ToneMatch outputs for digital audio with remote power (T4S), USB-A and -B for USB drive playback or PC/Mac interfacing, a dedicated headphone jack, and ¼” TRS analog outputs.
Convenient Gig-Ready Features
Rugged and ready to go, the T4S/T8S includes a protective magnetic cover and a bottom insert allows you to use standard mounting accessories to keep the T4S/T8S within reach.
What are the differences between the T4S and the T8S?
The T4S and the T8S both have the same compact interface, tactile knobs and advanced digital audio processing, yet the T8S gives you an expanded channel count with four more mic/line inputs and a total of four Aux sends. The T8S also includes an output meter to visually monitor your output level. The T4S can receive power and send digital audio to L1 Model II or L1 Model 1S products when using the included ToneMatch cable. The T8S comes standard with a universal power supply and does not offer a ToneMatch link.
What are ToneMatch presets, and what are their benefits?
ToneMatch presets are designed for specific instruments and microphones for use with the L1 Model 1S/II system, S1 Pro or F1 system. ToneMatch presets are available for each channel and instantly bring you closer to the true sound of your voice or instrument – all at the touch of a button. When you select a proprietary ToneMatch preset for your microphone or instrument, you are tapping into a powerful technology, available only from Bose.
What is the concept behind zEQ, and what are the benefits?
Ordinary tone controls are generic by design: “High,” “Mid” and “Low” controls are spread out across the entire musical spectrum. Proprietary zEQ automatically shifts the range of these controls so that they correspond directly to the range of your voice or instrument. zEQ gives you more precise control over your tone, making it easy to fine-tune your sound.
What is the benefit of the ToneMatch ports on the T4S?
When used with ToneMatch cables, connect the outputs of the T4S to one or two L1 Model 1S/II units via their ToneMatch ports. The user may enjoy the benefits of digital quality audio while alleviating the need for an additional power supply and excessive wiring when used with the L1 Model 1S/II system. (Note: this is for the T4S only, the T8S must be used with a power supply, although the T4S can be powered using the accessory ToneMatch power supply when not being used with an L1 system.)
What is the proper method for setting the gain on the T4S/T8S ToneMatch mixer?
Adjust the output volume of the source instrument to normal operating volume, or sing into the microphone using your loudest level. Make sure that the Master volume and the channel volume on the T4S/T8S are set to 0. While playing your instrument/audio sources as loudly as you would during a performance, turn the Trim control on applicable channel of the T4S/T8S clockwise until the signal/clip indicator glows green. If the indicator flashes red or glows steady red, turn the trim control counterclockwise to decrease the level until it’s most always green.
What are the two Aux outs on the T4S and 4 Aux outs on the T8S?
These are direct output signals that can be taken pre or post mix and connected to a number of different devices including personal monitors, amplifiers or recording devices. Aux outputs accept ¼” TRS balanced cables.
17" 18" 18How many inputs does the T4S/T8S ToneMatch mixer have, and what type are they?
18"17"Inputs 1-4 (1-8 with the T8S) are analog inputs channels with a combination input connector. This connector supports either balanced XLR audio cables or ¼” balanced (TRS) or unbalanced (TS) cables. Easily connect multiple sources with the added flexibility of accepting either balanced XLR audio cables or ¼” balanced or unbalanced cables.
Aux input channels 5&6 (9&10 T8S only) accept a ¼” balanced or unbalanced cable. Both inputs are independent of each other and can have separate volumes and pans. These stereo inputs are useful for connecting the outputs from PC audio interfaces, mixing consoles and keyboards/synths.
How can you verify the version of ToneMatch presets that are on the T4S/T8S?
Access the global preferences menu to confirm which interchangeable ToneMatch preset banks are loaded on the system. Use the rotary encoder to select the global Prefs mode. Press Menu button to select menu list, then rotate the Select button to scroll through the list and highlight the ToneMatch description.
What is the process for updating the T4S/T8S with new ToneMatch presets?
The T4S/T8S is equipped with a USB interface that may be connected to a PC. Check www.Bose.com/musicians for periodic updates on preset availability.
What is a Bose scene?
The T4S/T8S contains five Bose scenes each, which have specific default processing configurations for various applications intended as a starting point in achieving great sound. The T4S Bose scenes are Singer/songwriter, DJ/playback, Drums and bass, Electric works and Factory settings. The T8S Bose scenes are Full Band, String Band, Stereo DJ, Electronic and Factory settings.
T4S:
Bose Scene 01 – Singer/songwriter
Bose Scene 02 is designed for singer/songwriter playing keyboard or guitar and sometimes accompanied by an MP3 track.
Bose Scene 02 – DJ/playback
Bose Scene 03 is designed for a DJ event or any audio playback need. This setup uses two microphones and either an MP3 player, mixer or laptop PC.
Bose Scene 03 – Drums and bass
Bose Scene 04 is set up for a bass guitar, kick drum, and either an MP3 player or laptop PC.
Bose Scene 04 – Electric works
Bose Scene 05 is designed for electric and acoustic guitars, bass guitar and keyboard.
Bose Scene 05 – Factory settings
This scene restores the T4 mixer to the settings it had when it left the factory. Loading this scene erases any changes you previously made.
T8S
Bose Scene 01 – Full Band
Bose Scene 01 is designed for a full trio band with drums, bass, guitar and three vocal mics. This setup also uses aux 9/10 for backing tracks or set break music.
Bose Scene 02 – String Band
Bose Scene 02 is designed for a string band with a hand drum, bass, guitars, mandolin and vocal mics.
Bose Scene 03 – Stereo DJ
Bose Scene 03 is designed for a DJ to run multiple sources in a stereo configuration. It also has four vocal mics for any MC’s or announcements.
Bose Scene 04 – Electronic
Bose Scene 04 is designed for an electronic band. It has stereo source input, two stereo keyboard inputs and two vocal mics.
Bose Scene 05 – Factory Reset
This scene restores the T8S mixer to the settings it had when it left the factory. Loading this scene erases any changes you previously made.
What is a user-defined scene?
The T4S/T8S allows the user to easily store, recall and edit performance scenes (a snapshot of the complete state of the unit) into five user-defined scenes. User-defined scenes help achieve consistent sound with minimal configuration. After editing a Bose scene to your preference, you may re-save it as a user-defined scene, allowing you to easily recall it later. This greatly reduces the amount of configuration required.
What is a shared scene?
A shared scene is a single user scene that you can send out of the T4S/T8S to a PC when using the L1 updater software. This allows you to share the scene with other members of the user community. To obtain software, please go to www.Bose.com/musicians.
Does the T4S/T8S ToneMatch mixer have built-in effects? What are some of the features and applications where they may be used?
Yes. Below is a list of effects that users may independently assign/adjust for any or all channels. The user also enjoys discrete control over designated parameters for each respective channel.
Effects
Modulation
Chorus 1: Brite - Shimmering chorus that works well with acoustic instruments. Includes adjustable mix, depth and speed parameters.
Chorus 2: Warm - Like Chorus 1 but with slightly less high frequencies. Includes adjustable mix, depth and speed parameters and works well with electric guitars and basses.
Chorus 3: Dark - Like Chorus 2 but with less high frequencies for a darker tone. Includes adjustable mix, depth and speed parameters, and works well with electric guitars and basses.
Flanger 1: Tape - Tape-style flanger with no feedback. Includes adjustable mix, depth and speed parameters, and works well with electric guitars and basses.
Flanger 2: Feedback - Same as Flanger 1 but with preset Feedback effect.
Phaser 1: Stomp - Classic “stomp box”-style phaser. Features a preset wide speed with variable speed and feedback parameters, and works well with electric guitars/basses and keyboards.
Phaser 2: Rack - Classic “rack”-style phaser. Features a positive mix type with variable speed and feedback parameters, and works well on electric guitars/basses and keyboards.
Phaser 3: Warm - Vintage-style phaser. Features a positive mix type with variable speed and feedback parameters, and works well as an effect on electric guitars/basses and keyboards.
Phaser 4: Bright - Phaser with no bass. Features a positive mix type with variable speed and feedback parameters that works well on electric guitars and keyboards.
Tremolo - Vintage-style tremolo effect with variable speed and depth parameters that works well as an effect on guitars and keyboards.
Delay
Choose from analog, digital or tape delay. Independently assign/adjust the delay settings for desired channels with discrete control over the mix and feedback time parameters for each channel. For example, the user may select a tape delay for the vocal on Channel 1 while selecting an analog delay for the guitar on Channel 2. Set your delay time with the center knob or use the tap tempo feature by pressing the center knob at desired tempo.
Digital Delay - Digital delay effect where the repeats remain uncolored. Features adjustable mix, time, and feedback parameters, and may be used on guitars, drums or vocals.
Analog Delay - Classic analog delay effect, where the repeats continuously deteriorate. Features adjustable mix, time and feedback parameters, and may be used with guitars, drums or vocals.
Tape Delay - Vintage-style tape delay effect, where the repeats deteriorate even more than analog delay, and may be used with guitars, horns, harmonica or vocals.
Reverb
The T4S/T8S allows access to a global reverb type that may be applied to both the master output and Aux outputs, or you can select separate reverb types for the master outputs and Aux outputs. The reverb types are plate, small, medium, large and cavern. Control decay time and level of reverb signal sent through master output. Please keep in mind that once you select a global reverb type to be used among any or all channels, you may control the mix and brightness of each channel. However, the type of reverb may only be altered for all channels. This is achieved through adjusting the Reverb Type mixer mode.
Plate - Creates the ambience of a medium-sized space. Features adjustable time and balance (ratio of early/later reflections) parameters and may be used with guitar, horns, percussion instruments and vocals.
Small - Creates the ambience of a small-sized space. Features adjustable time and balance (ratio of early/later reflections) parameters and may be used with guitar, horns, percussion instruments and vocals.
Medium - Creates the ambience of a medium-sized space. Features adjustable time and balance (ratio of early/later reflections) parameters and may be used with guitar, horns, percussion instruments and vocals.
Large - Creates the ambience of a large-sized space. Features adjustable time and balance (ratio of early/later reflections) parameters, and may be used with guitar, horns, percussion instruments and vocals.
Cavern - Creates the ambience of an extremely large space. Features adjustable time and balance (ratio of early/later reflections) parameters, and may be used with guitar, horns, percussion instruments and vocals.
Dynamics Processing
Compressor 1: Light - Compressor featuring a preset low compression ratio with variable threshold and gain parameters. May be used as a general-purpose compression for most instruments and microphones that require minimal level control.
Compressor 2: Medium - Compressor featuring a preset moderate compression ratio with variable threshold and gain parameters and may be used with basses, guitars, keyboards, vocals or other instruments requiring subtle level control.
Compressor 3: Heavy - Compressor featuring a preset high compression ratio with variable threshold and gain parameters and may be used with loud instruments such as horns and drums, vocals or other instruments that require more aggressive level control.
Noise gate - adjustable threshold and speed independently assignable for each channel. Controls extraneous noise from open microphones or hot instrument pickups from being introduced into the system.
Limiter – User-adjustable threshold and gain settings are independently assignable for each channel.
Prevents input signals from overloading, helping to maintain consistent gain staging.
De-Esser – User-adjustable threshold and gain settings are independently assignable for each channel.
Compression useful in reducing high-end frequencies associated with vocal sibilant sounds.
Kick Gate - The Kick Gate is a Bose proprietary technology that allows you to drive your kick
drum to loud levels while avoiding microphone feedback.
Step 1: Connect an appropriate microphone. It is imperative that you gain
stage the microphone correctly. Your hardest kick hits should put the LED
clip meter solidly in the yellow, just shy of the red.
• Step 2: Activate the kick gate. Use the default settings initially. Turn the
volume of the system up to desired performance level.
• Step 3: Play the softest that you will play in the performance. You should
clearly hear these kick hits.
• Step 4: Playing softly, raise the
threshold knob until you hear some of your
kick hits get cut off. Back the threshold down 3db from this point.
• Step 5: Play the kick drum as you normally would. Reduce ‘Tightness’ to
add more boom to your sound.
• Step 6: Enjoy your kick drum!
Can you assign multiple effects to any or all channels?
Yes. The user may run multiple effects on one channel while simultaneously running a set of completely different effects on each of the other channels. Each effect type has designated user-adjustable parameters, which also may vary from channel to channel.
Can I create a sub mix to send to a house PA system or recording device?
Yes. The Aux outputs on the T4S/T8S allow you to send selected input channels to separate mixes by accessing the Aux menu under PAN/AUX. You then can determine if the signal will be Dry (after preamp), Pre (includes EQ and FX) or Post (after fader).
Does the T4S/T8S have amp modeling capability?
No. Distortion must be produced first and then fed into the T4S/T8S as a clean, non-clipping signal. To achieve distortion, the guitarist can use a few methods:
Inline devices: One popular method would be to use any of the effects pedals on the market or use a DSP-based amplifier modeler that models the tone produced by amplifier tubes, guitar transducers and guitar amplifier speaker cabinets.
Miking a guitar amplifier: Another method would be to use a guitar amplifier, and mic the speaker as closely as possible. The trick here is to run the amplifier at the lowest level at which the correct tone is attainable but does not diminish the benefits of the ToneMatch setting. Louder amplifiers can be located and miked offstage. Miking small, low-watt amplifiers is a better technique for this method.
Use a loading device: Some electric guitarists may prefer to use their amplifier's output as an input signal into the power stand. Before doing this, they must use a load device, such as a "Plate Soak" or a "Hot Plate" to give a line-level output suitable for the input stage of the T4S/T8S.
Use the "line output" of a guitar amplifier: Some amplifiers have this option, and it may be suitable for some guitarists. The only suggestion here is to turn the volume of the amplifier down so only the ToneMatch setting is heard.
Refer to the Bose website and Portable PA Community at www.Bose.com/musicians for more information on interfacing instruments with the ToneMatch mixers.
Can I purchase the T4S/T8S and use it with other Bose systems?
Yes. The T4S/T8S is available for purchase separately or may be used with an L1 Model 1S/II system, S1 Pro or F1 System. When the T4S/T8S is fused with one of the products, the ToneMatch settings are optimized for the loudspeaker. The T4S/T8S can be connected analog any number of amplifiers or loudspeakers. A power supply is required to run the mixer which is available through Bose or authorized dealers of Bose products.
What is the 45-day Better Music Guarantee?
At Bose, we recognize that customers may want to experience Bose portable PA components in their own environment with their specific gear. That is why we offer the ability for you to purchase and use the system in your specific application for up to 45 days. If for any reason you are not satisfied, you may return it for a refund. This offer is exclusive to Bose direct sales channels.
Where can you hear and try the T4S/T8S ToneMatch mixer?
40"39"Order it and try it for 45 days, directly from Bose Corporation. We encourage customers to experience the T4S/T8S mixers in their own environment with their specific gear. That is why we offer the ability for you to purchase and use the system in your specific application for up to 45 days, and if for any reason you are not satisfied, you may return it for a refund. This offer is exclusive to Bose direct sales channels. Optionally, you can easily try out the product at participating MI retailers.
What is included with the purchase of the T4S/T8S ToneMatch mixers?
The T4S comes with a magnetic protective cover. The T4S comes also with a ToneMatch cable. T8S comes with both the magnetic protective cover and a universal power supply.
What are the available accessories for the T4S/T8S?
ToneMatch power supply
Comes standard with the T8S mixer, optional for the T4S mixer when used without a L1® Model 1S or L1 Model II system.
Carrying Case
A hard-shell briefcase with handle and available storage for cables for the T4S/T8S mixers.
Source: Bose Pro T4S/T8S FAQ