S1 Pro system
Contents
- 1 Documentation
- 2 Downloads
- 3 Related Products
- 4 Input/Output Panel
- 5 ToneMatch® Presets
- 6 Reverb
- 7 Power Switch
- 8 S1 Pro LEDs
- 9 Battery
- 10 Pole Cup Switch
- 11 Channel 3 Volume Control
- 12 Noisy Volume Controls
- 13 Orientations and Dispersion
- 14 Auto EQ
- 15 Line Out
- 16 Connecting a Mixer to an S1 Pro system
- 17 Bluetooth
- 18 S1 Pro System Bass Distortion with Bluetooth through Channel 3
- 19 S1 Pro with Sub1 or Sub2
- 20 S1 Pro with F1 Subwoofer
- 21 Rotating the Logo
- 22 Limiter
- 23 S1 Pro System Reset
- 24 FAQs

Introduced January 23, 2018 - replaced by S1 Pro+ 2023
Discuss it here: Bose Portable L1 Group
Documentation
Downloads
S1 Pro System Firmware updates & Bose Connect App
Product Images
Mechanical Files
Sales Tools
Firmware
See: S1 Pro System Updates Version 7.0.10 June 2018
Related Products
Bose S1 Pro Compared to Bose L1® Compact
S1 Pro Introduction
Unboxing and Setup
Input/Output Panel
Overview

Gain Staging
- Using a Bose device as the source
When connecting a ToneMatch Mixer[1] or an S1 Pro System Line Out to an S1 Pro System channel 1 or channel 2
Set the volume control to 10:00 o'clock with 1/4 inch (6.3 mm) Tip-Ring-Sleeve
- The signal strength from a ToneMatch Mixer[1] or an S1 Pro System Line Out is sufficient to achieve the maximum usable volume from the S1 Pro System
- Control the overall volume from the ToneMatch Mixer[1] or the first S1 Pro System. If you use an XLR cable, set the volume control to 9:00 o'clock

- Using a third-party source (not a Bose device as the source)
For each channel you are using on the S1 Pro System
- Turn the channel volume off
- Connect your sound source
- Adjust the volume of the source device output to the reference or nominal output level.
- On analog consoles this may be marked as unity or 0 dB.
- On digital consoles this may be marked as -18 dBFS[2][3]. The exact value (-18 dBFS to -20 dBFS) may vary depending your location[4].
- Refer to the manual for the source device for details.
- If the source device does not have metering or indicators, set the output as high as you can without hearing distortion or seeing red indicator lights.
- While playing/singing as loud as you will during your performance, bring up the channel volume until you see solid green on the channel indicator light. Occasional flickers of red are okay. If you see solid red or you hear distortion, turn down the volume.
Input Gain

- Channels 1 and 2
- XLR: -infinity to + 49 dB
- 1/4 inch (6.3 mm) Balanced input (Tip-Ring-Sleeve): -infinity + 42 dB
- 1/4 inch (6.3 mm) Unbalanced input (Tip-Sleeve): -infinity + 36 dB
- Aux
- 1/8 inch (3.1 mm) Sterero (Tip-Ring-Sleeve): -infinity to + 17 dB
- Recommended Connections
- XLR:
- Microphones
- Microphone-level signals
- 1/4 inch (6.3 mm) Balanced input (Tip-Ring-Sleeve): Balanced line-level signals
- T4S/T8S ToneMatch® Mixers or T1 ToneMatch Audio Engine
- Third-party mixer line-level output
- Another S1 Pro Line Output when daisy chaining S1 Pro systems
- 1/4 inch (6.3 mm) Unbalanced input (Tip-Sleeve): Instruments
- Guitars
- Keyboards
- Guitar processors
Related: Balanced vs Unbalanced
Further Reading
Tone Controls
Channels 1 and 2
- Bass +/-8 dB @ 100 Hz (60 Hz – 900 Hz)
- Treble +/-10 dB @ 10 kHz (1.5 kHz – 17.4 kHz)
Aux Input
When you insert a 1/8" (3.5 mm) jack in the Aux input, this disables streaming Bluetooth.

Microphone vs Guitar Volume
See S1 Pro Microphone vs Guitar Volume
ToneMatch® Presets
On Channels 1 and 2 you can select a ToneMatch® Preset.

These are the equivalent Presets on the ToneMatch® mixers (T1, T4S, T8S)
Off
- Category: Utility
- Preset: Flat
L1 Compact equivalent: Channel 2, Line Level (switch position down)
Guitar
- Category: Acoustic Guitars
- Preset: Steel String w/piezo
L1 Compact equivalent: Channel 2, Guitar (switch position up)
Microphone
- Category: Vocal Mics
- Preset: Handheld Mics
L1 Compact equivalent: Channel 1
- The Microphone Preset includes a sharp low-cut filter, keeping only that part of the audio spectrum where the microphone is useful. Using the microphone with this preset minimizes bass regeneration. The microphone preset was developed for close microphone use (“eat the mic”), which is the best way to optimize your vocal signal for tone and gain before feedback[5].
- About the presets: No mic that I know of sounds good for close vocal, even for recording for that matter. All our presets compensate for this. A lot of these mics sound a lot more natural when you back off a foot or so from them. Of course, this is true in the studio too. No one does this for a live performance (backs very far off the mic) since you want to maximize gain before feedback by eating the mic. And so then you get funny sound and so then you need our presets to make it natural. [6]
Reverb
The reverb in the S1 Pro system was engineered to be a useful general-purpose tool for a solo performer in venues suitable for up to 50 people. The Reverb control on the S1 Pro system is roughly analogous to the Mix parameter on the T1 ToneMatch Audio Engine and T4S/T8S ToneMatch® Mixers.
There is no direct mapping of the S1 Pro system Reverb to the T1 ToneMatch Audio Engine or T4S/T8S ToneMatch® Mixers.
You can get roughly similar results
- Type Medium
- Time 4.00 msec
- Balance 100%
- Mix, Bright - set by ear
- Type Medium
- Time 100%
- Balance 100%
- Mix, Bright - set by ear
OR
- Type Large
- Time 70%
- Balance 70%
- Mix, Bright - set by ear
Power Switch

- In Use
- Set the power switch to the top position (on).
- Standby
- When you are not using the S1 Pro System you can leave the power switch in the standby position (middle) or the quick-charge position (bottom).
If the S1 Pro System is not connected to AC power, it won't matter if you choose the middle or bottom position.
- In Transit
- You can put the S1 Pro System power switch in the bottom position (quick charge) position when transporting the unit. This may reduce the likelihood the switch will get bumped to the on position.
- Charging
- When you are charging the S1 Pro System you can put the power switch in the standby position (middle) or the quick-charge position (bottom).
More detail.

S1 Pro LEDs
S1 Pro LEDs
- Summary
- There are two power-related LEDs: Power on the front of the system and Battery Status on the back of the system next to the power switch.
- There are three LEDs for signal input.
- There is one LED for Bluetooth.
S1 LED status

Power LED
| Off | System is off |
| Blue | System is on |
| Blue (flashing) | System is in low power sleep mode Happens after dormant for an hour Resumes automatically when an audio signal is present |
| Red | System fault |
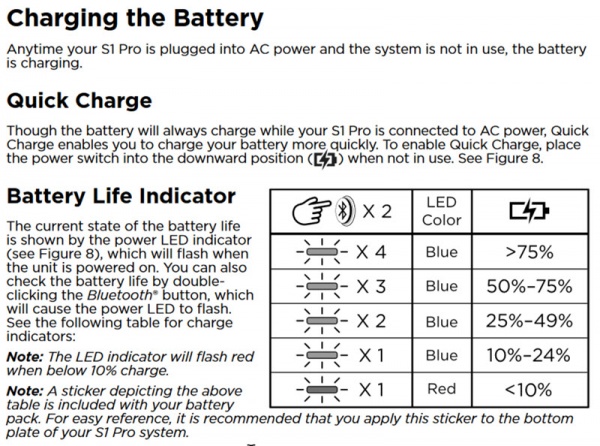
Power/Battery LED

If using the battery the LED next to the system power switch shows the battery's charge state by flashing when powered on. To check the charge at any time, double-press the
Bluetooth button in the Input 3 section.
| Blue - 4 flashes | 75 - 100% charge |
| Blue - 3 flashes | 50 - 74% charge |
| Blue - 2 flashes | 25 - 49% charge |
| Blue - 1 flash - may appear to be flashing | 10 - 24% charge |
| Red - 1 flash | Less than 10% charge |
Signal LED
There are 3 signal LEDs: one above the volume knob for Inputs 1, 2 and 3.
| Off | No or low level signal present |
| Green | Signal present |
| Red | Signal clipping |
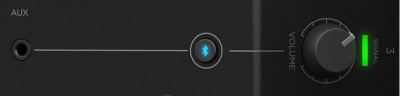
Bluetooth LED
The Bluetooth LED is located on the Bluetooth button under Input 3 on the connection / control panel.
| Off | Bluetooth is off |
| White (flashing) | Pairing mode / connecting |
| White (solid) | Connected to Bluetooth device |
Battery
S1 Pro Battery
Documentation
Run Time
Up to 11 hours of play .
The full output of the S1 Pro system is available even when running on the internal battery. This is unlike some systems that throttle performance to extend the battery life.
Your run time will vary based on:
- Volume and to a lesser extent the tone controls
- Higher volume and turning up the tone controls draws more energy than lower settings.
- Program material
- Prerecorded music is usually compressed. This may draw more power than live music at the same perceived volume because live music has more dynamics (lower draw in quiet moments).
Charging Times

Estimates:
- 6.0 hours Trickle charge (system idle, connected to AC Power), switch in Standby or Play position
- 2.5 hours Fast charge (connected to AC Power), switch in Fast Charge (down) position
Checking the Battery Level
To check the battery, turn on the S1 Pro (switch in the top position). Wait until the power light is steady blue. Double tap the Bluetooth button (tap tap in under a second). Count how many times the power light blinks before returning to steady blue.
- NOTE If you are running your S1 Pro System and battery LED turns solid red - the battery is nearly out of power. Connect to AC power to keep the show going.
Battery Specifications
Battery Life
The S1 Pro uses a lithium-ion battery. Individual battery performance will vary due to battery age, storage conditions, and the number of charge cycles.
Bose does not guarantee how long a lithium-ion battery will retain its charge. However, we expect a fully charged battery in a new S1 Pro system will last 30 days with the power switch in the “Standby” (⏻) position if the system is using Firmware 7.1.5[7] or later.
After 30 days of non-use, the battery will enter Sleep Mode. Bose recommends that you wake up[8] the battery and fully charge it at least once a year. If you leave it in Sleep Mode for longer than a year, the battery may completely discharge and become unusable.
Additional reading Battery Life.
Temperature Considerations
Please note the following information from the S1 Pro Battery Pack Owner’s Guide:
- Charging temperature range: 0°C - 42°C (32°F - 108°F)
- Discharging temperature range: -20°C - 45°C (-4°F - 113°F)
You can operate the S1 Pro on the battery pack down to -20°C (-4°F), The running time may be reduced but not significantly.
- NOTE
- The battery does not charge temperatures below 0°C (32°F).
The battery will stop charging when the temperature is below 0°C - 42°C (32°F - 108°F) but the charging light may continue to flash.
The battery will stop functioning below -20°C - 45°C (-4°F - 113°F)
If you have questions on this point please see Battery Life in the Cold
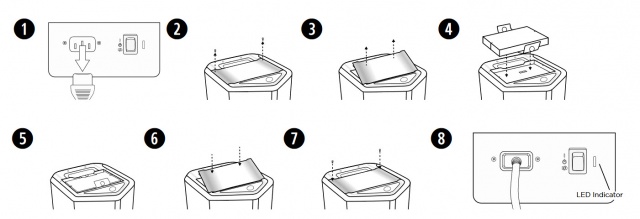
Installation and Removal

The screw heads are Phillips.


Note: The screws remain attached to the battery cover. You can't misplace or lose them because they don't separate from the battery cover.
Sleep Mode
Here is an excerpt from the S1 Pro Battery Owners Guide

Sleep mode is to protect the battery.
Sleep mode is the lowest current draw of the integrated circuits (ICs) in the battery pack. If the ICs were left unchecked, eventually they would drain the cells below their safety threshold. When the cells are allowed to discharge below a certain level, they become susceptible to dendritic growths within the cells. This can lead to catastrophic failures of the cells. The battery fails and is non-recoverable.
We use the sleep mode (or shipping mode) to extend the timeline long enough to greatly reduce the occurrence of failed battery packs.
If you have lithium-ion battery powered tools, you have probably experienced this. You put the tool away at the end of the season. Next year, you take them out again to use them only to find the battery no longer works and you have to replace it (you prevent this by storing them in the charger instead of leaving it in the tool). The use-profile for the S1 Pro System is that it will be used in the warmer months, and with a very high likelihood, it will be put away in the colder months. This is why we put it back into sleep mode when not in use for more than 30 days.
Flying with the Lithium Ion Battery
Here's some information about Flying with Lithium Ion batteries from the FAA
https://www.faa.gov/about/init.../more_info/?hazmat=7
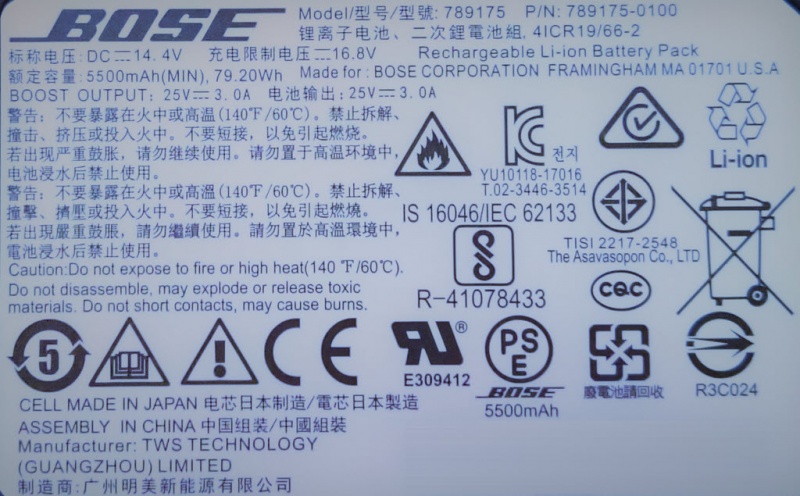
- Size limits: Lithium metal (non-rechargeable) batteries are limited to 2 grams of lithium per battery. Lithium ion (rechargeable) batteries are limited to a rating of 100 watt hours (Wh) per battery. These limits allow for nearly all types of lithium batteries used by the average person in their electronic devices. With airline approval, passengers may also carry up to two spare larger lithium ion batteries (101-160 watt hours). This size covers the larger after-market extended-life laptop computer batteries and some larger batteries used in professional audio/visual equipment.
The battery in the S1 Pro is rated at 79.20 Wh. That's not in the documentation, but it is on the label on the battery.
Pole Cup Switch
S1 Pro Pole Cup Switch
The S1 Pro uses an accelerometer to determine if it is in the tilt-back, horizontal or vertical position. It also has a switch inside the pole cup to determine if it is mounted on a speaker stand. Based on the orientation and the switch, the S1 Pro automatically applies the correct EQ. If you depress the switch the speaker stand EQ is applied regardless of the orientation of the S1 Pro.Here's a picture of the switch inside the pole cup.

Warning - Do NOT use Speaker Stands Like This

Bose recommends using speaker stands that have solid, smooth surfaces. Do not use stands like the one shown below. It will damage the switch in the pole cup.
Warning - Do NOT use speaker pole adapters
Bose recommends that you do NOT use speaker stand adapters like the Hercules SS100B. You could damage switch in the pole cup.

Channel 3 Volume Control
S1 Pro Channel 3 Volume
The S1 Pro System channel 3 volume control behaves differently than the volume controls on channels 1 and 2.Slow to Respond
If you find the volume control seems slow to respond (especially between 7-11 o'clock) please turn up the volume at the source (Bluetooth or physical connection).
For Bluetooth connections, if you set the volume on the source device to maximum, this will give you the greatest usable range on the S1 Pro Aux Channel volume control.
Steps in Volume
The S1 Pro has a digital gain knob on channel 3 which is divided into incremental steps. When you slowly turn the volume knob up with a strong input signal present, you may hear steps in loudness.
We are aware of this behavior and it is not a symptom of a fault or malfunction.
Volume Cut Off
This affects the sound connected to the Aux input and Bluetooth streaming.

The sound stops at about 8:00 o'clock although it appears that should happen at 7:00 o'clock on the dial. The transition to silence
- will be smoother when the source signal is low
- will be more abrupt when the source signal is high
This is normal for this control.
The control is digital (functioning in steps). With a low signal source, the change you hear for each step will be small. With a high signal source, the change you hear for each step will be larger.
Noisy Volume Controls
On S1 Pro system channels 1 and 2: When you rotate the volume controls back and forth within 10 seconds of turning on the unit, you may hear a scratchy sound.
This is not a symptom of a hardware issue with the volume controls that warrants concern.
The noise is related to a start-up process within the unit, not the volume controls. The noise you hear is not the result of a physical problem with the volume controls.
When you turn on the unit and rapidly turn one of the volume controls back and forth you may hear a noise. This can happen on either channel, 1 or 2.
After several seconds, the sound stops. At this point, the volume controls on both channels 1 and 2 should work as expected, quietly.
If you cycle the power off and back on, you can get the same result on the other channel, 1 or 2.
If you turn on the unit and let it sit for 20 seconds, the volume controls are quiet. That doesn't mean you have to wait for 20 seconds before you can use the unit. You just have to wait for 20 seconds if you don't want to hear the noise when you rotate the volume controls quickly.
Related discussion in the Bose Portable PA Community
Orientations and Dispersion
- Dispersion
In the speaker stand, tabletop, and tilt-back orientations
- Horizontal 120 degrees
- Vertical 50 degress
In the Horizontal (monitor) orientation
- Horizontal 50 degrees
- Vertical 120 Degrees
Auto EQ
S1 Pro Auto EQ
If you take a loudspeaker and put it on a speaker stand, then a table top, and then on the floor, the sound will change*. When the speaker is on a table top or the floor, it is interacting with the boundaries (table top, floor, walls and ceiling too). This means, if you want great sound in all situations you have to EQ the loudspeaker.Bose tuned the S1 Pro to sound great in all four positions (speaker stand, table top, floor (both tilt-back and horizontal)) taking into account the boundaries. And the engineers carefully considered how you would be using the S1 Pro . That's why there are two settings for the floor (tilt-back and monitor).
I encourage you not to second-guess the automatic EQ. To use them in ways other than Bose intended you'd have to put the loudspeaker in a free field (a room without reflections).
But if you could put the S1 Pro in a free field here's what might hear.
⇒ Using the speaker stand position as a reference (basically, flat):
⇒ Table top: a little less bass than speaker stand

⇒ Tilt-back: a little less bass than Table top.

⇒ Horizontal: about the same as Tilt-back except there's some EQ treatment to support use as a monitor.

Line Out
Overview and Specifications
- The S1 Pro System Line Out is
- ¼ inch (6.3 mm) Tip-Ring-Sleeve jack: Nominal +2.4 dBu, Max +20 dBu
- Output Impedance: 9.4 kilo-ohm kΩ
- The Line Out is not affected by the Auto EQ. It's the combined output of all three channels (with volume controls, ToneMatch Presets, tone controls, and reverb) and is same whether the unit is in tilt-back, monitor, tabletop or on a speaker stand.
- Notes
- Using a Tip-Sleeve unbalanced cable will result in a drop in the audio level of -6dBu.
- There is no limiter on this output so you may get more than the rated maximum, but it could sound distorted.
S1 Pro Daisy Chain (one to another)
S1 Pro Daisy Chain Settings
This is an overview of how to connect one S1 Pro System to another.- On the first S1 Pro turn off the volumes of all channels
- Run the LINE OUT to the second S1 Pro system using a balanced cable (1/4 inch (6.3 mm) Tip-Ring-Sleeve cable
- On the second S1 Pro set the volume to 10:00 o'clock. This should give you the same volume on the second unit as the first
- On the first S1 Pro bring up the volume to the appropriate level on the channels you are using

There is no reason to turn the second S1 Pro system above 10:00 o'clock because it will be louder than the first system and the signal will clip and distort before the first system does.
On the second S1 Pro System, for each channel you are connecting to the first S1 Pro System use these settings while you are setting up.

- Reverb OFF
- Bass at 12:00 o'clock
- Treble at 12:00 o'clock
- ToneMatch switch OFF
You can adjust the Reverb, Bass, and Treble after you get your basic sound working.
- S1 Pro+
You can also connect to the Channel 3 Aux input. For best results, use a 1/4 inch (6.3 mm) Tip-Ring-Sleeve cable.

Gain Staging
- Using a Bose device as the source
When connecting a ToneMatch Mixer[1] or an S1 Pro System Line Out to an S1 Pro System channel 1 or channel 2
Set the volume control to 10:00 o'clock with 1/4 inch (6.3 mm) Tip-Ring-Sleeve
- The signal strength from a ToneMatch Mixer[1] or an S1 Pro System Line Out is sufficient to achieve the maximum usable volume from the S1 Pro System
- Control the overall volume from the ToneMatch Mixer[1] or the first S1 Pro System. If you use an XLR cable, set the volume control to 9:00 o'clock
- Using a third-party source (not a Bose device as the source)
For each channel you are using on the S1 Pro System
- Turn the channel volume off
- Connect your sound source
- Adjust the volume of the source device output to the reference or nominal output level.
- On analog consoles this may be marked as unity or 0 dB.
- On digital consoles this may be marked as -18 dBFS[9][10]. The exact value (-18 dBFS to -20 dBFS) may vary depending your location[11].
- Refer to the manual for the source device for details.
- If the source device does not have metering or indicators, set the output as high as you can without hearing distortion or seeing red indicator lights.
- While playing/singing as loud as you will during your performance, bring up the channel volume until you see solid green on the channel indicator light. Occasional flickers of red are okay. If you see solid red or you hear distortion, turn down the volume.
Combo Inputs
- S1 Pro Channels 1 and 2 have combo inputs that accept
- XLR (balanced mono)
- Microphone or Line-Level inputs
- 1/4 inch (6.3 mm) Tip-Ring-Sleeve connection (balanced mono)
- Line-Level inputs
- 1/4 inch (6.3 mm) Tip-Sleeve connection (unbalanced mono)
- Line-Level inputs and instruments (e.g. guitars, keyboards, guitar processors, loopers)
- When using a third-party device (e.g., mixer or another line-level source) should I use the XLR or 1/4 inch inputs?
- The S1 Pro 1/4 inch Tip-Ring-Sleeve inputs are best suited for line-level balanced inputs. This is a better match for the signal level.
- The S1 Pro XLR inputs are best suited for microphones.
When the S1 Pro Channel input lights hit red or you hear distortion, the signal is clipping and you've reached the maximum usable volume. From the source, if the XLR outputs are line-level and the 1/4 inch Tip-Ring-Sleeve outputs are line-level, it won't matter which type of cable you use. They'll both get the job done, although the volume control setting will be lower with the XLR connection. That doesn't indicate more headroom. The maximum usable volume is the same either way.
Alternate Connection
You can use an XLR cable (mic cable) from a Line Level Source (e.g., L1 Pro, S1 Pro+) to second S1 Pro System channels 1 or 2 (XLR inputs), but the signal may clip, overload, or be too high to control the volume. To attenuate (reduce) the signal, use a -20 dB or -30 dB Pad
XLR Cable

![]()
Click image for more information about Pads
Connecting a Mixer to an S1 Pro system
Article from Bose Connecting an S1 Pro to a mixer
Connecting the S1 Pro System to a Third Party Device
S1 Pro to a Third Party Device
Bluetooth
Version
The S1 Pro system supports Bluetooth version 4.2
Bluetooth Light
- Fast blink - attempting to re-connect with previously paired devices
- Slow blink - in pairing mode
- Solid - connected
- No active connection (must put in pairing mode to create a connection)
- No devices in the S1 Pro system device list
Bluetooth Pairing
- Turn on the Bluetooth feature on your mobile device.
Note: The Bluetooth feature is usually found in the Settings menu. - Press and hold the Bluetooth Pair button for two seconds.
Note: When ready to pair, the Bluetooth button will flash white. - Select your Bose® SI Pro system from the device list.
Note: When the device pairs successfully, the Bluetooth button will turn solid white.
Note: If your paired phone receives a call, any music playing will be paused and the ring will come through the phone: no calls or notifications will come through the SI Pro.
Once you have paired the S1 Pro system to a Bluetooth device, the S1 Pro system will automatically connect to that device when you turn on the S1 Pro system if it is powered on and within range. If you want to terminate that connection, terminate the connection on the Bluetooth device.
Clear the Bluetooth Pairing List
- Press and hold the Bluetooth button. until it goes dark (about 7-10 seconds).
- On your Bluetooth device, remove the Bose S1 Pro from the device list.
You are now ready to pair the S1 Pro to a Bluetooth device.
Turn off Bluetooth
You cannot turn off Bluetooth however if you clear the Bluetooth device list, you won't be able to connect to the S1 Pro system until you create a new paired connection.
- If you press and hold the Bluetooth button until it goes dark (7-10 seconds), this clears the Bluetooth device list on the {{S1 Pro)}. You will not be able to connect to the S1 Pro system unless you put it into pairing mode (press and hold the Bluetooth button until it blinks (approximately 3 seconds) or put the S1 Pro system in Standby mode (power switch middle position) or Fast Charge (power switch in lower position) and then turn the S1 Pro system on again.
When you turn on the power on the S1 Pro, it will attempt to connect to a paired device via Bluetooth. If there are no paired device, it will go into pairing mode.
If the S1 Pro cannot connect to a paired device, the Bluetooth light will blink for about two minutes while it is attempting to connect. If it doesn't make a connection, the Bluetooth light will turn off (time out). At that point, the Bluetooth is off until the next time you turn the power off/on.
Disconnect a Bluetooth connection
If you have Bluetooth connection active and you want to disconnect it. If you manually disconnect, the S1 Pro system will time out after about 2 minutes, and Bluetooth will remain off until the next time you power off/on.
- IOS
Starting with iOS 9, Apple has added a new option for Bluetooth devices:
- Open Settings, select Bluetooth
- Tap the "i" circle button to the right of the accessory.
- From there, you can see the new "Disconnect" option, alongside the legacy "Forget This Device" choice.
- Android
Disconnect or Unpair from a Bluetooth Device
- From home, tap Apps > Settings > Connections tab > Bluetooth.
- Tap the ON/OFF slider to turn Bluetooth on.
- Tap the connected device, and then tap OK to disconnect.
Reconnect a Bluetooth Connection after a time out
If the S1 Pro system Bluetooth light is off (because it has timed out), if you press it briefly, it will blink.
With the Bluetooth light blinking, I've been able to initiate a Bluetooth connection from a previously paired device. This worked with:
- An IOS 11.4 device
- An Android 7.0 device
- A Windows 10 device
Bass Content in Bluetooth
- How can I reduce the bass in Bluetooth music
- The S1 Pro System reproduces the audio received over Bluetooth. To change the EQ use an app in the Bluetooth source device.
See IOS Equalizer
See Bass over excursion... Community discussion
- Will Bose issue a firmware update to change the bass response in Bluetooth content?
- We tested the S1 Pro system with a wide range of applications including live music, music playback with various styles of music, public speaking, and more. We tuned the bass response for the best overall performance for the widest number of people. We continue to listen to customer comments here and through all channels. We know that most of our customers are extremely happy with the sound of the S1 Pro system.
- We have explored ways to change the response in the low frequencies. We found making the S1 Pro system more tolerant of heavy bass diminishes the overall performance in other ways. We don't have plans to change the sound profile of the S1 Pro system through a firmware update. Source
S1 Pro System Bass Distortion with Bluetooth through Channel 3
- There have been some discussions in the Bose Portable PA Community about bass distortion with Bluetooth sources through Channel 3. Will Bose issue a firmware update to fix this?
- If you hear bass distortion you're hitting the maximum volume (bass) the S1 Pro system can handle. We tested the S1 Pro system with a wide range of applications including live music, music playback with various styles of music, public speaking, and more. We tuned the bass response for the best overall performance for the widest number of people. We continue to listen to customer comments here and through all channels. We know that most of our customers are extremely happy with the sound of the S1 Pro system.
If you need more overall volume for music playback you need a bigger enclosure. The L1 Compact and the larger L1 systems may be a better choice.
Source: S1 Pro Channel 3 has too much bass. Related discussion S1 Pro channel 3 bass over excursion
Consider using an app to control the sound at the source. For example Using the Spotify Equalizer with your S1 Pro system
We have explored ways to change the response in the low frequencies. We found making the S1 Pro system more tolerant of heavy bass diminishes the overall performance in other ways. We don't have plans to change the sound profile of the S1 Pro system through a firmware update.
S1 Pro with Sub1 or Sub2

Preferred Method
Connections with Sub1 or Sub2 and the S1 Pro system
For best results, the signal flow should go from
- The signal source (e.g., ToneMatch Mixer[1], mixer, DJ console) output to
- The Sub1 or Sub2 subwoofer LINE IN 1 ()
- The Sub1 or Sub2 subwoofer LINE OUT 1 to
- The S1 Pro system with channel volume set to 10 o'clock.

- Note these settings on the Sub1 or Sub2
- 👉 Set LINE IN EQ to L1
- 👉 Set LINE OUT EQ to S1 (Press and hold LINE OUT EQ button for 4 seconds)
Set up this way,
- The Sub1 or Sub2 handles frequencies from 40 Hz (Sub1) 37 Hz (Sub2) to 150 Hz
- The S1 Pro system handles frequencies above 150 Hz
- Mono - Example with a T4S as the audio source
- Start with the Volume on S1 Pro and Sub, as shown. Adjust as necessary from there.

The picture shows a stereo setup. The signal flow is from left to right.


- Recommended cable
Use an XLR to 1/4 inch (6.35 mm) Tip-Ring-Sleeve cable for best results.

If you use an XLR to XLR cable, the signal may be too hot for the S1 Pro system.
Alternative Connection
- Can I connect the S1 Pro Line Out to the Sub?
The method described above is preferred, but you can use the S1 Pro system as the sound source (e.g., microphone and guitar and backing tracks via Bluetooth) Note the following:
- The S1 Pro system will sound the same as without the subwoofer (62 Hz - 17 kHz)
- The Sub1 or Sub2 will cover from 40 Hz (Sub1) 37 Hz (Sub2) to 150 Hz
- You will be able to push S1 Pro system harder (louder) if you route the signal as described at the top of this article
S1 Pro with F1 Subwoofer
- Can I use one or two S1 Pro Systems with an F1 Subwoofer?
- Yes. Please see this discussion in the Bose Portable PA Community S1 Pros with F1 Subwoofer
Rotating the Logo
Rotate the logo counter-clockwise NOT clockwise. Don't force it. You will break the mechanism.
Limiter
- Does the S1 Pro System have limiters or internal protection?
- Yes, the S1 Pro System has two separate limiters. One for the speaker array. One for the Woofer.
Note: If you hear distortion or the channel lights are red, turn down the volume.
S1 Pro System Reset
- Turn off the S1 Pro System
- Disconnect everything (audio, USB connections, Power)
- Remove the battery [12]
- Wait 30 seconds
- Reinstall the battery[12]
- Reconnect (audio, USB, Power)
- Turn on the power
FAQs
S1 Pro FAQ
S1 Pro system FAQ
What makes the Bose S1 Pro multi-position PA system different from other PA systems?
The S1 Pro is the ultimate all-in-one PA, floor monitor, practice amplifier and primary music system. Multiple positions, supported by Auto EQ, ensure that you always sound your best. And with a 3-channel mixer, reverb, Bluetooth® streaming and ToneMatch processing onboard, the S1 Pro is ready to be your go-anywhere PA.
How do I set the system up?
1.) Choose your system orientation based on the application.
2.) Plug in the AC power cord or use optional battery
3.) Connect audio source. If using a guitar or microphone, set the ToneMatch switch to the appropriate setting.
4.) Turn the power on and turn up the volume controls.
What is the optimal placement when using the S1 Pro?
The versatile S1 Pro system operates in four unique modes and can be set up differently based on the application.
Elevated Surface
Position the S1 Pro on a surface. This projects sound clearly and evenly throughout the audience, and ensures that audience members enjoy the full frequency range of the system.
Tilt-Back
For performances where your audience is close to you, tilt the S1 Pro onto its back edge. For best results, the performer should stand or sit to one side of the loudspeaker to avoid blocking sound from the audience.
Monitor Mode
To use the S1 Pro as a personal floor monitor, place it on the ground horizontally, in front of and pointing toward the performer. Tilt the loudspeaker onto its side edge. Rotate the Bose logo counterclockwise to match your chosen mode.
Speaker Stand
Place one or two S1 Pro systems on speaker stands (sold separately) for general-purpose sound reinforcement.
What function does Auto EQ perform?
Auto EQ provides optimal performance by sensing the orientation of the S1 Pro multi-position PA system using internal sensors. Once placed into a new position, the system applies the optimal equalization curve to maximize the quality of sound.
Given its smaller size does the S1 Pro system project sound as far as the L1 Compact system?
The S1 Pro multi-position PA system produces horizontal coverage that is comparable to that of L1 systems. Longer line arrays, such as those found in these systems, can project sound further with less drop-off of sound levels than the smaller array found in the S1 Pro.
Is the S1 Pro multi-position PA system designed for Mobile DJ’s?
Yes. The enhanced portability, easy set-up and professional sound quality of the S1 Pro system makes it suitable for a variety of applications as a smaller PA system: DJs, community and athletic events, business presentations, or wherever high-performance and easy-to-use sound amplification is needed.
The S1 Pro features best-in-class Bluetooth® streaming with one-button pairing. A 3.5 mm input for connecting a DJ mixer, laptop, CD player, or portable audio device allows for wired operation. When making announcements, simply plug a dynamic handheld microphone into one of the microphone/instrument channels.
Two S1 Pro systems are recommended for DJ applications to help reproduce stereo sound. Additionally, a single S1 Pro system can be conveniently used as a satellite system for larger DJ events.
What are the benefits of the integrated ToneMatch processing?
Whether you’re using an acoustic guitar or a handheld dynamic microphone, ToneMatch allows you to match the sound of the source by maximizing the sonic properties through equalization.
How many channels does the S1 Pro system have?
Three. The S1 Pro system has two full-featured channels designed for live speech or musical performance and one channel dedicated to prerecorded material using Bluetooth® streaming or 1/8” (3.5 mm) source.
Does the S1 Pro multi-position PA system have an analog audio output for expansion?
Yes. The S1 Pro multi-position PA system has a balanced line output to send the master mix out to another S1 Pro or to an audio console.
Are the S1 Pro systems compatible with T4S/T8S ToneMatch mixers?
Yes. However, please note that the optional ToneMatch power supply is required for operation. For musical performances that require access to our most advanced tone shaping library, a full suite of studio quality effects, dynamics processing, and expanded inputs and outputs, ToneMatch mixers are the recommended choice.
To use the T4S/T8S ToneMatch mixer with the S1 Pro multi-position PA system, connect a master output of the ToneMatch mixer to input 1 or 2 on the S1 Pro system. Adjust the master level of the ToneMatch mixer to at least 50% and adjust the S1 Pro input volume knob to the desired level.
How can I take advantage of instruments or devices that deliver stereo output?
A single S1 Pro multi-position PA system can combine the two channels and fill the venue with one speaker. For instruments or recorded material where stereo reproduction is essential, two S1 Pro systems can be used to deliver stereo sound.
How are you able to obtain such a high level of performance from a smaller system?
Great care was taken in the design process to ensure that all the speakers and electronics perform as one integrated system. This allows the S1 Pro multi-position PA system to be extremely efficient and maximize its acoustical output while maintaining its small profile.
Is the S1 Pro water resistant?
The S1 Pro is not water resistant. It does however ship with a slip cover for normal transport.
Can I connect an external subwoofer, such as the Bose B1 bass module, to the S1 Pro multi-position PA system?
No, the system does not support adding bass modules. However, the S1 Pro does provide a reasonable amount of bass from its integrated high-excursion woofer.
Where should the S1 Pro multi-position PA system be positioned on stage?
System placement requirements for the S1 Pro multi-position PA system are flexible. For optimal sound for both the audience and performer, position the system directly behind – or behind and slightly off to one side of – the performer.
Does the S1 Pro have a universal power supply, so it can be used with any wall outlet?
Yes. The S1 Pro has a universal power supply that allows it to operate in regions ranging from 100V – 240V. The proper power cord for the specific region in which the system was purchased is included in the product carton.
What is the warranty period on the S1 Pro multi-position PA system?
The S1 Pro multi-position PA system has a two-year limited warranty.
Can the S1 Pro multi-position PA system be used together with an L1 system?
Yes. All systems can share the same stage. The L1 Compact and L1 Model II systems have longer line arrays than the S1 Pro and can project sound further with less drop-off of sound levels than the smaller array found on the S1 Pro.
Where can I learn more about the S1 Pro multi-position PA system or L1 portable line array systems and obtain tips on maximizing the benefits of my system?
Please visit the Bose Pro Portable PA Community
- ↑ 1.0 1.1 1.2 1.3 1.4 1.5 1.6 T4S ToneMatch mixer or T8S ToneMatch mixer or T1 ToneMatch Audio Engine
- ↑ dBFS
- ↑ dBU vs dBFS
- ↑ dBFS Analog Levels
- ↑ Original description of how the Microphone Presets work
- ↑ Cliff Henricksen talks about Microphone Presets
- ↑ Bose recommends that you update your firmware to the latest version for the best performance. See: S1 Pro Firmware Update for details.
- ↑ To wake up the battery from Sleep Mode, plug your S1 Pro into a power outlet and turn the power switch to the “On” (⏽) position. See: S1 Pro Battery Sleep Mode for details.
- ↑ dBFS
- ↑ dBU vs dBFS
- ↑ dBFS Analog Levels
- ↑ 12.0 12.1 Remove or Install the battery
The screw heads are Phillips.
 Note: The screws remain attached to the battery cover. You can't misplace or lose them because they don't separate from the battery cover.