Sub1/Sub2
Contents
- 1 Introduction
- 2 Documentation
- 3 Firmware Updates
- 4 Comparisons Sub1/Sub2 Subwoofers
- 5 RaceTrack Woofer
- 6 Cardioid Mode
- 7 Level Control
- 8 SubMatch Cable
- 9 SubMatch Connection Signal Flow
- 10 Sub2 with Sub1
- 11 S1 Pro system with Sub1/Sub2
- 12 Preferred Method
- 13 Alternative Connection
- 14 L1 Compact with Sub1/Sub2
- 15 L1 Model II with Sub1/Sub2
- 16 Cooling
- 17 Running Multiple Subwoofers
- 18 Comparing L1 Pro Power Stands to Subs
- 19 Questions about this article
Introduction
Introduced: October 2020
First available: January 2021
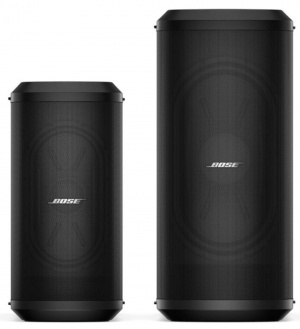
Use the Sub1 or Sub 2 bass modules with the Bose L1 Pro32
- Sub1 creates a compact system (down to 40 Hz)
- Sub2 plays lower and louder (down to 37 Hz)
- Extreme portability using RaceTrack woofers
Use the Sub1 or Sub 2 bass modules with other PA systems (e.g., Bose S1 Pro or third-party systems)
Documentation
Firmware Updates

Version 5.06
May 26, 2021
- Fixes an issue that allows users to disable Low Power Standby mode.
- Allows wider range of Standby button press lengths when powering on product.
- Implements timed audio output mute when powering on product.
- Updates to green/red signal/clip LED threshold.
Installation
- Use a USB C cable (click the picture to the right to see where it connects on the Sub)
- Go to http://btu.bose.com using a PC or Mac
- Follow the prompts on the screen
- Instructions
Comparisons Sub1/Sub2 Subwoofers


| Specification | B1 | B2 | L1 Pro8 Power Stand only | L1 Pro16 Power Stand only | Sub1 | Sub2 | F1 Subwoofer |
|---|---|---|---|---|---|---|---|
| dB SPL at 1 meter Continuous/Peak |
109 dB (estimated, not published) |
112 dB (estimated on total system SPL of L1 Model 1S with B2) |
112 dB (cont) 118 dB (peak) (values estimated on total system SPL) |
118 dB (cont) 121 dB (peak) (values estimated on total system SPL) |
118 dB (cont) 124 dB (peak) |
123 dB (cont) 129 dB (peak) |
124 dB (cont) 130 dB (peak) |
| Watts RMS Active/Passive |
125 Passive |
250 Passive |
240 Active |
1000 Active |
480 Active |
1000 Active |
1000 Active |
| Weight pounds | 28 | 45 | 30.9 | 41.4 | 34.1 | 51.7 | 55 |
| Drivers | Two 5.25" | Two 10" | One 7"x13" RaceTrack | One 10"x18" RaceTrack | One 7"x13" RaceTrack | One 10"x18" RaceTrack | Two 10" |
| Cardioid Mode | n/a | n/a | n/a | n/a | Yes | Yes | n/a |
| Compatibility with Bose Products | L1 Legacy | L1 Legacy | n/a not intended to be used separately |
n/a not intended to be used separately |
L1 Pro, L1 Legacy, S1 Pro, L1 Compact | L1 Pro, L1 Legacy, S1 Pro, L1 Compact | L1 Pro, L1 Legacy, S1 Pro, L1 Compact |
| Compatibility with non-Bose products | No passive, no low-pass filter |
No passive, no low-pass filter |
n/a not intended to be used separately |
n/a not intended to be used separately |
Yes active, switchable low-pass filter |
Yes active, switchable low-pass filter |
Yes active, switchable high-pass filter |
- This data is compiled from Bose Technical Data Sheets and discussions with the Bose L1 Product Managers for the unpublished data.
- Two Sub1s or Sub2
Two Sub1s have approximately the same membrane surface area as the Sub2, (180 square inches).
The power difference is negligible (960 watts RMS compared to 1000 watts RMS).
Two Sub1s tightly coupled (stacked or side-by-side) should provide up to +6 dB SPL[1] over a single Sub1 (118 + 6 = 124). The Sub 2 is 123 dB SPL. The SPL performance of two Sub1s should be similar to a single Sub2.
The Sub1 goes down to 40 Hz. The Sub2 goes down to 37 Hz (-3 dB). The difference is due to the larger physical volume of the Sub2 enclosure. Running two Sub1s does not change the frequency response.
- L1 Pro16
The SPL output of the L1 Pro16 is 118 db SPL (124 peak). The output is similar to the Sub1.
- Technical Data for standalone units
- L1 Pro8 Technical Data Sheet
- L1 Pro16 Technical Data Sheet
- L1 Pro32 Technical Data Sheet
- Sub1 Technical Data Sheet
- Sub2 Technical Data Sheet
RaceTrack Woofer

- Unique RaceTrack woofers integrated in the Bose Sub1 and Sub2 modular subwoofers deliver powerful bass, have an optimized center of gravity, and save a lot of space. This slim design means you get the full impact of a conventional subwoofer without the cumbersome size, freeing up room in your vehicle and on the stage, and making every carry in between — home to car, vehicle to venue — much easier. [2]
Although the comparisons are approximate and this assumes that other variables like input power are similar:
- The 7"x13" RaceTrack woofer in the Sub1 is comparable to 12" round driver.
- The 10"x18" RaceTrack woofer is comparable to a 15" round driver.
Note: Both the Sub1 and L1 Pro8 use a 7"x13" RaceTrack woofer. The L1 Pro8 is rated at 240 watts RMS to the subwoofer. The Sub1 is rated at 480 watts RMS.
Cardioid Mode

Cardioid Subs Explained
A cardioid sub configuration allows for a coverage pattern that is not unlike a cardioid microphone pickup pattern. This coverage pattern allows for most of the sound energy to be focused in front of the sub module stack while drastically reducing the sound energy that is propagated behind the subwoofer stack. This contrasts with a standard subwoofer configuration that will act in an omnidirectional coverage pattern where sound energy propagates equally in all directions for the sub module. The main benefit of the cardioid setup is that the low frequency sound energy from your performance will be focused on the audience and not back onto the stage. This is especially helpful when amplifying large resonant acoustic instruments like drums or an upright bass. This coverage pattern is achieved by changing the direction of the second sub module driver and time aligning it using a small delay to the front facing sub module driver. This will create destructive interference behind the sub stack and results in phase cancellation of the sound energy while creating constructive interference between the modules in front of the sub stack resulting in phase summation and increased sound energy.
To accomplish this, stack two matching sub modules on top of one another as shown here. Make sure that the module facing away from the audience is at the bottom of your stack. This configuration allows for a 10 dB SPL down point located directly behind the subwoofer stack. This configuration is possible with both the Sub1 and Sub2 modules when stacked with an identical module as seen to the left. This can be accomplished without any extra AC power runs thanks to the SubMatch cabling innovation that transmits both power and audio signal to the second subwoofer module.

Connecting and Setting Up
Connecting and setting up To configure cardioid subs, stack two identical modules as seen to the left, connect the top sub module to an L1 Pro32 via a SubMatch cable or an external source and A/C power. Next set the top sub to positive polarity and the bottom sub to cardioid mode by pressing and holding the polarity button until the CARDIOID LED is illuminated.
Make sure that the LEVEL settings are matched across the sub modules as mismatching them will skew the performance of cardioid mode. Once this setup has been completed a 10dB down point will be present directly behind the sub stack. This performance will be extremely beneficial if your performance includes any large resonant instruments such as an upright bass or a drum set.

Note: Bose does not claim Cardioid mode increases the Sound Pressure Level (SPL) in front of the subwoofers. The main benefit is that it reduces the SPL behind the subwoofers.
Bose Sub1/Sub2 Documentation
Cardioid mode is for use with a stack of two identical Sub modules, which allows for most of the sound energy to be focused in front of the Sub stack while reducing the sound energy that is generated behind the Sub stack.
Press and hold the button for four seconds to select CARDIOID. The LED will illuminate white while selected. Press and hold again to switch back to +.
Cardioid mode should only be used in a stacked configuration of two identical Sub modules, with the top Sub facing the coverage area and the bottom Sub facing the non-coverage area.
Set the Phase/ Pattern of the top Sub to + and the Phase/Pattern of the bottom Sub to CARDIOID.
When adjusting the level of the stacked subs in Cardioid mode, be sure that the Level Control is set to the same position on both Subs.
See the below diagrams for Sub stack orientation and coverage patterns.

Level Control

- Question
- Why have a LEVEL control on the Bose Sub1/Sub2? This can also apply to other subwoofers as well.
- Answer
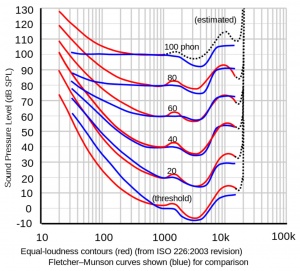
At lower volume, the Equal Loudness contour[3] shows that humans don't perceive bass as well as mid-highs. You can compensate for this by turning up the Sub1/Sub2 LEVEL Control.
Other times bass may seem excessive
- At higher volumes
- Due to boundary effects (proximity to walls and corners)
- On a resonant stage
You can compensate for this by turning down the Sub1/Sub2 LEVEL Control.

- Set the Sub1/Sub2 Level control at 12:00 o'clock[4].
- Raise/lower the volume of the L1 Pro32 as required.
- Adjust the Sub1/Sub2 Level control to balance bass level with the mid-high level from the L1 Pro 32.
SubMatch Cable

- SubMatch Connectivity
- Proprietary technology by Bose to connect Sub1 or Sub2 Powered Bass Module to the L1 Pro32 Portable Line Array, delivering both power and audio.
- Using the SubMatch cable automatically sets the system’s crossover and EQ automatically
- Included Cable
- One SubMatch Cable is included with the L1 Pro32 line array; additional cables are sold separately.
- The SubMatch Cable is NOT included with the Sub1 or Sub2
- Alternative Connections
- You can connect an L1 Pro to a Sub1/Sub2 without a SubMatch cable using an IEC (AC power) cable for power and an XLR to XLR cable for audio.
Specifications: The SubMatch Cable is 152 cm (60 inches) long and weighs 0.36 kg (0.79 lb).
- From Bose
- SubMatch connectivity is a proprietary technology invented by Bose to connect the Sub1 or Sub2 Powered Bass Module to the L1 Pro32 Portable Line Array — or to daisy-chain an additional Sub1 or Sub2 to the system. A SubMatch Cable is included with each L1 Pro32 line array and delivers both power and audio from your L1 Pro32 to your Sub1 or Sub2 subwoofer, making setup easier and allowing the system’s crossover and EQ to automatically calibrate for optimal sound. And if you want to connect a second Sub1 or Sub2 to your L1 Pro32 system, all you need is a second SubMatch Cable. NOTE: One SubMatch Cable is included with purchase of the L1 Pro32 line array; additional cables sold separately.
Source: Bose
Specifications
- Dimensions (L * 0): 152.4 cm * 3.6 cm (60.0 in x 1.4 in) Net Weight: 0.36 kg (0.79 lb)
- Model Number: ABC1-DBQ05AB
- Input Voltage: 300 V (Pin 2, Pin 3), 30 V (Pin 4, Pin 5)
Documentation and Reference
SubMatch Connection Signal Flow

L1 Pro 32 SubMatch Output
- Full range audio signal
- AC Power
Sub1/Sub2 SubMatch Pass Thru
- Full range audio signal (unaffected by any settings on the Sub1/Sub2)
- AC Power
Sub1/Sub2 using a SubMatch port for input
- LINE IN EQ (LPF or L1)
- The LINE IN EQ is automatically set to L1 regardless of the position of the button
- LINE OUT EQ (FULL RANGE or HPF)
- Line Out 1 LINE OUT EQ is FULL RANGE or HPF depending on the setting of the Line Out EQ button
- Line Out 2 LINE OUT EQ is FULL RANGE or HPF depending on the setting of the Line Out EQ button
Sub2 with Sub1
You can use a Sub1 and Sub2 together. The connection will be L1 Pro32 to Sub2 to Sub1
- Connect the L1 Pro32 to the Sub2 (use the SubMatch cable)
- On the Sub2 set the Line Out EQ to HPF (High Pass Filter)
- Connect the Sub2 Line Out to the Sub1 (Correction
optional: use a SubMatch cable to the Sub1) - Level - set to 12:00 o'clock on both. If adjustments are necessary - keep the Level Control the same on both Subs
- Polarity: Plus on both
S1 Pro system with Sub1/Sub2
Preferred Method
Connections with Sub1 or Sub2 and the S1 Pro system
For best results, the signal flow should go from
- The signal source (e.g., ToneMatch Mixer[5], mixer, DJ console) output to
- The Sub1 or Sub2 subwoofer LINE IN 1 ()
- The Sub1 or Sub2 subwoofer LINE OUT 1 to
- The S1 Pro system with channel volume set to 10 o'clock.

- Note these settings on the Sub1 or Sub2
- 👉 Set LINE IN EQ to L1
- 👉 Set LINE OUT EQ to S1 (Press and hold LINE OUT EQ button for 4 seconds)
Set up this way,
- The Sub1 or Sub2 handles frequencies from 40 Hz (Sub1) 37 Hz (Sub2) to 150 Hz
- The S1 Pro system handles frequencies above 150 Hz
- Mono - Example with a T4S as the audio source
- Start with the Volume on S1 Pro and Sub, as shown. Adjust as necessary from there.

The picture shows a stereo setup. The signal flow is from left to right.


- Recommended cable
Use an XLR to 1/4 inch (6.35 mm) Tip-Ring-Sleeve cable for best results.

If you use an XLR to XLR cable, the signal may be too hot for the S1 Pro system.
Alternative Connection
- Can I connect the S1 Pro Line Out to the Sub?
The method described above is preferred, but you can use the S1 Pro system as the sound source (e.g., microphone and guitar and backing tracks via Bluetooth) Note the following:
- The S1 Pro system will sound the same as without the subwoofer (62 Hz - 17 kHz)
- The Sub1 or Sub2 will cover from 40 Hz (Sub1) 37 Hz (Sub2) to 150 Hz
- You will be able to push S1 Pro system harder (louder) if you route the signal as described at the top of this article
L1 Compact with Sub1/Sub2
Please see L1 Compact with Sub1 or Sub2
L1 Model II with Sub1/Sub2
If you have a T1 ToneMatch mixer

- Connect the T1 Main Output to the Sub1/Sub2
- 1/4 inch Tip Ring Sleeve to Sub1/Sub2 Input 1.
- If you prefer, you can use a 1/4 inch (6.3 mm) Tip-Ring-Sleeve to XLR (T1 to Sub1/Sub2 Input 1).
There's no particular benefit to choosing one cable over the other.
- On the Sub1/Sub2 set the LPF setting to L1.
- DO NOT connect Sub1/Sub2 to the L1 Model II Bass Line Out. That output is EQd for the B2 or B1. Also, if you have one or two B1s connected to the Model II Power Stand and you connect something to the Bass Line Out, the system will reduce the overall bass output by -12 dB [6]
- You can continue to use the ToneMatch cable between the T1 and L1 Model II (no need to use a ToneMatch Power Supply)
If you have a third-party mixer
- Connect a sub or aux line out to Sub1/Sub2 Input 1.
- On the Sub1/Sub2 set the LPF setting to L1.
- DON'T connect Sub1/Sub2 to the L1 Model II Bass Line Out. That output is EQd for the B2 or B1.
Cooling
- Question
How are the Sub1/Sub2 cooled?
- Answer
Sub1 and Sub2 have extruded aluminum heat sinks mounted to the backside of the I/O panel. This pulls heat out of the electronics and transfers some to the air moving through the acoustic volume of the sub and helps to cool.[7]
Running Multiple Subwoofers
If you are running two or more subwoofers, you want to read these articles:
Comparing L1 Pro Power Stands to Subs
The L1 Pro8 and Sub1 use the 7" x 13" Racetrack transducer. The L1 Pro16 and Sub2 use the 10" x 18" Racetrack transducer. The following is a comparison of the performance of the L1 Pro power stands and the Sub1 and Sub2
L1 Pro8 Power Stand compared to Sub1
Both use the 7" x 13" Racetrack transducer
The L1 Pro8 power stand is 31 pounds. The Sub1 is 35.5.
The L1 Pro8 power stand is slightly smaller than the Sub1.
The L1 Pro8 power stand bass amp is 240 watts RMS. The Sub1 is 480 watts RMS.
The L1 Pro8 is 112 dB SPL continuous. The Sub1 is 118 dB SPL continuous.
The L1 Pro8 goes down to 45 Hz (-3 dB). The Sub1 goes down to 40 Hz (-3 dB).
L1 Pro16 Power Stand compared to Sub2
Both use the 10" x 18" Racetrack transducer
The L1 Pro16 power stand is 41.4 pounds. The Sub2 is 52.
The L1 Pro16 power stand is slightly smaller than the Sub2.
The L1 Pro16 bass amp is 1000 watts RMS. The Sub2 is 1000 watts RMS.
The L1 Pro16 is 118 dB SPL continuous. The Sub2 is 123.8 dB SPL continuous.
The L1 Pro16 goes down to 42 Hz (-3 dB). The Sub2 goes down to 37 Hz (-3 dB). The difference is due to the larger physical volume of the Sub2 enclosure.
Questions about this article
- ↑ +3 dB from doubling the power and +3 dB from mutual coupling.
- ↑ RaceTrack Woofer on pro.bose.com
- ↑ Equal Loudness contour
- ↑ Bose Sub1 & Sub2 Powered Bass Modules Owners Guide
- ↑ T4S ToneMatch mixer or T8S ToneMatch mixer or T1 ToneMatch Audio Engine
- ↑ L1 Model II with cable connected to Bass Line Out
- ↑ Bose Professional