Difference between revisions of "Template:TC-Helicon to L1®"
m |
m |
||
| Line 8: | Line 8: | ||
|TCH=[http://www.tc-helicon.com/products/voicelive-play-gtx/ VoiceLive Play GTX] | |TCH=[http://www.tc-helicon.com/products/voicelive-play-gtx/ VoiceLive Play GTX] | ||
|TCH Image=[[Image:Voicelive-play-gtx_top.jpg|300px|right]] | |TCH Image=[[Image:Voicelive-play-gtx_top.jpg|300px|right]] | ||
| − | |TCH Image = {{#img: image=Voicelive-play-gtx_top.jpg |page=http://www.tc-helicon.com/products/voicelive-play-gtx| height= | + | |TCH Image = {{#img: image=Voicelive-play-gtx_top.jpg |page=http://www.tc-helicon.com/products/voicelive-play-gtx| height=250px |title=TC-Helicon VoiceLive Play GTX }} |
}} | }} | ||
</pre> | </pre> | ||
| Line 15: | Line 15: | ||
{{Compact icon}}{{Model 1S icon}}{{Model II icon}} | {{Compact icon}}{{Model 1S icon}}{{Model II icon}} | ||
| − | <html><div style="float:right"></html>{{{TCH Image|{{#img: image=Voicelive-play-gtx_top.jpg |page=http://www.tc-helicon.com/products/voicelive-play-gtx| height= | + | <html><div style="float:right; padding:30px"></html>{{{TCH Image|{{#img: image=Voicelive-play-gtx_top.jpg |page=http://www.tc-helicon.com/products/voicelive-play-gtx| height=250px |title=TC-Helicon VoiceLive Play GTX }}}}}<html></div></html> |
=== [[Compact]] === | === [[Compact]] === | ||
The {{{TCH}}} has two outputs available (Vocal and Guitar) but I choose the LEFT output and run MONO so that I can make the connection with one cable. I don't use {{{Model parameter 1|Compact Channel 1}}} when I'm using the {{{TCH}}}. | The {{{TCH}}} has two outputs available (Vocal and Guitar) but I choose the LEFT output and run MONO so that I can make the connection with one cable. I don't use {{{Model parameter 1|Compact Channel 1}}} when I'm using the {{{TCH}}}. | ||
Revision as of 05:30, 10 February 2014
Usage:
{{TC-Helicon to L1®
|L1=[[Compact]]
|Model parameter 1= [[Compact#Channel_1|Compact Channel 1]]
|Model parameter 2= [[Compact#Channel_2|Compact Channel 2]]
|TCH=[http://www.tc-helicon.com/products/voicelive-play-gtx/ VoiceLive Play GTX]
|TCH Image=[[Image:Voicelive-play-gtx_top.jpg|300px|right]]
|TCH Image = {{#img: image=Voicelive-play-gtx_top.jpg |page=http://www.tc-helicon.com/products/voicelive-play-gtx| height=250px |title=TC-Helicon VoiceLive Play GTX }}
}}


Compact
The {{{TCH}}} has two outputs available (Vocal and Guitar) but I choose the LEFT output and run MONO so that I can make the connection with one cable. I don't use Compact Channel 1 when I'm using the {{{TCH}}}.
I prefer to use an adapter (XLR to ¼ inch jack) from the {{{TCH}}} left out - to Compact Channel 2. That way you don't have to work around the {{{L1}}}'s internal microphone Preset.

There's MIX button on the {{{TCH}}} that brings up a screen where it's easy to control the relative volumes (voice and guitar) on the {{{TCH}}} so I don't have to touch the Compact once I'm set up. And it's nice to use just one cable from the {{{TCH}}} to the {{{L1}}}. This also keeps the Compact Channel 1 free in case I need to plug in another microphone.
I use an adapter like this
- xlr female to 1/4 female adapter
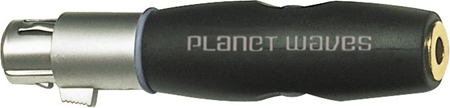
- NA3FJ Neutrik 3 Pin XLR Female to 1/4" TRS Female Locking Barrel Adapter
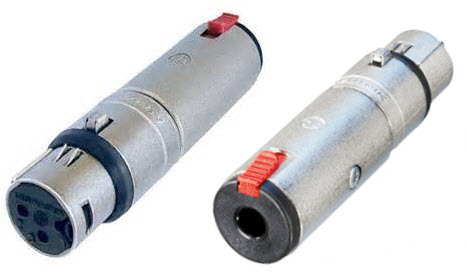


using a ¼ inch jack Tip-Ring-Sleeve cable
TO
{{{Model parameter 2}}}
