Difference between revisions of "T1® ToneMatch Mixer Reverb"
m (→Selecting a type of reverb) |
m (ST moved page ToneMatch Mixer Reverb to T1® ToneMatch Mixer Reverb) |
||
| (One intermediate revision by the same user not shown) | |||
| Line 15: | Line 15: | ||
#*; Large: Creates the ambience of a large-sized space. Features adjustable time and balance (ratio of early/later reflections) parameters. Works well with guitars, horns, percussion instruments, and vocals. | #*; Large: Creates the ambience of a large-sized space. Features adjustable time and balance (ratio of early/later reflections) parameters. Works well with guitars, horns, percussion instruments, and vocals. | ||
#*;Cavern: Creates the ambience of an extremely large space. Features adjustable time and balance (ratio of early/later reflections) parameters. A unique and interesting reverb effect. | #*;Cavern: Creates the ambience of an extremely large space. Features adjustable time and balance (ratio of early/later reflections) parameters. A unique and interesting reverb effect. | ||
| − | # Rotate the Type button to scroll through the reverb list and highlight the desired reverb type. | + | # Rotate the Type button to scroll through the reverb list and highlight the desired reverb type. |
| − | # Press the Type button to select. | + | # Press the Type button to select. |
| − | # Press the Balance button to select the Time Control <br>Rotating the Time control controls the decay time of the selected reverb model from its minimum decay time to its maximum decay time. At 0%, the decay time will be at minimum and will simulate the smallest room size available to the currently selected reverb type. At 100%, the decay time will be at maximum and will simulate the largest room size available to the currently selected reverb type. Each reverb type has their own usable range of decay times that work best for the selected model type. The Reverb Decay parameter allows you to adjust the reverb time between the specific ranges that work best for the selected reverb model type. | + | # (T4S/T8S only) Press the Balance button to select the Time Control <br>Rotating the Time control controls the decay time of the selected reverb model from its minimum decay time to its maximum decay time. At 0%, the decay time will be at minimum and will simulate the smallest room size available to the currently selected reverb type. At 100%, the decay time will be at maximum and will simulate the largest room size available to the currently selected reverb type. Each reverb type has their own usable range of decay times that work best for the selected model type. The Reverb Decay parameter allows you to adjust the reverb time between the specific ranges that work best for the selected reverb model type. |
| − | # Press the Time control to switch to Bal. Rotate the Bal. control to adjust the early-to-late reflection ratio (0% = all early reflections, 100% = all late reflections). | + | # (T4S/T8S only) Press the Time control to switch to Bal. Rotate the Bal. control to adjust the early-to-late reflection ratio (0% = all early reflections, 100% = all late reflections). |
==Adding reverb== | ==Adding reverb== | ||
Latest revision as of 12:15, 8 April 2018
Selecting a type of reverb
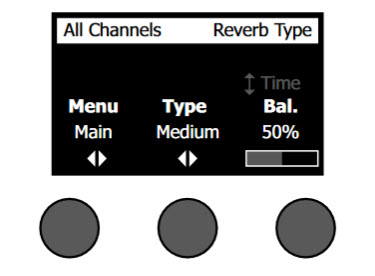
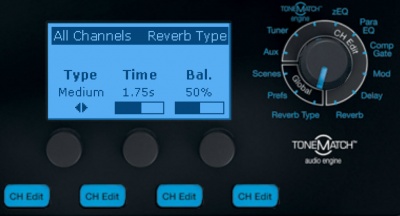
The Reverb Type function allows you to select the type of reverb that is applied to all input channels. The decay time (Time) and balance (Bal) are adjustable. Balance controls the ratio of early-to-late reflections.
- Select Reverb Type with the T1 rotary selector.
On the T4S or T8S, select if you are applying the reverb type to the Main output or Aux output
- Press the Type button to display the list of reverbs:
- Plate
- Creates the ambience of a typical studio plate reverb. Features adjustable time and balance (ratio of early/later reflections) parameters. Works well with guitars, horns, percussion instruments, and vocals.
- Small
- Creates the ambience of a small-sized space. Features adjustable time and balance (ratio of early/later reflections) parameters. Works well with guitars, horns, percussion instruments, and vocals.
- Medium
- Creates the ambience of a medium-sized space. Features adjustable time and balance (ratio of early/later reflections) parameters. Works well with guitars, horns, percussion instruments, and vocals.
- Large
- Creates the ambience of a large-sized space. Features adjustable time and balance (ratio of early/later reflections) parameters. Works well with guitars, horns, percussion instruments, and vocals.
- Cavern
- Creates the ambience of an extremely large space. Features adjustable time and balance (ratio of early/later reflections) parameters. A unique and interesting reverb effect.
- Rotate the Type button to scroll through the reverb list and highlight the desired reverb type.
- Press the Type button to select.
- (T4S/T8S only) Press the Balance button to select the Time Control
Rotating the Time control controls the decay time of the selected reverb model from its minimum decay time to its maximum decay time. At 0%, the decay time will be at minimum and will simulate the smallest room size available to the currently selected reverb type. At 100%, the decay time will be at maximum and will simulate the largest room size available to the currently selected reverb type. Each reverb type has their own usable range of decay times that work best for the selected model type. The Reverb Decay parameter allows you to adjust the reverb time between the specific ranges that work best for the selected reverb model type. - (T4S/T8S only) Press the Time control to switch to Bal. Rotate the Bal. control to adjust the early-to-late reflection ratio (0% = all early reflections, 100% = all late reflections).
Adding reverb
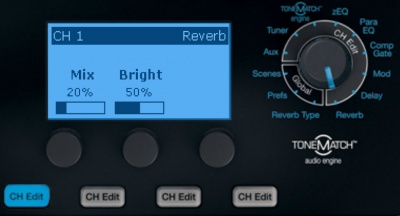
The Reverb function applies a user-adjustable amount of reverb to the selected channel. To select the type of reverb, see Selecting a type of reverb above.
To add reverb, press the CH Edit button for the channel you want to modify. Turn the Rotary Selector to Reverb.
Note: To bypass the Reverb effects, press the Mix button. Press it again to activate.
- Rotate the Mix button to adjust the desired mix of dry signal to wet signal (reverb-processed).
- Rotate the Bright button to equalize the high frequencies of reverb applied to the selected channel.

