Difference between revisions of "L1® Unofficial Performers' Guide"
(cleaned up the wording ... Master volume --> Master Level for example) |
(Table of Contents and L1™ System Benefits side-by-side) |
||
| Line 3: | Line 3: | ||
for the Bose® Personalized Amplification System™ family of products. | for the Bose® Personalized Amplification System™ family of products. | ||
| − | If you will be using the Bose System for the first, second, or third time and are looking for quick-hit things you need to know you are in the right place. This is for you in the role of performer who may or may not actually own | + | If you will be using the Bose System for the first, second, or third time and are looking for quick-hit things you need to know you are in the right place. This is for you in the role of performer who may or may not actually own an L1™ System. <!-- TODO Initially, I will write this with the solo or duo act in mind. There may be another version later for larger ensembles later. --> |
If you just got your new System then you will want to check out the [[L1™ Unofficial Users' Guide]] which covers things that System owners like to know. | If you just got your new System then you will want to check out the [[L1™ Unofficial Users' Guide]] which covers things that System owners like to know. | ||
| − | + | <table border="0"> | |
| − | + | <tr> | |
| − | = | + | <td width="40%">__TOC__</td> |
| − | + | <td> | |
| − | + | <!-- not sure this belongs here or on a separate page, but I converted it to a template so we can present it in several places if we want --> | |
| − | + | {{L1™ System Benefits}} | |
| − | + | </td> | |
| − | + | </tr> | |
| − | + | </table> | |
| − | |||
| − | |||
| − | |||
| − | |||
| − | |||
| − | |||
| − | |||
| − | |||
== Setting up == | == Setting up == | ||
If you are stepping onto the stage and someone has made all the connections for you skip down to the section about Performing. | If you are stepping onto the stage and someone has made all the connections for you skip down to the section about Performing. | ||
Revision as of 03:22, 30 August 2006
The Unofficial Performers' Guide
for the Bose® Personalized Amplification System™ family of products.
If you will be using the Bose System for the first, second, or third time and are looking for quick-hit things you need to know you are in the right place. This is for you in the role of performer who may or may not actually own an L1™ System.
If you just got your new System then you will want to check out the L1™ Unofficial Users' Guide which covers things that System owners like to know.
Setting up
If you are stepping onto the stage and someone has made all the connections for you skip down to the section about Performing.
Microphone Setup
Gain setup for a vocal microphone
Connections
Connections General Examples

click the picture above for downloadable PDF version.
Interactive Tour of the Inputs and Outputs
Inputs and Outputs (interactive display) showing connections.
Connections for a Soloist

click the picture above for downloadable PDF version.
Connections for a Duo

click the picture above for downloadable PDF version.
B1 Cables (blue)
- Make sure the Speakon cables (blue) are really connected. Insert and turn clockwise. There should be an audible click. You should have to slide the silver lock and twist counterclockwise to remove the cable. If you can remove it without a twist, it is not really connected.
Presets
- Presets are used to get the best possible sound from your inputs. They are not meant to make something sound like something else (like Guitar processor or instrument patches). The presets for vocal microphones are based on using close mic techniques.
- Gain Staging
- Mixers Connection suggestions for specific mixers.
- Effects
If the stage is already set up, then it is time to talk about performing.
Performing
Hearing yourself
This is a different approach to amplifying your sound. There is typically only one amplified version of your sound entering the room. That will be the Cylindrical Radiator®. Typically it will be set up behind you. Unlike conventional approaches, you will not be behind the main speakers going to the room.
How does it sound? - It may seem unusual for a few minutes because you are hearing yourself in much the same way the audience is hearing you. This is a big difference because you will be hearing yourself in the context of the room instead of out of context in the monitor. Where do I stand? - Usually in front of the Cylindrical Radiator®. Sometimes beside it. If you are in front of it, an ideal would be approximately 7-10 feet. This is easy to work out if you have the standard 15 foot cable. Assuming you have the Remote mounted on your mic stand, the cable should be a straight run back to the Power Stand. Where is the monitor? - No monitor required. You will be hearing yourself through the same Cylindrical Radiator® that the audience is hearing. Where is the reverb? - This is typically not required because you will be hearing the natural reverb in the room not a monitor mix from a floor wedge. Hearing Yourself with the Bose...
Microphone Technique
"Sing as loud as you're going to sing with your lips touching the windscreen and adjust the trim so that the LED just flickers RED. (You can do this with the channel and master volumes on the remote turned all the way down. Remember that when you want to be your loudest vocally, you're lips should be touching the windscreen. You can always "work" the mic by backing away from it to lower volume but always remember that when you need to be loudest, you're kissing that windscreen. This technique is true for ANY live amplification system, not just ours. Please stay in touch with us here and let us know how you, er, well, make out." -- Ken-at-Bose
You will probably find that you hear yourself better with this system than in other live music situations. If you are new to the experience, you may want to back off from the microphone. Try this instead. Get up closer to the mic. Relax and get used to hearing yourself. You will find it is easier to sing when you can hear.
Feedback
Feedback occurs when sound coming from the Cylindrical Radiator® is reintroduced into the System and amplified again. You typically hear either a high pitched squeal or a low pitched howl. The first usually comes from a vocal microphone and the second is more likely from an acoustic instrument like a Guitar.
Microphone Feedback (squeal)
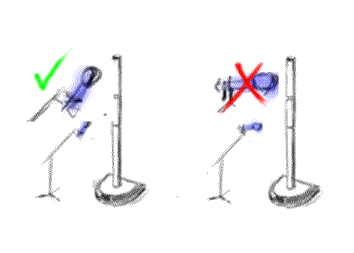
- Point the mic above the Cylindrical Radiator® and slightly to the left or right of it
- Practice close mic technique "eat the mic"
- Avoid leaving the mic pointed in the general direction of the Cylindrical Radiator® with nothing in between.
- Check the gain staging. If you have the input sensitivity set too high, it can be difficult to avoid feedback.
- Use the remote to turn down the highs a little bit.
- Try presets #03 or #04 (High Gain Bright, High Gain Normal)
Instrument Feedback (howl)
The most likely source of a low end howl is an acoustic instrument like an Acoustic Guitar.
- Change the angle of the B1. Just change the direction at which it is pointed. Avoid having it pointed directly at the body of an acoustic Guitar.
- Use the Remote to turn down the lows a little bit. This will tend to clean up the mix overall even if you are not experiencing feedback.
- Try preset #44 or #85 (Sound Hole Notch)
Leaving the stage: Always turn down the R1 Remote Control Master Level.
The Remote
Why is the Volume Control in front of me?
Where is the sound-guy?
The R1 Remote gives you the final say about how you will sound in performance. The System once set properly is very stable and does not require a lot of real time tweaking. It is there for you to use if you want, but it does not have to distract you from doing the show.
What are all these knobs
and what will they do for me?
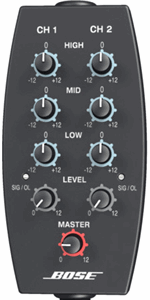
Find the Master Level (ringed in red - center bottom of the R1 Remote). This is your main control for all the sound coming out of the System. You will want to turn it down when you are not actively using the System. Use Channel 1 and 2 Level controls (just above the Master) to work out the balance between the two channels.
Use the Tone controls. Start with all these straight up at 12 o'clock and adjust to suit you.
Important: There is a tiny delay between making an adjustment and hearing the difference. Make small adjustments and then listen for difference. Otherwise you may tend add too much EQ. Make sure that the Remote is visible and easily accessible to you as you are playing. Use the velcro to make it stationary so you can adjust the controls with one hand.
Stage Volume
You and your audience are going to be hearing your performance in a new way. To be heard and understood you will probably run your stage at a lower volume than you have with other equipment.
Getting Ready
This section will suggest things that you can do to prepare to use the System for the first time. For example: Rehearsal
When you are rehearsing, stand or sit in the same positions as you will when performing. You want to hear yourself in the same way in rehearsal and performance so that making the transition from one to the other is relatively easy. One of the features of the System is localization: being able to hear everyone in their relative positions on stage. It is good to get a sense of that before you get to the stage.
Practice Your Microphone Technique
If you are a vocalist, one of the single most important things you can do is practice your microphone technique. You get the best gain-before-feedback using close micing. The presets for vocal mics are designed for close micing.


