Difference between revisions of "L1® Compact"
m (ST moved page L1® Compact to L1® Compact) |
m |
||
| (13 intermediate revisions by the same user not shown) | |||
| Line 1: | Line 1: | ||
| − | < | + | <div class="tocdiv"> |
| − | < | + | <div>__TOC__</div> |
| − | < | + | <div> |
| − | + | [[File:CompactFullSize.jpg|Link=https://www.bose.com/en_us/products/speakers/portable_pa_speakers/l1-compact-system.html#v=l1_compact_black|right|L1 Compact]] | |
| + | <!-- | ||
<html> | <html> | ||
| − | <div style="float:right"><a href=" | + | <div style="float:right"><a href="https://www.bose.com/en_us/products/speakers/portable_pa_speakers/l1-compact-system.html#v=l1_compact_black"><img src="http://toonz.ca/bose/wiki/images/4/4e/CompactFullSize.jpg" alt="L1® Compact" border="0" ></a></div> |
</html> | </html> | ||
| − | [ | + | --> |
| + | |||
| + | [https://www.bose.com/en_us/products/speakers/portable_pa_speakers/l1-compact-system.html#v=l1_compact_black L1® Compact page on bose.com] | ||
Announced: April 1 2009 | Announced: April 1 2009 | ||
| + | Discontinued: May 2021 | ||
| + | ;Documentation | ||
{{:L1® Compact Documentation}} | {{:L1® Compact Documentation}} | ||
| − | + | ;Features | |
| − | + | ||
| + | High-performing, powered, portable two-way loudspeaker system with a 180° H x 40° V nominal dispersion designed for the production and reproduction of live music, music playback, speeches and A/V sound reproduction | ||
| + | |||
| + | Articulated line array loudspeaker technology produces wide, uniform sound coverage throughout the entire listening area—even off to the extreme sides | ||
| + | |||
| + | Curved array design provides 40° of vertical coverage | ||
| + | |||
| + | Integrated ToneMatch® presets contain hardwired equalization curves for dynamic handheld microphones and acoustic guitars | ||
| + | |||
| + | Lightweight, interlocking components for easy transport | ||
| + | |||
| + | Offers both collapsed and extended setup positions | ||
| + | Applications | ||
| + | * Live music performances | ||
| + | * Mobile DJs | ||
| + | * Places of worship | ||
| + | * Schools and universities | ||
| + | * Resorts and hospitality venues | ||
| + | * Business presentations | ||
| + | |||
| + | |||
| + | |||
| + | |||
| + | <br> | ||
| + | [[File:Compact 180 degrees-800.png|link=https://www.bose.com/en_us/products/speakers/portable_pa_speakers/l1-compact-system.html#v=l1_compact_black|400px]] | ||
| + | |||
| + | </div> | ||
| + | </div> | ||
| + | |||
| + | == Documentation == | ||
| + | {{:L1® Compact Documentation}} | ||
| Line 27: | Line 62: | ||
{{:L1® Compact Documentation}} | {{:L1® Compact Documentation}} | ||
| − | == | + | == L1 Products Comparison == |
[http://www.bose.com/controller?url=/popup/compare_charts/pop_compare_l1.jsp Product Comparison] | [http://www.bose.com/controller?url=/popup/compare_charts/pop_compare_l1.jsp Product Comparison] | ||
| Line 111: | Line 146: | ||
{{:L1® Compact Table Top Mode}} | {{:L1® Compact Table Top Mode}} | ||
| − | === | + | === {{L1}} Compact Microphone Accessory Pack === |
Contents: | Contents: | ||
* Audix OM3 microphone | * Audix OM3 microphone | ||
| Line 118: | Line 153: | ||
* 3.5mm Stereo mini cable | * 3.5mm Stereo mini cable | ||
| − | The | + | The Handheld Mic or Audix OM3 preset both work great. |
To obtain pricing and availability please contact 800-444-2673. | To obtain pricing and availability please contact 800-444-2673. | ||
| Line 150: | Line 185: | ||
[http://bose.infopop.cc/eve/forums/a/tpc/f/7521050644/m/745104421?r=613103811#613103811 Source: Eric-at-Bose] | [http://bose.infopop.cc/eve/forums/a/tpc/f/7521050644/m/745104421?r=613103811#613103811 Source: Eric-at-Bose] | ||
| − | For optimal performance we recommend using both extensions when the system is set up in its Extended position. | + | For optimal performance, we recommend using both extensions when the system is set up in its Extended position. |
[http://bose.infopop.cc/eve/forums/a/tpc/f/7521050644/m/745104421?r=563103811#563103811 Source: Neil-at-Bose] | [http://bose.infopop.cc/eve/forums/a/tpc/f/7521050644/m/745104421?r=563103811#563103811 Source: Neil-at-Bose] | ||
| Line 224: | Line 259: | ||
==== Cliff-at-Bose ==== | ==== Cliff-at-Bose ==== | ||
| − | First of all, the L1® Compact is very different in basic nature from the two original ones. It has a head-high vertically-divergent array that is ultra-wide horizontally. the vertical angle is narrow enough so its sound pressure fall-off with distance is not as severe as, say, a guitar amp, but it's somewhat greater than an {{Model I}} or {{Model II}}. We have data galore taken on the {{Compact}} array, but to a musician, | + | First of all, the L1® Compact is very different in basic nature from the two original ones. It has a head-high vertically-divergent array that is ultra-wide horizontally. the vertical angle is narrow enough so its sound pressure fall-off with distance is not as severe as, say, a guitar amp, but it's somewhat greater than an {{Model I}} or {{Model II}}. We have data galore taken on the {{Compact}} array, but to a musician, it's not only useless, it's confusing. Thinking about this stuff intellectually leads nowhere. |
So, forgetting all this, The {{Compact}} sounds the same and, from personal experience playing and singing solo, it feels the same. When I played (this seems to be a typical configuration), the system was off to the side 5' and back of me 4'. It is louder when you get on top of it (unlike the L1) so you need to get a little further from it. But not much. | So, forgetting all this, The {{Compact}} sounds the same and, from personal experience playing and singing solo, it feels the same. When I played (this seems to be a typical configuration), the system was off to the side 5' and back of me 4'. It is louder when you get on top of it (unlike the L1) so you need to get a little further from it. But not much. | ||
| Line 238: | Line 273: | ||
| − | == Connections from a | + | == Connections from a {{T1}} == |
{{:T1 ToneMatch® Audio Engine to Compact}} | {{:T1 ToneMatch® Audio Engine to Compact}} | ||
| Line 263: | Line 298: | ||
Note: The AC line power in can peak around 100W during a loud burst. | Note: The AC line power in can peak around 100W during a loud burst. | ||
| − | We have also tested the L1 Compact with several DC to AC Inverters | + | We have also tested the L1 Compact with several DC to AC Inverters. Avoid modified sine wave inverters. Pure sine wave inverters are preferable. |
| − | I recommend that an inverter of at least 300W be used | + | |
| + | I recommend that an inverter of at least 300W be used. Less then that has not been tested. | ||
Here are measurements we took, realize this also includes the inverter efficiency: | Here are measurements we took, realize this also includes the inverter efficiency: | ||
| Line 278: | Line 314: | ||
</pre> | </pre> | ||
| − | There are also "Power Packs" available which have the battery built in with the inverter. | + | There are also "Power Packs" available which have the battery built-in with the inverter. |
To find out how long one of the "Portable Power Packs" will run divide the amp hour rating of the battery by the amps from the list above (usually divide by 3), this is assuming it uses a 12V battery. | To find out how long one of the "Portable Power Packs" will run divide the amp hour rating of the battery by the amps from the list above (usually divide by 3), this is assuming it uses a 12V battery. | ||
[http://bose.infopop.cc/eve/forums/a/tpc/f/7521050644/m/745104421?r=782102261#782102261 Source: Tom-at-Bose] | [http://bose.infopop.cc/eve/forums/a/tpc/f/7521050644/m/745104421?r=782102261#782102261 Source: Tom-at-Bose] | ||
| − | There was a follow up question about the impact of using a {{T1}} with the {{Compact}}. Expect that adding a {{T1}} may draw as much power as the {{Compact}} meaning that your power requirements may be double what is show above. | + | There was a follow-up question about the impact of using a {{T1}} with the {{Compact}}. Expect that adding a {{T1}} may draw as much power as the {{Compact}} meaning that your power requirements may be double what is show above. |
<html> | <html> | ||
<blockquote> | <blockquote> | ||
| Line 290: | Line 326: | ||
<br>The T1 power supply rating of 81-100 VA is the same as 81-100 watts (volts times amps is watts). So I consider T1 maximum power draw 100 watts. | <br>The T1 power supply rating of 81-100 VA is the same as 81-100 watts (volts times amps is watts). So I consider T1 maximum power draw 100 watts. | ||
<br>So based on these official specs this setup presents a maximum draw of 300 watts. A good rule of thumb for an inverter would be to oversize by at least a factor of two so at least 600 watts for the inverter. | <br>So based on these official specs this setup presents a maximum draw of 300 watts. A good rule of thumb for an inverter would be to oversize by at least a factor of two so at least 600 watts for the inverter. | ||
| − | <br>Keep in mind official specs can be conservative (as Tom's lower wattage numbers show). Feel free to measure your power draw at home using regular utility and/or inverter power. If you have access to a kill-a-watt or similar, it will tell you how much power in watts your Compact and T1 are drawing with your sources at your levels. Sometimes real world testing is best. | + | <br>Keep in mind official specs can be conservative (as Tom's lower wattage numbers show). Feel free to measure your power draw at home using regular utility and/or inverter power. If you have access to a kill-a-watt or similar, it will tell you how much power in watts your Compact and T1 are drawing with your sources at your levels. Sometimes real-world testing is best. |
<br> | <br> | ||
Thanks and good luck! | Thanks and good luck! | ||
| Line 307: | Line 343: | ||
{{Compact Channel 2}} | {{Compact Channel 2}} | ||
| − | == Line Out == | + | == Line Out == |
<section begin="Line Out" /> | <section begin="Line Out" /> | ||
[[Image:CompactLineOut.gif|right]] | [[Image:CompactLineOut.gif|right]] | ||
| + | |||
=== Rear panel outputs === | === Rear panel outputs === | ||
| − | ¼-inch output – Mono analog output that accepts either ¼ inch | + | |
| − | + | ¼-inch output – Mono analog output that accepts either ¼ inch Tip-Ring-Sleeve balanced or | |
| − | by connecting the ¼-inch output from one | + | Tip-Sleeve unbalanced cables. |
| − | (Channel 2) on a second | + | |
| + | Can be used to link multiple {{Compact}} systems together | ||
| + | by connecting the ¼-inch output from one {{Compact}} system to the ¼-inch input | ||
| + | (Channel 2) on a second {{Compact}} system. This will provide additional coverage | ||
in larger spaces. You can also use the ¼-inch output to connect to a house PA | in larger spaces. You can also use the ¼-inch output to connect to a house PA | ||
| − | system and use the | + | system and use the {{Compact}} system as your personal monitor. |
| + | |||
| + | ==== Output Level ==== | ||
| + | |||
| + | ¼ inch (6.3 mm) jack: Nominal +2.2 dBu, Max +20 dBu | ||
Note: Using a TS unbalanced cable will result in a drop in the audio level of -6dBu. | Note: Using a TS unbalanced cable will result in a drop in the audio level of -6dBu. | ||
| Line 367: | Line 411: | ||
{{:Compact Physical Comparisons}} | {{:Compact Physical Comparisons}} | ||
| + | |||
| + | == Quick Start Card == | ||
| + | {{L1 Compact Quick Start Card}} | ||
== Zusammenfassung in Deutsch == | == Zusammenfassung in Deutsch == | ||
Latest revision as of 00:35, 20 May 2021
Contents
- 1 Documentation
- 2 Interactive Tools
- 3 Videos
- 4 Documents and Resources
- 5 L1 Products Comparison
- 6 FAQs from the Bose® Pro Portable PA Community
- 6.1 Presets
- 6.2 Bass Expansion
- 6.3 Controls
- 6.4 Setting the Volume and the LEDs
- 6.5 Positioning
- 6.6 L1 Compact Microphone Accessory Pack
- 6.7 Universal Power Supply
- 6.8 Available in Bose Retail Stores
- 6.9 Extensions
- 6.10 Drivers
- 6.11 Voicing / T1 ToneMatch® Audio Engine
- 6.12 Comparisons to Other Members of the L1® Family
- 7 Microphones
- 8 Connections from a T1 ToneMatch Audio Engine
- 9 AC Power
- 10 Channel 1
- 11 Channel 2
- 12 Line Out
- 13 Mixer to Share Presets
- 14 Compact Extensions Sticking
- 15 Static Electricity
- 16 Physical Comparison to other L1® Products
- 17 Physical Comparison to other small amplifiers
- 18 Quick Start Card
- 19 Zusammenfassung in Deutsch
- 20 Expanded Text from the L1® Compact Page
Announced: April 1 2009
Discontinued: May 2021
- Documentation
- L1® Compact FAQ (pdf format)
- L1® Compact Technical Data
- L1® Compact Features Functions and Benefits (pdf format)
- L1® Compact Interactive Tour
- Features
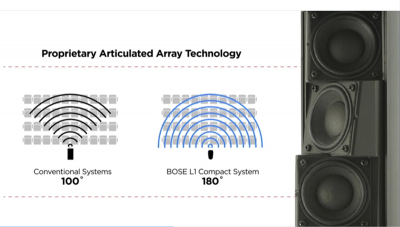
High-performing, powered, portable two-way loudspeaker system with a 180° H x 40° V nominal dispersion designed for the production and reproduction of live music, music playback, speeches and A/V sound reproduction
Articulated line array loudspeaker technology produces wide, uniform sound coverage throughout the entire listening area—even off to the extreme sides
Curved array design provides 40° of vertical coverage
Integrated ToneMatch® presets contain hardwired equalization curves for dynamic handheld microphones and acoustic guitars
Lightweight, interlocking components for easy transport
Offers both collapsed and extended setup positions Applications
- Live music performances
- Mobile DJs
- Places of worship
- Schools and universities
- Resorts and hospitality venues
- Business presentations
Documentation
- L1® Compact FAQ (pdf format)
- L1® Compact Technical Data
- L1® Compact Features Functions and Benefits (pdf format)
- L1® Compact Interactive Tour
Interactive Tools
Videos
Documents and Resources
- L1® Compact FAQ (pdf format)
- L1® Compact Technical Data
- L1® Compact Features Functions and Benefits (pdf format)
- L1® Compact Interactive Tour
L1 Products Comparison
FAQs from the Bose® Pro Portable PA Community
Presets
Channel 1:
- T1 ToneMatch® Audio Engine equivalent: Handheld Mics
- L1® Model I equivalent: 01 Handheld Microphones
Channel 2:
- T1 ToneMatch® Audio Engine equivalent: Acoustic Guitars: Steel String w/piezo
- L1® Model I equivalent: 40 Acoustic Guitars: Steel String w/piezo
Bass Expansion
Q: Can I use a PackLite® power amplifier model A1 with the Compact?
A: Basically, no.
Applicable quote from Neil-at-Bose
- We designed the L1 Compact to feature integrated bass and as a result the bass is not expandable as it is with L1 Model I or Model II.
- The L1 Compact's output passes a full-range signal therefore it would send alot of "undesired" mid range frequency to a Packlite system which would significantly alter the tonal balance of the system.
- If you are a customer that needs more bass a L1 Model I or L1 Model II system would be be a better fit.
Source: Neil-at-Bose in the Bose® Pro Portable PA Community
Controls
We’ve designed the L1 Compact with the goal of providing a simple user interface for both musicians and general purpose users. You will notice there is volume control for each channel but no overall master volume. This means that the power amp section is always at full gain. In this configuration the Channel 1 and Channel 2 volume controls are effectively acting as trim controls. The benefit of a trim control is that you don’t need to significant gain in order to drive the L1 Compact to full output.
The L1 Compact microphone Channel 1 is designed to work with a wide range of handheld microphones from popular microphones like a Shure Beta 58A all the way to lower sensitivity microphones like the Sennheiser e8155. As you may know sensitivity can vary between microphones so we’ve elected to include a higher amount of gain on the microphone channel.
In order to maximize signal to noise (when using the L1 Compact Channel 1 Microphone Channel) we recommend that you determine the loudest level that is required for your room/application and follow the steps below.
- Plug in your microphone to Channel 1
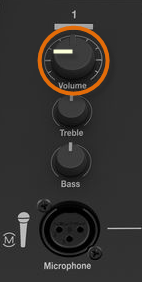
- Turn the L1 Compact Channel 1 Volume/Trim to 9 o’clock
- Speak into the microphone at your loudest volume and softest volume
- Adjust the Channel 1 Volume/Trim control to a setting that will work for your loud and soft vocal passages.
- Remember since this is effectively a trim control (and the master is at full) you don’t need to build additional headroom into the system.
- Additional tip: In most cases, the Channel 1 Volume/Trim Preamp has more gain than you will ever need, so if you don’t need the extra gain, don’t use it as it will only introduce noise.
Setting the Volume and the LEDs
Question: What do the Signal/Clip indicators (green/red lights) on the L1 Compact mean.
Answer:
- For both Channel 1 and Channel 2 the Red LED indicates that the Limiter is being activated.
- Blinking red signifies that you are achieving maximum usable audio output
- Solid red indicates that the system is clipping and volume should be reduced
Question: What happens when the Compact is running at full-out. That is, is it going to audibly clip, compress or something else.
Answer:
- The L1 Compact limiters are set to allow some audible clipping to enable a performer to hear when the unit is topped out and have a better feel for its maximum output range.
Differences in Volume Settings
There have been reports that the volume controls behave differently when comparing early production units and later ones.
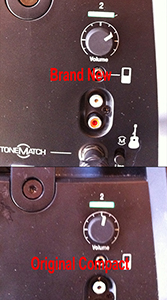
- I can see how it could be possible that there could be subtle differences in the position of the level controls between early and newer production units, but this variance should be very small. We did receive some initial comments that suggested that the system got loud very quickly, therefore the pot taper on the newer units is slightly different. The amount of usable volume remains unchanged and there were no adjustments to the tonal balance of the system. — Neil-at-Bose, January 2010[1]
Positioning
From the L1® Compact Owner's Guide (pdf format)
The L1® Compact does not play as loud, nor as deep in bass, nor does it project as far into a room as either the L1 Model I or L1 Model II. If you are used to performing with a L1® Model I or L1® Model II you may find that you have to run the L1® Compact louder on stage than the others to project into the room.
The L1® Compact has extremely wide horizontal dispersion (like the L1 Model II. If you are using a vocal microphone you will probably have better gain-before-feedback with the L1® Compact off to the side a bit so the microphone is aimed away from the speaker array on top of the L1® Compact.
More: Stage Layouts / Positioning Your System
Compact in Table Top Mode
- Question
- To my knowledge, this is the first time Bose has suggested we place a bass enclosure on a table (for certain applications). It seems to me this would reduce bass response (no reflecting surface, like a floor) and invite the table itself to vibrate at certain frequencies. Source: Bose Guy in Calgary
- Answer
On the subject of bass performance, a bass box can under certain conditions, create undesirable cancellations (dropouts) at certain frequencies, because of interference between the bass box and it's mirror image from a nearby boundary.
In the worst case, if you put a bass box outdoors, 1/4 wavelength above the ground, then climbed a ladder so your ears were over the bass box, you would be on the line connecting the bass box and it's mirror image and at a frequency equivalent to a 1/4 wavelength distance between box and ground, there would be a deep notch in the response.
However, if you were instead on the ground (not on a ladder) and so were roughly equal distance from the box and it's mirror image there would be no harmful cancellation.
That's roughly what to expect when you put the L1 Compact on a table: listeners are on the ground plane and therefore are roughly equal distance from the speaker and its mirror image, and therefore should not hear a dropout of bass.
We did a lot of experimentation and we're confident that the L1 Compact sounds really good in tabletop mode.
On the subject of table vibration, I think the only thing to be concerned about there is something rattling or audible vibrating. So far, that hasn't happened to me, but if it did, and I couldn't deaden the vibration I'd have to move the L1 Compact, or as suggested, use it on the floor in extended position.
Ken
Source: Ken-at-Bose
L1 Compact Microphone Accessory Pack
Contents:
- Audix OM3 microphone
- Audix CBL-20 20' XLR cable
- Stereo RCA cable
- 3.5mm Stereo mini cable
The Handheld Mic or Audix OM3 preset both work great.
To obtain pricing and availability please contact 800-444-2673.
Universal Power Supply
The L1 Compact system features a switching power supply that allows it to operate in regions ranging from 100V – 240V. The proper power cord for the specific region in which the system was purchased is included in the product carton.
Available in Bose Retail Stores
The L1 Compact will be offered in all Bose retail stores, the L1 model I and model II will remain in select stores only.
Extensions
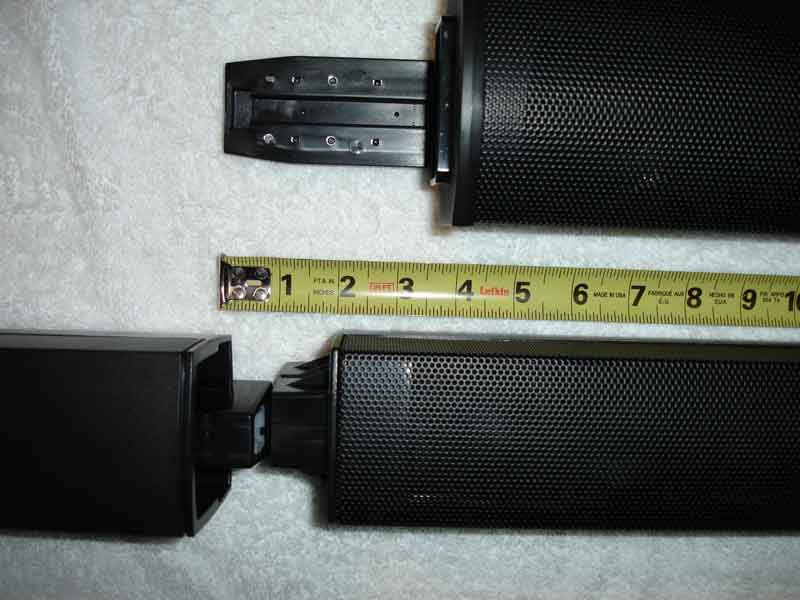
The extensions are interchangeable. They contain no speakers.
Q: Why does Bose say that I have to use both extensions?
A: You can use either or both extensions but we didn't see applications where there are advantages to using one so we don't promote it that way.
— Source: Ken-at-Bose
- Extended Position
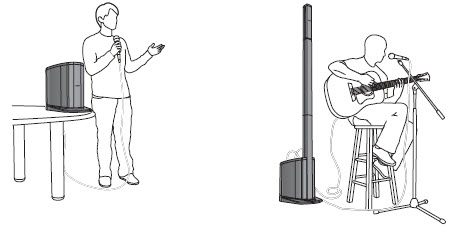
Recommended for larger audiences, the extended position allows users to elevate the L1 Compact loudspeaker array, enabling it to project sound clearly and evenly throughout larger venues. Included with the L1 Compact system are two interlocking L1 Compact extensions used to elevate the array.
- Collapsed Position
Recommended for smaller audiences, the collapsed position allows the L1 Compact loudspeaker array to be inserted in the front of the power stand, creating a very small profile. When used in this position, the system should be placed on top of a table or elevated stage. This will allow sound to project clearly and evenly throughout the room.
For optimal performance, we recommend using both extensions when the system is set up in its Extended position.
Drivers
Array Section
There are six high power drivers in the array section.
Vertical Dispersion
- With the Models I and II, I have had to tilt them forward on occasion (no more than an inch on the PS cabinet or back legs) because the output pattern is so horizontal. This made a very audible improvement for the back seats.
I expect, with the Compact, this will no longer be necessary due to the new array configuration. Any idea what the vertical dispersion angle is on the high end? Bose Guy in Calgary
Plus or minus 20 degrees. No tilting needed.
The vertical dispersion is only +-20 degrees which is pretty confined compared to most stand mounted speakers.
The curvature in the array is to achieve the +-20 degree vertical pattern. We designed for that pattern so the speaker would work in a typical raked seating area -- something we thought the L1 Compact system would be used for a lot, and we wanted to make sure that those seated in the front row of a cramped venue with the product in it's extended position would still get sound.
Convex arrangement of 6 speaker array
- I'm curious about the slight 'convex' arrangement of the 6-speaker array. Why that rather than a straight or even a slightly 'concave' arrangement? Source: Dan Cornett
The vertical convexity of the HF array will actually produce a very useful vertical dispersion at HF. The unit needs this. IF it were a straight array, you'd be shooting over the heads of, say, people seated in front of a bandstand looking up. That geometry coupled with the driver articulation (like the L1/II) makes for a spectacular distribution of sound, especially in the HF. It's amazing when you hear it.
Power Stand
The L1 Compact systems power stand has integrated bass with an 8" woofer and will play down to 65hz. The drivers in the loudspeaker array are indeed smaller than those used in the L1 model I and model II systems.
Crossover
We moved the crossover up to 400-ish.
Voicing / T1 ToneMatch® Audio Engine
We voiced all the L1 systems the same, so that tone would be the same on each.
Also, that makes it possible for the T1 audio engine to travel from say a Model II to an L1 Compact system with no additional change of settings on the T1.
Comparisons to Other Members of the L1® Family
These are anecdotes from people-at-Bose.
Ken-at-Bose
What I would say is that the L1 Compact system does not play as loud, nor as deep in bass, nor does it project as far into a room as either the L1 Model I or Model II.
It doesn't really offer expandable bass.
We think its performance and price are very appealing to a large number of people for whom the performance and price of the Model I or Model II are unnecessarily high.
If I played in bigger, noisier rooms, used bass and drums, or played hard driving rock/blues/metal, or had an instrument that really shined because of deep bass etc. I should be steered to the Model I or Model II.
For a quiet, attentive audience I would think that a singer songwriter could comfortably entertain 150 people, give or take, with an L1 Compact system
If the room or people are noisy, take that down to 50.
Cliff-at-Bose
First of all, the L1® Compact is very different in basic nature from the two original ones. It has a head-high vertically-divergent array that is ultra-wide horizontally. the vertical angle is narrow enough so its sound pressure fall-off with distance is not as severe as, say, a guitar amp, but it's somewhat greater than an L1 Model I or L1 Model II. We have data galore taken on the L1 Compact array, but to a musician, it's not only useless, it's confusing. Thinking about this stuff intellectually leads nowhere.
So, forgetting all this, The L1 Compact sounds the same and, from personal experience playing and singing solo, it feels the same. When I played (this seems to be a typical configuration), the system was off to the side 5' and back of me 4'. It is louder when you get on top of it (unlike the L1) so you need to get a little further from it. But not much.
It's very well behaved and it's easy to arrive at an organically-correct distance from it. But; bottom line; it really behaves like the other L1's. I know it has less overall output than the big ones, but I never felt that limit playing demos for a variety of audiences prior to yesterday's launch. I know the system will allow me to entertain at a level I'm happy with in our live music theater. I really don't want more level from it. Our theater holds over 100 and is acoustically treated to be pretty dry. Charlie Farrin did the same on a number of occasions. He's an experienced pro, playing guitar and singing to demonstrate for other audiences. As an audience member listening to Charlie, I was delighted with the sound quality and level. It was exceptionally articulate musically and I understood all his words, on songs I wasn't familiar with.
I'm guessing if you're playing guitar or keys and singing (a solo gig), you can play for 100 with great quality. I never thought once about the capacity of the LF (lower frequencies). My keys are never exaggerated on the low end and I want them to sound like, for instance, a real piano or a Rhodes Suitcase. I'm guessing an organ player playing a heavy bass line and singing, like a solo gig, might put the thing to the test. I haven't experienced this and don't do it myself.
Microphones
Discussion of Microphones you can use with the Compact
Connections from a T1 ToneMatch Audio Engine
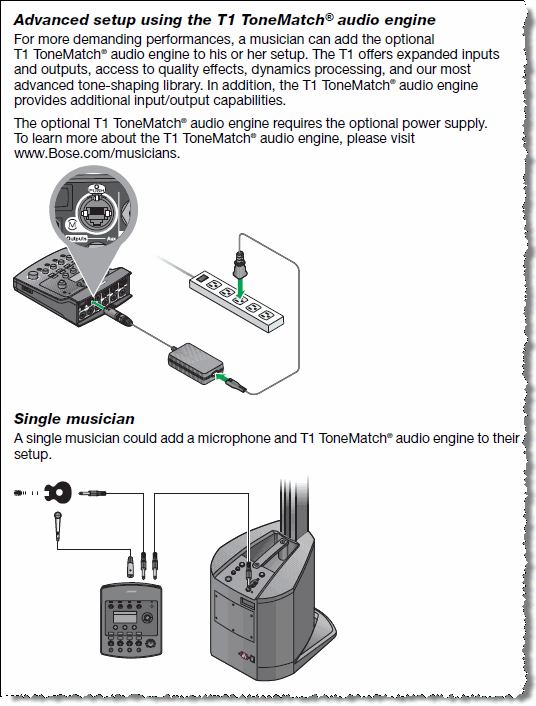
You can connect a T1 ToneMatch Audio Engine to L1 Compact
Here is an excerpt from page 12 of the L1® Compact Owner's Guide (pdf format)
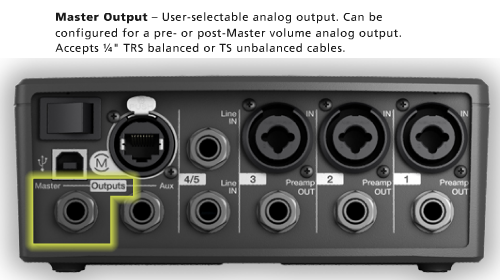
Connect FROM T1 ToneMatch Audio Engine Master or Aux Output using ¼ inch jack connections.
Connect TO the Compact Channel 2 volume straight up (12:00 o'clock to 1:00 o'clock) for good results. You can turn it up higher, but if you see the light on the Compact solid red (flickers of red are okay) or you hear distortion, turn down the volume on the Compact.
¼ Inch Tip-Ring-Sleeve (balanced) to ¼ Inch Tip-Ring-Sleeve (balanced)
A balanced connection is preferred and will provide better noise rejection over greater distances than the unbalanced connection.
¼ Inch Tip-Ring-Sleeve (unbalanced) to ¼ Inch Tip-Sleeve (unbalanced)
This should work fine but a balanced connection (immediately above) is preferred especially if you will have cable runs in excess of 20 feet (6 meters) or if you hear line noise, hum or hiss.
Channel 2 Connection from T1 ToneMatch Audio Engine Details
Connect the T1 ToneMatch Audio Engine Master output L1 Compact channel 2.
Turn the Channel 1 volume all the way down (fully counterclockwise) unless you have a microphone attached to it.
AC Power
Battery Power
This is especially for those who want to run the L1 Compact with an inverter connected to a car battery or from a Power Pack.
Note: The L1 Compact accepts all AC Power In voltages from 100V to 240V, the different part numbers change the power cord in the box.
Here is the AC Power in levels we have measured on the L1 Compact, please realize that these are approximate and vary greatly with audio content.
                Power   230V   120V   100V

          Idle:  12W   0.06A   0.1A   0.12A
       (no audio)

Filling a room:  30W   0.14A   0.25A  0.3A

      Full Out:  60W   0.3A    0.5A   0.6A
(Red LED blinking)
Note: The AC line power in can peak around 100W during a loud burst.
We have also tested the L1 Compact with several DC to AC Inverters. Avoid modified sine wave inverters. Pure sine wave inverters are preferable.
I recommend that an inverter of at least 300W be used. Less then that has not been tested.
Here are measurements we took, realize this also includes the inverter efficiency:
Current from 12V Battery to Inverter

          Idle: 12W   1.5 Amps from battery

Filling a room: 30W   3 Amps from battery

      Full Out: 60W   6 Amps from battery
There are also "Power Packs" available which have the battery built-in with the inverter. To find out how long one of the "Portable Power Packs" will run divide the amp hour rating of the battery by the amps from the list above (usually divide by 3), this is assuming it uses a 12V battery.
There was a follow-up question about the impact of using a T1 ToneMatch Audio Engine with the L1 Compact. Expect that adding a T1 ToneMatch Audio Engine may draw as much power as the L1 Compact meaning that your power requirements may be double what is show above.
What an interesting inquiry! First I'll note the official maximum wattage spec for L1 Compact is 200 watts max. Keep in mind, maximum power draw would only occur with the L1 playing at maximum, blaring volume. Normal power draw at "normal" volumes will be something much less than 200 watts.
The T1 power supply rating of 81-100 VA is the same as 81-100 watts (volts times amps is watts). So I consider T1 maximum power draw 100 watts.
So based on these official specs this setup presents a maximum draw of 300 watts. A good rule of thumb for an inverter would be to oversize by at least a factor of two so at least 600 watts for the inverter.
Keep in mind official specs can be conservative (as Tom's lower wattage numbers show). Feel free to measure your power draw at home using regular utility and/or inverter power. If you have access to a kill-a-watt or similar, it will tell you how much power in watts your Compact and T1 are drawing with your sources at your levels. Sometimes real-world testing is best.
Thanks and good luck!
MattS-at-Bose MattS-at-Bose
Channel 1
Question: Channel One on the L1 Compact seems noisy.
Response from Craig-at-Bose
First and most importantly, please make sure that you have a microphone connected when you turn up the Channel 1 Volume control. As other members of the community pointed out, when the Channel 1 Volume control is set to 12:00 o'clock the system is extremely loud. Below are some additional details as well as guidelines for adjusting your levels. Please read through my post and let me know if you have any further questions.
We’ve designed the L1 Compact with the goal of providing a simple user interface for both musicians and general purpose users. You will notice there is volume control for each Channel but no overall Master volume. This means that the power amp section is always at full gain. In this configuration the Channel and Channel 2 volume controls are effectively acting as trim controls. The benefit of a trim control is that you don’t need to significant gain in order to drive the L1 Compact to full output.
The L1 Compact microphone channel is designed to work with a wide range of hand held microphones from popular microphones like a Shure Beta 58A all the way to lower sensitivity microphones like the Sennheiser e8155. As you may know sensitivity can vary between microphones so we’ve elected to include a higher amount of gain on the microphone channel.
In order to maximize signal to noise (when using the L1 Compact Channel One microphone channel) we recommend that you determine the loudest level that is required for your room/application and follow the steps below.
- Plug in your microphone to Channel 1
- Turn the L1 Compact Channel 1 Volume / Trim to 9 o’clock
- Speak into the microphone at your loudest volume and softest volume
- Adjust the Channel 1 Volume / Trim control to a setting that will work for your loud and soft vocal passages.
- Remember since this is effectively a trim control (and the master is at full) you don’t need to build additional headroom into the system.
- Additional tip: In most cases, the Channel 1 Microphone Preamp has more gain than you will ever need, so if you don’t need the extra gain, don’t use it as it will only introduce noise.
Thanks, Craig
Channel 2
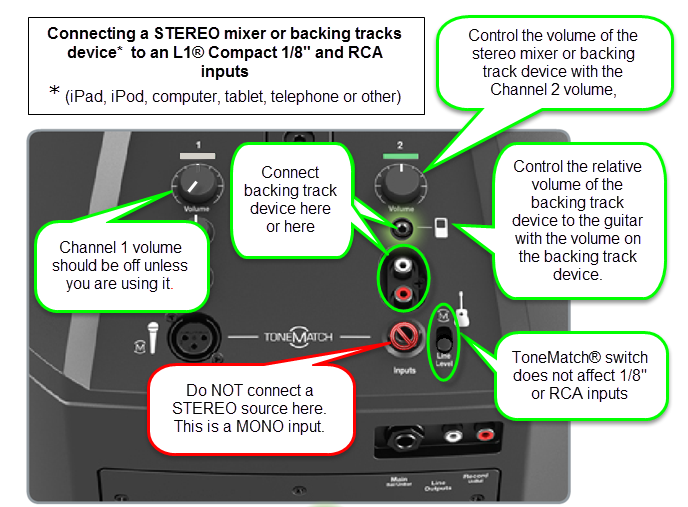
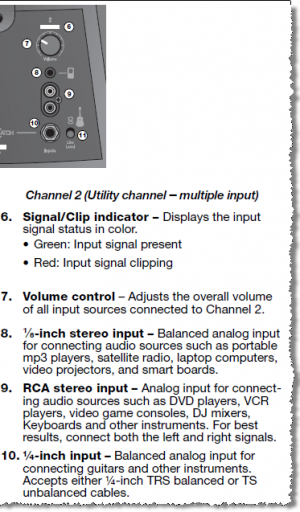
The Compact is different from the Model 1S and Model II because it can accept stereo inputs on the Channel 2 1/8" and RCA inputs.
Stereo Inputs on Compact Channel 2
If have RCA outputs from your mixer you can connect to the Compact Channel 2 RCA inputs. It's likely that the RCA outputs on the mixer are recording outputs and you may have control the output level separate from the mixer master faders. Please see your manual for details.
If you have a way to convert the mixer stereo output to 1/8" stereo jack then you can connect to Compact Channel 2 1/8" stereo input.
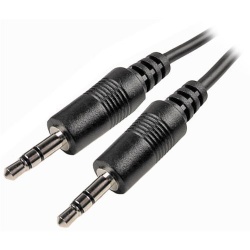
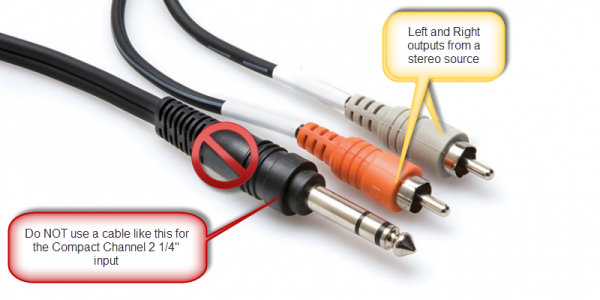
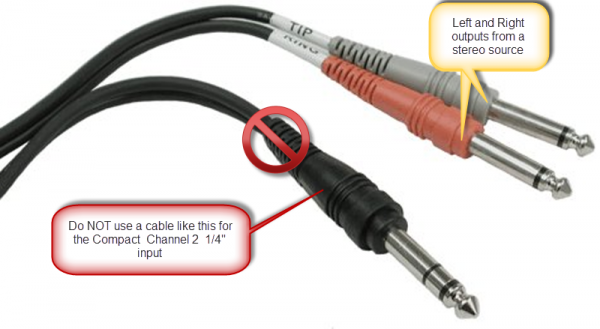
Use a cable like this from your backing track source (iPod, Computer, CD / DVD player)
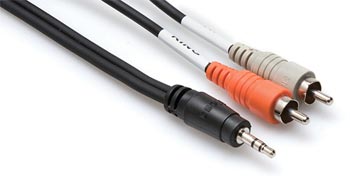
or if your cable has RCA (phono) jacks you can use a cable like this.
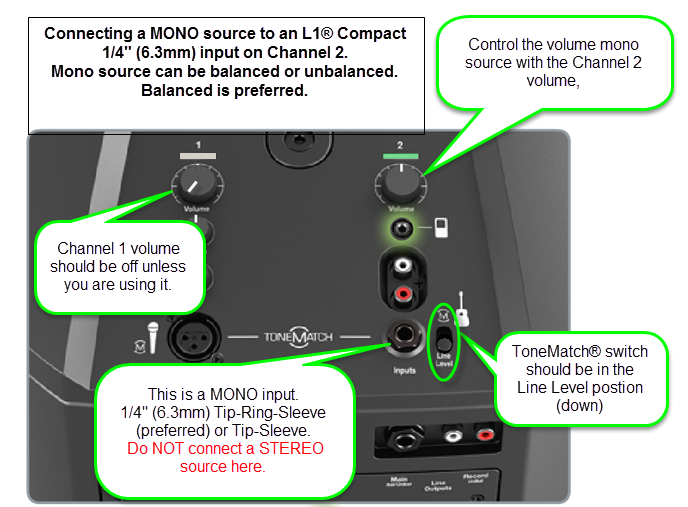
Mono Input on Compact Channel 2
Start with the Volume set straight up and adjust so that you get a solid green signal. If you see red, turn the trim down.
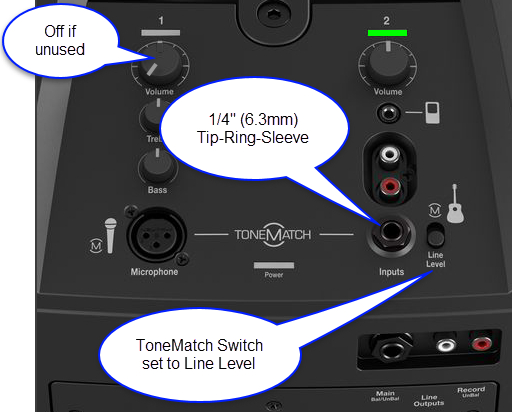
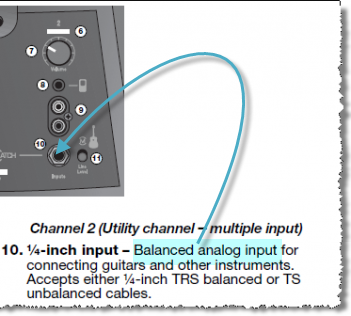
The ¼ inch jack input accepts a balanced or unbalanced connection.
- Can a stereo signal be used with the ¼ inch jack input?
A ¼ inch Tip-Ring-Sleeve connector carrying a stereo signal should not be used with the analog input on the L1 Compact.
Even though a ¼ inch Tip-Ring-Sleeve connector can carry a stereo signal this is not how this physical connection is used on the L1 Compact.
The ¼ inch jack input on the L1 Compact is balanced, and will therefore subtract the Left and Right signals on a stereo cable and you will hear almost no signal in the L1 Compact.
- The 1/8 inch jack is STEREO not Balanced
The L1 Compact Channel 2: 1/8-inch jack is STEREO not BALANCED.
The written documentation is incorrect. It says:
- 1/8-inch stereo input - Balanced analog input for connecting audio sources such as portable mp3 players, satellite radio, laptop computers, video projectors, and smart boards.
Correction
- 1/8-inch stereo input -
BalancedStereo analog input for connecting audio sources such as portable mp3 players, satellite radio, laptop computers, video projectors, and smart boards.
Source Neil-at-Bose
Line Out
Rear panel outputs
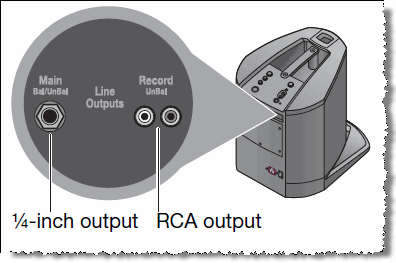
¼-inch output – Mono analog output that accepts either ¼ inch Tip-Ring-Sleeve balanced or Tip-Sleeve unbalanced cables.
Can be used to link multiple L1 Compact systems together by connecting the ¼-inch output from one L1 Compact system to the ¼-inch input (Channel 2) on a second L1 Compact system. This will provide additional coverage in larger spaces. You can also use the ¼-inch output to connect to a house PA system and use the L1 Compact system as your personal monitor.
Output Level
¼ inch (6.3 mm) jack: Nominal +2.2 dBu, Max +20 dBu
Note: Using a TS unbalanced cable will result in a drop in the audio level of -6dBu.
Source: Page 6 of the L1® Compact Owner's Guide (pdf format)
¼ inch jack output EQ
The Compact has a balanced line-out that is a mix of all the inputs, post level and EQ settings on the input panel. The signal at the line out will be full range down to 30 Hz. There is an exception. The Channel 2 input will be band-pass above 60 Hz (nothing below that) when the ToneMatch® switch is ON (up position). The other inputs are unaffected.
- If the Tonematch switch is engaged on Channel 2 then sources connected to the 1/4" input will not pass anything below 60Hz out of the line outputs.
- This does not apply to the 1/8" and RCA inputs which will pass information down to 30Hz through the line outputs regardless of where the ToneMatch switch is positioned.
- If the ToneMatch switch is set to line level sources connected to the 1/4" input will also pass information down to 30Hz through the line outputs.
Assumptions
- You have more than two inputs requiring presets.
- Two or more of those inputs are similar, for example: microphones that are of the same make and model.
- You have a stereo mixer or one that has two distinct busses.
General Principles
For the following discussion, a "side" of the mixer is either Left or Right, or it could be a "buss" or "alt" channel routing.
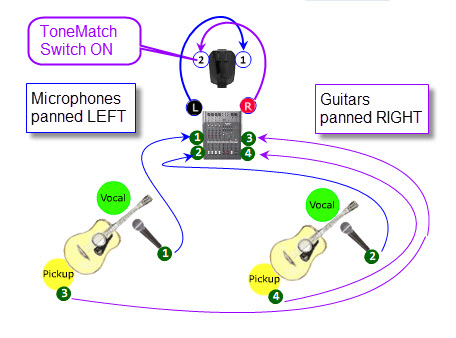
- Pool all microphone inputs to one side of the mixer (e.g. LEFT).
- Take the pooled output (LEFT output the mixer) to Compact Channel 1 (built-in Preset is Handheld Vocal Microphone)
- Pool all other inputs to the other side of the mixer (e.g. RIGHT)
If these inputs are not acoustic guitars with pickups run the mixer RIGHT output to Compact Channel 2 with the ToneMatch switch set to Line Level (down).
- Take the pooled output (the other side of the mixer) to Power Stand Channel 2 and use a Preset that is appropriate for the input, or Preset 00.
- Take the pooled output (RIGHT output the mixer) to Compact Channel 2
- If the inputs are acoustic guitars with pickups set the ToneMatch switch ON (up position)
- If the inputs are NOT acoustic guitars with pickups set the ToneMatch switch to Line Level(down position)
Example
2 Vocals, 2 Guitars
- You have two vocal microphones. Route these through the mixer to Compact Channel 1
- You have two similar Acoustic Guitars with pickups. Route these through the mixer to Compact Channel 2 with ToneMatch switch on (UP).
Connections
Microphones
- Run both microphones to the mixer.
- On the input strips for the microphones pan all the way to the LEFT
- Run the Mixer LEFT output to the Compact Channel 1
Guitars
- Run both Guitars to the mixer.
- On the input strips for the Guitars pan all the way to the RIGHT
- Run the Mixer RIGHT output to the Power Stand Channel 2
- Set the Compact Channel 2 ToneMatch Switch ON (up position)
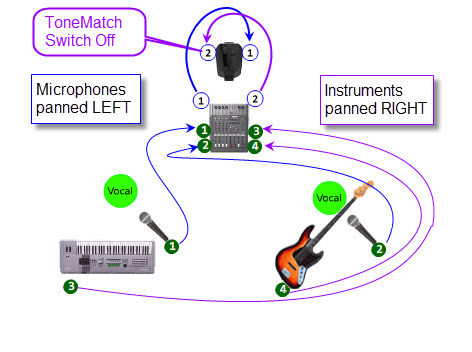
2 Vocals, 2 Instruments
Microphones
- Run both microphones to the mixer.
- On the input strips for the microphones pan all the way to the LEFT
- Run the Mixer LEFT output to the Compact Channel 1
Instruments
- Run both Instruments to the mixer. I used a Keyboard and an Electric Bass as examples
- On the input strips for the Instruments pan all the way to the RIGHT
- Run the Mixer RIGHT output to the Power Stand Channel 2
- Set the Compact Channel 2 ToneMatch Switch to Line Level (down position)
Compact Extensions Sticking
All,
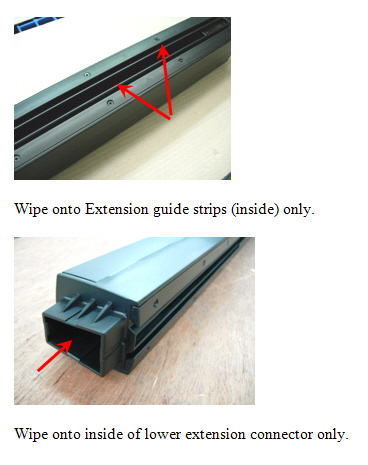
For those folks that are experiencing this issue we can confirm that using a “dry lubricant with Teflon” would be an acceptable solution. This can be sprayed onto a cloth and wiped onto the inside of the extension & array tracks and the inside of the lower extension electrical housing.
Note: Please do not spray directly near the electrical connections:
There are many manufactures that offer similar products, one in particular that we have used in the past with success is the TRI−FLOW* Superior Dry Lubricant with Teflon* produced by Sherwin-Williams, please note that we do not endorse any one product in particular – we are merely trying to provide you with a point of reference.
I hope this information is helpful.
Thank you, Neil
original discussion: Compact Extensions Getting Difficult to Insert
Tip for Separating the Extensions
Here is a tip for Col. Andy on the Bose® Pro Portable PA Community
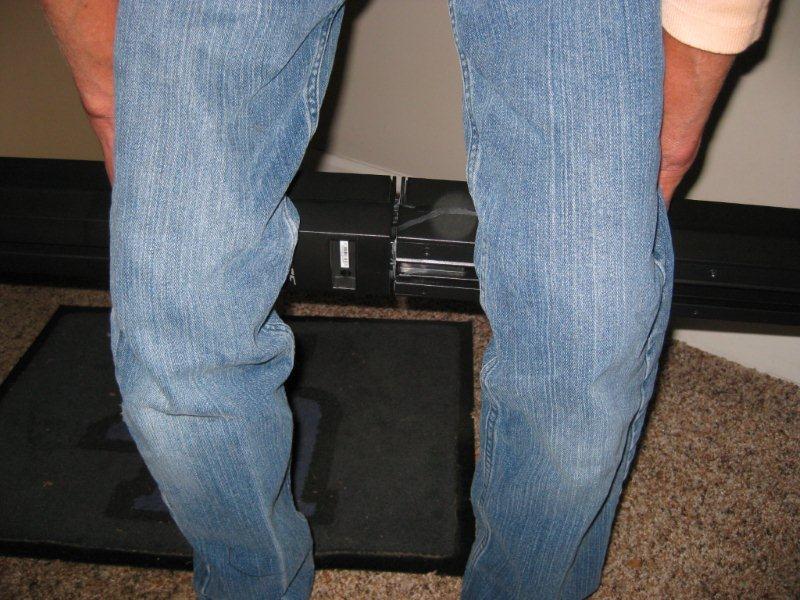
- I use an old fisherman's trick that gets a sticky collapsable rod apart to get my Compact extensions apart.
After removing the speaker section, with your knees together, place the joined extensions behind them. Spreading your knees against your wrists will then apply even pressure to seperate the sections.
- When you spread your knees against your hands, it provides a straight even pull. You can also see the overspray from the dry lubricant I use to make the separation easier.
Sources:
Static Electricity
Some Compact owners report static electricity sparks when removing the cover from the Power Stand.
Here is a note from Neil-at-Bose
- It sounds like the sparks are from the cover to the plastic case. They will dissipate without a problem. Engineering thoroughly tested the L1 Compact with ESD (electro static discharge) hits to all surfaces and the most common result is that absolutely nothing happened. On some discharges an audio crackle can be heard.
- We would like to assure you that this will not damage the system.
Source — Neil-at-Bose
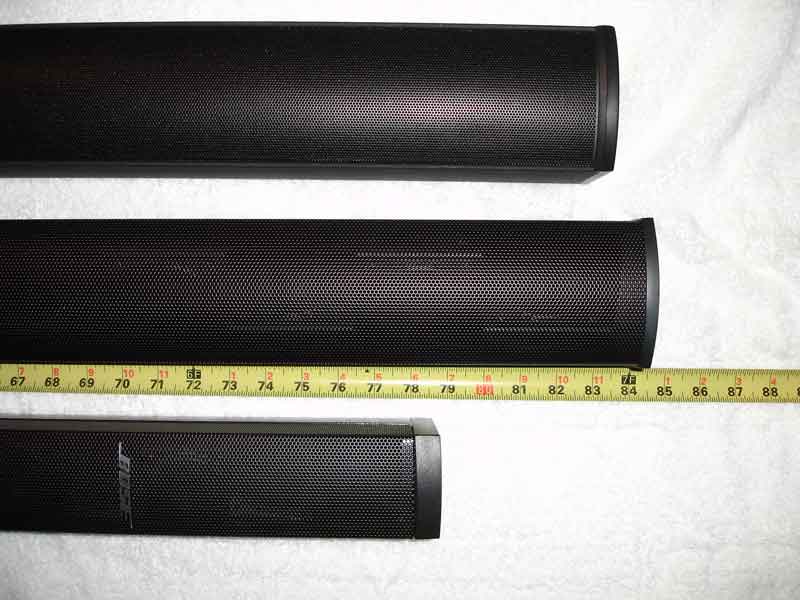
Physical Comparison to other L1® Products
System Heights (fully assembled)
Fully assembled height
- Model I / Classic: 82.75
- Model II: 84 inches
- Compact: 78.5 inches
Assembly Clearance
You need 2 inches above the height of the Compact's fully extended height to assemble it.
- Compact = 78.5 + 2.0 = 80.5
That is compared to four inches clearance for the
- Model II = 84 + 4 = 88
- Model I = 82.75 + 4 = 86.75
- Classic = 82.75 + 6 = 88.75 (long bayonet setting)
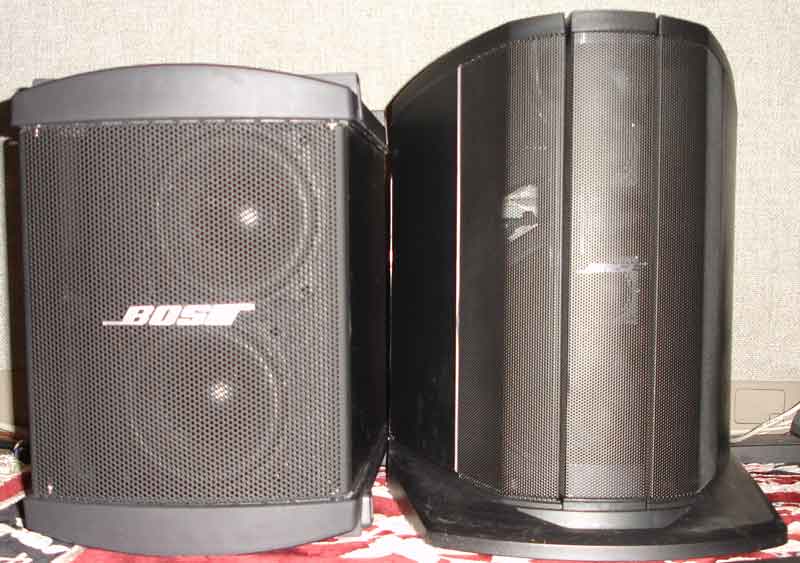
B1 and Compact
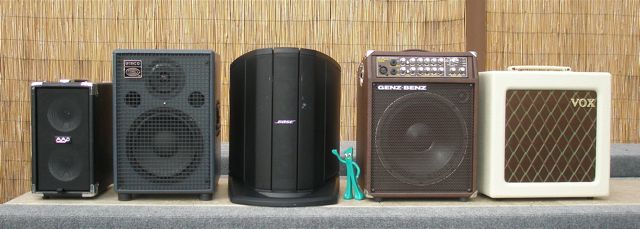
Physical Comparison to other small amplifiers
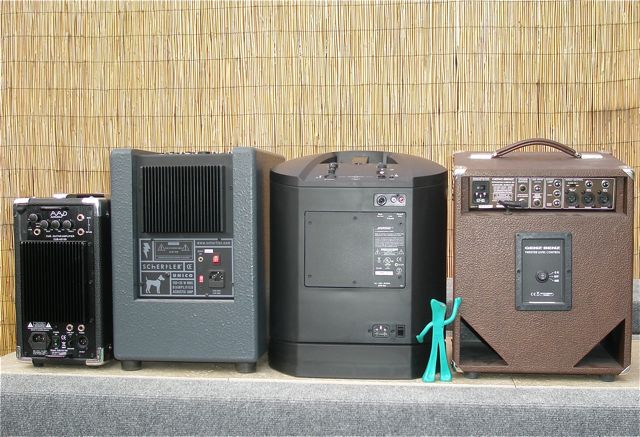
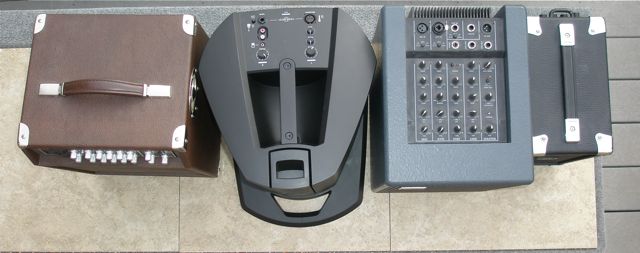
Compact beside other amplifiers. — Thanks to Kramster for the pictures.
From the left: AAD Phil Jones Cub 100, Schertler Unico, Compact, Gumby, Genz Benz Compak 300 T10, Vox AC4TV
From the rear
From the top
Used with permission from Kramster — Source - Kramster
Quick Start Card
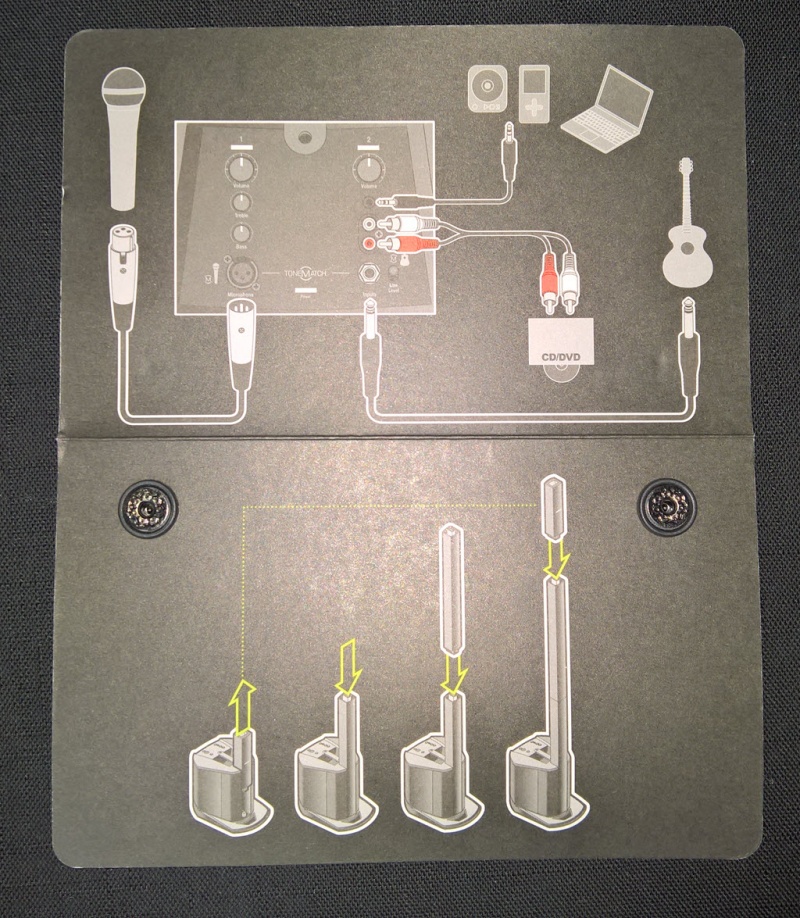
On the L1 Compact slip cover there are two snaps. These secure the Quick Start Card.
Zusammenfassung in Deutsch
Hier eine kurze (allerdings unvollständige) Zusammenfassung in deutsch:
- Das Abstrahlverhalten i.d. Breite (horizontal) soll aber praktisch identisch mit der L1-Familie sein. Die vertikale Abstrahlung soll bei etwa +/-20° liegen, d.h. man muss die Säule nicht mehr kippen, z.B. um die Zuhörer direkt v.d. Bühne oder auf nach hinten ansteigenden Sitzreihen zu erreichen.
- Reichweite: Die L1® Compact trägt wegen der kürzeren Säule (mit 6 Hochleistungs-Treibern) nicht ganz so weit wie die "grosse" L1, d.h. die Lautstärke fällt mit zunehmender Entfernung etwas mehr ab.
- Leistung: Klar, daß die L1® Compact u.a. aufgrund des deutlich geringeren Gewichtes weniger Leistung als die anderen L1-Modelle hat. Dennoch reicht die Leistung aus, um 150 "ruhige" Zuhörer mit hervorragendem Sound zu versorgen, - bei lauterem Publikum reduziert sich diese Zahl allerdings auf etwa 50 Leute.
Aber natürlich gilt auch hier: Selber hören u. sehen ist besser als viel lesen.
Source: BlackForestMan Wolfgang
Expanded Text from the L1® Compact Page
L1® Compact system
- Bose® Spatial Dispersion™ loudspeaker technology delivers sound evenly across the stage and throughout the audience—even to the extreme sides
- Two ToneMatch® channels with fixed presets for a handheld microphone and an acoustic guitar
- Integrated bass speaker in power stand
- Two setup positions: collapsed for smaller spaces or extended for larger ones
- Ideal for musical performances, mobile DJs, classrooms, business presentations and other events
Introducing the L1 Compact portable line array system. Carry it in one trip. Set it up in one minute. Fill the room with Bose sound.
The new L1 Compact system combines conventional PA and monitors into one sleek unit. Positioned behind or to the side of a performer, DJ or presenter, it delivers wide, even sound coverage throughout the stage area and audience—even off to the extreme sides. It's our smallest, lightest, easiest-to-set-up L1 system, weighing just 29 pounds.
Big sound. Small package
Now you can have quality Bose sound for almost any gig, event or occasion. The L1 Compact system is small enough to fit in your trunk or back seat, and its innovative modular design makes setup easy and fast. You can arrange it in either a collapsed configuration for smaller spaces or a taller, extended configuration for larger ones. No extra gear to haul. No heavy speakers to hoist onto stands. No speaker cables.
A different loudspeaker
The L1 Compact system's slim loudspeaker distributes sound clearly and evenly throughout the room, thanks to Bose Spatial Dispersion technology. The speaker's unusual vertical shape makes it distinctly different from conventional PA speakers―and has a very positive effect on sound coverage. Even audience and band members off to the extreme sides hear the same clear, tonally balanced sound as those in front.
The L1 Compact loudspeaker array is smaller than those in L1 Model I and II systems, but it produces comparable horizontal sound coverage. L1 Model I and Model II loudspeakers project sound further with less dropoff of volume than the L1 Compact array.
Integrated system
With the L1 Compact system, you don't have to carry a separate amplifier, mixer or bass cabinet: They're already built in. The system's power stand includes an integrated bass speaker and amplifier, plus a built-in mixer providing a total of four inputs and two outputs.
Channel 1 is a microphone input with a customized ToneMatch preset for a handheld dynamic microphone. The preset automatically optimizes a handheld microphone's tone when used with the L1 Compact system. Channel 2 accepts up to three inputs at once, including a guitar, keyboard or other instrument, DJ mixer, MP3 player, laptop or projector. It features a customized ToneMatch preset to optimize the sound of an acoustic guitar.
The new L1 Compact system: audio performance, simplified setup and one-trip portability. Only from Bose.
Bose L1® Compact
URL http://worldwide.bose.com/pro/en_us/web/l1_compact/page.html
Release Date: 2012-09-27
Height: 78.5 inches
Weight: 29.2 pounds
Power Stand Depth:16.8 inches
Power Stand Width:13.2 inches
Description: FAQ, documentation, hints and tips for owners of the L1® Comppact
Description:
Key Features
High-performing, powered, portable two-way loudspeaker system with a 180° H x 40° V nominal dispersion designed for the production and reproduction of live music, music playback, speeches and A/V sound reproduction
Articulated line array loudspeaker technology produces wide, uniform sound coverage throughout the entire listening area—even off to the extreme sides
Curved array design provides 40° of vertical coverage
Integrated ToneMatch® presets contain hardwired equalization curves for dynamic handheld microphones and acoustic guitars
Lightweight, interlocking components for easy transport
Offers both collapsed and extended setup positions
Physical
Enclosure
Power Stand: Polypropylene
Extensions and Array: ABS
Dimensions
Assembled height, collapsed position: 16.5" (418 mm)
Assembled height, extended position: 78.5" (1995 mm)
Net Weight
Power Stand: 24.6 lb (11.2 kg)
Extensions (each): 2.3 lb (1.1 kg)
Color
Black
Package Contents
1 system
- ↑ Neil-at-Bose Why do two Compacts Sound Different January 2010

