Difference between revisions of "B1 Cable"
m |
m (→Replacement and Longer Cables) |
||
| Line 20: | Line 20: | ||
[http://www.audiopile.net/NL413GA Audiopile.net NL413GA | NL4 Speakon equipped 13/4 Speaker Cable] | [http://www.audiopile.net/NL413GA Audiopile.net NL413GA | NL4 Speakon equipped 13/4 Speaker Cable] | ||
| − | ;Note: If you have an L1 Model 1S or L1 Model II - do NOT add a 10k resistor to the cable. That's only required with an L1® Model I or L1® Classic. | + | ;Note: If you have an L1 Model 1S or L1 Model II - do NOT add a 10k resistor to the cable. That's only required when using a B2 with an L1® Model I or L1® Classic. |
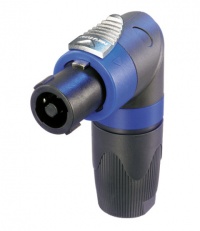
Consider getting 90 degree ends like this: | Consider getting 90 degree ends like this: | ||
| + | |||
[[File:NL4FRX.jpg|link=http://www.audiopile.net/NL4FRX|Image=NL4 400w.jpg|200px|NL-4 speaker cable]] | [[File:NL4FRX.jpg|link=http://www.audiopile.net/NL4FRX|Image=NL4 400w.jpg|200px|NL-4 speaker cable]] | ||
Latest revision as of 10:32, 28 January 2024
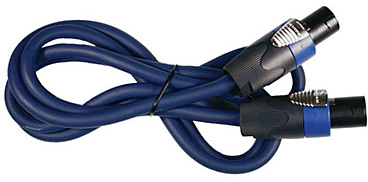
— click image to see details at http://bose.com/musicians —
If you are having issues with your L1 - sound dropping out and resuming you may want to double check your blue B1 cables.
B1/B2 Cable - Connections
From Kyle-at-Bose [1]
We've seen some past B1 cable quality problems which, because of input from folks like you, we've since resolved.
I'm fairly confident that the connector and wires in the cable assembly are OK. The problems we were having were related to the actual connection of the wire leads to the Speakon connector. Problems would be obvious in one case- the bass module cuts out. The second case would not be so obvious- the EQ to the B1 and L1 would be wrong and would make the system perform and sound poor.
So, if you have a moment and a screwdriver, we can fix these cables together.
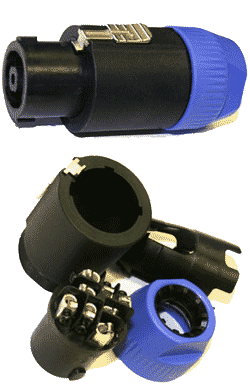
Remove the rear shell of the connector by unscrewing it. (See the pic below, not the exact connector but similar). We use a 4-wire connection so what you need to do is re-attach, possibly restripping first (need to use a wire stripper), the wire to the connector terminals. There are four terminals +1, -1, +2, -2. Each wire needs to be appropriately connected to the same terminal on each end of the cable. Luckily, no soldering is needed. These Speakon connectors have screw terminals. All you need to do is unscrew the terminal using a screwdriver, reinsert the bare wire, and then tighten the terminal.
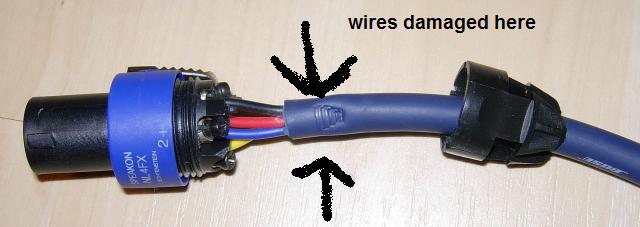
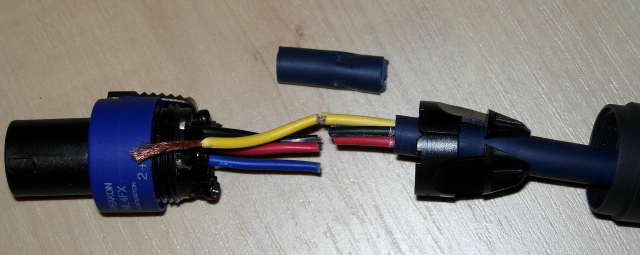
B1/B2 Conductors Broken
From Harry (dancingdogmuse)[2]
The initial symptoms were clicking followed by silence. It turned out to be a problem with broken wires inside the blue jacket of the B1 cable.
Replacement and Longer Cables
The Bose B1/B2 requires a NL4 connector with all 4 pins connected (that's why we call it 4-wire cable). Unfortunately, the Speakon connector comes in three different flavors, NL2 (2-pins), NL4 (4 pins), and NL8 (8-pins). Most salespeople are not aware of the differences.
A good source for the correct cables is
Audiopile.net NL413GA | NL4 Speakon equipped 13/4 Speaker Cable
- Note
- If you have an L1 Model 1S or L1 Model II - do NOT add a 10k resistor to the cable. That's only required when using a B2 with an L1® Model I or L1® Classic.
Consider getting 90 degree ends like this:
— Click image for details —
If you call Mark and tell him you want the cable for the Bose B1, you will get one that is made to our specifications. You can also any custom length cable at a very reasonable price.
- Hilmar-at-Bose[3]
