Difference between revisions of "Template:Two T1®s with Two L1®s"
m |
m |
||
| (4 intermediate revisions by the same user not shown) | |||
| Line 13: | Line 13: | ||
</style> | </style> | ||
</html> | </html> | ||
| − | <div style="float:right; padding: | + | <div style="float:right; padding-bottom:25px; "> |
{{T1 icon}}{{Model 1S icon}}{{Model II icon}}</div> | {{T1 icon}}{{Model 1S icon}}{{Model II icon}}</div> | ||
<br /> | <br /> | ||
| − | <html><div style="padding:15px | + | <div class="tocdiv"> |
| + | <div>__TOC__</div> | ||
| + | <div><h2>Introduction</h2> | ||
| + | In most situations, if you have two or more {{{Model|Model 1S}}} systems, you will want to run each sound source (microphone or instrument) to just one {{{Model|Model 1S}}} system, typically the closest one. Sometimes people want to connect two {{{Model|Model 1S}}} systems together. This is [[Dual Mono]] and not generally recommended except in very specific applications (see [[Stereo_/_Mono_/_Distributed_Systems|Stereo / Mono / Distributed systems]]). If you want to run [[Dual Mono]] Bose recommends that the {{{Model|Model 1S}}} systems are at least 20 feet apart (6 meters). | ||
| + | |||
| + | The following notes show the recommended way of setting up two {{{Model|Model 1S}}} systems ({{{Model|Model 1S}}} complete with {{t1 nl}} and bass module) and then two ways to run [[Dual Mono]] for special situations. | ||
| + | |||
| + | </div> | ||
| + | </div> | ||
| + | |||
| + | <!-- | ||
| + | <html><div style="padding:15px; "></html> | ||
In most situations, if you have two or more {{{Model|Model 1S}}} systems, you will want to run each sound source (microphone or instrument) to just one {{{Model|Model 1S}}} system, typically the closest one. Sometimes people want to connect two {{{Model|Model 1S}}} systems together. This is [[Dual Mono]] and not generally recommended except in very specific applications (see [[Stereo_/_Mono_/_Distributed_Systems|Stereo / Mono / Distributed systems]]). If you want to run [[Dual Mono]] Bose recommends that the {{{Model|Model 1S}}} systems are at least 20 feet apart (6 meters). | In most situations, if you have two or more {{{Model|Model 1S}}} systems, you will want to run each sound source (microphone or instrument) to just one {{{Model|Model 1S}}} system, typically the closest one. Sometimes people want to connect two {{{Model|Model 1S}}} systems together. This is [[Dual Mono]] and not generally recommended except in very specific applications (see [[Stereo_/_Mono_/_Distributed_Systems|Stereo / Mono / Distributed systems]]). If you want to run [[Dual Mono]] Bose recommends that the {{{Model|Model 1S}}} systems are at least 20 feet apart (6 meters). | ||
| Line 22: | Line 33: | ||
<html></div></html> | <html></div></html> | ||
| + | --> | ||
| + | |||
Latest revision as of 10:45, 16 October 2019
Usage:
{{Two T1®s with Two L1®s
|Model=Model II
}}
Introduction
In most situations, if you have two or more Model 1S systems, you will want to run each sound source (microphone or instrument) to just one Model 1S system, typically the closest one. Sometimes people want to connect two Model 1S systems together. This is Dual Mono and not generally recommended except in very specific applications (see Stereo / Mono / Distributed systems). If you want to run Dual Mono Bose recommends that the Model 1S systems are at least 20 feet apart (6 meters).
The following notes show the recommended way of setting up two Model 1S systems (Model 1S complete with T1 ToneMatch® Audio Engine and bass module) and then two ways to run Dual Mono for special situations.
Standard Setup with Two Model 1S Systems
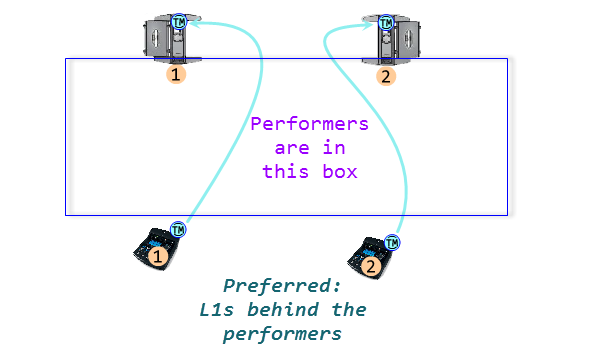
If you have two systems made of one Model 1S with T1® and a B1 or B2 bass module then set up like this.
| Pro | Con |
|---|---|
|
This is the ideal, the way the L1® System was designed to be used. This allows you to give each performer control over his/her own sound. The audience experiences the Cocktail Party Effect |
It may be a challenge to get enough distance between the microphones and the L1®s |
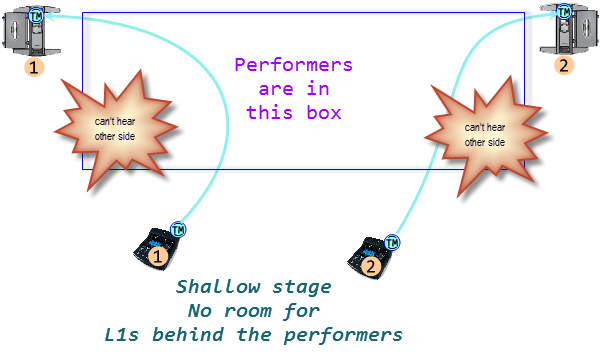
Shallow Stage Monitoring Issue
| Pro | Con |
|---|---|
|
Pushing the L1® out to the sides beside the performers allows more room for the performers on the stage. |
Performers at the edges of the stage may have trouble hearing people on the opposite side of the stage. |
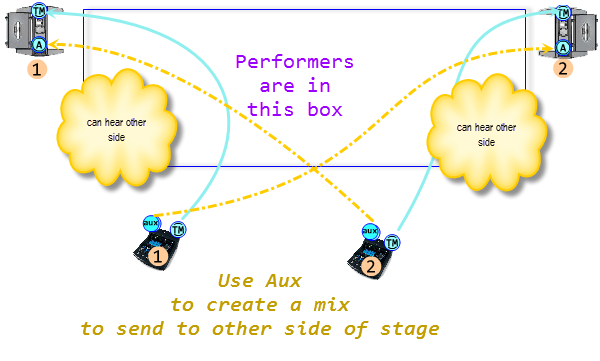
Aux Output to Opposite Model 1S
If you MUST do this, then for best results there should be at least 20 feet (6 meters) between the L1®s.
| Pro | Con |
|---|---|
|
Allow better monitoring for performers so they can hear the performers on the other side of the stage. Using Aux allows you to create a separate mix to be sent to the opposite side of the stage. The Aux volume outputs from each channel can be controlled at the T1® |
Decreased gain before feedback (greater likelihood of feedback). More microphones per system, and each microphone is heard through two systems Multiple Source Interference - hollow or ringy sounding vocals, uneven distribution of the bass. T1 Aux Output - not difficult to set up, but inconvenient to manage during a live show. No Reverb on Aux - the Aux output does NOT include Reverb effect. See also: Dual Mono |
T1 Aux Output
{{#Click:T1 ToneMatch® Audio Engine / Aux|Image:T1AuxOutput.png|T1 Aux Output}}
Please click the picture above for detailed instructions on how to set up the Aux mix.
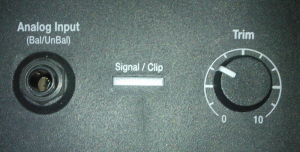
Model 1S Analog Input
The Analog connection is a ¼ inch phone jack. You can use this for a second T1® using the T1® Analog Master output (¼ inch phone jack).
This connection is made with a standard ¼ inch jack instrument cable. This can be Tip-Sleeve or Tip-Ring-Sleeve connectors.
Set Power Stand Analog Input Trim to 3 to have approximately the same level as you would have if you had connected with the ToneMatch® connection. You may have to adjust this, but 3 is a good place to start.
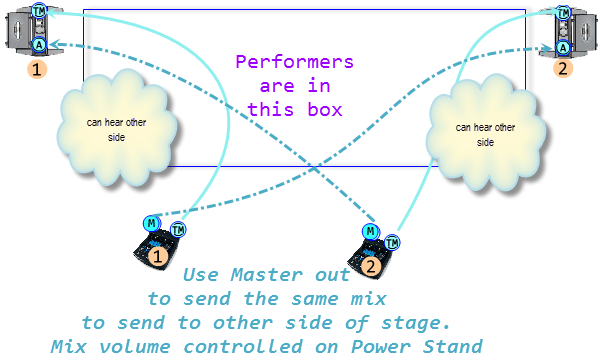
Analog Master Output to Opposite {{{Model}}}
If you MUST do this, then for best results there should be at least 20 feet (6 meters) between the L1®s.
| Pro | Con |
|---|---|
|
Allow better monitoring for performers so they can hear the performers on the other side of the stage. Simpler setup on the T1 ToneMatch® Audio Engine because you don't have to set up a separate mix as you would using Aux (above). The Master Output is the same as the mix being sent through the ToneMatch port so it includes all effects including reverb.
|
Decreased gain before feedback (greater likelihood of feedback). More microphones per system, and each microphone is heard through two systems Multiple Source Interference - hollow or ringy sounding vocals, uneven distribution of the bass. T1® Master Output is the same as the ToneMatch Port output - You will need to use the Model II Power Stand Analog Input Trim to control the volume across the stage. If you use reverb and have it coming out of both sides of the stage, this can further decreased gain before feedback (greater likelihood of feedback). See also: Dual Mono |
T1 Master Output
{{#Click:T1 ToneMatch® Audio Engine#.C2.BC_inch_jack_Output_Connections|Image:T1MasterOutput.png|T1 Master Output.}}
Please click the picture above for detailed instructions on how to set up the use the Master Output.
Model 1S Analog Input
The Analog connection is a ¼ inch phone jack. You can use this for a second T1® using the T1® Analog Master output (¼ inch phone jack).
This connection is made with a standard ¼ inch jack instrument cable. This can be Tip-Sleeve or Tip-Ring-Sleeve connectors.
Set Power Stand Analog Input Trim to 3 to have approximately the same level as you would have if you had connected with the ToneMatch® connection. You may have to adjust this, but 3 is a good place to start.


