Difference between revisions of "Stereo Mixer to Mono L1®"
m |
m |
||
| (55 intermediate revisions by the same user not shown) | |||
| Line 1: | Line 1: | ||
| − | {{Model II icon}}{{Model 1S icon}}{{Compact icon}} | + | {{Model II icon}}{{Model 1S icon}}{{Compact icon}} __NOEDITSECTION__ |
<html> | <html> | ||
<link rel="stylesheet" type="text/css" href="/shadowbox/shadowbox.css"> | <link rel="stylesheet" type="text/css" href="/shadowbox/shadowbox.css"> | ||
| Line 17: | Line 17: | ||
margin-top:35px; | margin-top:35px; | ||
float:left; | float:left; | ||
| − | width: | + | width:275px; |
} | } | ||
.rightColTOC{ | .rightColTOC{ | ||
| Line 49: | Line 49: | ||
<div class="rightColTOC"> | <div class="rightColTOC"> | ||
</html> | </html> | ||
| − | ==Using a stereo mixer with an {{L1}}== | + | ===Using a stereo mixer with an {{L1}}=== |
| − | + | ;General principles for connecting a stereo mixer to the mono input on your {{L1}}. | |
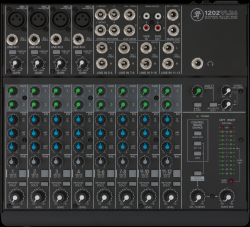
[[Image:Mackie1202VLZ4.png|250px|Stereo Mixer]] | [[Image:Mackie1202VLZ4.png|250px|Stereo Mixer]] | ||
| − | The inputs on the {{Model 1S}}, {{Model II}}, and the [[L1%C2%AE_Compact#Channel_2|Compact Channel 2]] are MONO. For best results do '''NOT''' use any kind of Y-adapter to connect stereo outputs from a mixer to a mono input on an {{L1}}. See [[Why_Not_Wye|Why Not Wye]] for details. | + | The inputs on the [[Mixer to L1 Pro|L1 Pro Input 3]], {{Model 1S}}, {{Model II}}, and the [[L1%C2%AE_Compact#Channel_2|Compact Channel 2]] ¼ inch jack are MONO. Check to see if your mixer has a MONO output. If it does, then use that. |
| + | |||
| + | If your mixer does not have a mono output pan all your inputs to one side (e.g. LEFT) and take the LEFT output and connect that to your {{L1}}. | ||
| + | |||
| + | For best results do '''NOT''' use any kind of Y-adapter to connect stereo outputs from a mixer to a mono input on an {{L1}}. See [[Why_Not_Wye|Why Not Wye]] for details. | ||
If you have questions or comments about this article please post a note in the [http://bose.infopop.cc/eve/forums/a/frm/f/3976055944 Bose Forum - Technical Questions]. | If you have questions or comments about this article please post a note in the [http://bose.infopop.cc/eve/forums/a/frm/f/3976055944 Bose Forum - Technical Questions]. | ||
| Line 64: | Line 68: | ||
</html> | </html> | ||
| + | ==== L1® Inputs ==== | ||
| + | =====L1® Model 1S Analog Input===== | ||
| − | + | [[File:Model II Analog Input Level Green.png|link=Model_1S#Analog_Input|Model 1S Analog Input]] | |
| − | |||
| − | + | =====L1® Model II Analog Input===== | |
| − | + | [[File:Model II Analog Input Level Green.png|link=Model_II#Analog_Input||Model II Analog Input]] | |
| − | + | {{Analog Input Trim|Device=Mixer}} | |
| − | {{ | + | =====L1® Compact Channel 2===== |
| + | {{Compact Channel 2}} | ||
| + | === General Principles=== | ||
| − | It's | + | It's easy to make this work. You can pan all your inputs hard LEFT and take the LEFT output and connect that to your {{L1}}. If you have a stereo source and two stereo channels, then you can |
#Run the left side of the stereo source to the left input on one stereo channel, | #Run the left side of the stereo source to the left input on one stereo channel, | ||
| Line 85: | Line 92: | ||
#Pan any other inputs hard left | #Pan any other inputs hard left | ||
#Use the left output of mixer and connect that to the {{L1}} Analog input. | #Use the left output of mixer and connect that to the {{L1}} Analog input. | ||
| + | |||
| + | Question: Is there a loss of quality when using only one output (e.g. Left only)? <br>No loss of quality. See [[Mixer Left Output Only]] | ||
| + | |||
| + | ==== Connections ==== | ||
| + | Where possible use a balanced connection between the mixer output and the L1® input. | ||
| + | |||
| + | ===== XLR Mixer to 1/4 Tip-Ring-Sleeve L1® ===== | ||
| + | {{XLR Female to 1/4 TRS}} | ||
| + | |||
| + | ===== 1/4 Tip-Ring-Sleeve Mixer to 1/4 Tip-Ring-Sleeve L1® ===== | ||
| + | {{1/4 TRS to 1/4 TRS}} | ||
Here are a some examples of how you can get a mono output out of your stereo mixer. | Here are a some examples of how you can get a mono output out of your stereo mixer. | ||
| − | === Behringer Eurorack UB1222FX === | + | === Specific Mixers === |
| + | |||
| + | ==== Allen & Heath ZED 10-FX ==== | ||
| + | |||
| + | [[File:AllenHeathZFX10MonoLeft.png|link=http://www.allen-heath.com/ahproducts/zed-10fx/||800px|Allen Heath ZED 10-FX web page]] | ||
| + | |||
| + | |||
| + | [http://www.allen-heath.com/ahproducts/zed-10fx/ Allen Heath ZED-FX10 web page] | ||
| + | |||
| + | Use a cable like this: | ||
| + | |||
| + | {{XLR Female to 1/4 TRS}} | ||
| + | |||
| + | ==== Allen & Heath ZED Sixty-14FX ==== | ||
| + | |||
| + | [[File:Allen Heath ZED Sixty-14FX Mono Left.png|link=http://www.allen-heath.com/ahproducts/zed60-14fx/|800px|Allen Heath ZED Sixty 14-FX web page]] | ||
| + | |||
| + | |||
| + | [http://www.allen-heath.com/ahproducts/zed60-14fx/ Allen Heath ZED Sixty-14FX web page] | ||
| + | |||
| + | Use a cable like this: | ||
| + | |||
| + | {{XLR Female to 1/4 TRS}} | ||
| + | |||
| + | |||
| + | ==== Alto Live 802 ==== | ||
| + | |||
| + | [[File:Alto Live 802 Mono Left.png|link=http://http://www.altoproaudio.com/products/live-802/|800px|Alto Live 802 web page]] | ||
| + | |||
| + | [[File:Alto Live 802 Mono Left Output.png|link=http://http://www.altoproaudio.com/products/live-802/|800px|Alto Live 802 web page]] | ||
| + | |||
| + | |||
| + | [http://www.altoproaudio.com/products/live-802/ Alto Live 802 web page] | ||
| + | |||
| + | Use a cable like this: | ||
| + | |||
| + | {{1/4 TRS to 1/4 TRS}} | ||
| + | |||
| + | |||
| + | ==== Behringer Eurorack UB1222FX ==== | ||
| + | |||
| + | [[File:Behringer UBC1222FXPannedLeftMono.png|link=http://www.behringer.com/EN/Products/UB1222FX-PRO.aspx||800px|Behringer Eurorack UB1222FX web page]] | ||
| + | |||
| + | |||
| + | Use a cable like this: | ||
| + | |||
| + | {{XLR Female to 1/4 TRS}} | ||
| + | |||
| + | ==== Behringer Eurorack X1222USB ==== | ||
| + | |||
| + | [[File:Behringer X1222 USB Mono.png|link=https://www.music-group.com/Categories/Behringer/Mixers/Analog-Mixers/X1222USB/p/P0A0I||800px|Behringer Eurorack X1222USB web page]] | ||
| + | |||
| + | Use a cable like this: | ||
| + | |||
| + | {{XLR Female to 1/4 TRS}} | ||
| − | + | ==== Behringer Xenix 1202FX ==== | |
| − | = | + | [[File:Behringer Xenyx 1202FX Mono.jpg|link=https://media.music-group.com/media/PLM/data/docs/P0571/1002FX_1202FX_M_EN.pdf||800px|Behringer Xenyx 1202FX owners manual]] |
| − | {{ | + | The 1/4 inch (6.3mm) outputs on this mixer are unbalanced mono. |
| + | |||
| + | Use a cable like this: | ||
| + | |||
| + | {{1/4 TS}} | ||
| + | |||
| + | [[File:TsMtsM.png]] | ||
| + | |||
| + | ==== Mackie 1402 VLZ4 ==== | ||
| + | |||
| + | [[File:Mackie1402VL4PannedLeftMono.png|link=http://www.mackie.com/products/vlz4-series-compact-mixers/downloads|Mackie 1402VLZ4 web page]] | ||
<!-- | <!-- | ||
| Line 101: | Line 183: | ||
[http://www.mackie.com/products/vlz4-series-compact-mixers/downloads/ Mackie 1402VLZ4 web page] | [http://www.mackie.com/products/vlz4-series-compact-mixers/downloads/ Mackie 1402VLZ4 web page] | ||
| − | === | + | ==== Mackie CFX-12 ==== |
| + | |||
| + | [[File:MackieCFX12PannedLeftMono.png|link=http://www.mackie.com/pdf/CFXMKIISeries_OM.pdf|Mackie CFX-12 Manual]] | ||
| + | |||
| + | |||
| + | [http://www.mackie.com/pdf/CFXMKIISeries_OM.pdf link to Mackie CFX-12 Manual] | ||
| + | |||
| + | ==== Mackie ProFX8 ==== | ||
| − | + | [[File:MackieProFX8PannedLeftMono.png|link=http://www.mackie.com/products/profx8/||Mackie ProFX8 web page]] | |
<!-- | <!-- | ||
| − | [[Image: | + | [[Image:Mackie1402VL4PannedLeftMono.png]] |
--> | --> | ||
| + | [http://www.mackie.com/products/profx8/ Mackie ProFX8 web page] | ||
| + | |||
| + | ==== Mackie ProFX12 ==== | ||
| + | |||
| + | [[File:MackieProFX12 Mono Output.png|link=http://www.mackie.com/products/profx12/||Mackie ProFX12 web page]] | ||
| + | |||
| + | [http://www.mackie.com/products/profxseries/pdf/ProFX-OM.pdf Mackie ProFX12 manual] | ||
| + | |||
| + | ==== Mackie ProFX12V2 ==== | ||
| + | |||
| + | [[File:MackieProFX12V2 Mono Output.png|link=http://www.mackie.com/products/profx12/||Mackie ProFX12 web page]] | ||
| + | |||
| + | [http://www.mackie.com/products/profxseries/pdf/ProFX-OM.pdf Mackie ProFX12 manual] | ||
| + | |||
| + | |||
| + | ==== Presonus Studio Live 16.0.2 ==== | ||
| + | There is a Mono output. | ||
| + | |||
| + | [[Image:Presonus1602Mono.png]] | ||
| + | |||
| + | Use a cable like this: | ||
| + | |||
| + | {{XLR Female to 1/4 TRS}} | ||
| + | |||
| + | If you don't have access to cable like the one above, you can use one of the ¼ inch jack Tip-Ring-Sleeve balanced outputs. You can pan all the inputs to the LEFT side and use the LEFT output. | ||
| + | |||
| + | [[Image:Presonus1602.png]] | ||
| + | |||
| + | |||
| + | |||
| + | [http://www.presonus.com/downloads/products/pdf/StudioLive1602_OwnersManual_EN6.pdf Presonus Studio Live 16.0.2 Owners Manual] | ||
| + | |||
| + | |||
| + | ==== Yamaha MG10 ==== | ||
| + | |||
| + | [[File:YamahaMG10PanLeft.png|link=http://usa.yamaha.com/products/live_sound/mixers/analog-mixers/mg_standard_model/mg10/?mode=model#tab=product_lineup||Yamaha MG10 web page]] | ||
| + | |||
| + | {{1/4 TRS to 1/4 TRS}} | ||
[http://usa.yamaha.com/products/live_sound/mixers/analog-mixers/mg_standard_model/mg10/?mode=model#tab=product_lineup Yamaha MG10 web page] | [http://usa.yamaha.com/products/live_sound/mixers/analog-mixers/mg_standard_model/mg10/?mode=model#tab=product_lineup Yamaha MG10 web page] | ||
| + | |||
| + | ==== Yamaha MG10/2 ==== | ||
| + | |||
| + | [[File:YamahaMG102PanLeft.png|link=https://usa.yamaha.com/files/download/other_assets/5/333545/MG10_2E.pdf|Yamaha MG10/2 owners guide]] | ||
| + | |||
| + | {{1/4 TRS to 1/4 TRS}} | ||
| + | |||
| + | |||
| + | ==== Yamaha MG12XU ==== | ||
| + | |||
| + | [[File:YamahaMG12XUPanLeft.png|link=http://www.yamahaproaudio.com/global/en/products/mixers/mg_xu/|Yamaha MG12XU web page]] | ||
| + | |||
| + | {{1/4 TRS to 1/4 TRS}} | ||
| + | |||
| + | [http://www.yamahaproaudio.com/global/en/products/mixers/mg_xu/ Yamaha MGXU web page] | ||
| + | |||
| + | |||
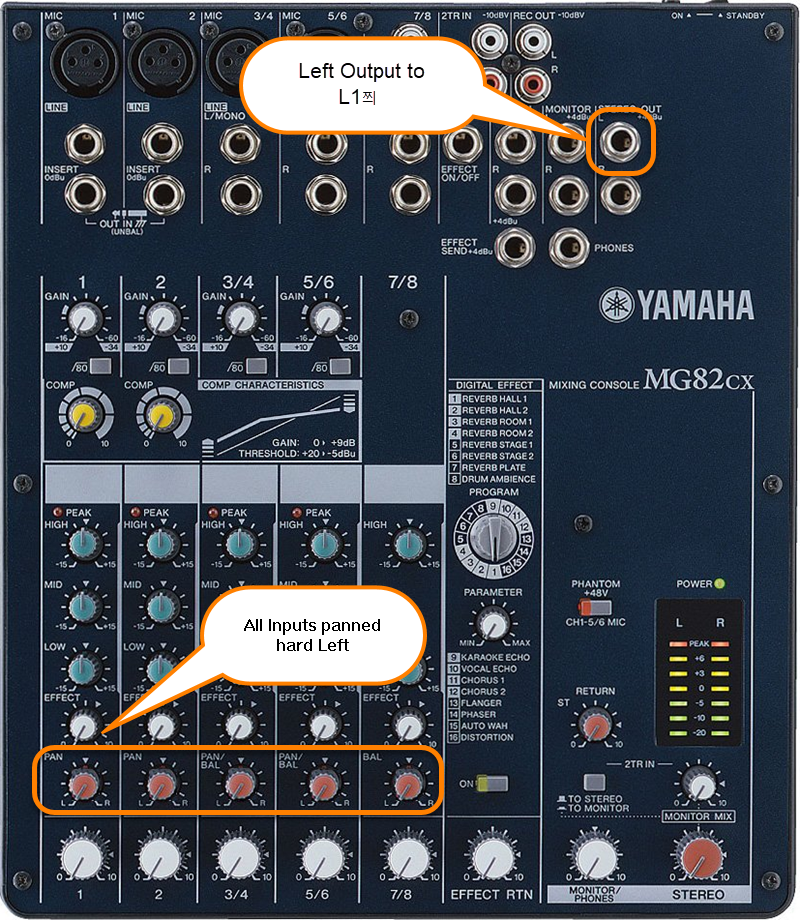
| + | ==== Yamaha MG82CX ==== | ||
| + | |||
| + | [[File:Yamaha MG82CX mono output.png|link=http://download.yamaha.com/api/asset/file/?language=en&site=usa.yamaha.com&asset_id=8050|Yamaha MB82CX]] | ||
| + | |||
| + | {{1/4 TRS to 1/4 TRS}} | ||
---- | ---- | ||
| + | [[Category:Connections]] | ||
[[Category:Mixer]] | [[Category:Mixer]] | ||
| + | [[Category:Allen Heath]] | ||
| + | |||
[[Category:Yamaha]] | [[Category:Yamaha]] | ||
[[Category:Mackie]] | [[Category:Mackie]] | ||
Latest revision as of 10:45, 18 August 2024
Contents
- 1 Using a stereo mixer with an L1
- 2 Stereo Inputs on Compact Channel 2
- 3 Mono Input on Compact Channel 2
- 4 General Principles
- 5 Specific Mixers
- 5.1 Allen & Heath ZED 10-FX
- 5.2 Allen & Heath ZED Sixty-14FX
- 5.3 Alto Live 802
- 5.4 Behringer Eurorack UB1222FX
- 5.5 Behringer Eurorack X1222USB
- 5.6 Behringer Xenix 1202FX
- 5.7 Mackie 1402 VLZ4
- 5.8 Mackie CFX-12
- 5.9 Mackie ProFX8
- 5.10 Mackie ProFX12
- 5.11 Mackie ProFX12V2
- 5.12 Presonus Studio Live 16.0.2
- 5.13 Yamaha MG10
- 5.14 Yamaha MG10/2
- 5.15 Yamaha MG12XU
- 5.16 Yamaha MG82CX
Using a stereo mixer with an L1
- General principles for connecting a stereo mixer to the mono input on your L1 .
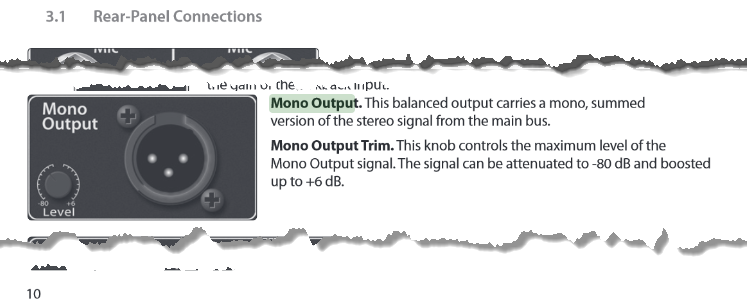
The inputs on the L1 Pro Input 3, L1 Model 1S, L1 Model II, and the Compact Channel 2 ¼ inch jack are MONO. Check to see if your mixer has a MONO output. If it does, then use that.
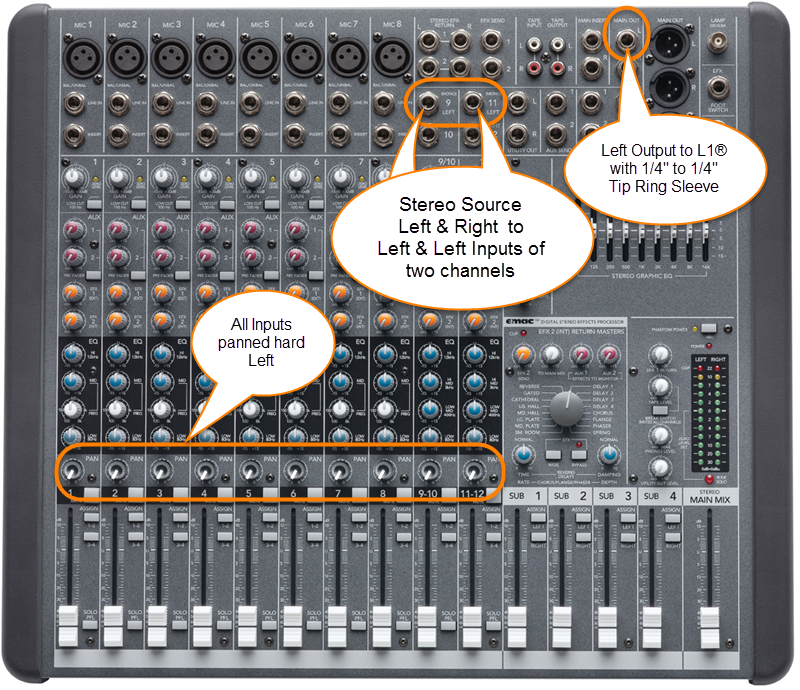
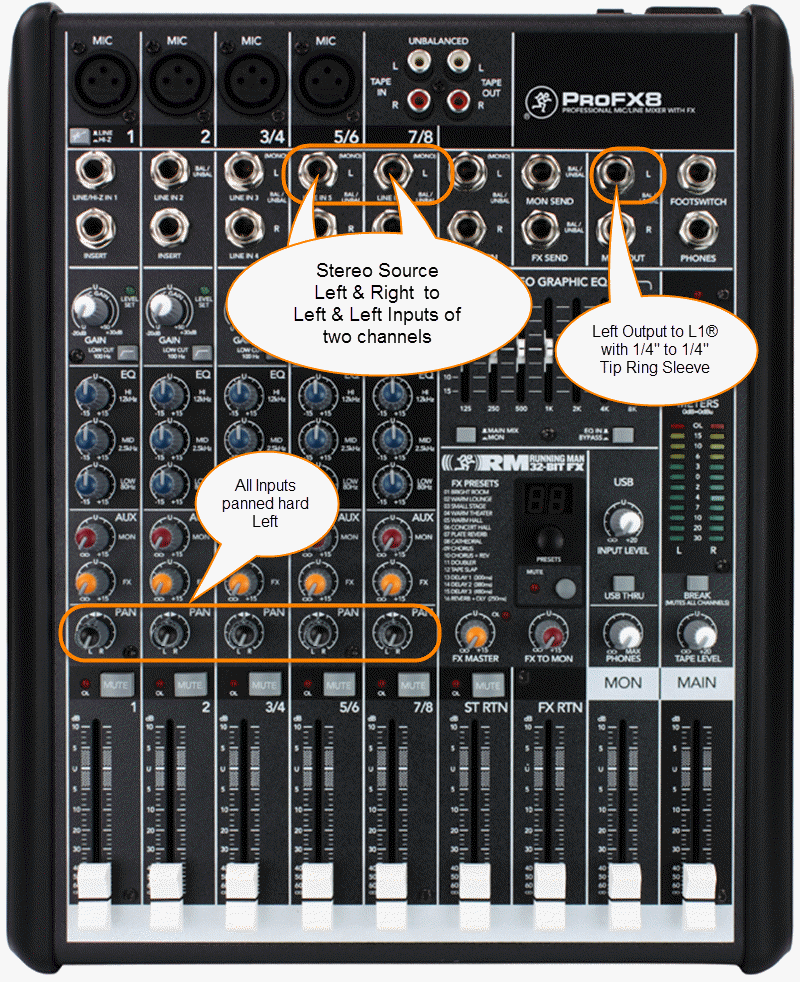
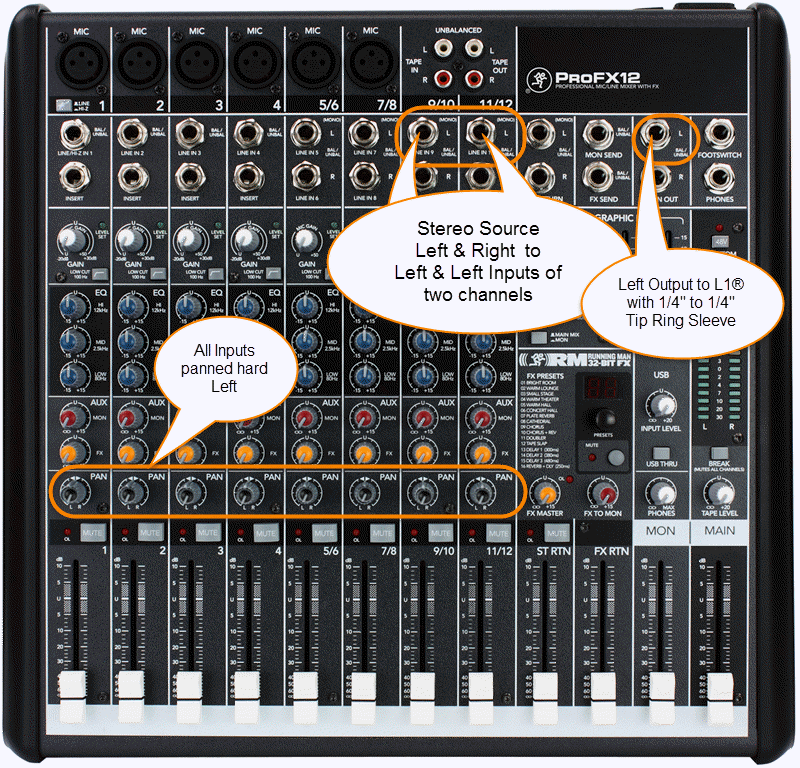
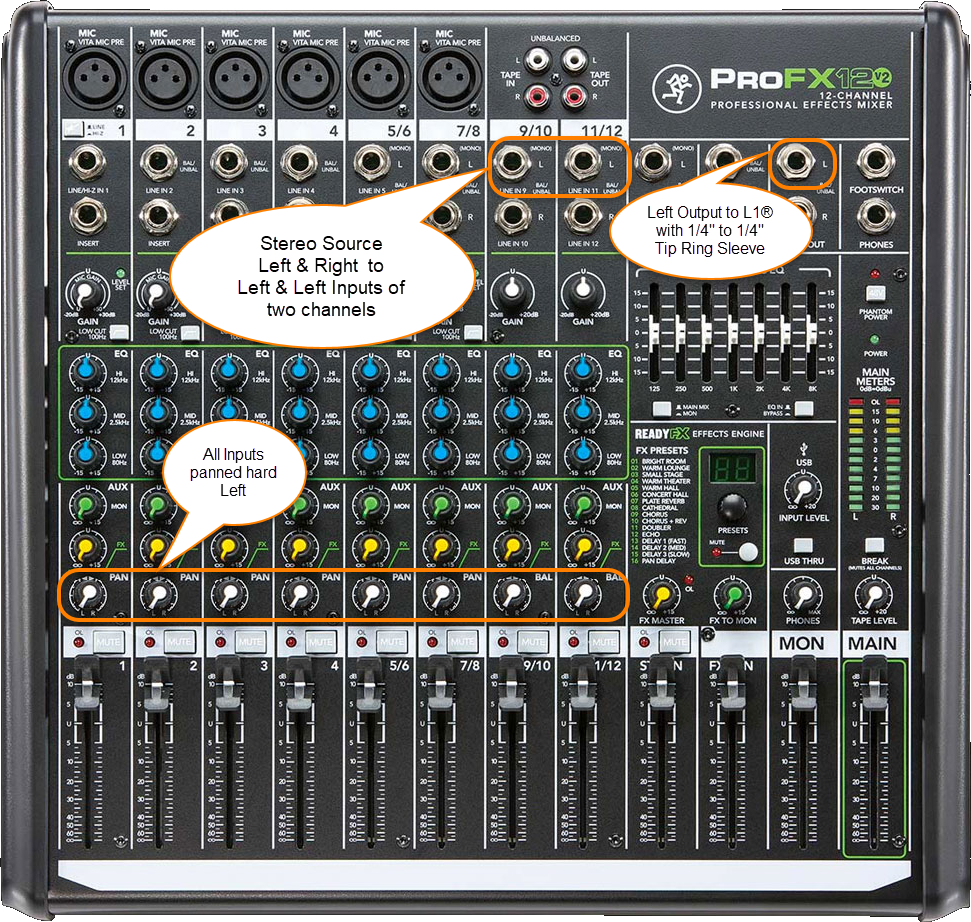
If your mixer does not have a mono output pan all your inputs to one side (e.g. LEFT) and take the LEFT output and connect that to your L1 .
For best results do NOT use any kind of Y-adapter to connect stereo outputs from a mixer to a mono input on an L1 . See Why Not Wye for details.
If you have questions or comments about this article please post a note in the Bose Forum - Technical Questions.
L1® Inputs
L1® Model 1S Analog Input
L1® Model II Analog Input
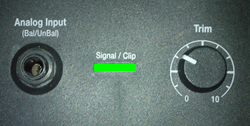
- Setting the Trim Control
- Set the Trim control on the power stand to the 0 (zero) position.
- Connect the audio source to the Analog Input
- Adjust the volume of the Mixer output to the reference or nominal output level.
- On analog consoles this may be marked as unity or 0 dB.
- On digital consoles this may be marked as -18 dBFS[1][2]. The exact value (-18 dBFS to -20 dBFS) may vary depending your location[3].
- Refer to the manual for the Mixer for details.
- If the Mixer does not have metering or indicators, set the output as high as you can without hearing distortion or seeing red indicator lights.
- While playing/singing as loud as you will during your performance, increase the Trim level so that the Signal/Clip indicator glows green or yellow. Occasional flickers of red are okay.
- If the Signal/Clip indicator glows solid red or you hear distortion, decrease the Trim level so that it glows only green or yellow.
L1® Compact Channel 2
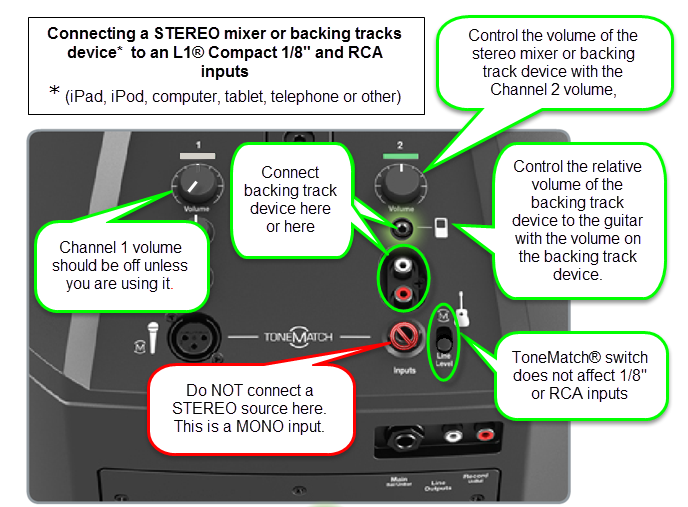
The Compact is different from the Model 1S and Model II because it can accept stereo inputs on the Channel 2 1/8" and RCA inputs.
Stereo Inputs on Compact Channel 2
If have RCA outputs from your mixer you can connect to the Compact Channel 2 RCA inputs. It's likely that the RCA outputs on the mixer are recording outputs and you may have control the output level separate from the mixer master faders. Please see your manual for details.
If you have a way to convert the mixer stereo output to 1/8" stereo jack then you can connect to Compact Channel 2 1/8" stereo input.
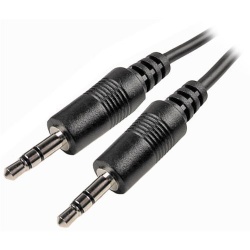
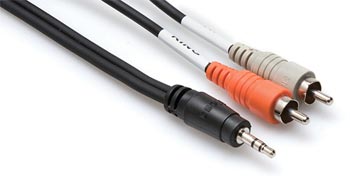
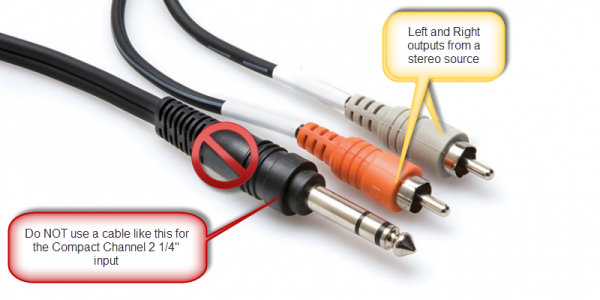
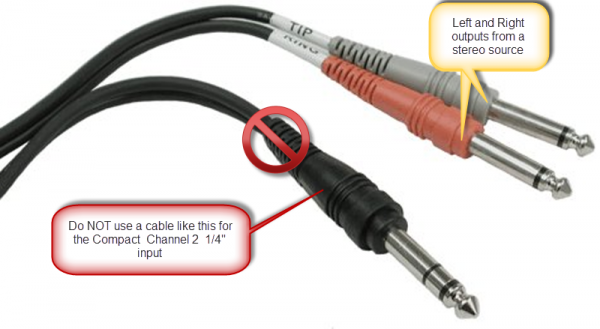
Use a cable like this from your backing track source (iPod, Computer, CD / DVD player)
or if your cable has RCA (phono) jacks you can use a cable like this.
Mono Input on Compact Channel 2
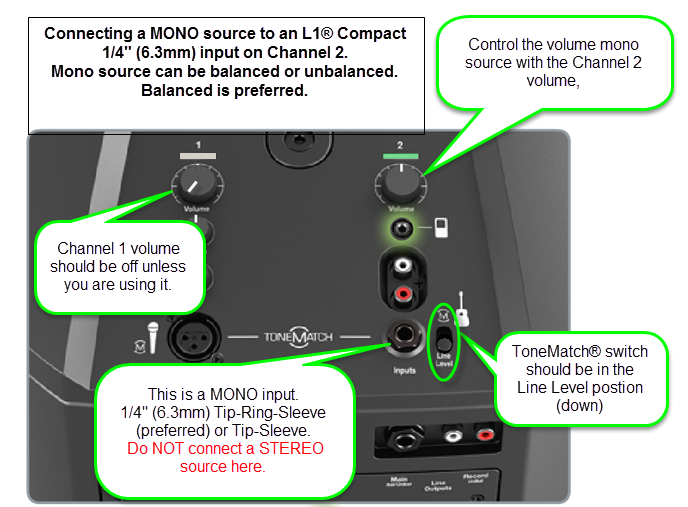
Start with the Volume set straight up and adjust so that you get a solid green signal. If you see red, turn the trim down.
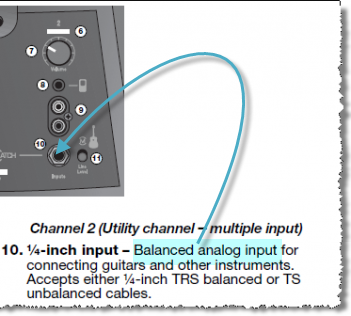
The ¼ inch jack input accepts a balanced or unbalanced connection.
- Can a stereo signal be used with the ¼ inch jack input?
A ¼ inch Tip-Ring-Sleeve connector carrying a stereo signal should not be used with the analog input on the L1 Compact.
Even though a ¼ inch Tip-Ring-Sleeve connector can carry a stereo signal this is not how this physical connection is used on the L1 Compact.
The ¼ inch jack input on the L1 Compact is balanced, and will therefore subtract the Left and Right signals on a stereo cable and you will hear almost no signal in the L1 Compact.
- The 1/8 inch jack is STEREO not Balanced
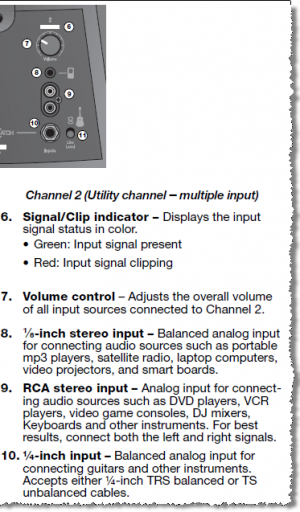
The L1 Compact Channel 2: 1/8-inch jack is STEREO not BALANCED.
The written documentation is incorrect. It says:
- 1/8-inch stereo input - Balanced analog input for connecting audio sources such as portable mp3 players, satellite radio, laptop computers, video projectors, and smart boards.
Correction
- 1/8-inch stereo input -
BalancedStereo analog input for connecting audio sources such as portable mp3 players, satellite radio, laptop computers, video projectors, and smart boards.
Source Neil-at-Bose
General Principles
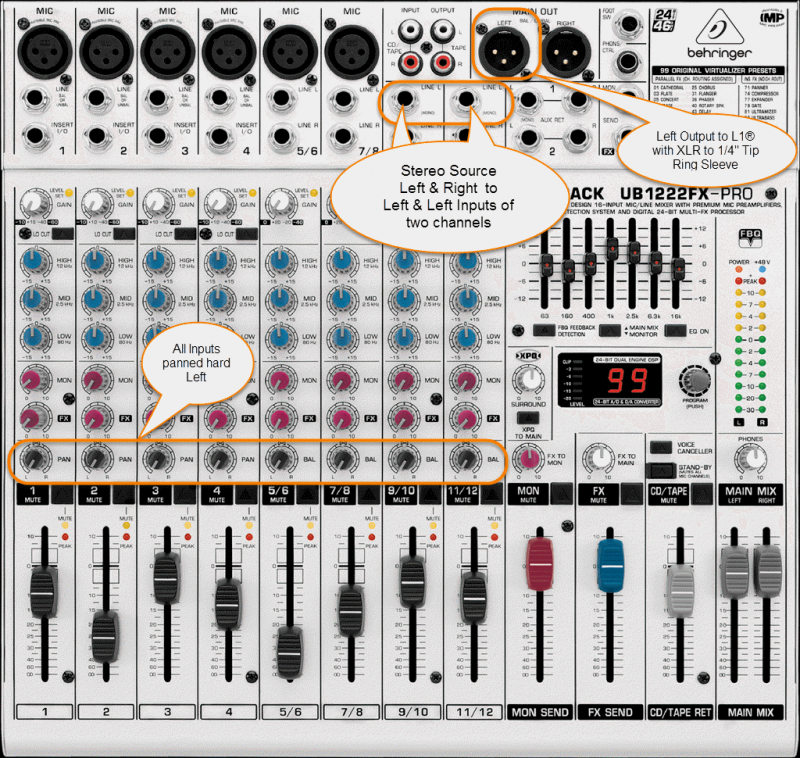
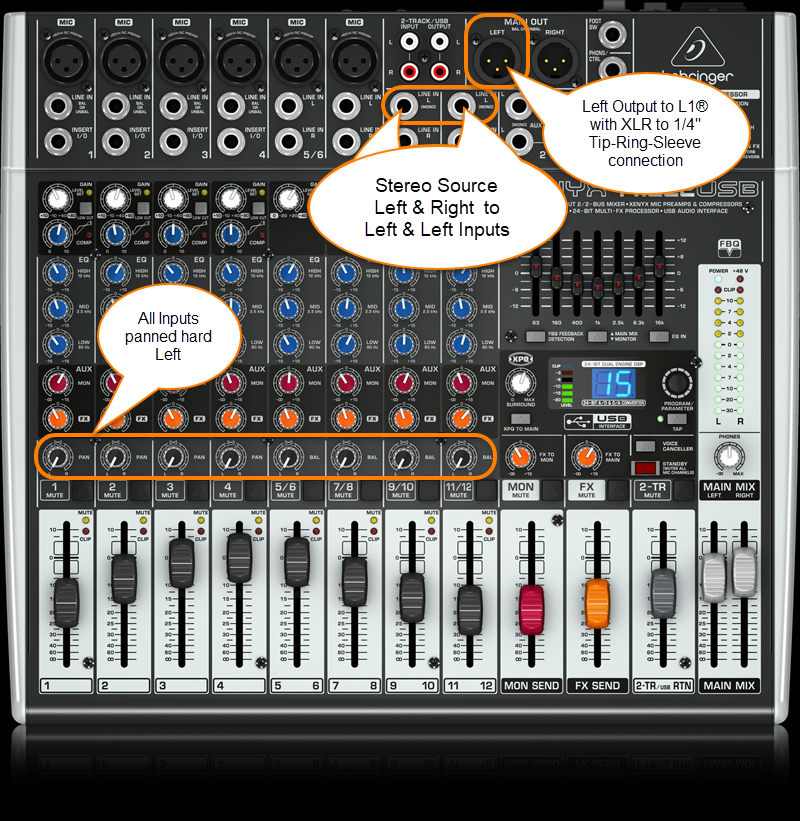
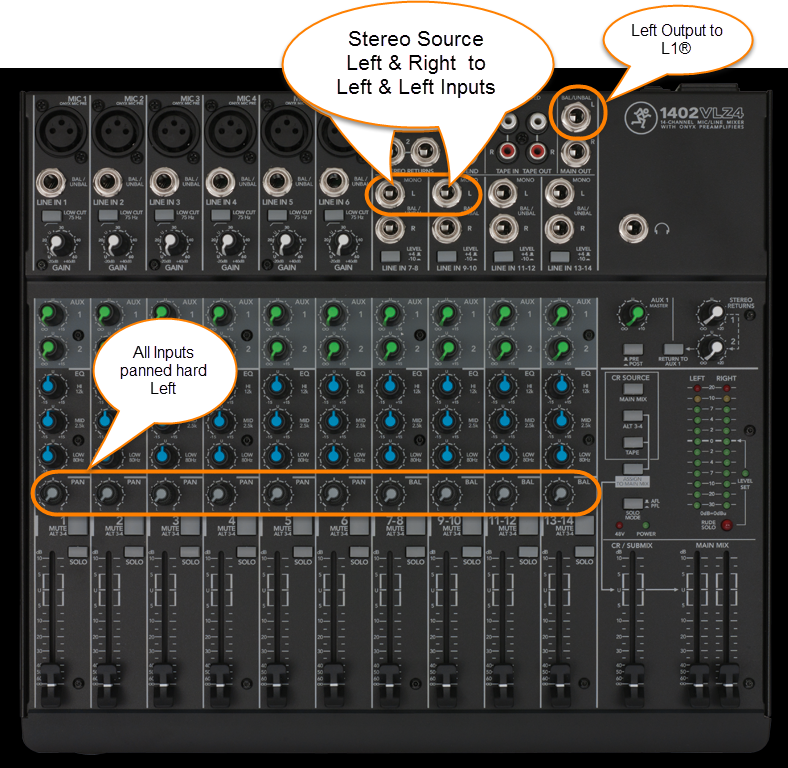
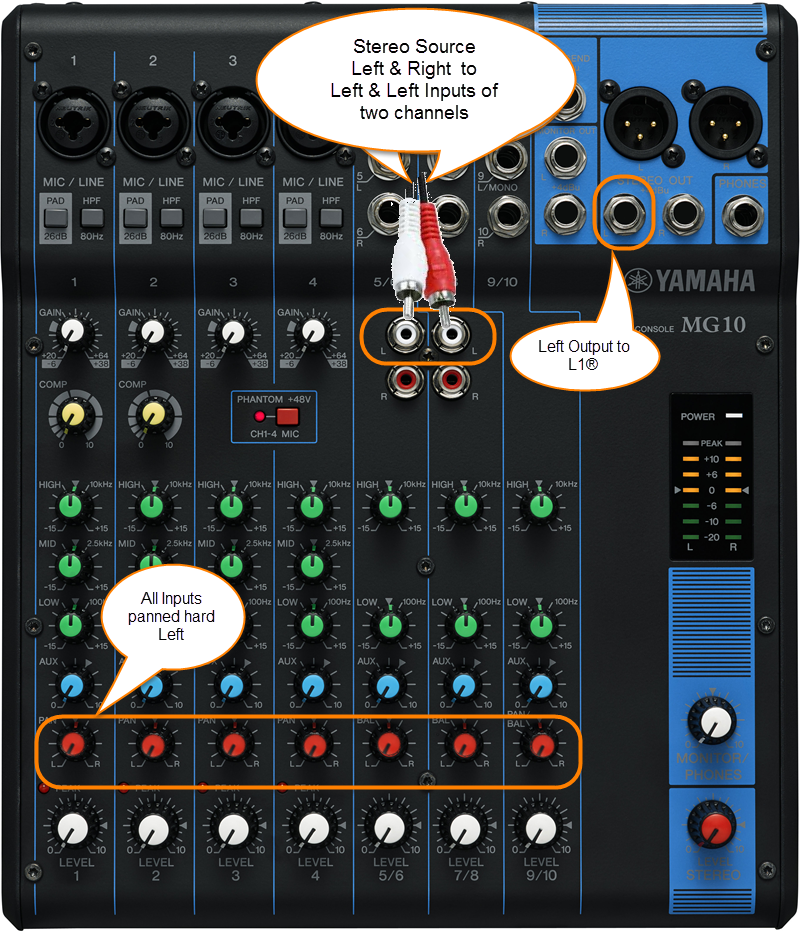
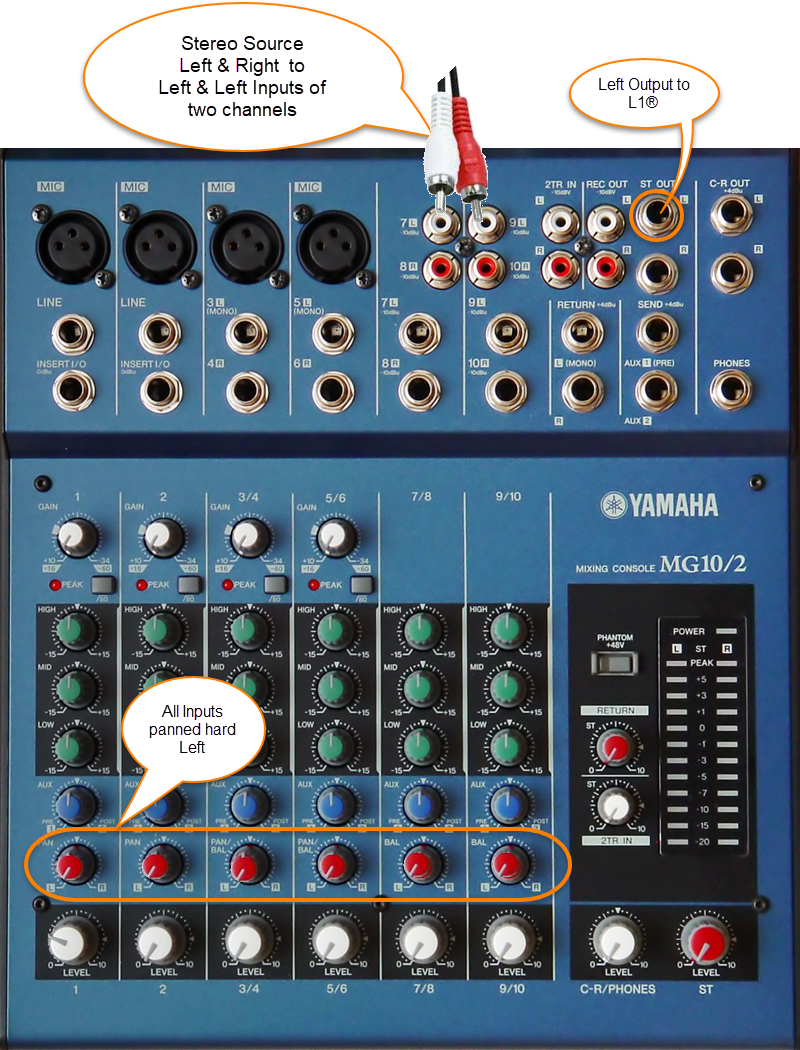
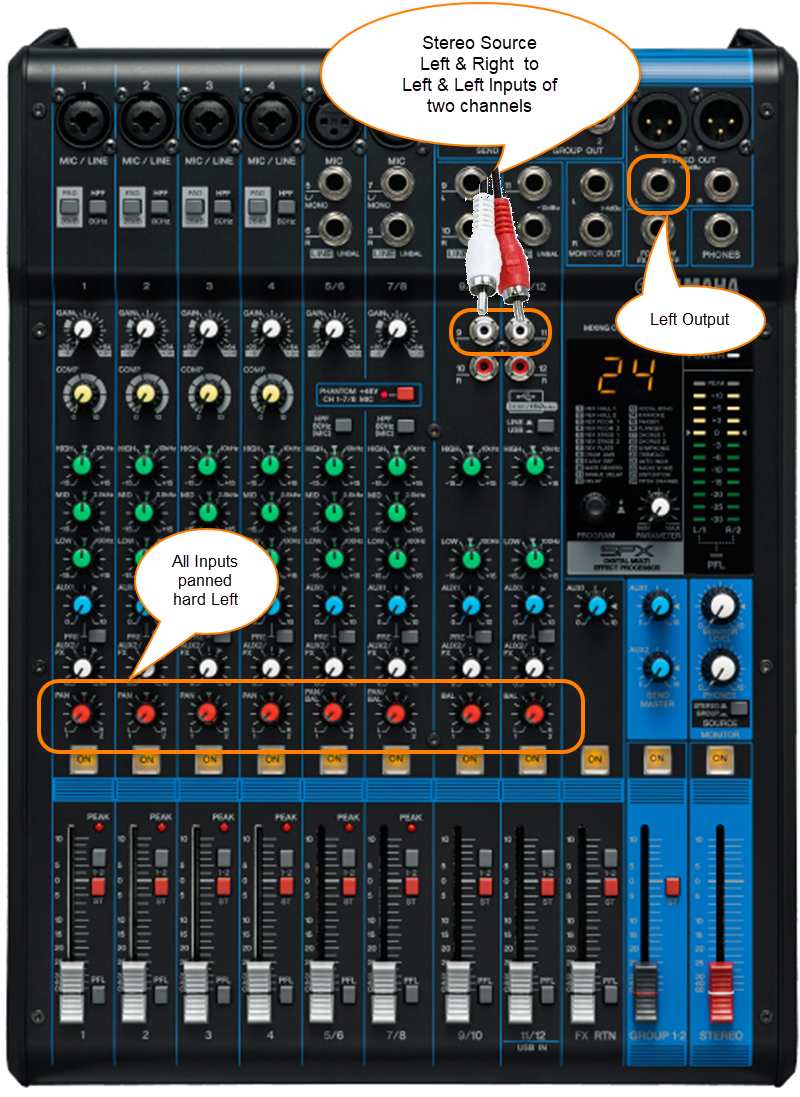
It's easy to make this work. You can pan all your inputs hard LEFT and take the LEFT output and connect that to your L1 . If you have a stereo source and two stereo channels, then you can
- Run the left side of the stereo source to the left input on one stereo channel,
- Run and the right side of the stereo source to the left side of another stereo channel.
- Pan any other inputs hard left
- Use the left output of mixer and connect that to the L1 Analog input.
Question: Is there a loss of quality when using only one output (e.g. Left only)?
No loss of quality. See Mixer Left Output Only
Connections
Where possible use a balanced connection between the mixer output and the L1® input.
XLR Mixer to 1/4 Tip-Ring-Sleeve L1®
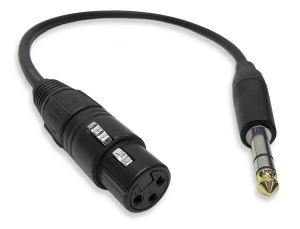
The output side is XLR so you will also need a converter or cable that is XLR female to Balanced ¼ inch jack Tip-Ring-Sleeve.
Female XLR to 1/4" Male TRS Balanced Adaptor Cable (audiopile.net)
1/4 Tip-Ring-Sleeve Mixer to 1/4 Tip-Ring-Sleeve L1®
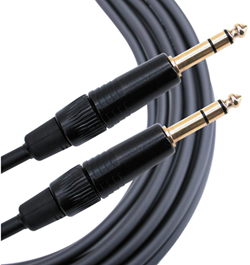
The output side is 1/4 inch (6.35 mm) Tip-Ring-Sleeve jack and the input on the Bose side is 1/4 inch (6.35 mm) Tip-Ring-Sleeve jack. Use a cable like this.
1/4" TRS Balanced Patch Cable (audiopile.net)
Here are a some examples of how you can get a mono output out of your stereo mixer.
Specific Mixers
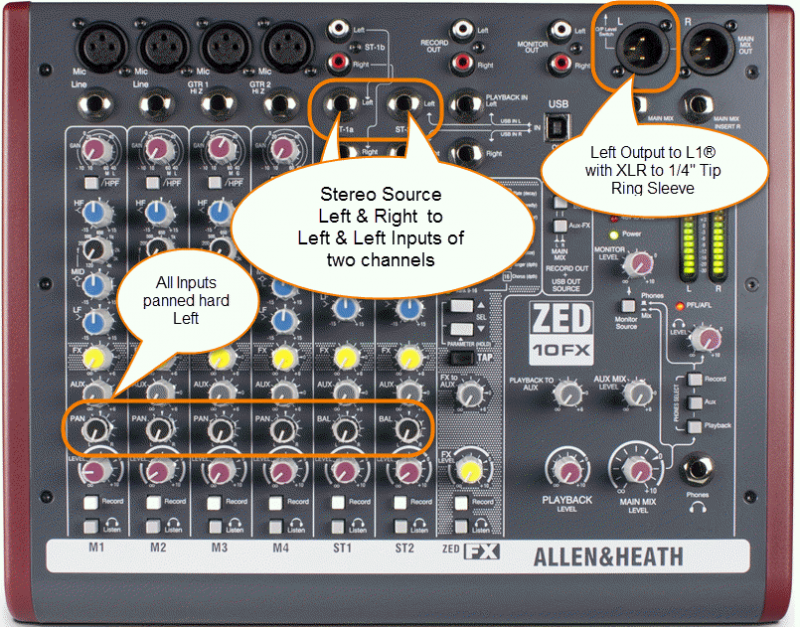
Allen & Heath ZED 10-FX
Use a cable like this:
The output side is XLR so you will also need a converter or cable that is XLR female to Balanced ¼ inch jack Tip-Ring-Sleeve.
Female XLR to 1/4" Male TRS Balanced Adaptor Cable (audiopile.net)
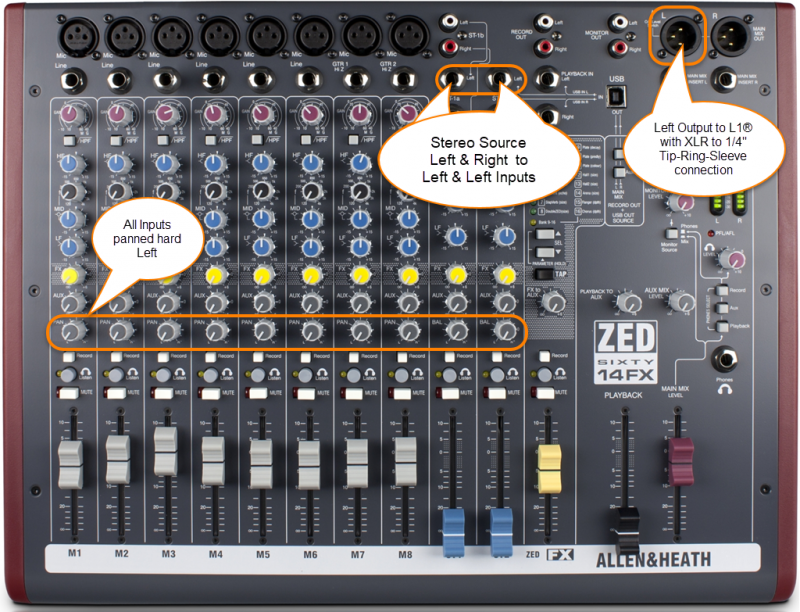
Allen & Heath ZED Sixty-14FX
Allen Heath ZED Sixty-14FX web page
Use a cable like this:
The output side is XLR so you will also need a converter or cable that is XLR female to Balanced ¼ inch jack Tip-Ring-Sleeve.
Female XLR to 1/4" Male TRS Balanced Adaptor Cable (audiopile.net)
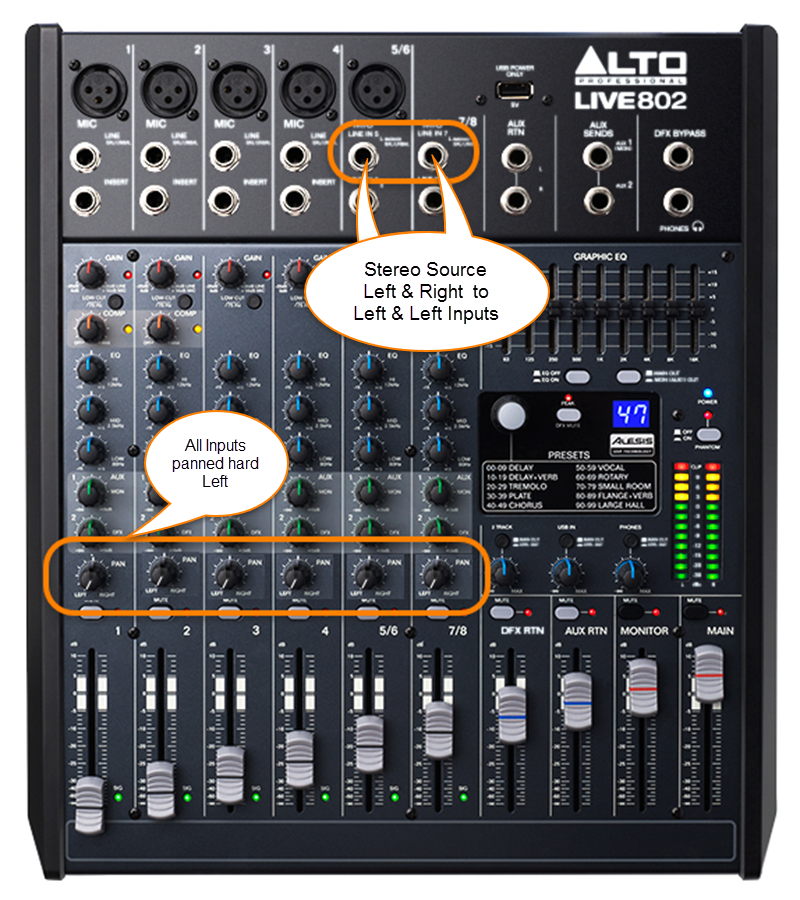
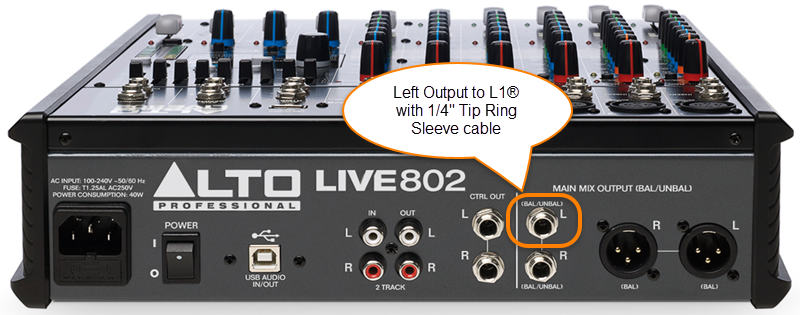
Alto Live 802
Use a cable like this:
The output side is 1/4 inch (6.35 mm) Tip-Ring-Sleeve jack and the input on the Bose side is 1/4 inch (6.35 mm) Tip-Ring-Sleeve jack. Use a cable like this.
1/4" TRS Balanced Patch Cable (audiopile.net)
Behringer Eurorack UB1222FX
Use a cable like this:
The output side is XLR so you will also need a converter or cable that is XLR female to Balanced ¼ inch jack Tip-Ring-Sleeve.
Female XLR to 1/4" Male TRS Balanced Adaptor Cable (audiopile.net)
Behringer Eurorack X1222USB
Use a cable like this:
The output side is XLR so you will also need a converter or cable that is XLR female to Balanced ¼ inch jack Tip-Ring-Sleeve.
Female XLR to 1/4" Male TRS Balanced Adaptor Cable (audiopile.net)
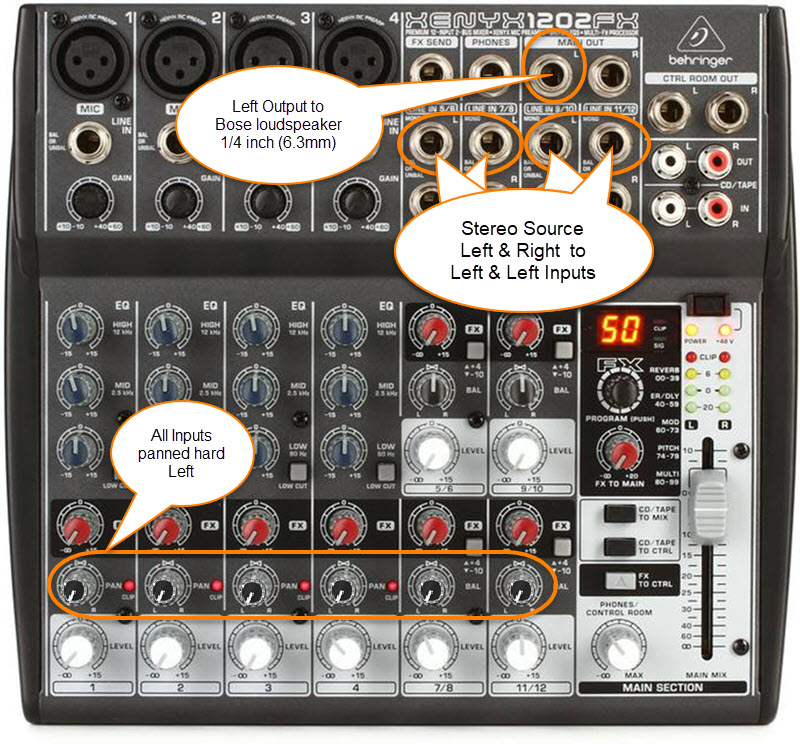
Behringer Xenix 1202FX
The 1/4 inch (6.3mm) outputs on this mixer are unbalanced mono.
Use a cable like this:
1/4 inch (6.35 mm) Tip-Sleeve
Mackie 1402 VLZ4
Mackie CFX-12
Mackie ProFX8
Mackie ProFX12
Mackie ProFX12V2
Presonus Studio Live 16.0.2
There is a Mono output.
Use a cable like this:
The output side is XLR so you will also need a converter or cable that is XLR female to Balanced ¼ inch jack Tip-Ring-Sleeve.
Female XLR to 1/4" Male TRS Balanced Adaptor Cable (audiopile.net)
If you don't have access to cable like the one above, you can use one of the ¼ inch jack Tip-Ring-Sleeve balanced outputs. You can pan all the inputs to the LEFT side and use the LEFT output.
Presonus Studio Live 16.0.2 Owners Manual
Yamaha MG10
The output side is 1/4 inch (6.35 mm) Tip-Ring-Sleeve jack and the input on the Bose side is 1/4 inch (6.35 mm) Tip-Ring-Sleeve jack. Use a cable like this.
1/4" TRS Balanced Patch Cable (audiopile.net)
Yamaha MG10/2
The output side is 1/4 inch (6.35 mm) Tip-Ring-Sleeve jack and the input on the Bose side is 1/4 inch (6.35 mm) Tip-Ring-Sleeve jack. Use a cable like this.
1/4" TRS Balanced Patch Cable (audiopile.net)
Yamaha MG12XU
The output side is 1/4 inch (6.35 mm) Tip-Ring-Sleeve jack and the input on the Bose side is 1/4 inch (6.35 mm) Tip-Ring-Sleeve jack. Use a cable like this.
1/4" TRS Balanced Patch Cable (audiopile.net)
Yamaha MG82CX
The output side is 1/4 inch (6.35 mm) Tip-Ring-Sleeve jack and the input on the Bose side is 1/4 inch (6.35 mm) Tip-Ring-Sleeve jack. Use a cable like this.
1/4" TRS Balanced Patch Cable (audiopile.net)


