Difference between revisions of "Presets - Finding What Works"
m (categories added) |
m (→Gain) |
||
| (7 intermediate revisions by the same user not shown) | |||
| Line 15: | Line 15: | ||
== Ready == | == Ready == | ||
=== Presets - Current Version === | === Presets - Current Version === | ||
| − | Get the newest | + | If you have a {{T1}} you can skip the next two paragraphs and down to [[{{PAGENAME}}#Performance_Environment|Performance Environment]]. |
| + | |||
| + | Get the newest Presets. The latest are the version 3.0 presets , and at this point, {{Model I}} systems currently being shipped have version 3.0. If you are not sure what version you have see [[Presets/Model I and Classic#What_Version_Do_I_Have|Presets - What version do I have?]]. | ||
| + | |||
| + | If you are using a {{Classic}} or {{Model I}} the Presets version 2.0 are fine for Acoustic Guitar or Electric Guitar as there were no changes to those Presets in version 3.0. | ||
=== Performance Environment === | === Performance Environment === | ||
| Line 29: | Line 33: | ||
== Set == | == Set == | ||
| − | * Set up the Bose system the way you normally would, doing your best to simulate actual performance circumstances. This includes putting you and the Remote as far from the | + | * Set up the Bose system the way you normally would, doing your best to simulate actual performance circumstances. This includes putting you and the Remote or {{T1 nl}} as far from the {{L1 nl}} System as you would normally be when playing live. |
* To keep things simple I will use the example of testing for use with an Electric Guitar. You can adapt these ideas to work with your instrument or microphone. I would run a relatively clean sound with no effects (no reverb, chorus or delay). You are listening for tone. | * To keep things simple I will use the example of testing for use with an Electric Guitar. You can adapt these ideas to work with your instrument or microphone. I would run a relatively clean sound with no effects (no reverb, chorus or delay). You are listening for tone. | ||
| Line 44: | Line 48: | ||
=== Gain === | === Gain === | ||
| − | * Set the [[Gain Staging|gain]] so you are solidly in the green (occasional red flickers are | + | * Set the [[Gain Staging|gain]] so you are solidly in the green (occasional red flickers are okay) on the PS1 Powerstand trim lights. If you are using a {{T1 nl}} set it so that you have green with occasional flickers of yellow (no red). |
| + | |||
| + | Do this while you are playing or singing as loud as you normally would in performance | ||
* Tune your Guitar | * Tune your Guitar | ||
| Line 78: | Line 84: | ||
<references/> | <references/> | ||
| − | + | ---- | |
| − | [[ | + | [[Category:L1® System]] |
[[category:Presets]] | [[category:Presets]] | ||
[[category:PS1 Powerstand]] | [[category:PS1 Powerstand]] | ||
Latest revision as of 10:55, 13 April 2011
Here are some hints for getting the most out of the presets.[1]
Principles
You want to:
- Simulate performance conditions. (room, volume, instrument, mind set)
- Keep everything constant except for the presets (volume, tone, instrument)
- Make the switching between presets as fast and painless as possible. It is very difficult to compare two sounds if there is more than a second or two between hearing the sounds you are comparing.
- Keep notes of what you did and did not like as you go through the process.
- Only change one thing at a time between comparisons (in this case, the presets).
What follows is a suggestion about how you can go through the presets while honouring the principles above.
Contents
Ready
Presets - Current Version
If you have a T1 ToneMatch Audio Engine you can skip the next two paragraphs and down to Performance Environment.
Get the newest Presets. The latest are the version 3.0 presets , and at this point, L1 Model I systems currently being shipped have version 3.0. If you are not sure what version you have see Presets - What version do I have?.
If you are using a L1 Classic or L1 Model I the Presets version 2.0 are fine for Acoustic Guitar or Electric Guitar as there were no changes to those Presets in version 3.0.
Performance Environment
- Get to someplace that is as big as places you normally perform.
- Plan to run the system at full performance volume.
Bring a Friend
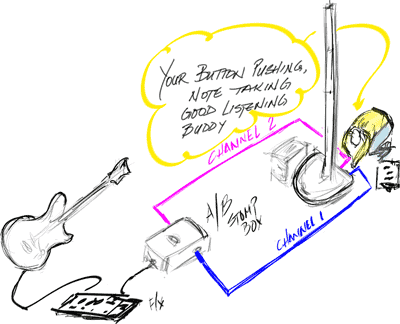
- Bring a friend to change connections, push buttons and if you are lucky, take notes
- Consider getting an A/B footswitch if you are testing a line-level instrument or Guitar
- Bring some extra cables (1/4" and XLR)
- Plan to take some time with this, and bring some kind of compensation for your friend.
Set
- Set up the Bose system the way you normally would, doing your best to simulate actual performance circumstances. This includes putting you and the Remote or T1 ToneMatch® Audio Engine as far from the L1® System as you would normally be when playing live.
- To keep things simple I will use the example of testing for use with an Electric Guitar. You can adapt these ideas to work with your instrument or microphone. I would run a relatively clean sound with no effects (no reverb, chorus or delay). You are listening for tone.
Connections
If you are using a vocal microphone skip to Gain
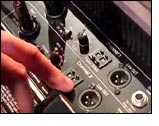
- Run the guitar into an A/B switch and connect
- Guitar + any tone crafting gear to the input of the A/B switch
- Output A to Channel 1 on the Bose system
- Output B to Channel 2 on the Bose system
- Have your friend set presets for both Channels to 00
Gain
- Set the gain so you are solidly in the green (occasional red flickers are okay) on the PS1 Powerstand trim lights. If you are using a T1 ToneMatch® Audio Engine set it so that you have green with occasional flickers of yellow (no red).
Do this while you are playing or singing as loud as you normally would in performance
- Tune your Guitar
- On the R1 Remote set the tone controls and channel levels to the straight up position (12:00 o'clock)
- Bring up the R1 Remote Master level to performance volume. This is important because your perception of tone will vary with volume.
Go
Using your A/B switch, flip back and forth between A and B and have your friend tweak the trims controls so that you are equally loud in both channels. This is important because you can't really compare sounds at different volumes.
Now this is where your friend gets to do most of the work.
- Starting with the presets that are recommended for your instrument (in this case Electric Guitar) set one preset on Channel 1 and the next one in the sequence on Channel 2.
- Play (or sing) a familiar riff a couple of times and then switch channels with your A/B switch
- Play the same riff again on the second channel
- Decide which of the two you like the best - make a note of this
- On the other channel, switch to the next preset on the list
- Playing the same riff, switch between the two channels and decide which one you like
- Keeping the one you like on one channel, try the next preset on the other channel.
- Okay - you get the idea - repeat until you've been through all the recommended presets.
- If you've found a couple that you really like, then your search is over. If not then try other presets that are not labelled "Electric Guitar"
Once you find a couple of presets you like, start working with your gear and tone settings on the Remote.
Have fun!
Take your friend out to dinner.
- ↑ This originally appeared on the Bose® Musicians Community Discussion Boards

