Difference between revisions of "S1 Pro+ To L1 Pro"
m |
m |
||
| (8 intermediate revisions by the same user not shown) | |||
| Line 1: | Line 1: | ||
| − | {{ | + | {{L1 Pro icon}}{{S1 Pro+ icon}} |
{{DivToc | {{DivToc | ||
| Line 5: | Line 5: | ||
|RightBody = Connect an S1 Pro+ to an L1 Pro | |RightBody = Connect an S1 Pro+ to an L1 Pro | ||
| + | |||
| + | You will connect your microphone and or instruments to the S1 Pro+ | ||
| + | |||
| + | The objective is to use the S1 Pro+ as the stage monitor facing the performer(s) and the L1 Pro will be the main loudspeaker for the audience; the Front of House system (FOH). | ||
| + | |||
| + | |||
[[File:S1 Pro+ to L1 Pro1.jpg|300px|Right]] | [[File:S1 Pro+ to L1 Pro1.jpg|300px|Right]] | ||
| − | |||
| − | |||
|Categories = | |Categories = | ||
| Line 25: | Line 29: | ||
;L1 Pro (main loudspeaker for the audience - Front of House) | ;L1 Pro (main loudspeaker for the audience - Front of House) | ||
| − | :This is the L1 Pro to which you send the sound from S1 Pro | + | :This is the L1 Pro to which you send the sound from S1 Pro+ |
==== Set Up ==== | ==== Set Up ==== | ||
| − | # | + | # S1 Pro+ Turn down the volume on all channels. |
| − | + | # L1 Pro | |
| − | # | + | #* Turn down the volume on all channels. |
| − | |||
| − | |||
| − | |||
| − | |||
| − | # | ||
| − | |||
| − | |||
#* Set Bass and Treble at 12:00 o'clock (flat) | #* Set Bass and Treble at 12:00 o'clock (flat) | ||
| − | #* Set Reverb off | + | #* Set Reverb off |
| + | #* Set ToneMatch to Off on channels 1 and 2 | ||
| − | ==== | + | ==== XLR Cable ==== |
| − | + | Use an XLR cable (e.g., microphone cable) to connect the S1 Pro+ Line Out to L1 Pro channel 1 or 2. | |
| + | *The advantage to this method is XLR cables are common and easily found | ||
| + | *The disadvantage is you takes up a full-featured channel on the L1 Pro | ||
| + | [[File:S1 Pro+ to L1 Pro2.jpg|800px]] | ||
| − | [[File:S1 Pro+ | + | ==== XLR to 1/4 inch (6.3 mm) Tip-Ring-Sleeve ==== |
| + | Use an XLR to 1/4 inch (6.3 mm) Tip-Ring-Sleeve cable | ||
| + | *The advantage to this method is this leaves both full-featured channels (1 & 2) on the L1 Pro available for other uses | ||
| + | [[File:S1 Pro+ to L1 Pro3.jpg|800px]] | ||
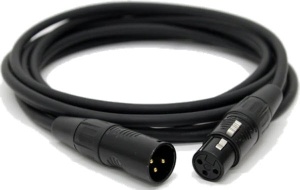
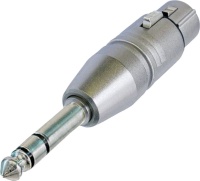
| − | XLR | + | <br>or use an XLR cable with a converter<br>[[File:XLR cable.jpg|300px]][[File:XLR Female to 14 TRS Adapter.jpg|200px]] |
| − | + | ==== Levels ==== | |
| − | + | # On S1 Pro+, bring up the channel volumes to the desired levels | |
| − | + | # On L1 Pro, bring up the channel volume to suit your application. Note: This will not necessarily match the same position on the dials as S1 Pro+ | |
| − | + | # Turn down the volume on any unused channels | |
| − | |||
| − | |||
| − | |||
| − | |||
| − | |||
| − | |||
---- | ---- | ||
[[Category:S1 Pro+]] | [[Category:S1 Pro+]] | ||
Latest revision as of 23:11, 18 August 2024
Terms used
- S1 Pro+ (stage monitor and mixer)
- This is the S1 Pro+ to which you have connected your microphone and or instruments using inputs 1, 2, 3
- L1 Pro (main loudspeaker for the audience - Front of House)
- This is the L1 Pro to which you send the sound from S1 Pro+
Set Up
- S1 Pro+ Turn down the volume on all channels.
- L1 Pro
- Turn down the volume on all channels.
- Set Bass and Treble at 12:00 o'clock (flat)
- Set Reverb off
- Set ToneMatch to Off on channels 1 and 2
XLR Cable
Use an XLR cable (e.g., microphone cable) to connect the S1 Pro+ Line Out to L1 Pro channel 1 or 2.
- The advantage to this method is XLR cables are common and easily found
- The disadvantage is you takes up a full-featured channel on the L1 Pro
XLR to 1/4 inch (6.3 mm) Tip-Ring-Sleeve
Use an XLR to 1/4 inch (6.3 mm) Tip-Ring-Sleeve cable
- The advantage to this method is this leaves both full-featured channels (1 & 2) on the L1 Pro available for other uses
or use an XLR cable with a converter

Levels
- On S1 Pro+, bring up the channel volumes to the desired levels
- On L1 Pro, bring up the channel volume to suit your application. Note: This will not necessarily match the same position on the dials as S1 Pro+
- Turn down the volume on any unused channels


