Difference between revisions of "T1 ToneMatch® Audio Engine / Aux"
m (formatting) |
m |
||
| (21 intermediate revisions by the same user not shown) | |||
| Line 1: | Line 1: | ||
| + | === Overview === | ||
| − | The output of any of the Channels 1, 2, 3, 4/5 can be sent to the Aux out. Tap points where you can set the output to the Aux. | + | [[Image:T1Aux.png|right]] |
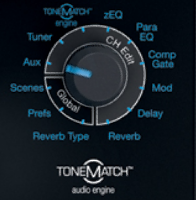
| + | The output of any of the Channels 1, 2, 3, 4/5 can be sent to the Aux out. You can take the Aux out to provide a separate mix for recording or running to another {{L1}} or separate amplification system. | ||
| + | |||
| + | Tap points where you can set the output to the Aux.<ref name="AuxTap">Aux Tap Points from page 26 of the {{T1 Manual}}</ref> | ||
* Dry: After Preamp: The completely dry (no processing) signal is routed directly from the preamp stage. | * Dry: After Preamp: The completely dry (no processing) signal is routed directly from the preamp stage. | ||
| Line 6: | Line 10: | ||
* Post: After Fader: The signal is routed after the Channel volume control with applied processing. | * Post: After Fader: The signal is routed after the Channel volume control with applied processing. | ||
| + | Excerpt from the {{T1 Manual}} | ||
| + | ---- | ||
| + | [[Image:T1ManualP26AuxRouting.png]] | ||
| + | ---- | ||
| + | |||
| + | [[Image:T1AuxOutput.png]] | ||
| + | === Setting the Tap Point === | ||
| + | {{:T1® Aux / Dry or Pre or Post}} | ||
=== No Reverb on Aux === | === No Reverb on Aux === | ||
| Line 11: | Line 23: | ||
A: Hilmar-at-Bose writes<ref>Hilmar-at-Bose writes about [http://bose.infopop.cc/eve/forums/a/tpc/f/7521050644/m/4091082864?r=8551095774#8551095774 No Reverb on Aux]</ref> | A: Hilmar-at-Bose writes<ref>Hilmar-at-Bose writes about [http://bose.infopop.cc/eve/forums/a/tpc/f/7521050644/m/4091082864?r=8551095774#8551095774 No Reverb on Aux]</ref> | ||
| − | : The {{T1}} has lots of different effects units and normally they are unique to each channel. That means that the | + | : The {{T1}} has lots of different effects units and normally they are unique to each channel. That means that the T1<sup>®</sup> has 4 individual dynamic processors, 4 modulators (chorus flanger, phaser, etc.) , 4 EQs, 4 delay processors, etc. The only exception is the reverb, which is shared by all channels. <br /> |
:The AUX is also a per-channel control. That means if you turn up the AUX of channel, you expect to hear signals from channel 1 and only from channel 1. However, the output of the reverb processor contains the reverb portions of all 4 channels. If we add that to the Aux, you'd hear the reverb portions of all 4 channels and not only the channel that you are interested in. In most cases, this is probably not what you want.<br /> | :The AUX is also a per-channel control. That means if you turn up the AUX of channel, you expect to hear signals from channel 1 and only from channel 1. However, the output of the reverb processor contains the reverb portions of all 4 channels. If we add that to the Aux, you'd hear the reverb portions of all 4 channels and not only the channel that you are interested in. In most cases, this is probably not what you want.<br /> | ||
:If you are familiar with conventional mixing consoles, you will find that the situation is quite similar. You can only route to an AUX output effects that are specific to a channel (normally these would be connected to the insert loop of this channel). The "shared" effects typically come into the board through an AUX return, which is not channel specific. | :If you are familiar with conventional mixing consoles, you will find that the situation is quite similar. You can only route to an AUX output effects that are specific to a channel (normally these would be connected to the insert loop of this channel). The "shared" effects typically come into the board through an AUX return, which is not channel specific. | ||
| Line 22: | Line 34: | ||
What To Do: | What To Do: | ||
| − | * Check if the Aux output is configured for the desired tap point for each input channel. Refer to “Routing input | + | * Check if the Aux output is configured for the desired tap point for each input channel. Refer to “Routing input signals to the Aux output” on page 26.<ref name="AuxTap"></ref> |
| − | signals to the Aux output” on page 26. | ||
Note: No reverb comes from the Aux output even if the tap point is Pre or Post. | Note: No reverb comes from the Aux output even if the tap point is Pre or Post. | ||
* Verify that each input assigns the desired signal level to the Aux output. | * Verify that each input assigns the desired signal level to the Aux output. | ||
| + | |||
| + | === Aux Out to a {{S1}} === | ||
| + | The Aux Out is balanced mono and suitable to connect to the {{S1}} Channel 1 or 2. | ||
| + | |||
| + | For best results use a 1/4 inch (6 mm) Tip-Ring-Sleeve cable. A 1/4 inch (6 mm) Tip-Sleeve cable will have up to -6dB lower signal and be more susceptible to line noise. | ||
| + | |||
| + | {{:S1 Pro with T1}} | ||
| + | |||
| + | === Aux Out to a separate System === | ||
| + | |||
| + | ==== Aux Out to Headphones ==== | ||
| + | The Aux Out is balanced mono intended to be connected to the balanced input of another device at line-level. This may also work with headphones but the volume will be very low and likely not loud enough to be heard over live stage volume. | ||
| + | |||
| + | If you connect to a stereo input, the signals for Left and Right may cancel out. This might not be an issue for headphones as the Left and Right signals are not combined. | ||
| + | |||
| + | ==== Aux Out to In-Ear-Monitors ==== | ||
| + | The Aux Out is balanced mono intended to be connected to the balanced input of another device at line-level. This may also work with headphones but the volume will be very low and likely not loud enough to be heard over live stage volume. | ||
| + | |||
| + | If you use an In-Ear-Monitor system that has built-in amplification, this may work. | ||
| + | |||
| + | If you connect to a stereo input, the signals for Left and Right may cancel out. This might not be an issue for headphones as the Left and Right signals are not combined. | ||
| + | |||
| + | ==== Input Directed to Aux Out Only ==== | ||
| + | To direct an input exclusively to Aux see: [[T1 ToneMatch® Audio Engine / Aux to a Separate System]] | ||
| + | |||
| + | |||
| + | <!-- preparation for more notes about using T1™ connected to two Power Stands --> | ||
| + | <!-- | ||
| + | Originally posted by BlackForestMan: | ||
| + | As [b]separation of musical sources (voc or instrument) on several L1[/b] is one of other great advantages of the BOSE L1-System, that [b]is what I try to do whenever possible[/b]. | ||
| + | And that's what I tried to do with [b]one T1 for two (or three) musicians[/b]. | ||
| + | |||
| + | In the meantime I've found a way how to [b]use the ch-vol knob to control the aux path[/b], with very very few (hardly noticeable) signal on the master out path, by putting the AUX-Mix to 100% and reducing the trim for this channel. | ||
| + | |||
| + | So it's almost perfect for me, besides the missing reverb on aux out. | ||
| + | |||
| + | Wolfgang[/QUOTE] | ||
| + | |||
| + | See it [url=http://bose.infopop.cc/eve/forums/a/tpc/f/7521050644/m/4091082864?r=8791046974#8791046974]in context[/url] | ||
| + | |||
| + | A note about the missing reverb on aux out. Wolfgang is correct. There is no reverb on aux out. For details see: | ||
| + | |||
| + | [url=http://toonz.ca/bose/wiki/index.php?title=T1_ToneMatch%E2%84%A2_Audio_Engine/Aux]No Reverb on Aux[/url] | ||
| + | --> | ||
| + | |||
| + | |||
| + | <!-- end preparation --> | ||
<noinclude> | <noinclude> | ||
| Line 33: | Line 91: | ||
<references /> | <references /> | ||
[[Category:T1]] | [[Category:T1]] | ||
| + | [[Category:T1Aux]] | ||
</noinclude> | </noinclude> | ||
Latest revision as of 19:02, 9 July 2018
Contents
Overview
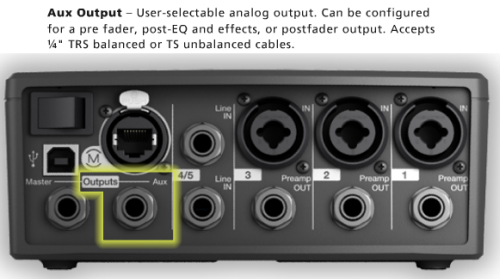
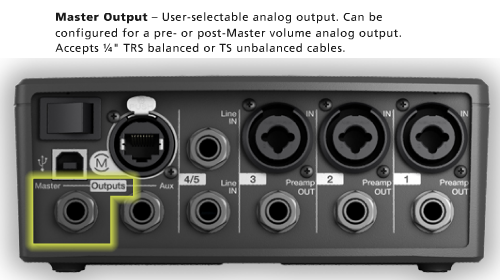
The output of any of the Channels 1, 2, 3, 4/5 can be sent to the Aux out. You can take the Aux out to provide a separate mix for recording or running to another L1 or separate amplification system.
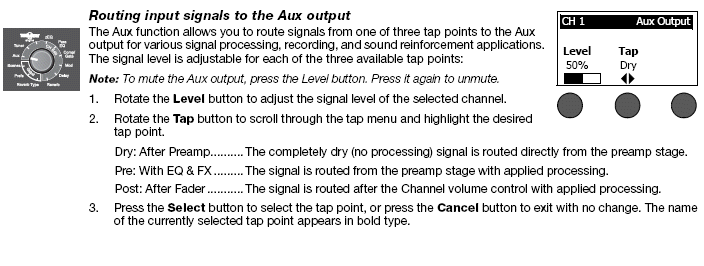
Tap points where you can set the output to the Aux.[1]
- Dry: After Preamp: The completely dry (no processing) signal is routed directly from the preamp stage.
- Pre: With EQ & FX: The signal is routed from the preamp stage with applied processing.
- Post: After Fader: The signal is routed after the Channel volume control with applied processing.
Excerpt from the T1 ToneMatch® Audio Engine Owner's Guide (62 pages)
T1 ToneMatch Audio Engine Service Manual
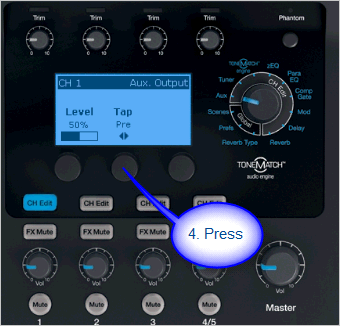
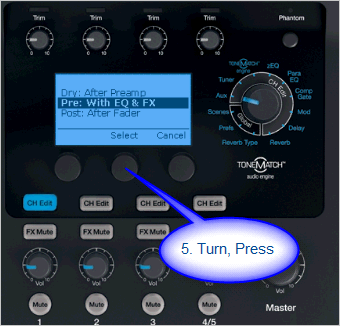
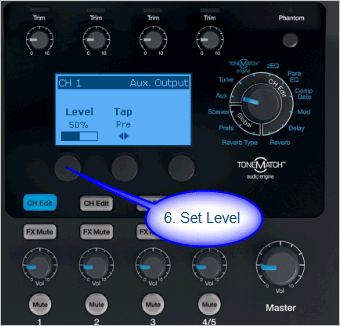
Setting the Tap Point
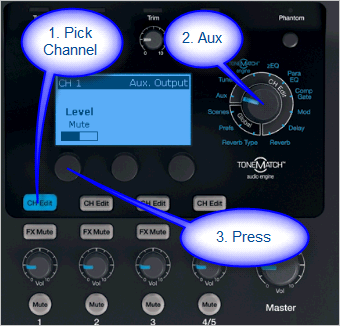
Setting the Aux Output to
- Dry: After Preamp
- Pre: With EQ & FX
- Post: After Fader
Press to access Tap menu.
Select
- Dry: After Preamp
- Pre: With EQ & FX
- Post: After Fader (note that channel Volume and Mute button also affect Aux)
No Reverb on Aux
Q: Why is there no Reverb on the Aux output of the T1 ToneMatch Audio Engine?
A: Hilmar-at-Bose writes[2]
- The T1 ToneMatch Audio Engine has lots of different effects units and normally they are unique to each channel. That means that the T1® has 4 individual dynamic processors, 4 modulators (chorus flanger, phaser, etc.) , 4 EQs, 4 delay processors, etc. The only exception is the reverb, which is shared by all channels.
- The AUX is also a per-channel control. That means if you turn up the AUX of channel, you expect to hear signals from channel 1 and only from channel 1. However, the output of the reverb processor contains the reverb portions of all 4 channels. If we add that to the Aux, you'd hear the reverb portions of all 4 channels and not only the channel that you are interested in. In most cases, this is probably not what you want.
- If you are familiar with conventional mixing consoles, you will find that the situation is quite similar. You can only route to an AUX output effects that are specific to a channel (normally these would be connected to the insert loop of this channel). The "shared" effects typically come into the board through an AUX return, which is not channel specific.
The discussion continues in the Message Board
Reference: page 52 of the T1 ToneMatch® Audio Engine Owner's Guide (62 pages)
T1 ToneMatch Audio Engine Service Manual
Problem: Aux output does not sound right.
What To Do:
- Check if the Aux output is configured for the desired tap point for each input channel. Refer to “Routing input signals to the Aux output” on page 26.[1]
Note: No reverb comes from the Aux output even if the tap point is Pre or Post.
- Verify that each input assigns the desired signal level to the Aux output.
Aux Out to a S1 Pro System
The Aux Out is balanced mono and suitable to connect to the S1 Pro System Channel 1 or 2.
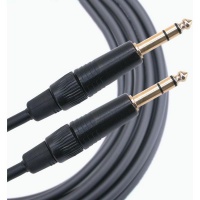
For best results use a 1/4 inch (6 mm) Tip-Ring-Sleeve cable. A 1/4 inch (6 mm) Tip-Sleeve cable will have up to -6dB lower signal and be more susceptible to line noise.
- Applicability
- This article applies to connecting the T1 ToneMatch Audio Engine Master Output or Aux Output to the S1 Pro System
- Power for the T1 ToneMatch Audio Engine
- If your T1 ToneMatch Audio Engine is connected to an L1 Model 1S or L1 Model II, the T1 ToneMatch Audio Engine will get power from the Power Stand. If it not, you will need a ToneMatch Power Supply to run the T1 ToneMatch Audio Engine.
- Cables
- The T1 ToneMatch Audio Engine Analog Outputs and the S1 Pro System 1/4 inch (6.3 mm) inputs are balanced. For best results use a 1/4 inch (6.35 mm) Tip-Ring-Sleeve cable for a balanced connection. You can use a 1/4 inch (6.35 mm) Tip-Sleeve cable, but you will lose up to -6 dB in signal strength and you may pick up line noise.
On the S1 Pro System, for each channel you are connecting to the T1 ToneMatch Audio Engine use these settings while you are setting up.
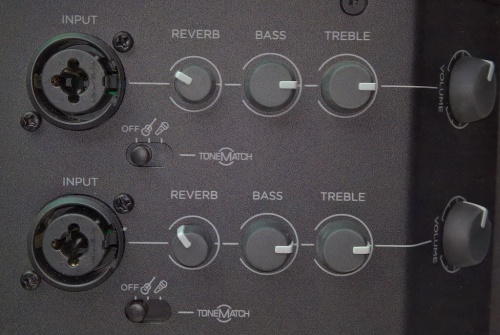
- Reverb OFF
- Bass at 12:00 o'clock
- Treble at 12:00 o'clock
- ToneMatch switch OFF
You can adjust the Reverb, Bass, and Treble after you get your basic sound working.
- S1 Pro+
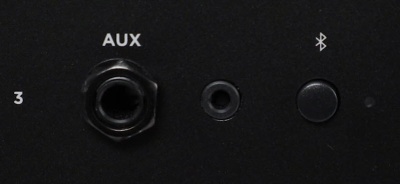
You can also connect to the Channel 3 Aux input. For best results, use a 1/4 inch (6.3 mm) Tip-Ring-Sleeve cable.
Gain Staging
- Using a Bose device as the source
When connecting a ToneMatch Mixer[3] or an S1 Pro System Line Out to an S1 Pro System channel 1 or channel 2
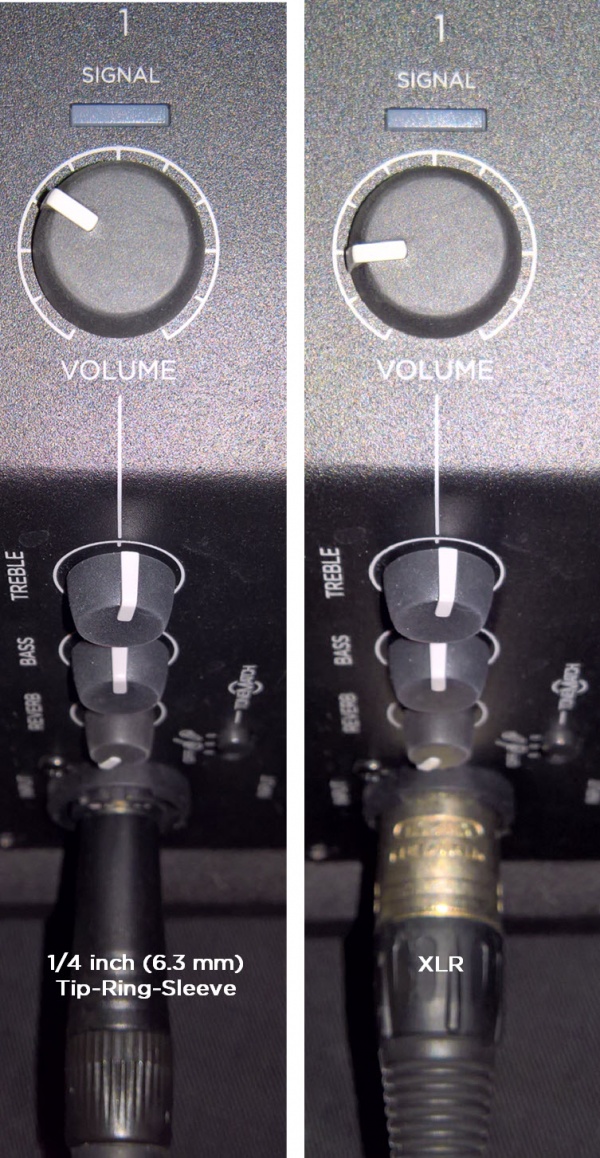
Set the volume control to 10:00 o'clock with 1/4 inch (6.3 mm) Tip-Ring-Sleeve
- The signal strength from a ToneMatch Mixer[3] or an S1 Pro System Line Out is sufficient to achieve the maximum usable volume from the S1 Pro System
- Control the overall volume from the ToneMatch Mixer[3] or the first S1 Pro System. If you use an XLR cable, set the volume control to 9:00 o'clock
- Using a third-party source (not a Bose device as the source)
For each channel you are using on the S1 Pro System
- Turn the channel volume off
- Connect your sound source
- Adjust the volume of the source device output to the reference or nominal output level.
- On analog consoles this may be marked as unity or 0 dB.
- On digital consoles this may be marked as -18 dBFS[4][5]. The exact value (-18 dBFS to -20 dBFS) may vary depending your location[6].
- Refer to the manual for the source device for details.
- If the source device does not have metering or indicators, set the output as high as you can without hearing distortion or seeing red indicator lights.
- While playing/singing as loud as you will during your performance, bring up the channel volume until you see solid green on the channel indicator light. Occasional flickers of red are okay. If you see solid red or you hear distortion, turn down the volume.
Combo Inputs
- S1 Pro Channels 1 and 2 have combo inputs that accept
- XLR (balanced mono)
- Microphone or Line-Level inputs
- 1/4 inch (6.3 mm) Tip-Ring-Sleeve connection (balanced mono)
- Line-Level inputs
- 1/4 inch (6.3 mm) Tip-Sleeve connection (unbalanced mono)
- Line-Level inputs and instruments (e.g. guitars, keyboards, guitar processors, loopers)
- When using a third-party device (e.g., mixer or another line-level source) should I use the XLR or 1/4 inch inputs?
- The S1 Pro 1/4 inch Tip-Ring-Sleeve inputs are best suited for line-level balanced inputs. This is a better match for the signal level.
- The S1 Pro XLR inputs are best suited for microphones.
When the S1 Pro Channel input lights hit red or you hear distortion, the signal is clipping and you've reached the maximum usable volume. From the source, if the XLR outputs are line-level and the 1/4 inch Tip-Ring-Sleeve outputs are line-level, it won't matter which type of cable you use. They'll both get the job done, although the volume control setting will be lower with the XLR connection. That doesn't indicate more headroom. The maximum usable volume is the same either way.
Alternate Connection
You can use an XLR cable (mic cable) from a Line Level Source (e.g., L1 Pro, S1 Pro+) to S1 Pro or S1 Pro+ channels 1 or 2 (XLR inputs), but the signal may clip, overload, or be too high to control the volume. To attenuate (reduce) the signal, use a -20 dB or -30 dB Pad
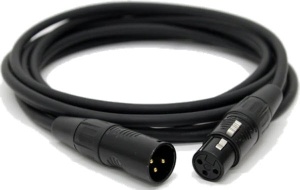
XLR Cable
Click image for more information about Pads
Connecting a Mixer to an S1 Pro system
Article from Bose Connecting an S1 Pro to a mixer
[[Category:S1}}
Aux Out to a separate System
Aux Out to Headphones
The Aux Out is balanced mono intended to be connected to the balanced input of another device at line-level. This may also work with headphones but the volume will be very low and likely not loud enough to be heard over live stage volume.
If you connect to a stereo input, the signals for Left and Right may cancel out. This might not be an issue for headphones as the Left and Right signals are not combined.
Aux Out to In-Ear-Monitors
The Aux Out is balanced mono intended to be connected to the balanced input of another device at line-level. This may also work with headphones but the volume will be very low and likely not loud enough to be heard over live stage volume.
If you use an In-Ear-Monitor system that has built-in amplification, this may work.
If you connect to a stereo input, the signals for Left and Right may cancel out. This might not be an issue for headphones as the Left and Right signals are not combined.
Input Directed to Aux Out Only
To direct an input exclusively to Aux see: T1 ToneMatch® Audio Engine / Aux to a Separate System
- ↑ 1.0 1.1 Aux Tap Points from page 26 of the T1 ToneMatch® Audio Engine Owner's Guide (62 pages) T1 ToneMatch Audio Engine Service Manual
- ↑ Hilmar-at-Bose writes about No Reverb on Aux
- ↑ 3.0 3.1 3.2 T4S ToneMatch mixer or T8S ToneMatch mixer or T1 ToneMatch Audio Engine
- ↑ dBFS
- ↑ dBU vs dBFS
- ↑ dBFS Analog Levels
