Difference between revisions of "Template:ToneMatch Mixers to F1 Model 812"
m |
m |
||
| Line 1: | Line 1: | ||
| + | <!-- | ||
#Plug in your ToneMatch mixer and F1 812 to power and then connect the audio path using an XLR or TRS ¼-inch cable. | #Plug in your ToneMatch mixer and F1 812 to power and then connect the audio path using an XLR or TRS ¼-inch cable. | ||
#Power on the devices. | #Power on the devices. | ||
| Line 5: | Line 6: | ||
#Set ToneMatch Trim controls and set the input volumes as high as possible without input clipping. You can use the Prefs | Input Level on the ToneMatch mixer to monitor the input level. | #Set ToneMatch Trim controls and set the input volumes as high as possible without input clipping. You can use the Prefs | Input Level on the ToneMatch mixer to monitor the input level. | ||
#Unmute the channels on the ToneMatch mixer and adjust your channel volumes to stay between 0 dB and +6 dB at the master output. You can monitor this visually on the T8S LED or in the Prefs | Output Level on the ToneMatch mixer. | #Unmute the channels on the ToneMatch mixer and adjust your channel volumes to stay between 0 dB and +6 dB at the master output. You can monitor this visually on the T8S LED or in the Prefs | Output Level on the ToneMatch mixer. | ||
| + | |||
| + | --> | ||
| + | |||
| + | == Gain Staging == | ||
| + | For each {{F1}} | ||
| + | |||
| + | === {{F1}} Channel 1 Combo Input === | ||
| + | The use an XLR or ¼ inch Tip-Ring-Sleeve jack cable. | ||
| + | |||
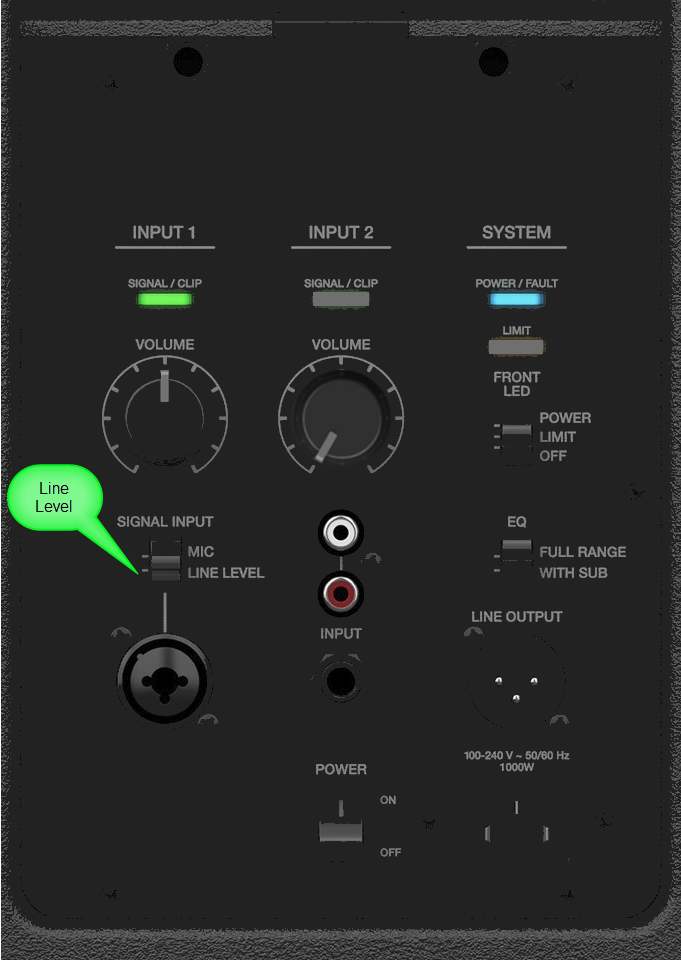
| + | === MIC / LINE LEVEL === | ||
| + | Set this to LINE LEVEL | ||
| + | |||
| + | |||
| + | ==== Volume Control ==== | ||
| + | Use the Input 1 volume control. | ||
| + | |||
| + | [[File:F1 812 Channel 1 only.png]] | ||
| + | |||
| + | # Set the Input 1 '''Volume''' control to the 0 (zero) position. | ||
| + | # Connect the {{T8S}} Main Output to the Input 1 | ||
| + | # Adjust the volume of the {{T8S}} Main Output to the maximum output without distortion. This is probably between 10:00 o'clock and 12:00 o'clock on the Master Output | ||
| + | # While playing music through the {{T8S}}, increase the '''Volume''' level so that the '''Signal/Clip''' indicator glows green with flickers of red. This will probably be around 9:00-11:00 o'clock | ||
| + | # If the '''Signal/Clip''' indicator glows red, decrease the '''Volume''' level so that it glows only green or red. If you see red flashes longer than one second, turn down the volume. | ||
---- | ---- | ||
Revision as of 02:02, 12 April 2019
- Set ToneMatch Trim controls and set the input volumes as high as possible without input clipping. You can use the Prefs | Input Level on the ToneMatch mixer to monitor the input level.
- Unmute the channels on the ToneMatch mixer and adjust your channel volumes to stay between 0 dB and +6 dB at the master output. You can monitor this visually on the T8S LED or in the Prefs | Output Level on the ToneMatch mixer.
-->
Contents
Gain Staging
For each F1 Model 812 Flexible Array Loudspeaker
F1 Model 812 Flexible Array Loudspeaker Channel 1 Combo Input
The use an XLR or ¼ inch Tip-Ring-Sleeve jack cable.
MIC / LINE LEVEL
Set this to LINE LEVEL
Volume Control
Use the Input 1 volume control.
- Set the Input 1 Volume control to the 0 (zero) position.
- Connect the T8S ToneMatch mixer Main Output to the Input 1
- Adjust the volume of the T8S ToneMatch mixer Main Output to the maximum output without distortion. This is probably between 10:00 o'clock and 12:00 o'clock on the Master Output
- While playing music through the T8S ToneMatch mixer, increase the Volume level so that the Signal/Clip indicator glows green with flickers of red. This will probably be around 9:00-11:00 o'clock
- If the Signal/Clip indicator glows red, decrease the Volume level so that it glows only green or red. If you see red flashes longer than one second, turn down the volume.
