Sketches / Principles
|
This article is an editorial and expresses the opinion and experience of ST the author. Please post comments in the discussion page.
|
Sketches: The Principles
This outlines the guiding principles behind all the sketches that I put up on the Bose® Musicians Community Message Boards in the Illustrating Setups section.
Contents
The Ideal
Wherever possible, use the system as designed. To me, this means:
- One system per player (vocals or instrument or vocals plus instrument)
- Each player controls his/her own volume and tone with the R1 Remote or T1 ToneMatch Audio Engine
- Each player is positioned closer to his/her own Bose® system, than to any other (loud) sound source on stage
- Classic/Model I: Where there are both vocals and instruments running into a Bose® system, vocals and mic'd instruments take first priority for the channels 1 and 2.
- I almost always put the vocals in channel 1, just for consistency, not because there is any difference between channels 1 and 2.
- Keep loud acoustic sound sources out of the line-of-sight (line-of-hearing) between any player and any Bose® system on the stage.
- Although I usually lay things out so that the Bose Systems are at the back of the stage they don't have to be there. There are exceptions where it makes sense to put the systems for the Bass or Drums off the wall, to get them closer to the players.
- Keep all acoustic sources at low volume on stage. Back line amps should be moved off stage or pointed off stage if possible. Bass amps may be an exception.
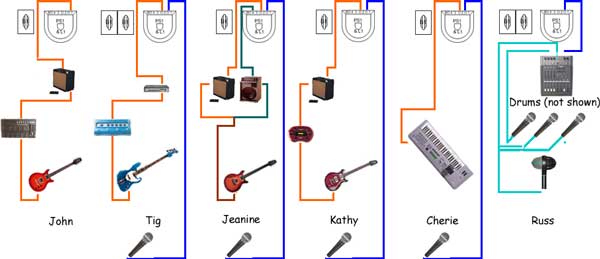
Here is a Sketch from late 2004 where I applied these ideas.
More general principles
- Principles for running multiple performers with several L1 systems
- Every sound source should be amplified through only one system
- Run sound sources that have similar frequency ranges to different systems. This avoids masking and enhances the Cocktail Party Effect)
- Route vocals to different systems
- Route individual guitars to different systems
- Avoid "panning" a sound source across two or more Systems. While this may sound fine on stage and help with the stage mix, it can cause phase issues and nulls in the audience. It will also lower the gain before feedback for microphones
- Every player should hear him/herself through the system closest to them
- Keep loud sources out of the path between a player and their system
- All players that should be heard at the same volume should be the same distance from their System
Compromises: Not quite the Ideal
Most of the sketches are for people and situations where the ideal is not feasible so we move on to the next tier of principles: Where more than one player is running through a Bose® system.
Priorities for channels 1 and 2
(for access to the presets and the Remote)
- Vocals
- Mic'd instruments
- Line level instruments without volume or tone controls onboard
Mixers and Effects
- Each individual sound (voice or instrument) comes through only one Bose® system (this is the reason for panning hard left or hard right when using more than one system).
- Nothing gets panned in the middle range. We are trying to avoid dual-mono (phase summing and cancellation issues).
- If there is more than one Bose® system being driven by a mixer, treat each of those systems as being supplied by a separate channel or sub-mix.
- If possible, microphones and instruments should be routed to channels 1 and 2 to take advantage of the presets.
- Effects should be used sparingly (if at all) and care must be taken that the effects if used do not cause cross-talk ( channel bleed).
- Leverage all presets on the Bose Systems. For example: If you've got identical microphones running into a mixer. These would all use the same preset, so I'd treat the three microphones as a sub-mix and route that to the Bose System on say, Channel 1 and set the preset for the model of microphone being used. You could do this again for Channel 2 and then a third sub-mix (flat) to Channel 3 or 4.
General approaches in the Sketches
In the sketches I will usually put the vocals in the channels that correspond to where the players will be standing with respect to the Remote. For example: If there are two vocalists using channels 1 and 2,
- The vocalist on the left (facing the Remote) into channel 1.
- The vocalist on the right will go into channel 2.
Exceptions
Traditional Bluegrass situations (several acoustic players sharing a microphone or two) requires a different approach.
Large ensembles like a choir, classical instrument instruments of big bands will require special consideration.
Process and Tools
Please see my other articles about
- the process of creating the sketches and
- the tools I use to make it happen.

