Behringer Xenyx 1002B to S1 Pro System
Contents
Introduction
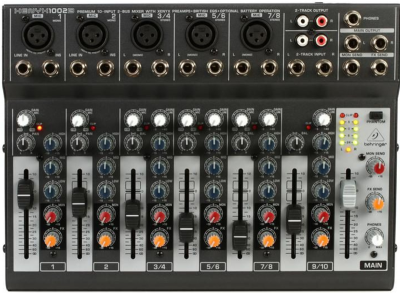
Here's a link to the Behringer 1002 B Owners Manual.
The MAIN outputs from this mixer are unbalanced, 1/4 inch (6mm) Tip-Sleeve connections. You can use ordinary instrument cables. They don't have to be balanced.

For best results, use cables that are less than 20 feet (6 meters).
S1 Pro System Settings
On the S1 Pro System, for each channel you are connecting to the mixer use these settings while you are setting up.

- Reverb OFF
- Bass at 12:00 o'clock
- Treble at 12:00 o'clock
- ToneMatch switch OFF
You can adjust the Reverb, Bass, and Treble after you get your basic sound working.
Gain Staging
- Using a Bose device as the source
When connecting a ToneMatch Mixer[1] or an S1 Pro System Line Out to an S1 Pro System channel 1 or channel 2
Set the volume control to 10:00 o'clock with 1/4 inch (6.3 mm) Tip-Ring-Sleeve
- The signal strength from a ToneMatch Mixer[1] or an S1 Pro System Line Out is sufficient to achieve the maximum usable volume from the S1 Pro System
- Control the overall volume from the ToneMatch Mixer[1] or the first S1 Pro System. If you use an XLR cable, set the volume control to 9:00 o'clock

- Using a third-party source (not a Bose device as the source)
For each channel you are using on the S1 Pro System
- Turn the channel volume off
- Connect your sound source
- Adjust the volume of the source device output to the reference or nominal output level.
- On analog consoles this may be marked as unity or 0 dB.
- On digital consoles this may be marked as -18 dBFS[2][3]. The exact value (-18 dBFS to -20 dBFS) may vary depending your location[4].
- Refer to the manual for the source device for details.
- If the source device does not have metering or indicators, set the output as high as you can without hearing distortion or seeing red indicator lights.
- While playing/singing as loud as you will during your performance, bring up the channel volume until you see solid green on the channel indicator light. Occasional flickers of red are okay. If you see solid red or you hear distortion, turn down the volume.
Stereo with two S1 Pro Systems
If you have two S1 Pro systems, connect one to each of the MAIN OUTPUTS (Left and Right)

- Connect the MAIN OUTPUT Left to the first S1 Pro Channel 1
- Connect the MAIN OUTPUT Right to the second S1 Pro Channel 2
- Set the Behringer MAIN output at "0" bring up the volume on each S1 Pro until you see solid green but not red on the channel LED.
Mono with one S1 Pro System (two cables)

- Connect the MAIN OUTPUT Left to the S1 Pro Channel 1
- Connect the MAIN OUTPUT Right to the S1 Pro Channel 2
- Set the Behringer MAIN output at "0" bring up the volume on each S1 Pro channel until you see solid green but not red on the channel LED.
Mono with one S1 Pro System (one cable)
Note: This won't work correctly if you are using the RCA inputs on the Behringer mixer.

Notes:
The Behringer mixer stereo. The S1 Pro System is mono. So we need to get a mono signal out of the Behringer mixer if you're using one S1 Pro.
- Set all the PAN and BAL controls hard LEFT
- Connect the LEFT Main Output to the S1 Pro channel 1 or 2.
- Set the Behringer MAIN output at "0" bring up the volume on the S1 Pro until you see solid green but not red on the channel LED.