Mixer


Mixer to Model 1S, Model II, Compact


Contents
- 1 Mixer to Model 1S, Model II, Compact
- 1.1 Using a stereo mixer with an L1
- 1.2 Stereo Inputs on Compact Channel 2
- 1.3 Mono Input on Compact Channel 2
- 1.4 General Principles
- 1.5 Specific Mixers
- 1.5.1 Allen & Heath ZED 10-FX
- 1.5.2 Allen & Heath ZED Sixty-14FX
- 1.5.3 Alto Live 802
- 1.5.4 Behringer Eurorack UB1222FX
- 1.5.5 Behringer Eurorack X1222USB
- 1.5.6 Behringer Xenix 1202FX
- 1.5.7 Mackie 1402 VLZ4
- 1.5.8 Mackie CFX-12
- 1.5.9 Mackie ProFX8
- 1.5.10 Mackie ProFX12
- 1.5.11 Mackie ProFX12V2
- 1.5.12 Presonus Studio Live 16.0.2
- 1.5.13 Yamaha MG10
- 1.5.14 Yamaha MG10/2
- 1.5.15 Yamaha MG12XU
- 1.5.16 Yamaha MG82CX
- 2 Mixer to L1 Model I and L1 Classic
Using a stereo mixer with an L1
- General principles for connecting a stereo mixer to the mono input on your L1 .

The inputs on the L1 Pro Input 3, L1 Model 1S, L1 Model II, and the Compact Channel 2 ¼ inch jack are MONO. Check to see if your mixer has a MONO output. If it does, then use that.
If your mixer does not have a mono output pan all your inputs to one side (e.g. LEFT) and take the LEFT output and connect that to your L1 .
For best results do NOT use any kind of Y-adapter to connect stereo outputs from a mixer to a mono input on an L1 . See Why Not Wye for details.
If you have questions or comments about this article please post a note in the Bose Forum - Technical Questions.
L1® Inputs
L1® Model 1S Analog Input
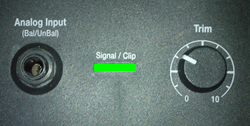
L1® Model II Analog Input
- Setting the Trim Control
- Set the Trim control on the power stand to the 0 (zero) position.
- Connect the audio source to the Analog Input
- Adjust the volume of the Mixer output to the reference or nominal output level.
- On analog consoles this may be marked as unity or 0 dB.
- On digital consoles this may be marked as -18 dBFS[1][2]. The exact value (-18 dBFS to -20 dBFS) may vary depending your location[3].
- Refer to the manual for the Mixer for details.
- If the Mixer does not have metering or indicators, set the output as high as you can without hearing distortion or seeing red indicator lights.
- While playing/singing as loud as you will during your performance, increase the Trim level so that the Signal/Clip indicator glows green or yellow. Occasional flickers of red are okay.
- If the Signal/Clip indicator glows solid red or you hear distortion, decrease the Trim level so that it glows only green or yellow.
L1® Compact Channel 2
The Compact is different from the Model 1S and Model II because it can accept stereo inputs on the Channel 2 1/8" and RCA inputs.
Stereo Inputs on Compact Channel 2
If have RCA outputs from your mixer you can connect to the Compact Channel 2 RCA inputs. It's likely that the RCA outputs on the mixer are recording outputs and you may have control the output level separate from the mixer master faders. Please see your manual for details.
If you have a way to convert the mixer stereo output to 1/8" stereo jack then you can connect to Compact Channel 2 1/8" stereo input.

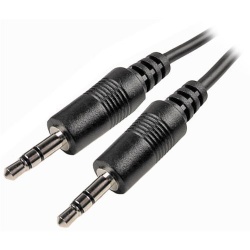
Use a cable like this from your backing track source (iPod, Computer, CD / DVD player)
Click picture for details
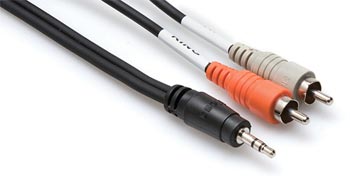
or if your cable has RCA (phono) jacks you can use a cable like this.
Click picture for details
Mono Input on Compact Channel 2
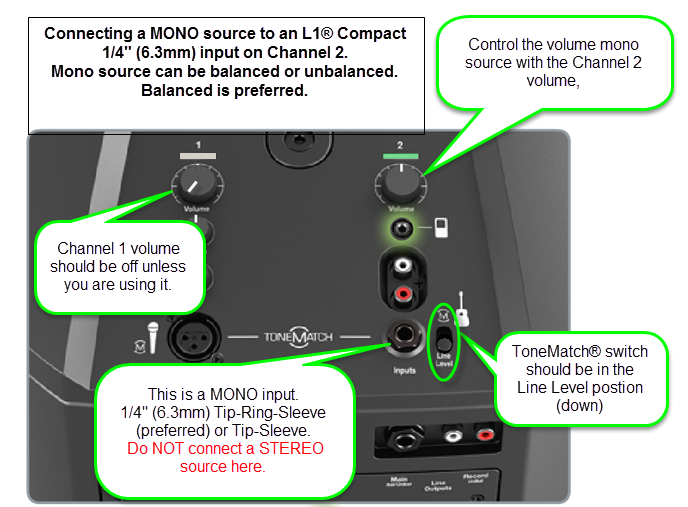
Start with the Volume set straight up and adjust so that you get a solid green signal. If you see red, turn the trim down.
The ¼ inch jack input accepts a balanced or unbalanced connection.


- Can a stereo signal be used with the ¼ inch jack input?
A ¼ inch Tip-Ring-Sleeve connector carrying a stereo signal should not be used with the analog input on the L1 Compact.
Even though a ¼ inch Tip-Ring-Sleeve connector can carry a stereo signal this is not how this physical connection is used on the L1 Compact.
The ¼ inch jack input on the L1 Compact is balanced, and will therefore subtract the Left and Right signals on a stereo cable and you will hear almost no signal in the L1 Compact.


- The 1/8 inch jack is STEREO not Balanced
The L1 Compact Channel 2: 1/8-inch jack is STEREO not BALANCED.
The written documentation is incorrect. It says:
- 1/8-inch stereo input - Balanced analog input for connecting audio sources such as portable mp3 players, satellite radio, laptop computers, video projectors, and smart boards.
Correction
- 1/8-inch stereo input -
BalancedStereo analog input for connecting audio sources such as portable mp3 players, satellite radio, laptop computers, video projectors, and smart boards.
Source Neil-at-Bose
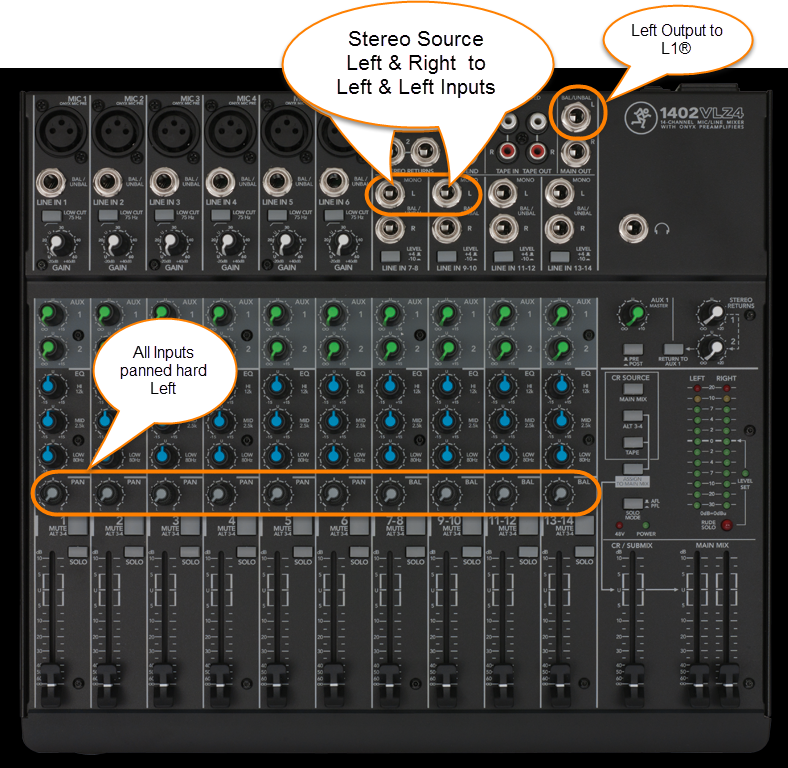
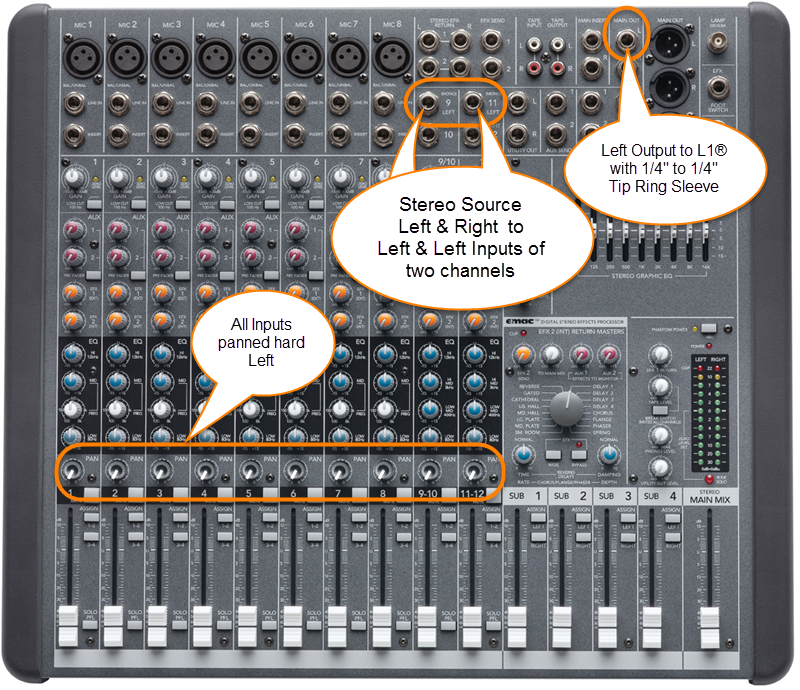
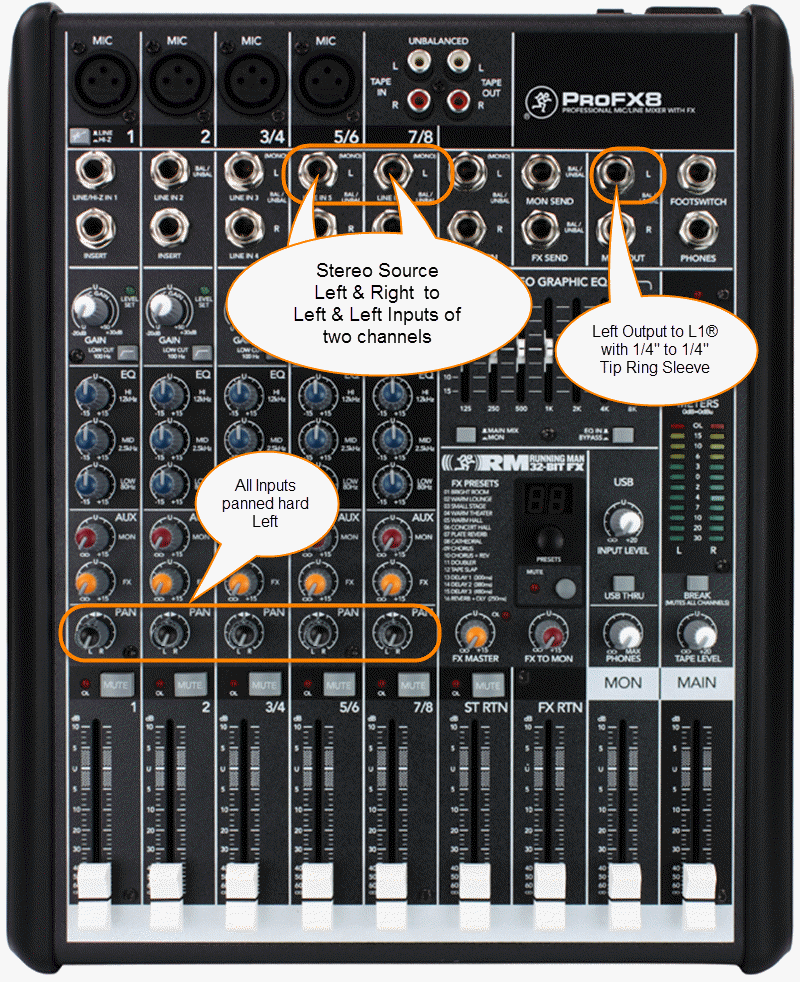
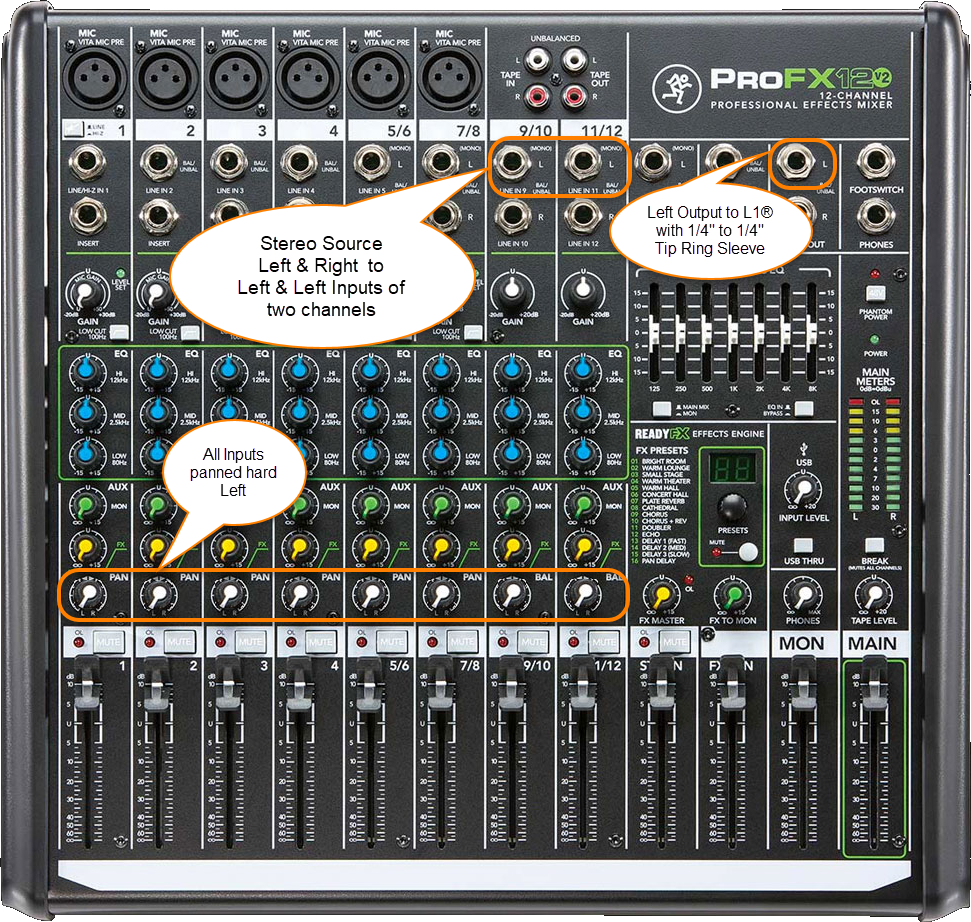
General Principles
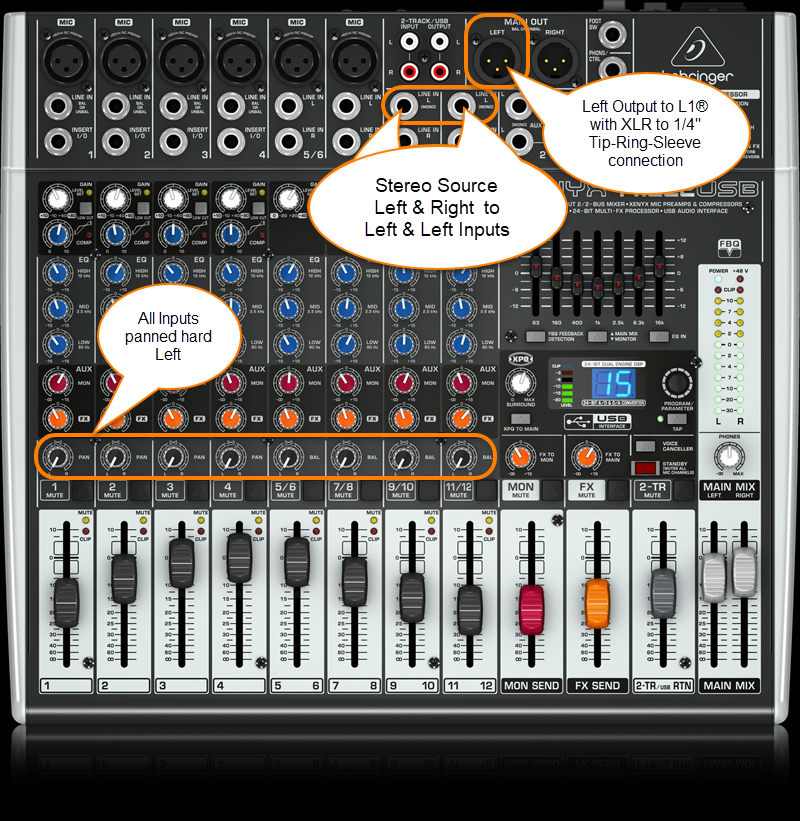
It's easy to make this work. You can pan all your inputs hard LEFT and take the LEFT output and connect that to your L1 . If you have a stereo source and two stereo channels, then you can
- Run the left side of the stereo source to the left input on one stereo channel,
- Run and the right side of the stereo source to the left side of another stereo channel.
- Pan any other inputs hard left
- Use the left output of mixer and connect that to the L1 Analog input.
Question: Is there a loss of quality when using only one output (e.g. Left only)?
No loss of quality. See Mixer Left Output Only
Connections
Where possible use a balanced connection between the mixer output and the L1® input.
XLR Mixer to 1/4 Tip-Ring-Sleeve L1®
The output side is XLR so you will also need a converter or cable that is XLR female to Balanced ¼ inch jack Tip-Ring-Sleeve.
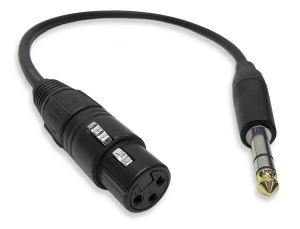
Female XLR to 1/4" Male TRS Balanced Adaptor Cable (audiopile.net)
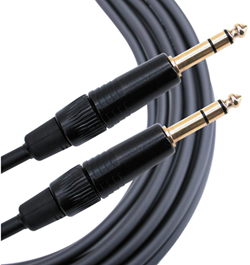
1/4 Tip-Ring-Sleeve Mixer to 1/4 Tip-Ring-Sleeve L1®
The output side is 1/4 inch (6.35 mm) Tip-Ring-Sleeve jack and the input on the Bose side is 1/4 inch (6.35 mm) Tip-Ring-Sleeve jack. Use a cable like this.
 .
.
1/4" TRS Balanced Patch Cable (audiopile.net)
Here are a some examples of how you can get a mono output out of your stereo mixer.
Specific Mixers
Allen & Heath ZED 10-FX
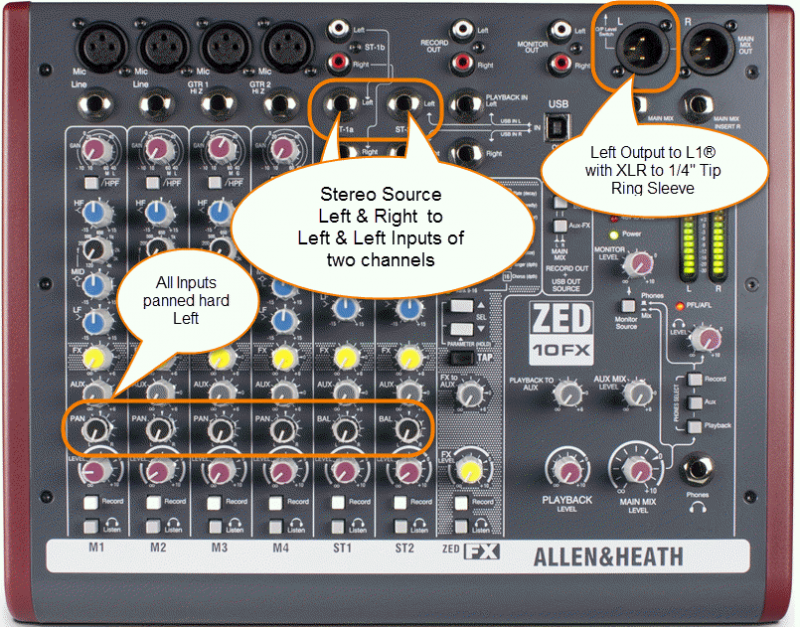
Use a cable like this:
The output side is XLR so you will also need a converter or cable that is XLR female to Balanced ¼ inch jack Tip-Ring-Sleeve.
Female XLR to 1/4" Male TRS Balanced Adaptor Cable (audiopile.net)
Allen & Heath ZED Sixty-14FX
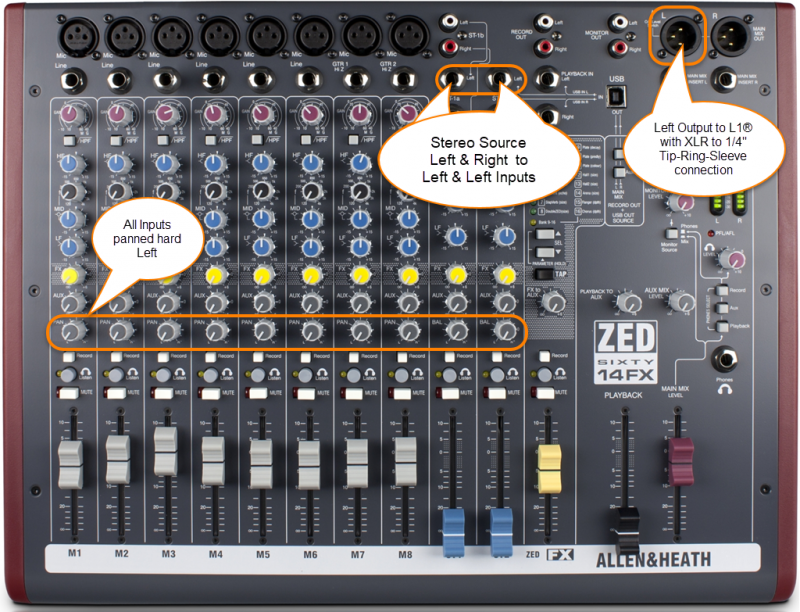
Allen Heath ZED Sixty-14FX web page
Use a cable like this:
The output side is XLR so you will also need a converter or cable that is XLR female to Balanced ¼ inch jack Tip-Ring-Sleeve.
Female XLR to 1/4" Male TRS Balanced Adaptor Cable (audiopile.net)
Alto Live 802
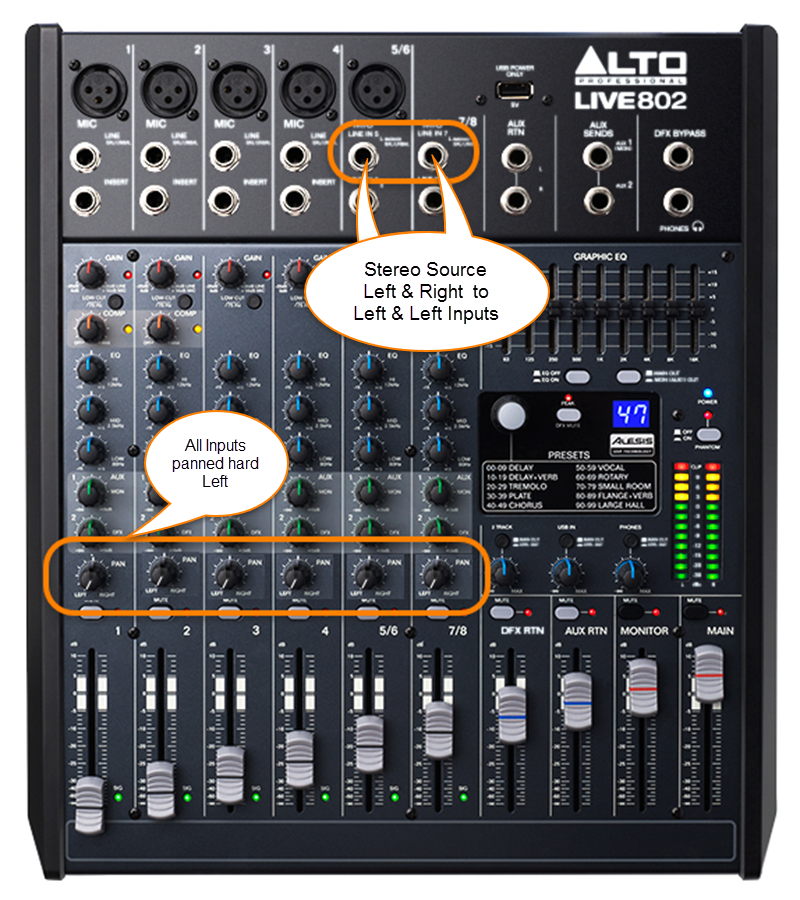
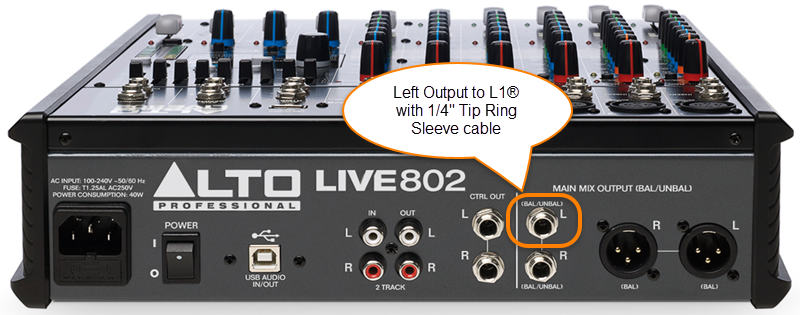
Use a cable like this:
The output side is 1/4 inch (6.35 mm) Tip-Ring-Sleeve jack and the input on the Bose side is 1/4 inch (6.35 mm) Tip-Ring-Sleeve jack. Use a cable like this.
.
1/4" TRS Balanced Patch Cable (audiopile.net)
Behringer Eurorack UB1222FX

Use a cable like this:
The output side is XLR so you will also need a converter or cable that is XLR female to Balanced ¼ inch jack Tip-Ring-Sleeve.
Female XLR to 1/4" Male TRS Balanced Adaptor Cable (audiopile.net)
Behringer Eurorack X1222USB
Use a cable like this:
The output side is XLR so you will also need a converter or cable that is XLR female to Balanced ¼ inch jack Tip-Ring-Sleeve.
Female XLR to 1/4" Male TRS Balanced Adaptor Cable (audiopile.net)
Behringer Xenix 1202FX
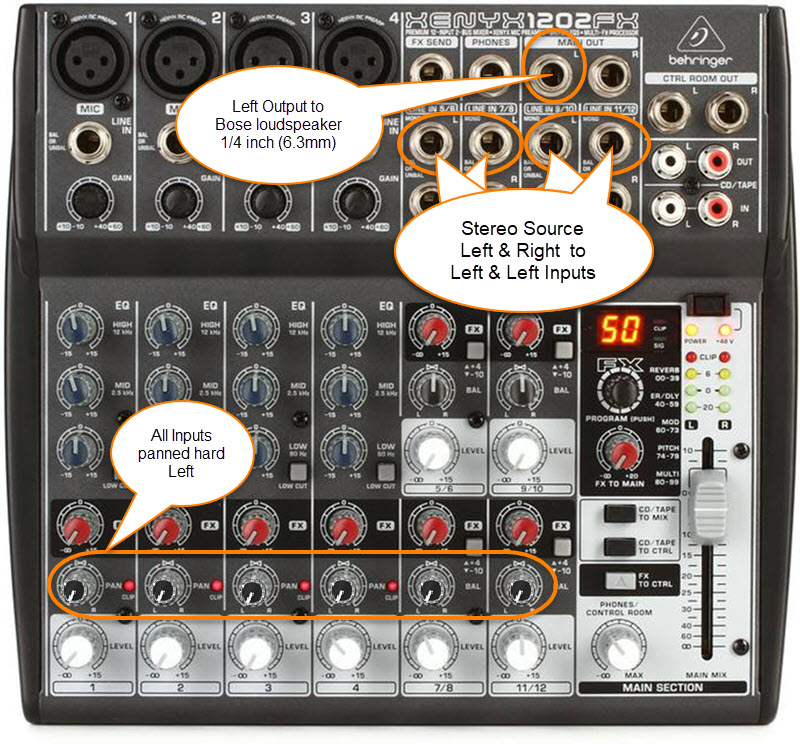
The 1/4 inch (6.3mm) outputs on this mixer are unbalanced mono.
Use a cable like this:
1/4 inch (6.35 mm) Tip-Sleeve
![]()
Mackie 1402 VLZ4
Mackie CFX-12
Mackie ProFX8
Mackie ProFX12

Mackie ProFX12V2
Presonus Studio Live 16.0.2
There is a Mono output.

Use a cable like this:
The output side is XLR so you will also need a converter or cable that is XLR female to Balanced ¼ inch jack Tip-Ring-Sleeve.
Female XLR to 1/4" Male TRS Balanced Adaptor Cable (audiopile.net)
If you don't have access to cable like the one above, you can use one of the ¼ inch jack Tip-Ring-Sleeve balanced outputs. You can pan all the inputs to the LEFT side and use the LEFT output.

Presonus Studio Live 16.0.2 Owners Manual
Yamaha MG10
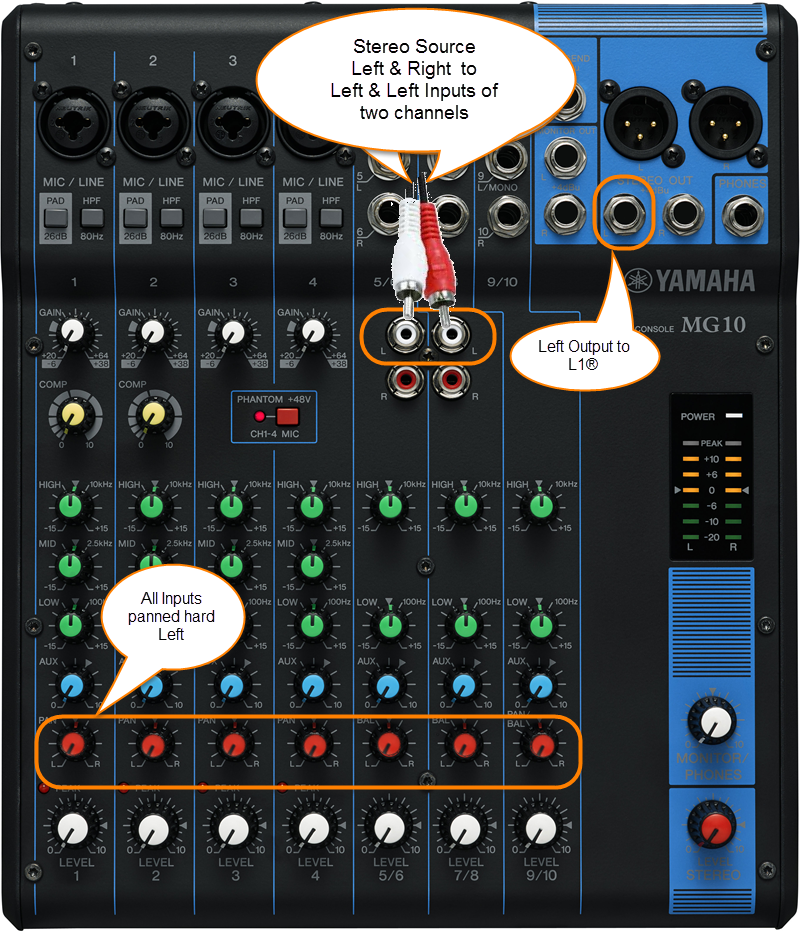
The output side is 1/4 inch (6.35 mm) Tip-Ring-Sleeve jack and the input on the Bose side is 1/4 inch (6.35 mm) Tip-Ring-Sleeve jack. Use a cable like this.
.
1/4" TRS Balanced Patch Cable (audiopile.net)
Yamaha MG10/2
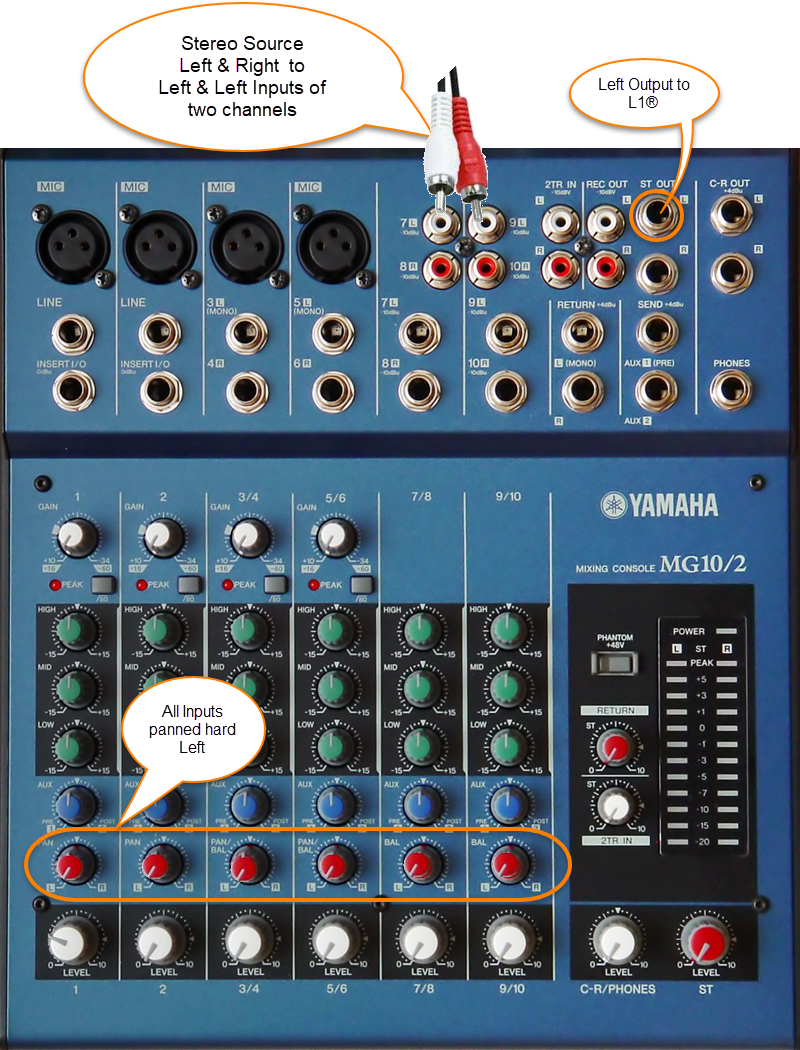
The output side is 1/4 inch (6.35 mm) Tip-Ring-Sleeve jack and the input on the Bose side is 1/4 inch (6.35 mm) Tip-Ring-Sleeve jack. Use a cable like this.
.
1/4" TRS Balanced Patch Cable (audiopile.net)
Yamaha MG12XU
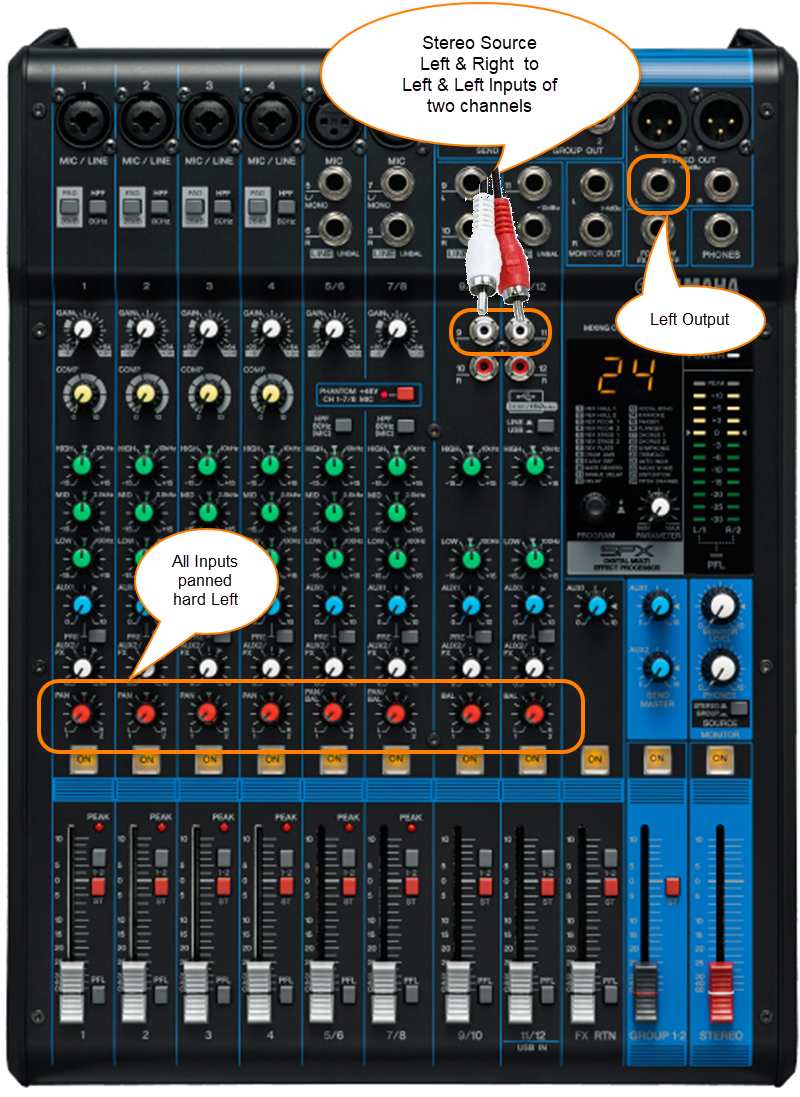
The output side is 1/4 inch (6.35 mm) Tip-Ring-Sleeve jack and the input on the Bose side is 1/4 inch (6.35 mm) Tip-Ring-Sleeve jack. Use a cable like this.
.
1/4" TRS Balanced Patch Cable (audiopile.net)
Yamaha MG82CX
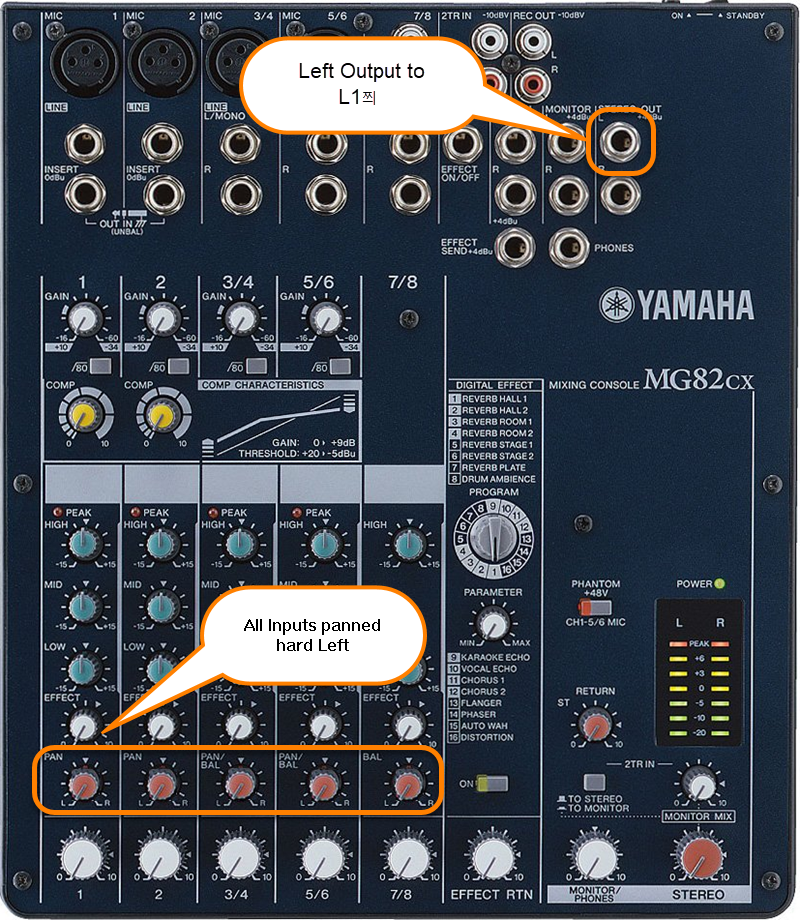
The output side is 1/4 inch (6.35 mm) Tip-Ring-Sleeve jack and the input on the Bose side is 1/4 inch (6.35 mm) Tip-Ring-Sleeve jack. Use a cable like this.
.
1/4" TRS Balanced Patch Cable (audiopile.net)
Mixer to L1 Model I and L1 Classic


¼ inch jack inch to ¼ inch
|
If your mixer has ¼ inch jack outputs, these are almost certainly at line-level and should work well with any of the ¼ inch jack inputs (Channels 1, 2, 3, 4) on a L1 Model I or L1 Classic. Any of the cables show at the right should work. |
¼ Inch Tip-Sleeve (unbalanced) to ¼ Inch Tip-Sleeve (unbalanced)
¼ Inch Tip-Ring-Sleeve (balanced) to ¼ Inch Tip-Sleeve (unbalanced)
¼ Inch Tip-Ring-Sleeve (balanced) to ¼ Inch Tip-Ring-Sleeve (balanced)
This should also work, but likely no better than a simple ¼ Inch Tip-Sleeve to Tip-Sleeve cable. This is because the ¼ Inch input on the Bose System is Tip-Sleeve (unbalanced) anyway. |

XLR to XLR

This is the same kind of cable you would use to connect a microphone.
The XLR inputs for Channels 1 and 2 are intended for microphone level inputs.
XLR (balanced) to XLR (balanced)
- If your source (mixer or CD/DVD player) has XLR outputs, check to see if you have the option to set it to a microphone level output. If so, use that setting.
- If your source has XLR outputs at line-level (most likely) then you will probably need a Pad between the source and the L1 Model I (or L1 Classic) Power Stand.
- You may be able to make things work without the Pad by turning down the output from the source and turning down the trim at the Power Stand. If it sounds okay then you are probably fine. If you cannot get enough a good sounding signal without an excess of noise then try a Pad.
L1 Model II
A ¼ inch Tip-Ring-Sleeve connector carrying a stereo signal should not be used with the analog input on the Model II.
Even though a ¼ inch Tip-Ring-Sleeve connector can carry a stereo signal this is not how this physical connection is used on the Mixer Power Stand.
The analog input on the Model II is balanced, and will therefore subtract the Left and Right signals on a stereo cable and you will hear an L-R (Left minus Right) signal in the Model II.
You cannot 'get through the gig' this way if you are a DJ or if you need to run prerecorded music or have stereo inputs.


Using a Mixer

![]()
If you are using a mixer instead of a T1 ToneMatch Audio Engine use the mixer to create a mono output and send that to the Model II Power Stand Analog input.
- If there is a stereo/mono switch then use it and send the mono output to the Model II Power Stand Analog input.
- If there is a Left/mono output then use that and send it to the Model II Power Stand Analog input.
- If there is no way to create a mono output then pan all your mixer inputs all the way to one side (e.g. Left) and then take the mixer for that side (e.g. Left) output and send it to the Model II Power Stand Analog input.
T1 ToneMatch Audio Engine

- You can run ¼ inch jack line level inputs to T1® Channels 1,2,3.
- You can probably run XLR line level inputs to the T1® Channels 1,2,3. No Pad required.
- T1 ToneMatch® Audio Engine inputs will accept a wide range of signals. We have not encountered a normal use where someone needed a pad - even using +4dbU console outputs[4]
- If you have the option to run ¼ inch to ¼ inch, you could use T1® Channels 4/5. This would leave more channels available for use with microphones and instruments with lower output levels.
- ↑ dBFS
- ↑ dBU vs dBFS
- ↑ dBFS Analog Levels
- ↑ MikeZ-at-Bose talks about T1® inputs in T1® Audio Engine Questions
DJ Mixer vs General Purpose Mixer
The discussion is live: DJ Mixers vs "Band" mixers and at least for now, open to some controversy.
Related Reading
- Read about specific mixers in Mixers
- Mixer to Share Presets