Difference between revisions of "T1 ToneMatch® Audio Engine / Daisy Chain"
m (tightened text) |
m |
||
| Line 3: | Line 3: | ||
[[Image:T1x2IntoModelIIa.gif]] | [[Image:T1x2IntoModelIIa.gif]] | ||
| − | In this example we have two {{T1}s. (T1®s) | + | In this example we have two {{T1}}s. (T1®s) |
| − | # T1® on the left connected to the {{Model II}} through the {{ToneMatch}} port | + | #T1® on the left connected to the {{Model II}} through the {{ToneMatch}} port |
| − | # T1® on the right connected to the T1® on the left through the Master Analog ¼ inch jack to the other T1® Channel 4 | + | #T1® on the right connected to the T1® on the left through the Master Analog ¼ inch jack to the other T1® Channel 4 |
This allows the performer using T1® #1 to control the overall volume of both T1®s. If the performer controlling T1® # does not adjust the volume of Channel 4, Changing the Master Volume maintains the relative balance between T1® #1 and T1® #2 | This allows the performer using T1® #1 to control the overall volume of both T1®s. If the performer controlling T1® # does not adjust the volume of Channel 4, Changing the Master Volume maintains the relative balance between T1® #1 and T1® #2 | ||
Revision as of 11:23, 7 December 2008
You can daisy chain one T1 ToneMatch Audio Engine into another.
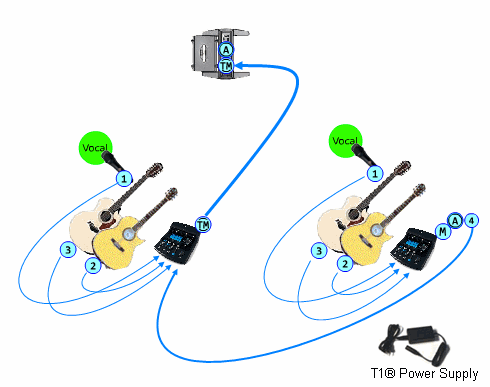
In this example we have two T1 ToneMatch Audio Engines. (T1®s)
- T1® on the left connected to the L1 Model II through the ToneMatch® port
- T1® on the right connected to the T1® on the left through the Master Analog ¼ inch jack to the other T1® Channel 4
This allows the performer using T1® #1 to control the overall volume of both T1®s. If the performer controlling T1® # does not adjust the volume of Channel 4, Changing the Master Volume maintains the relative balance between T1® #1 and T1® #2
