Difference between revisions of "T8S to L1 Model II"
m (used template:Balanced TRS from T8S to L1 Model II) |
m |
||
| (8 intermediate revisions by the same user not shown) | |||
| Line 1: | Line 1: | ||
| + | <div class="tocdiv"> | ||
| + | <div>__TOC__</div> | ||
| + | <div><h2>Introduction</h2> | ||
| + | |||
| + | Connect a {{T8S}} to two {{Model II}}s or two {{Model 1S}} or one of each. | ||
| + | |||
| + | ;Recommendation:If you are panning everything up the middle like a traditional front of house setup, set up the L1 systems at least 20 feet (6 meters) apart. If you pan each sound source to only one L1 system, this recommendation does not apply. For more information see: [[Stereo / Mono / Distributed Systems]] | ||
| + | |||
| + | * Connect the ToneMatch Power Supply to the {{T8S}} for power. | ||
| + | * Always use the ToneMatch Power Supply connected to the {{T8S}} ToneMatch port. | ||
| + | * '''Do not use the ToneMatch port to connect to a L1 power stand'''. The {{T8S}} draws more power than the L1 power stand can supply. | ||
| + | |||
| + | Related articles | ||
| + | * [[T8S to One L1 Model II]] | ||
| + | * [[T4S to Two Model II]] | ||
| + | </div> | ||
| + | </div> | ||
| + | |||
== Connect the T8S to {{Model II}} == | == Connect the T8S to {{Model II}} == | ||
| − | + | === 1/4 inch (6.3 mm) Tip-Ring-Sleeve Outputs === | |
[[File:T8S to L1 Model II.jpg|600px]] | [[File:T8S to L1 Model II.jpg|600px]] | ||
{{Balanced TRS from T8S to L1 Model II}} | {{Balanced TRS from T8S to L1 Model II}} | ||
| − | |||
Set the {{Model II}} Analog Input Trims to about 9:00 o'clock. | Set the {{Model II}} Analog Input Trims to about 9:00 o'clock. | ||
| − | + | === XLR Outputs === | |
| − | |||
| − | |||
| − | + | [[File:T8S XLR to L1 Model II.jpg|600px]] | |
| − | |||
| − | = | + | {{Balanced XLR |Source= [[T8S]]|Target= {{Model II}} |
| − | + | }} | |
| − | + | == L1 Model II Gain Staging == | |
| − | + | For each {{Model II}} | |
| − | |||
| − | |||
| − | |||
| − | |||
| − | |||
| − | |||
| − | |||
| − | |||
| − | |||
| − | |||
| − | |||
| − | + | {{L1 Model II Analog Input Gain Staging|Device={{T8S}}}} | |
---- | ---- | ||
[[Category:T8S]] | [[Category:T8S]] | ||
[[Category:Model II]] | [[Category:Model II]] | ||
| + | [[Category:Connections]] | ||
Latest revision as of 12:31, 10 April 2019
Introduction
Connect a T8S ToneMatch mixer to two L1 Model IIs or two L1 Model 1S or one of each.
- Recommendation
- If you are panning everything up the middle like a traditional front of house setup, set up the L1 systems at least 20 feet (6 meters) apart. If you pan each sound source to only one L1 system, this recommendation does not apply. For more information see: Stereo / Mono / Distributed Systems
- Connect the ToneMatch Power Supply to the T8S ToneMatch mixer for power.
- Always use the ToneMatch Power Supply connected to the T8S ToneMatch mixer ToneMatch port.
- Do not use the ToneMatch port to connect to a L1 power stand. The T8S ToneMatch mixer draws more power than the L1 power stand can supply.
Related articles
Connect the T8S to L1 Model II
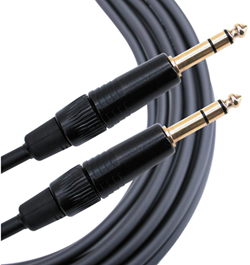
1/4 inch (6.3 mm) Tip-Ring-Sleeve Outputs

The output from the T8S ToneMatch mixer is a balanced mono 1/4 inch (6.35 mm) Tip-Ring-Sleeve and the input on the L1 Model II is a balanced mono 1/4 inch (6.35 mm) Tip-Ring-Sleeve so use a cable like this.
 .
.
1/4" TRS Balanced Patch Cable (audiopile.net)
Set the L1 Model II Analog Input Trims to about 9:00 o'clock.
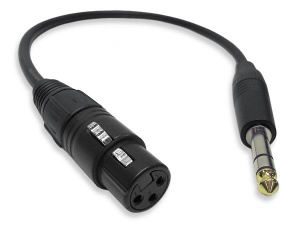
XLR Outputs

The output from the T8S is a balanced mono XLR and the input on the L1 Model II is a balanced mono 1/4 inch (6.35 mm) Tip-Ring-Sleeve so use a cable like this.
 .
.
XLR Female to 1/4" Male TRS Cable
L1 Model II Gain Staging
For each L1 Model II
L1 Model II Analog Input
The Analog input is a 1/4 inch (6.3 mm) Tip-Ring-Sleeve balanced input jack.

Analog input trim (volume, or gain) control
Setting the trim level on the Model II Power Stand is a one-time step. Once you have matched the output of the ToneMatch mixer to the input of the L1 you don't need to adjust it again.

T4S/T8S ToneMatch Mixers
- Connect the T8S ToneMatch mixer Main Output to the L1 Model II Analog Input
- Set the Analog Input trim to 9:00 o'clock. Control the volume with the Master Volume on the ToneMatch mixer.
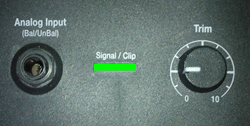
If you set the input trim higher, you will have excessive line noise. - If the Signal/Clip indicator glows red, decrease the Trim level so that it glows only green or yellow.

For third-party mixers
- Set the Trim control on the power stand to the 0 (zero) position.
- Connect the third-party mixer Main Output to the L1 Model II Analog Input
- Adjust the volume of the third-party Main Output to the reference or nominal output level.
- If the Signal/Clip indicator glows red, decrease the Trim level so that it glows only green or yellow.
