Difference between revisions of "Mixer / Alto / L-12"
m (first edit) |
m |
||
| (6 intermediate revisions by the same user not shown) | |||
| Line 10: | Line 10: | ||
== Outputs == | == Outputs == | ||
<!-- delete anything that is not applicable --> | <!-- delete anything that is not applicable --> | ||
| + | === Connnection to a Model I or Classic === | ||
| + | [[Image:AltoL-12Output1.jpg]] | ||
| − | + | This mixer has a button to attenuate the output to match microphone level inputs like those found on the {{Classic}} and {{Model I}}. | |
| − | {{ | + | or |
| + | |||
| + | [[Image:AltoL-12Outputs2.jpg]] | ||
| + | |||
| + | === Connection to a Model II === | ||
| + | |||
| + | [[Image:AltoL-12Outputs3.jpg]] | ||
| + | |||
| + | Connect to the {{Model II}} Analog Input | ||
| + | |||
| + | === Connection to a Compact === | ||
| + | |||
| + | [[Image:AltoL-12Outputs3.jpg]] | ||
| + | |||
| + | [[Image:Compact Channel 2 Line Level.png]] | ||
=== ¼ Inch with suitable output=== | === ¼ Inch with suitable output=== | ||
| Line 27: | Line 43: | ||
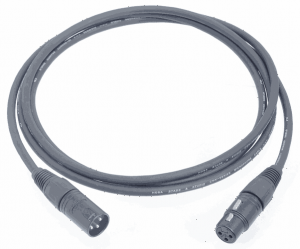
[[Image:XLRXLRMF.png|thumb|XLR to XLR, male to female|right]] | [[Image:XLRXLRMF.png|thumb|XLR to XLR, male to female|right]] | ||
(balanced to balanced) should be fine. This is the same kind of cable you would use to connect a microphone. | (balanced to balanced) should be fine. This is the same kind of cable you would use to connect a microphone. | ||
| − | |||
| − | |||
| − | |||
| − | |||
| − | |||
| − | |||
| − | |||
| − | |||
| − | |||
| − | |||
| − | |||
| − | |||
| − | |||
| − | |||
| − | |||
==== If you use the ¼ inch inputs ==== | ==== If you use the ¼ inch inputs ==== | ||
| Line 55: | Line 56: | ||
Links: | Links: | ||
* [http://www.altoproaudio.com/admin/_static/files/prodotti/75/121697566164149.pdf Alto L-12 Manual] | * [http://www.altoproaudio.com/admin/_static/files/prodotti/75/121697566164149.pdf Alto L-12 Manual] | ||
| − | * [ | + | * [http://www.altoproaudio.com/index.php?template=3&id_prod=75&id_padre= Alto L-12 web site |
| − | |||
| − | |||
| − | |||
More Notes | More Notes | ||
Latest revision as of 01:07, 23 October 2010
Alto L-12
Contents
Summary
Simplest thing that could possibly work.
Use the ¼ inch phone jack (Tip-Sleeve) outputs to
- The PS1 Power Stand (Classic) / Model I Channels 1 or 2 if you want to use the Presets and the R1 Remote Tone and Level Controls
OR - The PS1 Power Stand (Classic) / Model I Channels 3 or 4 if you prefer to leave Channels 1 or 2 open for other inputs. You will have to control Tone and relative Level (between the Channels) at your input source, as you do not have this control over Channels 3 and 4 in the PS1 Power Stand (Classic) / Model I or the R1 Remote.
You can use the XLR Balanced outputs.
Outputs
Connnection to a Model I or Classic
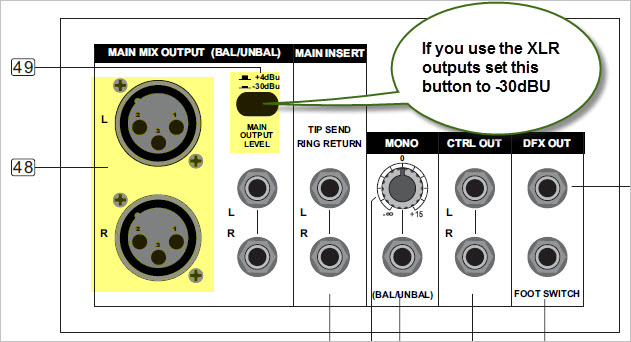
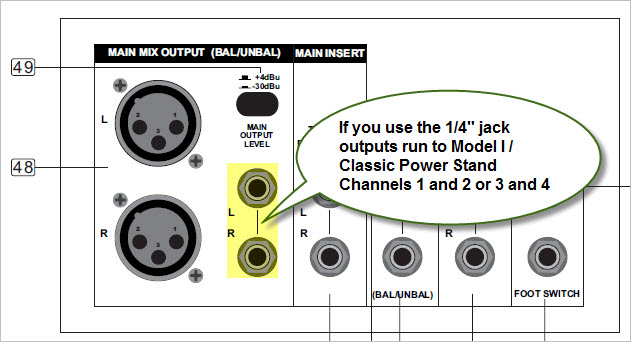
This mixer has a button to attenuate the output to match microphone level inputs like those found on the L1 Classic and L1 Model I.
or
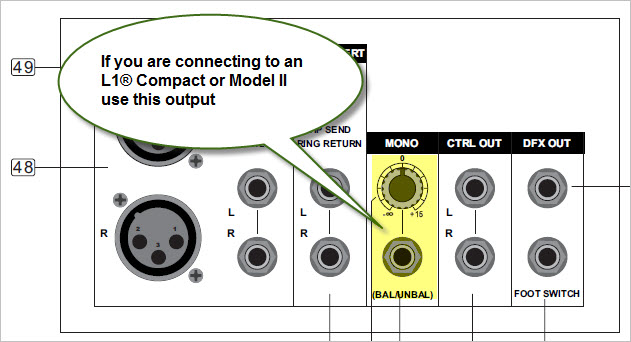
Connection to a Model II
Connect to the L1 Model II Analog Input
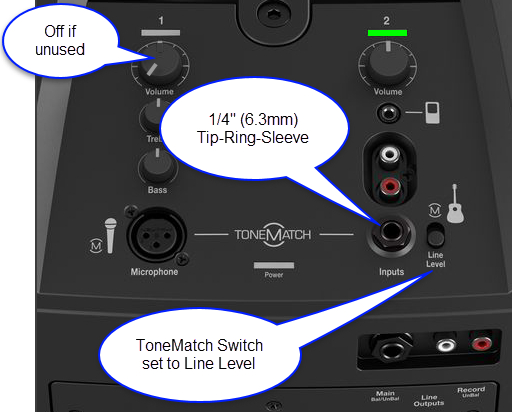
Connection to a Compact
¼ Inch with suitable output
for PS1 Powerstand Channel 1 or 2 inputs
You can use TS (Tip Sleeve) unbalanced cables, or TRS (Tip Ring Sleeve) balanced cables, but since the ¼ inch phone connections at the Bose Classic and Model I Power Stand are unbalanced there is no particular benefit using balanced cables.
¼ Inch Tip-Sleeve (unbalanced) to ¼ Inch Tip-Sleeve (unbalanced)
This should work fine.
¼ Inch Tip-Ring-Sleeve (balanced) to ¼ Inch Tip-Sleeve (unbalanced)
This should work fine.
¼ Inch Tip-Ring-Sleeve (balanced) to ¼ Inch Tip-Ring-Sleeve (balanced)
This should also work, but likely no better than a simple ¼ Inch Tip-Sleeve to Tip-Sleeve cable. This is because the ¼ Inch input on the Bose System is Tip-Sleeve (unbalanced) anyway.
Cables you can use
XLR (balanced) to XLR (balanced)
(balanced to balanced) should be fine. This is the same kind of cable you would use to connect a microphone.
If you use the ¼ inch inputs
Use
- The PS1 Power Stand (Classic) / Model I Channels 1 or 2 if you want to use the Presets and the R1 Remote Tone and Level Controls
OR - The PS1 Power Stand (Classic) / Model I Channels 3 or 4 if you prefer to leave Channels 1 or 2 open for other inputs. You will have to control Tone and relative Level (between the Channels) at your input source, as you do not have this control over Channels 3 and 4 in the PS1 Power Stand (Classic) / Model I or the R1 Remote.
Links:
- Alto L-12 Manual
- [http://www.altoproaudio.com/index.php?template=3&id_prod=75&id_padre= Alto L-12 web site
More Notes


