PS1 Powerstand


Contents
|
How to Tell the Difference Between Bose Portable PA ModelsThis is how to tell which L1®, S1 Pro, or F1 unit you have.
|
||||||||||||||||||||||||||||||||||||||||||||||||||||||||||||||||||||||||||


Connections
- PS1 Powerstand Connections
- PS1 Powerstand/Signal Flow for information about how your input signal flows through the PS1 Power Stand (Classic) / Model I
- Preventing Incorrect Connections
What do the LEDs mean?
Signal/OL LEDs: Channels 1 and 2

There are two LEDs on the PS1 Power Stand (Classic) / Model I near the Trim knob labelled Signal/OL -- one for Channel 1 and another for Channel 2.
These LEDs indicate when the signal level channel's preamplifier reaches certain important thresholds. The trim controls located near the LEDs adjust the amount of gain in the preamplifier.
- The LEDs turn from off → green when the signal level exceeds a small amount.
- The LEDs turn from green → red when the signal reaches a level that's about 10 dB below a level that would clip the preamp and cause objectionable distortion.
When the LED is off (but you are playing an instrument you think is connected to the PS1 or singing/talking into a microphone you think is connected): Increase the level of the trim control. If the LED still does not turn green or red, check instrument/microphone and cables to the PS1.
When you see green only: This indicates that there's some signal in the channel but not enough. While singing or playing the loudest you ever plan to in the performance, increase the trim level until the LED is only flickering red. This is the optimal gain.
When you see red most of the time: Decrease the trim level until you see only flickering red. This is the optimal gain.
Phantom Power LEDs: Channels 1 and 2

The LEDs near the Phantom Power button are either off or red when phantom power is turned on. — more information about Phantom Power
Power / System Status LED
This LED normally is a steady green when the power is on.

If it is not lit or if it is yellow/amber, contact Support.
Note: This LED may briefly flicker yellow /amber when the power is first turned on; this is normal. Within a couple of seconds, it should settle to a steady green.
Bass Line Out and B1 behavior

The behavior of the bass line out and B1 Bass Module outputs on the L1 Classic / L1 Model I / L1 Model II are based on the philosophy that adding B1 Bass Modules should give the user more dynamic range (can play louder) but should not alter the tone of the instrument, including tone adjustments made using the R1 Remote, the T1 ToneMatch Audio Engine or other tone-shaping equipment.
This philosophy is notably different from other manufacturers, who take the approach that it's okay (or desirable) that adding more bass speakers causes the instrument tone to become "bassier".
With this philosophy in mind, here is how the bass line out and B1 outputs work.
No cable plugged into the Bass Line out
| B1s connected | Output | EQ | Bass Signal Gain | Notes |
|---|---|---|---|---|
| 1 | 40Hz-180Hz | B1 specific EQ | Reference Level | |
| 2 | 40Hz-180Hz | B1 specific EQ | Reference Level -6 dB | Why? Because when you add a second B1, if you did not change the signal strength you would get 6 dB more bass relative to the mids and highs. This would alter the tone of the instrument. To keep the tone the same, while still allowing the more dynamic range (system can play louder by 6 dB) the signal level must be reduced by 6 dB. |
Cable connected to the Bass Line Out
| B1s connected | Output | EQ | Bass Signal Gain | Notes |
|---|---|---|---|---|
| 0 | 40Hz-180Hz | Flat EQ | Reference Level -6 dB | |
| 1 | 40Hz-180Hz | B1 specific EQ on Bass Line Out and B1 Out | Reference Level - 6 dB | If you are using a PackLite® power amplifier model A1 Extended Bass Package this is a total of 3 B1s (2 on the A1 and 1 on the Power Stand) |
| 2 | 40Hz-180Hz | B1 specific EQ on Bass Line Out and B1 Out | Reference Level -12 dB | If you are using a PackLite® power amplifier model A1 Extended Bass Package this is a total of 4 B1s (2 on the A1 and 2 on the Power Stand) |
With More Than 4 B1s
The Power Stand does not measure the exact number of PackLite® power amplifier model A1s, so there is a slight error if you use anything but 1,2, or 4 B1s.
For 6 B1s you will be 3.5 dB bass heavy, for 8 B1s it'll be 6 dB heavy.
B2 EQ
Bass Line Out: Model II post firmware 1.4 with System EQ 1.04


September 2012
- Bose released Model II Power Stand Model II firmware 1.4 with System EQ 1.04 to support the B2 Bass Module with the three position Bass Level Switch ( + Normal - ). Note: Support and behaviors for B1(s) is unchanged.
- The behavior of the bass line out with the B2 Bass Module Bass Module outputs on the Model 1S and Model II are based on the philosophy that adding B2 Bass Modules should give the user more bass output immediately. This changes the tonal balance as soon as you add a second B2 using an PackLite® power amplifier model A1 connected to the Bass Line Out. This is unlike the behaviour with B1 bass modules where the signal is attenuated as you add more B1s to maintain the tonal balance at lower volume levels.
- Note: If no bass modules are detected at the Bass Module Output the Bass Line Out EQ will be set to the B2 curve with the B2 switch set to Normal.
- — Source Craig-at-Bose
No cable plugged into the Bass Line out
| B2 Bass Modules connected | Output | EQ | Bass Signal Gain | Notes |
|---|---|---|---|---|
| 1 | 40Hz-200Hz | B2 specific EQ as set by the B2 Bass Level Switch ( + Normal - ) is present at the Bass Module Out and the Bass Line Out | Reference Level | There are three B2 EQ settings possible using the B2 Bass Level Switch ( + Normal - ) |
Cable connected to the Bass Line Out
| B2 Bass Modules connected | Output | EQ | Bass Signal Gain | Notes |
|---|---|---|---|---|
| 0 | 40Hz-200Hz | B2 EQ as though B2 attached and B2 Bass Level Switch set to Normal position | Reference Level | This presents the B2 EQ with the B2 Bass Level Switch set to the Normal position. (No resistance detected between the 2+ and 2- pins of an NL4 plug) |
| 1 | 40Hz-200Hz | B2 specific EQ as set by the B2 Bass Level Switch ( + Normal - ) is present at the Bass Module Out and the Bass Line Out |
Reference Level | If you are using a PackLite® power amplifier model A1 Extended Bass Package this is a total of two B2s (one on the A1 and one on the Power Stand) |
Powered Subwoofers
The Model II is an integrated system that supports Bose B1 and B2 bass modules. Connecting powered subwoofers to the Model II Power Stand Bass Line Out is not supported because EQ curves for the B1 or B2 are present at the Bass Line Out. This may or may not result in good results with a powered subwoofer.
If you want to use a powered subwoofer, connect your signal source to the subwoofer and connect the subwoofer high pass filter output to the L1® (any model).
Output if no B1 Bass Modules detected at the Bass Module Output (powered output) the signal at the Bass Line Out is:
- 40-180 Hz with B2 EQ applied if you have the current L1® Model II Power Stand Firmware Updates
- If you do not have the current firmware the signal at the Bass Line Out is: 40-180 Hz Bandpass (that is: NO B1 EQ) [1]
- The system Crossover for the Cylindrical Radiator®s is 180 Hz
If one or two B1 Bass Modules is detected or emulated using resistors across NL4 2+ / 2- pins
- 40-180 Hz with different EQ curves
- The system Crossover for the Cylindrical Radiator®s is 180 Hz
For details on how to do this see: Activating B1 EQ Curves and Using a Different Sub
- Note — Operation of the B2 with the Model I/Classic is only supported with the B2 Bass Level Switch set to Normal.
- See: Is the B2 Bass Module Compatible with the L1® Classic or Model I
Bass Module Output (powered output)
For the sake of those attaching third party passive speakers (an unsupported application), the output characteristics are the same as for the the B2 Bass Module (section immediately above).
- ↑ Hilmar-at-Bose intelligent crossover
A) When there are no bass sources attached, lower the crossover and try to get as much bass out of the L1 as is reasonably feasible (110 Hz) in this case
B) If there are bass sources bring the crossover up to 180 Hz (where the L1 starts to get really efficient) AND adjust the bass gain so that the overall spectral balance is maintained no matter how many bass sources are attached.
Original Source - Hilmar-at-Bose
Use the proper cables
Warning - Use Blue B1 Cables NL4 cables with your L1 Classic / L1 Model I / L1 Model 1S L1 Model II
If you are using a B1 Bass Module with your Power Stand it is ESSENTIAL for proper operation that you use the BLUE cable supplied with the B1 Bass Module or B2 Bass Module. This is required so that the L1 Classic/L1 Model I/L1 Model 1S/L1 Model II Power Stand can correctly identify when there are bass modules connected to it and if so, how many.
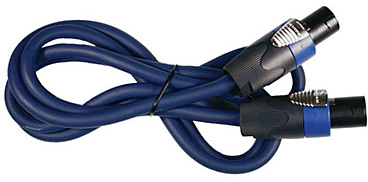
Please click the picture above for ordering information.
- Note
- The B2 Bass Level Switch will not change the sound of the B2 Bass Module if you are not using the correct cable.
See: PS1 Power Stand / Bass Line Out for details about how the Power Stand adapts to the number of bass modules are connected to it.
You may also use high quality NL4 cables (four conductor cables).
Alternate and longer cables for B1s
Crossover
If you don't plug in a B1 and connect a powered sub to the bass line out, the cross over will be at 180 Hz and the "Bass Line Out" will deliver a flat 40Hz to 180 Hz signal. The 110 Hz is only used when there is no B1 AND nothing connected to the "Bass Line Out". In this case we assume that the L1s have to provide full bandwidth to the best of their ability.[1]
Phantom Power
Hilmar-at-Bose posted a great message about phantom power (and why the Bose system is 24 volts)[1].
Let me add some technical ramblings to the 48/24 discussion. Condenser microphones require phantom for a couple of reasons
a) power an internal pre-amp
b) supply polarization voltage to the capsule
c) run an internal DC-DC converter that in turn fuels either preamp, capsule or both
Most condenser mics fall in category a). In this case, reducing the phantom from 48V to 24V has virtually no effect. In theory you can get higher voltages out of a 48V supply, but at this point you would clip the input of you mic preamp anyway.
In category b), the effect of dropping the phantom is that the overall sensitivity of the mic goes down by 6 dB. On the other hand, the max SPL goes up by 6dB. In general, you will simply have to turn up the trim a little more, but there shouldn't be any other effects.
Case c) is basically hit or miss. Either it works just fine or it doesn't work at all. I don't think there is any in-between.
Again, most mics these days fall in category a) and that's one of the reason why the the International Engineering Consortium (IEC) in it's standard 61938 (1996) in section 7.4.5. explicitly recommends
- quote: Although 12V and 48V systems are still in use, 24V systems are preferred for new developments
and that's why we've chosen 24V.
Leaving it in the bag
It is okay to do this if you like (and personally I find it a lot quicker for setup/teardown)
Heat
Hilmar-at-Bose speaks about the heat [2]
The PS1 does have fans, but they are only kicking in when you work the system pretty hard. The power amps are very efficient, and a nice side effect of high efficiency, is that there is a lot less heat to get rid off. So unless you are hitting it very hard, the fans will be off and at that kind of volume level, the fans are pretty much inaudible.
Leaving the system inside the bag is perfectly fine. The vents are above the mixer section and if the bag is open enough so you an insert any cables, than its also open enough to get appropriate ventilation.
If possible you should avoid exposing the PS1 (or any kind of electronics for that matter) to direct blazing sunlight. That can generate enormous amounts of heat inside the system to the point where it actually has to shut down (to protect some of the internal components). As a general rule, if it's too hot for you as the performer, than it's probably also too hot for the system. Finding a little shade will certainly help in a scenario like this.
Access Door / Flip Up Panel
Cliff-at-Bose talks about the door [3]
"I took my cover off right away and couldn't even tell you where it is right now. The carry bag for the PS1 seems to do a good job of keeping things clean in storage, the trunk, in transit. For the upper L1 section, turn it upside down, grab it by the bayonet, lower it into the bag and the bayonet should tuck into the top just fine.
Preventing Incorrect Connections
Cover Unused Inputs
To avoid mishaps at a gig cover or plug the unused inputs on your PS1 Powerstand. This picture shows white nylon caps in the lesser used inputs of a L1 Classic Powerstand. The L1 Model I does not have the inputs in the white area near the top right.

Here is a link to the full sized version of the image.
This tip is from Dan Cornett - see Dan's original tip about plugs for unused inputs
No Sound
Damaged Connections in the L1® boot
Inspecting for damaged connectors in the PS1 Powerstand boot.

Obstructions in the L1® boot
Look down the well - Thanks to Joseph for this one [4]
Set up my Bose as usual just before an early gig tonight and except for the sub-woofer (B1 Bass Module), there wasn't any sound coming out from the line array when plugging in the guitar directly (without the usual PODxt Live in front of it).
Whool! I was definitely started to freak... I surely didn't want to pull my van around again and have to get out the Roland Keyboard back-up amp.
The anguish I was going through just imagining having to use anything other then the Bose was excruciating.. to think that I might have to play the next run of back to back gigs (five of 'em to be exact) without my baby Bose...:-(
Trouble shooting all possibilities, nothing-nada was happening ... no beauteous guitar sound whatsoever!...
The one thing I did notice however, was that the pole was wobbling just a tiny bit. Whenever I would take it apart and put it back together again, there seemed to be the slightest, almost imperceptible of wobbles.
Finally, after taking it apart and putting it back together again for the third time I looked into the power base (PS1 Power Stand (Classic) / Model I) fitting and saw one of my picks lying there. Sure 'nuff... the pick was blocking the connection. This thin little pick was just enough to prevent the Bose from making full contact.
So be forewarned guitarists ... stray picks can be a threat to your total Bose sound fulfillment.
More Troubleshooting
Please see: Troubleshooting
Liquids
Hilmar-at-Bose [5] The best way to deal with a beverage accident is to
- Please, shut the system of immediately (liquid in the PS1 is a potential safety hazard)
- If you have the opportunity pour clear water after the beverage (to rinse out sticky stuff)
- wiggle a little to make sure all the water comes out of the drain holes in the bottom.
- Let the system dry out thoroughly for at least one day, several days are better
Battery Power
Hilmar-at-Bose tells us that battery power is not recommended [6]
A sufficiently sized generator will work with our system although they tend to be fairly noisy.
Car battery converters (so called "inverters") are a little problematic. Most inverters don't work well with our highly-efficient Switch Mode Power Supplies and need to be 2 to 3 times oversized. That draws really big amounts of current from the car battery and the wiring from the battery to the inverter needs to be able to handle that. This is by no means a trivial job, so we recommend against it.
- ↑ Hilmar talks about phantom power voltage 24 vs 48 volts
- ↑ Hilmar-at-Bose speaks about the heat in the Bose® Musicians Community Message Boards
- ↑ Cliff-at-Bose talks about the door in the Bose® Musicians Community Message Boards
- ↑ Thanks to Joseph for this one in the Bose® Musicians Community Message Boards
- ↑ Hilmar-at-Bose: Posted Fri July 07 2006Spillage in the Bose® Pro Portable PA Community
- ↑ Hilmar-at-Bose talks about battery power in the Bose® Musicians Community Message Boards