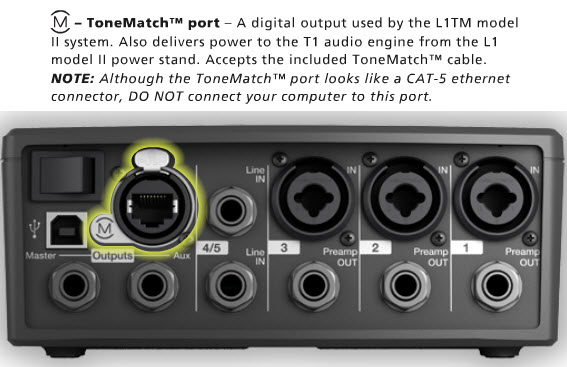
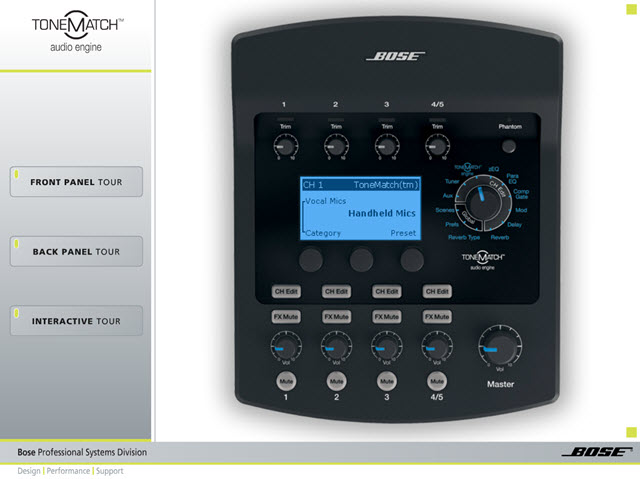
T1 ToneMatch® Audio Engine


Gain Staging
Your first adjustment for any input to your T1 ToneMatch Audio Engine is the Trim setting. The exact position of the Trim will vary depending on signal strength of your input source. The correct setting for any particular source may be different from your other sources.

Set Up Your Source
Set your source at the maximum that it will be when performing.
- Microphone
- Sing directly into the microphone using close microphone technique (lips just brushing the windscreen). Sing as loudly as you will sing during your performance. You want to set the Trim to work at your maximum volume.

- Instrument
- Turn your input as high as it is likely to go during performance.
Set Input Trim
Turn the Trim setting up until the Trim Light is solid green with occasional flickers of yellow. Use the Trim lights as your guide. (The exact position of the Trim knob is not important).

If you see flickers of red (below), turn the Trim down. You are definitely nearing or in compression. Turn the Trim down until there are no red flickers.

Bill-at-Bose [1] talks about setting the gain on a T1 ToneMatch Audio Engine.
- One difference in gain staging the T1 and the Classic is that the T1 has a three-stage trim LED. It lights up green when a signal is present, yellow when you are getting pretty loud (8 to 10 dB of headroom left), and red when you dangerously close to or at full scale.
- In a way, the yellow trim on the T1 is similar to how you treat the red on the Classic. Some yellow during peaks is good on the T1, just like some red on the Classic is good.
- If the T1 trim is going red, you should back off, you are definitely nearing or in compression.
- A really helpful feature on the T1 is to go to the Prefs/Output Level menu, and see where you are relative to maximum output.
T1® Trim Pots
The T1 trim controls for CH 1-3 provide a significant gain increase when you reach the upper limit. This increase in gain is normal operation.
Most sources like typical microphones and piezo pickup systems can provide enough level without the need to add significant gain from the trim control. Certain sources like passive acoustic guitar pickups require additional gain and in these cases it can be necessary to set the trim level to the upper range of the control. When the trim control is set this high you may notice the gain change. This is normal operation. If you want to run the trim control at lower settings we recommend using a preamp or simple stomp box level booster.
The trim for CH 4/5 do not exhibit the same behavior (as the trim controls for Channels 1,2,3) as these inputs are designed for line level sources and do not have the same gain staging as CH 1-3.
Source: Craig-at-Bose 2008/11/03
Inputs

The following notes about Channels 1,2,3, 4/5 are from Hilmar-at-Bose spread out over several posts in Information on the new T1 ToneMatch audio engine
Channels 1,2,3 support
- Balanced XLR
- Unbalanced Tip-Sleeve
The Tip-Sleeve inputs are high impedance so you can plug in an acoustic guitar with passive piezo pickup or any other passive instrument directly without a pre-amp. Input impedance on Channels 1,2,3 is about 1 MOhm. Channels 4 and 5 have an input impedance of about 10 kOhm.
- Choosing the "best" input impedance is a little bit of a trade off and matching the pickup's impedance is not necessarily the best choice.
- Piezo pickups are also somewhat of a capacitor and together with the input impedance of the preamp, this forms a low pass filter.
- If the impedance is too low, then the low pass filter is in the audible range and the guitar loses sparkle and gets a little dull.
- If the impedance is too high, the system gets noisy and somewhat sensitive and finicky. For example, stepping on or simply moving a cable changes its capacitance which creates clearly audible artifacts with a very high input impedance.
- We feel, that 1 MOhm is a very good compromise for a live application.
Bill-at-Bose gives us the following insights into Channels 1,2,3 and 4/5
- For inputs 1-3, you can physically plug a TS or TRS 1/4" plug into the jack, and get perfect fidelity.
- If you have a balanced line source and TRS cable, and plug into an unbalanced input (1,2,3), you may not get as much resistance to induced noise or potential ground loop hum as you will if you plug into the balanced inputs (4,5).
- Our Master and Aux outputs are actually balanced, so you will have an advantage on noise if you use a TRS, but they accept a TS also. So there we also wrote that they "accept" both TS and TRS.
For more information on about input impedance and electric guitar pickups see Guitar Impedance Matching and Understanding Impedance.
T1 Input Levels
- Turn the Rotary Selector to Global section and Prefs
- Press the first button, Menu

- Turn the Menu to Input Level.
- Press the first button to view the Input Levels


Stereo Sources
To connect a stereo source to a T1 ToneMatch Audio Engine see: Backing Tracks

Warning about Cables

If you use a cable like this to connect a stereo source to the T1 ToneMatch Audio Engine
- In Channels 1,2,3 you will hear only one side of the stereo source
- In Channels 4 or 5 the left and right channels from the source will tend to cancel each other out and you will get little or no output.
T1 ToneMatch Audio Engine No Pads Required
The T1® XLR inputs on channels 1-3 were designed to accept inputs from microphones up to normal line-level inputs without needing a switch or a pad. This is in unlike the L1 Model I or L1 Classic) Power Stand where a pad is recommended for line-level inputs.
- The T1 ToneMatch® Audio Engine Channels 1, 2, 3 inputs will accept a wide range of signals. We have not encountered a normal use where someone needed a pad - even using +4dbU console outputs, which is as high as it gets.
— MikeZ-at-Bose[2]
- ↑ Bill-at-Bose Talks about Gain Staging in the Bose® Musicians Community Message Boards
- ↑ MikeZ-at-Bose talks about T1® XLR inputs
Power Stand Input Setting
Connection to L1 Model I / L1 Classic with NO Remote
Here are details on how to connect a T1 ToneMatch Audio Engine to a L1 Classic or L1 Model I

Notes:
The recommended setting for Channel 3 or Channel 4 Level is 3 (see below).
With this setting you will not distort or clip the Model 1 no matter what you do on the T1. You can even use the Model 1 without the remote. More on this later.
For these conditions:
- T1 ToneMatch® Audio Engine going into L1® Model I/L1® Classic into Channel 3/4
- Balanced OR Unbalanced 1/4" cable
- Remote unplugged, OR, master volume on Remote at 12 o clock
- Proper gain staging required on the T1® itself
This will give you the same gain going into the L1® Model I/L1® Classic as if you were going through the ToneMatch® input on a L1 Model II.
If you are using the Remote on your L1® Model I/L1® Classic, then you will need to compensate a bit. If you are running the Remote master volume at max, then stick with 2 on Ch 3/4. When using a T1®, run the master volume of the R1 above 12 o'clock .
This is the power supply for the ToneMatch mixers (T1 ToneMatch Audio Engine and T4S/T8S ToneMatch® Mixers).
The T8S ships with a ToneMatch power supply because the T8S cannot draw power from an L1 Model 1S or L1 Model II Power Stand.
You will need the ToneMatch power supply to power your T1 or T4S mixer when running with an L1 Classic, L1 Model I, L1 Compact, S1 Pro System or non-Bose equipment. You will need a one of these if you have two ToneMatch mixers running into a single L1® Model II or L1® Model 1S. — details below the picture.
If you connect your T1 ToneMatch Audio Engine or T4S mixer to a L1 Model II or L1 Model 1S then the T1 ToneMatch® Audio Engine or T4S draws its power through the ToneMatch cable.
If you connect your ToneMatch mixer to an an L1 Classic, L1 Model I, L1 Compact or S1 Pro System or non-Bose equipment then you will need the ToneMatch power supply
If you are attaching two ToneMatch mixers to a single L1® Model II or L1 Model 1S then you will need this power supply to support the second ToneMatch mixer - the one connected to the Power Stand Analog Input.
See: Connecting Two T1®s to a Model II for details.
Connection to L1 Model I / L1 Classic with Remote
If you are using Channel 3 for the T1 ToneMatch® Audio Engine AND you want to use the PS1 Power Stand Channels 1 or 2 or 4 for other inputs, then you will want to connect the R1 Remote to the PS1 Power Stand.

Excerpt from the T1 ToneMatch Audio Engine Manual - page 20 - Note: this recommended input setting is now 3. See the note above.

With this setting you will not distort or clip the Model 1 no matter what you do on the T1. You can even use the Model 1 without the remote.
The T1 ToneMatch Audio Engine controls are a heck of a lot faster then the R1 controls. There is no perceivable lag.
Input setting recommendation now 3
MikeZ-at-Bose wrote[1] Bill-at-Bose and I have revisited this.
For these conditions:
- T1 ToneMatch® Audio Engine going into L1® Model I/L1® Classic into Channel 3/4
- Balanced OR Unbalanced 1/4" cable
- Remote unplugged, OR, master volume on Remote at 12 o clock
- Proper gain staging required on the T1® itself
I'm going to revise the original recommendation of 2 for Ch 3/4 to 3 - under the above conditions.
This will give you the same gain going into the L1® Model I/L1® Classic as if you were going through the ToneMatch® input on a L1 Model II.
If you are using the Remote on your L1® Model I/L1® Classic, then you will need to compensate a bit. If you running the Remote master volume at max, then stick with 2 on Ch 3/4. I would recommend against running the master volume below 12 o'clock when using a T1®.
Hopefully this is helpful - please ask away with any questions for clarification.
MikeZ
This is the power supply for the ToneMatch mixers (T1 ToneMatch Audio Engine and T4S/T8S ToneMatch® Mixers).
The T8S ships with a ToneMatch power supply because the T8S cannot draw power from an L1 Model 1S or L1 Model II Power Stand.
You will need the ToneMatch power supply to power your T1 or T4S mixer when running with an L1 Classic, L1 Model I, L1 Compact, S1 Pro System or non-Bose equipment. You will need a one of these if you have two ToneMatch mixers running into a single L1® Model II or L1® Model 1S. — details below the picture.
If you connect your T1 ToneMatch Audio Engine or T4S mixer to a L1 Model II or L1 Model 1S then the T1 ToneMatch® Audio Engine or T4S draws its power through the ToneMatch cable.
If you connect your ToneMatch mixer to an an L1 Classic, L1 Model I, L1 Compact or S1 Pro System or non-Bose equipment then you will need the ToneMatch power supply
If you are attaching two ToneMatch mixers to a single L1® Model II or L1 Model 1S then you will need this power supply to support the second ToneMatch mixer - the one connected to the Power Stand Analog Input.
See: Connecting Two T1®s to a Model II for details.
- ↑ MikeZ-at-Bose talks about the input setting on the L1® Model I or L1® Classic Power Stand with the T1®
ToneMatch Port

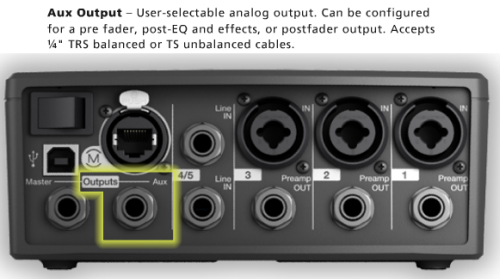
Aux Output
Overview

The output of any of the Channels 1, 2, 3, 4/5 can be sent to the Aux out. You can take the Aux out to provide a separate mix for recording or running to another L1 or separate amplification system.
Tap points where you can set the output to the Aux.[1]
- Dry: After Preamp: The completely dry (no processing) signal is routed directly from the preamp stage.
- Pre: With EQ & FX: The signal is routed from the preamp stage with applied processing.
- Post: After Fader: The signal is routed after the Channel volume control with applied processing.
Excerpt from the T1 ToneMatch® Audio Engine Owner's Guide (62 pages)
T1 ToneMatch Audio Engine Service Manual


Setting the Tap Point
Setting the Aux Output to
- Dry: After Preamp
- Pre: With EQ & FX
- Post: After Fader

Press to access Tap menu.

Select
- Dry: After Preamp
- Pre: With EQ & FX
- Post: After Fader (note that channel Volume and Mute button also affect Aux)


No Reverb on Aux
Q: Why is there no Reverb on the Aux output of the T1 ToneMatch Audio Engine?
A: Hilmar-at-Bose writes[2]
- The T1 ToneMatch Audio Engine has lots of different effects units and normally they are unique to each channel. That means that the T1® has 4 individual dynamic processors, 4 modulators (chorus flanger, phaser, etc.) , 4 EQs, 4 delay processors, etc. The only exception is the reverb, which is shared by all channels.
- The AUX is also a per-channel control. That means if you turn up the AUX of channel, you expect to hear signals from channel 1 and only from channel 1. However, the output of the reverb processor contains the reverb portions of all 4 channels. If we add that to the Aux, you'd hear the reverb portions of all 4 channels and not only the channel that you are interested in. In most cases, this is probably not what you want.
- If you are familiar with conventional mixing consoles, you will find that the situation is quite similar. You can only route to an AUX output effects that are specific to a channel (normally these would be connected to the insert loop of this channel). The "shared" effects typically come into the board through an AUX return, which is not channel specific.
The discussion continues in the Message Board
Reference: page 52 of the T1 ToneMatch® Audio Engine Owner's Guide (62 pages)
T1 ToneMatch Audio Engine Service Manual
Problem: Aux output does not sound right.
What To Do:
- Check if the Aux output is configured for the desired tap point for each input channel. Refer to “Routing input signals to the Aux output” on page 26.[1]
Note: No reverb comes from the Aux output even if the tap point is Pre or Post.
- Verify that each input assigns the desired signal level to the Aux output.
Aux Out to a S1 Pro System
The Aux Out is balanced mono and suitable to connect to the S1 Pro System Channel 1 or 2.
For best results use a 1/4 inch (6 mm) Tip-Ring-Sleeve cable. A 1/4 inch (6 mm) Tip-Sleeve cable will have up to -6dB lower signal and be more susceptible to line noise.
- Applicability
- This article applies to connecting the T1 ToneMatch Audio Engine Master Output or Aux Output to the S1 Pro System

- Power for the T1 ToneMatch Audio Engine
- If your T1 ToneMatch Audio Engine is connected to an L1 Model 1S or L1 Model II, the T1 ToneMatch Audio Engine will get power from the Power Stand. If it not, you will need a ToneMatch Power Supply to run the T1 ToneMatch Audio Engine.
- Cables

- The T1 ToneMatch Audio Engine Analog Outputs and the S1 Pro System 1/4 inch (6.3 mm) inputs are balanced. For best results use a 1/4 inch (6.35 mm) Tip-Ring-Sleeve cable for a balanced connection. You can use a 1/4 inch (6.35 mm) Tip-Sleeve cable, but you will lose up to -6 dB in signal strength and you may pick up line noise.
On the S1 Pro System, for each channel you are connecting to the T1 ToneMatch Audio Engine use these settings while you are setting up.

- Reverb OFF
- Bass at 12:00 o'clock
- Treble at 12:00 o'clock
- ToneMatch switch OFF
You can adjust the Reverb, Bass, and Treble after you get your basic sound working.
- S1 Pro+
You can also connect to the Channel 3 Aux input. For best results, use a 1/4 inch (6.3 mm) Tip-Ring-Sleeve cable.

Gain Staging
- Using a Bose device as the source
When connecting a ToneMatch Mixer[3] or an S1 Pro System Line Out to an S1 Pro System channel 1 or channel 2
Set the volume control to 10:00 o'clock with 1/4 inch (6.3 mm) Tip-Ring-Sleeve
- The signal strength from a ToneMatch Mixer[3] or an S1 Pro System Line Out is sufficient to achieve the maximum usable volume from the S1 Pro System
- Control the overall volume from the ToneMatch Mixer[3] or the first S1 Pro System. If you use an XLR cable, set the volume control to 9:00 o'clock

- Using a third-party source (not a Bose device as the source)
For each channel you are using on the S1 Pro System
- Turn the channel volume off
- Connect your sound source
- Adjust the volume of the source device output to the reference or nominal output level.
- On analog consoles this may be marked as unity or 0 dB.
- On digital consoles this may be marked as -18 dBFS[4][5]. The exact value (-18 dBFS to -20 dBFS) may vary depending your location[6].
- Refer to the manual for the source device for details.
- If the source device does not have metering or indicators, set the output as high as you can without hearing distortion or seeing red indicator lights.
- While playing/singing as loud as you will during your performance, bring up the channel volume until you see solid green on the channel indicator light. Occasional flickers of red are okay. If you see solid red or you hear distortion, turn down the volume.
Combo Inputs
- S1 Pro Channels 1 and 2 have combo inputs that accept
- XLR (balanced mono)
- Microphone or Line-Level inputs
- 1/4 inch (6.3 mm) Tip-Ring-Sleeve connection (balanced mono)
- Line-Level inputs
- 1/4 inch (6.3 mm) Tip-Sleeve connection (unbalanced mono)
- Line-Level inputs and instruments (e.g. guitars, keyboards, guitar processors, loopers)
- When using a third-party device (e.g., mixer or another line-level source) should I use the XLR or 1/4 inch inputs?
- The S1 Pro 1/4 inch Tip-Ring-Sleeve inputs are best suited for line-level balanced inputs. This is a better match for the signal level.
- The S1 Pro XLR inputs are best suited for microphones.
When the S1 Pro Channel input lights hit red or you hear distortion, the signal is clipping and you've reached the maximum usable volume. From the source, if the XLR outputs are line-level and the 1/4 inch Tip-Ring-Sleeve outputs are line-level, it won't matter which type of cable you use. They'll both get the job done, although the volume control setting will be lower with the XLR connection. That doesn't indicate more headroom. The maximum usable volume is the same either way.
Alternate Connection
You can use an XLR cable (mic cable) from a Line Level Source (e.g., L1 Pro, S1 Pro+) to S1 Pro or S1 Pro+ channels 1 or 2 (XLR inputs), but the signal may clip, overload, or be too high to control the volume. To attenuate (reduce) the signal, use a -20 dB or -30 dB Pad
XLR Cable

![]()
Click image for more information about Pads
Connecting a Mixer to an S1 Pro system
Article from Bose Connecting an S1 Pro to a mixer
[[Category:S1}}
Aux Out to a separate System
Aux Out to Headphones
The Aux Out is balanced mono intended to be connected to the balanced input of another device at line-level. This may also work with headphones but the volume will be very low and likely not loud enough to be heard over live stage volume.
If you connect to a stereo input, the signals for Left and Right may cancel out. This might not be an issue for headphones as the Left and Right signals are not combined.
Aux Out to In-Ear-Monitors
The Aux Out is balanced mono intended to be connected to the balanced input of another device at line-level. This may also work with headphones but the volume will be very low and likely not loud enough to be heard over live stage volume.
If you use an In-Ear-Monitor system that has built-in amplification, this may work.
If you connect to a stereo input, the signals for Left and Right may cancel out. This might not be an issue for headphones as the Left and Right signals are not combined.
Input Directed to Aux Out Only
To direct an input exclusively to Aux see: T1 ToneMatch® Audio Engine / Aux to a Separate System
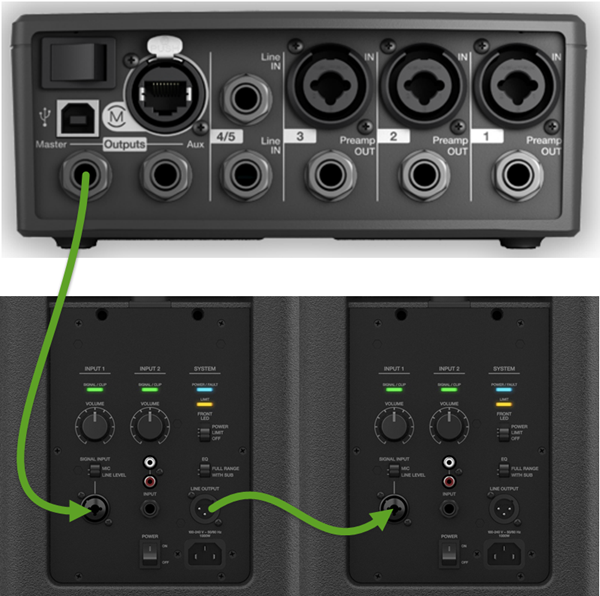
¼ inch jack Output Connections
Connecting from a T1 ToneMatch Audio Engine ¼ inch jack (Master or Aux) to other members of the L1® Family is simple. This article is applicable to L1 Compact, L1 Classic, L1 Model I, L1 Model II S1 Pro System.


Overview
You can use TS (Tip-Sleeve) unbalanced cables, OR TRS (Tip-Ring-Sleeve) balanced cables. If the cable uses ¼ inch jack plugs and the ends are the same, then the cable should be fine.
![]()
OR
![]()
Classic or Model I
For full details see: T1 ToneMatch® Audio Engine / Power Stand Input Setting
¼ Inch Tip-Sleeve (unbalanced) to ¼ Inch Tip-Sleeve (unbalanced)
This should work fine.
![]()
¼ Inch Tip-Ring-Sleeve (balanced) to ¼ Inch Tip-Ring-Sleeve (balanced)
Since the ¼ inch phone connections at the Bose Classic and Model I Power Stand are unbalanced there is no particular benefit using balanced cables but there is no harm.
![]()
L1 Model II
¼ Inch Tip-Ring-Sleeve (balanced) to ¼ Inch Tip-Ring-Sleeve (balanced)
A balanced connection is preferred and will provide better noise rejection over greater distances than the unbalanced connection.
![]()
¼ Inch Tip-Ring-Sleeve (unbalanced) to ¼ Inch Tip-Sleeve (unbalanced)
This should work fine but a balanced connection (immediately above) is preferred especially if you will have cable runs in excess of 20 feet (6 meters) or if you hear line noise, hum or hiss.
![]()
L1 Compact
You can connect a T1 ToneMatch Audio Engine to L1 Compact
Here is an excerpt from page 12 of the L1® Compact Owner's Guide (pdf format)

Connect FROM T1 ToneMatch Audio Engine Master or Aux Output using ¼ inch jack connections.
Connect TO the Compact Channel 2 volume straight up (12:00 o'clock to 1:00 o'clock) for good results. You can turn it up higher, but if you see the light on the Compact solid red (flickers of red are okay) or you hear distortion, turn down the volume on the Compact.
Template loop detected: T1 ToneMatch® Audio Engine / 1/4 inch Output Connections to L1® Family Members
Channel 2 Connection from T1 ToneMatch Audio Engine Details
Connect the T1 ToneMatch Audio Engine Master output L1 Compact channel 2.

Turn the Channel 1 volume all the way down (fully counterclockwise) unless you have a microphone attached to it.
Two T1®s to a Single Compact
Two T1®s to Separate Inputs on Compact Channel 2

Compact Channel 2 detail

Suggested by Tom the Guitar Guy[7]
Daisy Chain Two T1®s to Compact Channel 2

Compact Channel 2 detail
- ↑ 1.0 1.1 Aux Tap Points from page 26 of the T1 ToneMatch® Audio Engine Owner's Guide (62 pages) T1 ToneMatch Audio Engine Service Manual
- ↑ Hilmar-at-Bose writes about No Reverb on Aux
- ↑ 3.0 3.1 3.2 T4S ToneMatch mixer or T8S ToneMatch mixer or T1 ToneMatch Audio Engine
- ↑ dBFS
- ↑ dBU vs dBFS
- ↑ dBFS Analog Levels
- ↑ Tom the Guitar Guy in the Bose L1® Forum
F1 Model 812 Flexible Array Loudspeaker
Please see: T1 ToneMatch® Audio Engine to F1 System
Click the picture to read the full article
S1 Pro System
On the S1 Pro System, for each channel you are connecting to the mixer use these settings while you are setting up.
- Reverb OFF
- Bass at 12:00 o'clock
- Treble at 12:00 o'clock
- ToneMatch switch OFF
You can adjust the Reverb, Bass, and Treble after you get your basic sound working.
Gain Staging
- Using a Bose device as the source
When connecting a ToneMatch Mixer[1] or an S1 Pro System Line Out to an S1 Pro System channel 1 or channel 2
Set the volume control to 10:00 o'clock with 1/4 inch (6.3 mm) Tip-Ring-Sleeve
- The signal strength from a ToneMatch Mixer[1] or an S1 Pro System Line Out is sufficient to achieve the maximum usable volume from the S1 Pro System
- Control the overall volume from the ToneMatch Mixer[1] or the first S1 Pro System. If you use an XLR cable, set the volume control to 9:00 o'clock
- Using a third-party source (not a Bose device as the source)
For each channel you are using on the S1 Pro System
- Turn the channel volume off
- Connect your sound source
- Adjust the volume of the source device output to the reference or nominal output level.
- On analog consoles this may be marked as unity or 0 dB.
- On digital consoles this may be marked as -18 dBFS[2][3]. The exact value (-18 dBFS to -20 dBFS) may vary depending your location[4].
- Refer to the manual for the source device for details.
- If the source device does not have metering or indicators, set the output as high as you can without hearing distortion or seeing red indicator lights.
- While playing/singing as loud as you will during your performance, bring up the channel volume until you see solid green on the channel indicator light. Occasional flickers of red are okay. If you see solid red or you hear distortion, turn down the volume.
zEQ
Using the zEQ as a Tone Control when performing live is simple.

For more information see zEQ
Effects
Overview from Hilmar-at-Bose

Hilmar-at-Bose talks about the effects [5]
There is a large variety of effect processors out there with many different types, qualities, and prices and unfortunately there isn't a one-size-fits approach. Not the least factor is that a lot depends on personal taste and preference.
Our intention with the T1 ToneMatch Audio Engine was not necessarily to build the "world's best effects" but solid usable tools that the musician can deploy in a live situation as the situation requires. We've evaluated effect processors that are popular for live performance and used that to guide our own development. We've also tried to limit the complexity of the user interface, i.e. we provide only the most useful parameters for a certain effect and have pre-tuned the more esoteric ones.
This being said, the T1 ToneMatch Audio Engine has a couple of things that are different from most effects processors: The processing power devoted to this is substantial. The processing chip we use operates in 32-bit floating point and has a peak performance of about 2 billion operations per second (2 GFlops). That is a lot more than can be found in typical processors of this type.
This enables us also to run individual effects on all 4 channels. You can use different combination of compressor/limiter, chorus/flanger, delay, parametric EQ, etc. on each channel. The only thing that is shared is reverb. This is equivalent of having pretty much 4 multi-effects processors at the same time. This enables the user to fine tune and tweak the effects settings for each individual instruments without having to compromise between channels.
There is also some fairly unique processing such as KickGate™ (for drums), zEQ and ToneMatch™, that is not available from any other device I'm aware of.
Again, in the end each user will have to decide whether we have found the "sweet spot" or not, but I'm confident that these effects will work well for many users.
Hope that helps
Hilmar
Compressor
Using compressor/gate functions
The Comp/Gate function provides access to gate, compression, limiter, de-esser and kick drum presets with adjustable parameters. Note: To bypass the Comp/Gate settings, press the Type button. Press it again to activate.
1. Rotate the Type button to access the list of Comp/Gate effects and highlight your choice:
- Compressor 1: Light
- Compressor featuring a preset low-compression ratio with variable threshold and gain parameters. Works well as a general-purpose compressor for most instruments and microphones that require minimal level control.
- Compressor 2: Medium
- Compressor featuring a preset moderate compression ratio with variable threshold and gain parameters. Works well with basses, guitars, keyboards, and vocals requiring subtle level control.
- Compressor 3: Heavy
- Compressor featuring a preset high compression ratio with variable threshold and gain parameters. Works well with loud instruments – like horns and drums, as well as strong vocals that require more aggressive level control.
- Limiter
- Hard limiter featuring a preset ratio (8:1) with variable threshold and gain parameters. Works well with very loud instruments, such as drums, to prevent signal peaks from overloading the channel.
- De-Esser
- Side-chained compressor featuring a preset compression ratio with variable threshold and gain parameters. Designed to reduce sibilance on vocals.
- Noise Gate
- Noise gate with a fast preset attack time, variable threshold, and variable speed (release time). Well-suited for eliminating unwanted noise from microphones and instruments.
- KickGate 1: Regular
- Gate featuring a preset attack time, and variable threshold and tightness (release time) parameters. This is a Bose® proprietary technology designed specifically for kick drums. This robust gate provides maximum gain before feedback, making your kick drum as loud as possible through an L1™ system.
- KickGate 2: Fast
- Same as KickGate 1 – but adjusted for faster tempos. Select this setting if you are using a double bass drum pedal.
2. Press the Select button to select your choice, or press the Cancel button to exit the list with no change.
3. For Comp1-3, Limiter, De-Ess:
- Rotate the Thresh button to adjust the input threshold (trigger) level from -50dB to 0dB.
- Rotate the Gain button to adjust the gain from 0dB to 30.0dB. The gain bar above the button shows the amount of gain reduction. This display helps in setting the threshold.
For Gate:
- Rotate the Thresh button to adjust the input threshold (trigger) level from -90dB to -30dB.
- Rotate the Speed button to set the gate closing speed to any value from 0 (fastest) to 100% (slowest).
For Kick1-2:
- Rotate the Thresh button to adjust the input threshold (trigger) level from -20dB to 0dB.
Nick-at-Bose talks about where to start
- Question
- What are the recommended compression settings for the tone match?
Right now I'm using medium compression but need understanding what threshold does.
- Nick-at-Bose[6]
This is a great question. I'll start out by saying compression is a huge topic and there isn't necessary a best setting, though there can definitely be wrong settings.
Sometimes, maybe often times, the best setting is Bypassed.
"Threshold" is a setting that is entirely dependent on the source material. A more negative number will result in more compression. The closer the Threshold number is to 0 (which is the top of the scale in digital terms), the less compression there will be.
The top meter on the screen shows how much gain reduction is occurring. Roughly, each hash mark is about 2 dB of reduction. (No metering would indicate no compression, which means the signal is below the Threshold setting.)
Here's where I would start:
- Use the Light Compression setting
- Leave the Gain at 3.0 dB
- Set the Threshold so that on the louder parts of the performance, the meter at the top of the screen is hitting between the 1st and 3rd hash marks (starting at the right side of the screen). This would then mean that for the softer and mid-volume parts, there may be no compression happening at all. That's perfectly fine and probably desired.
Source: Nick-at-Bose
MikeZ-at-Bose talks about the Compressor settings
MikeZ-at-Bose talks about the Compressor settings in the T1 ToneMatch Audio Engine[7]
Light is about 2:1, fast attack and release.
Medium is about 3.5:1, fast attack and release.
Heavy is about 6:1, fast attack and release.
All have 'soft knee' transitions.
Hope this is helpful. When tuning the compressors I relied much more by ear to determine the settings than by numerical values.
A couple of comments on the settings.
When doing general compression like is done in the T1, I found fairly fast attack and release times to be the most versatile. Slower times need more fine tuning and are more prone to artifacts when used heavily.
The threshold is the most important control on any compressor, in my opinion. Careful adjustment of this is super important. You need to make sure you are compressing the parts of the instrument that you want to compress (peaks, 20% of the time, 100% of the time etc.)
Can I use more than one compressor function
- Question
- Can you add more than one effect on a given channel under the "comp/gate" channel parameter on the rotary dial?
The is one compressor per channel, and it can do only one function at a time (compressor, limiter, noise gate, de-esser, kickgate). For most signal sources, this should not be a limitation as most of the applications where you would use these effects are mutually exclusive.
The other effects (Mod, Delay) and Reverb operate the same way. You can only choose one function within the family of the effect.
Related Reading
The Truth About Compressors and Limiters
Para EQ
Parametric Equalizer

For details about the ParaEQ see:
Bypass
Introduction to Bypass
- This applies to all ToneMatch mixers.
Hi Folks,
At the recent L1 users conference in Colorado, we found out that a high percentage of T1 owners did not know about the BYPASS feature that's employed in many places in the T1.
The BYPASS feature is extremely useful in deciding if a particular adjustment is giving you the sound you want. It's a form of an A/B switch.
For example, if you want to hear how a particular ToneMatch preset sound on and off, you would use bypass. If you wanted to hear how a particular reverb sounded you could turn it on and off, on and off. And so on. Most effects have this valuable feature.
As an example, here's the screen after you've chosen a Tonematch preset for Channel 1. In this case, I've chosen the preset for an Audix OM5.
Tutorial

To go into bypass mode, just click on the rotary-push knob below the word "category" on the screen.

Here's what the screen looks like after you push the button.

Quick Tutorial on Highly Useful BYPASS Feature... - Ken-at-Bose

What Happens When You Bypass a Preset?
- What happens when you select a channel ‘Bypass’ button on the T1® audio engine?
- Pressing the ‘Bypass’ button on a channel will change it’s current ToneMatch® preset to the generic “Utility Flat” preset. This enables you to audition between specific ToneMatch® presets and the ‘Utility Flat’ setting, helping you decide which preset you will ultimately choose.
- In contrast, the key frequency adjustments for zEQ do not change when the ToneMatch® preset is ‘Bypassed’. For instance say that you originally had a ‘Kick Drum’ preset selected and then pressed ‘Bypass’, the key zEQ adjustment points would still remain focused on fine tuning a kick drum.
Source: Neil-at-Bose
Bypass Reverb
To bypass a zEQ setting on your T1®

Use this to compare the sound with and without a zEQ setting to really hear what the zEQ is doing to the sound in the room.
Bypass zEQ
To bypass a zEQ setting on your T1®
Use this to compare the sound with and without a zEQ setting to really hear what the zEQ is doing to the sound in the room.
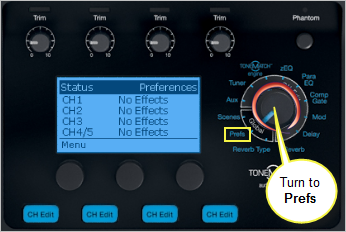
Status
To get a quick look at all the effects being used in your T1 ToneMatch® Audio Engine turn the Rotary Selector to Prefs.

Detailed Listing
Please see Effects
FX Mute Button
From MikeZ-at-Bose
FX Mute specifically mutes: Delay, Mod (Chorus, Flange,Phaser,Trem) and Reverb.
Comp/Gate, zEQ, and Para EQ are unaffected.

Connect Two T1 ToneMatch® Audio Engines to a Model II
The L1 Model II can accept two inputs.

This makes it easy for two performers to connect their own T1®s to a L1® Model II Power Stand.
ToneMatch® Input
The ToneMatch® connection is specifically designed for a T1 ToneMatch Audio Engine. The ToneMatch® cable is supplied with the T1 ToneMatch Audio Engine and uses a male Ethercon connector at both ends.
Analog Input

The Analog connection is a ¼ inch phone jack. You can use this for a second T1® using the T1® Analog Master output (¼ inch phone jack).
This connection is made with a standard ¼ inch jack instrument cable. This can be Tip-Sleeve or Tip-Ring-Sleeve connectors.
Set Power Stand Analog Input Trim to 3 to have approximately the same level as you would have if you had connected with the ToneMatch® connection. You may have to adjust this, but 3 is a good place to start.
Note: A T1® connected to the the Analog input will require the optional T1 ToneMatch® Audio Engine power supply.
Analog Connection from the Second T1® to the Model II Power Stand

¼ Inch Tip-Ring-Sleeve (balanced) to ¼ Inch Tip-Ring-Sleeve (balanced)
A balanced connection is preferred and will provide better noise rejection over greater distances than the unbalanced connection.
![]()
¼ Inch Tip-Ring-Sleeve (unbalanced) to ¼ Inch Tip-Sleeve (unbalanced)
This should work fine but a balanced connection (immediately above) is preferred especially if you will have cable runs in excess of 20 feet (6 meters) or if you hear line noise, hum or hiss.
![]()
Preamps
Comparison to Model I and Classic
MikeZ-at-Bose tells us:[1]
... (the preamps on the Model I are)... exactly the same as the Classic.
On the T1 ToneMatch Audio Engine they're different, but are designed to the same standard as the L1 Classic preamps.
Functionally they are basically the same in terms of frequency response, input impedance, noise performance, max gains etc.
The difference comes in how we get there. I'll try not to go into horribly boring detail. The name of the game is trade-offs, and in the end the design constraints dictate the *best* type of circuit used for *this* particular situation. Here are a couple of the many factors that dictate the differences:
Gain structure. The internal components of the T1 ToneMatch Audio Engine are different that the L1 Model I / L1 Classic and need to have signals fed to them in certain ways. Different designs are more suited to the levels needed than others.
Physical layout of the circuit on the board. There are four channels in a tighter space in the T1 ToneMatch Audio Engine. Again, certain designs lend themselves to be better at this than others.
After evaluating all of the factors that go into the design of a preamp we are using another proven circuit that relies more on discrete transistors rather than op-amps. It fits our needs better for this design situation. The preamp design itself is not necessarily any better or worse. There are *many* ways to skin the cat of preamp design to achieve a desired performance.
Will it sound different? No...I certainly cannot hear a difference playing through it. Can't measure one either.
Hope this sheds some light on it.
MikeZ[2]
Here are the specifications for the Model I Preamps.
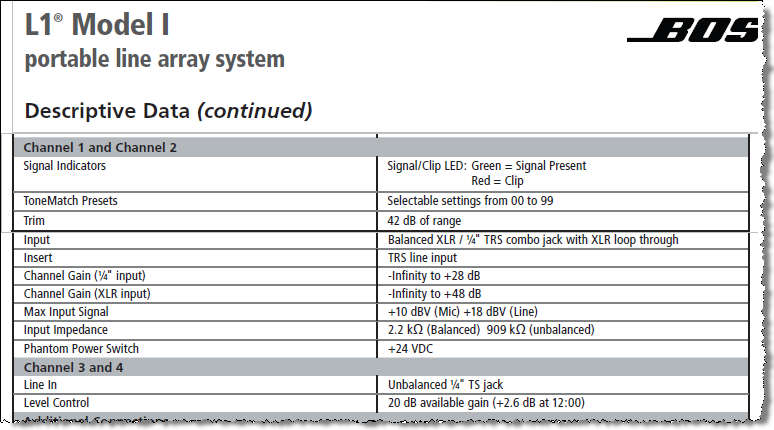
Preamps Out

The preamp outputs are before everything except the Trim control in the signal chain. - MikeZ-at-Bose[3]. This means that these are post-trim, and nothing else (e.g. Muting) has any effect on the signal at the preamp outs.
Presets
- ToneMatch® Presets for the T1® (downloadable presets that are not installed at the factory)
- T1 ToneMatch® Presets (includes downloadable lists with cross-references to Version 2 presets).
Tuner
If you are experiencing difficulties with the tuner, here are some points to check.
- *CRITICAL*. Make sure the CH Edit button is pressed on the Channel of the instrument you are trying to tune.
- Make sure your instrument is gain staged correctly.
The tuner needs a good strong signal (at least solid green) to lock on to. - Take off/bypass any effects that affect your instrument before the signal enters the T1®.
Any modulation effects will mess things up.
- In all of our testing and experience here we have found the tuner to be as accurate and reliable as other high-quality stage tuners. The T1 tuner is fairly 'fast' in terms of tracking speed. For example, typically, Boss tuners have more 'averaging' and slower tracking speed. The needle moves up to the note you are tuning slower, but is more stable once you get up there. Another example - Peterson tuners generally track faster. They go up very fast to the note, and move around more once you get up there - this is because the instrument is actually slightly varying pitch. The tuner is tracking this behavior correctly. Both Peterson and Boss make awesome, super accurate tuners, it's just like the difference between a Strat and a Les Paul...or a Porshe and a Benz.
- The T1 tuner, as I said, is faster in its tracking, and this may take some getting used to at first. It took me a little while to become accustomed to bench tuning my basses with a Peterson strobe tuner after using a Boss for a few years.
-- MikeZ-at-Bose[4]
- "The internal send for the tuner is Pre-FX" [5]
And a hint from Bill-at-Bose
- You may already know that the ubiquitous hum you hear, that can be caused by cable grounding problems, lighting dimmers, ground loops, etc., is based in the U.S. off the 120 VAC line.
- The line cycles at 60 Hz, you can usually pick up multiples of it: 120 Hz, 240 Hz. That's right between an A and a B-flat.
- Here are the frequencies:
- A#2/Bb2 116.54 Hz
- B2 123.47 Hz
Hum louder than your note will confuse your tuner for sure.
You hear that note everywhere you go in this 'civilised' world, from fluorescent lights to refridgerator motors to your PC hard drive.
USB (Computer Interface)
T1 USB Connection
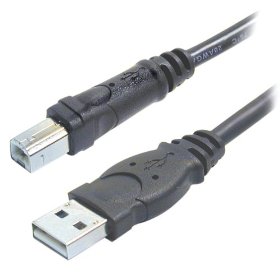
Connection from Computer to T1 ToneMatch® Audio Engine
Here is an excerpt from the T1 ToneMatch® Audio Engine Owner's Guide (62 pages)
T1 ToneMatch Audio Engine Service Manual

Here is a close up of the ends of the cable.
Live Application of USB in the T1 ToneMatch® Audio Engine
Hilmar-at-Bose talks about the USB interface[6]
Firstly, the T1 ToneMatch Audio Engine is designed as a convenient and powerful interface for a live musician. We try to put many useful controls directly at your finger tips so you can operate them while your playing or between songs. This basic idea has also influenced how we've implemented USB audio streaming. We try to accommodate the most common use cases (background tracks, DJ, quick recording) with the least amount of hassle & configuration work, even if that makes less common uses cases more difficult to accommodate.
USB audio in general
Hilmar-at-Bose talks about the USB interface[7]
When you plug in the T1 ToneMatch® Audio Engine into your PC it will appear to the PC as a USB sound card (USB audio device in Windows). You can play and record audio just like with any other soundcard, i.e. if you use for example Windows Media Player to play a song, the audio will be routed via USB to the T1 ToneMatch Audio Engine.
On the T1 ToneMatch® Audio Engine you can decide where you want it. You can route it either to the master (e.g. when using the PC to play background tracks) or into channel 4/5 to process it to your hearts content.

The T1 ToneMatch Audio Engine can also send audio back to the PC. You can select what you want to send. It can be either channel (1,2,3,4/5) or Aux or Master. For example you can make a little submix on the AUX bus and record that with for example Windows Sound Recorder or Audacity.
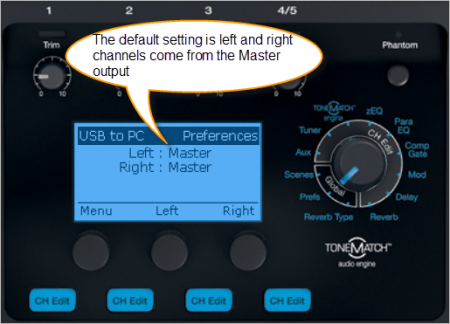
Here is an excerpt from page 30 of the ToneMatch® Audio Engine Owner's Guide
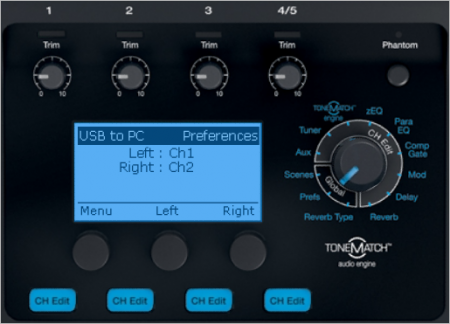
USB from T1® to PC (Computer)
- USB to PC

- Factory settings, the default
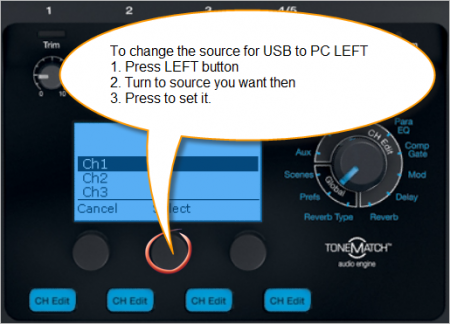
- Set output to Left
- Set output to Right
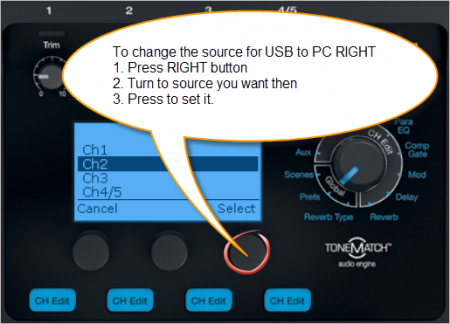
- This shows the result of sending T1® Channels 1 and 2 to USB LEFT and RIGHT
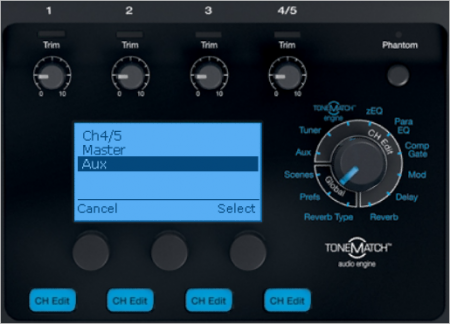
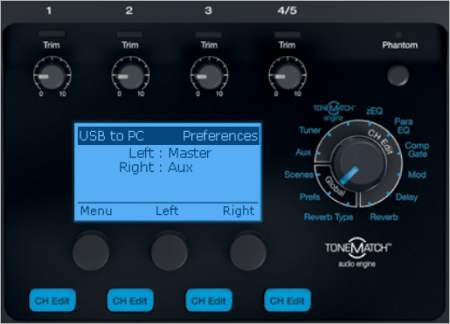
- Here is how you can send Master and Aux outputs to USB LEFT and RIGHT


USB from Computer
USB from PC to Master

You can route one or both channels to Channel 4/5 and this gives you local control of Presets, zEQ, ParaEQ, Effects and volume.
Setting USB from PC to Channel 4/5
Video
Step by Step
- Turn the Rotary Selector to Global section and Prefs
- Press the first button, Menu
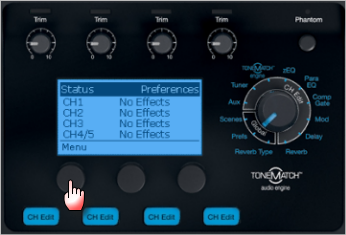
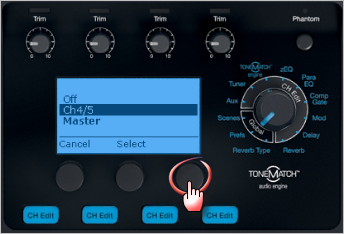
- Turn the Menu to USB from PC, Press
- By default the USB from PC Left and Right channels are routed to the Master Output and you control all of the sound from the computer.
You can route one or both channels to Channel 4/5 and this gives you local control of Presets, zEQ, ParaEQ, Effects and volume.
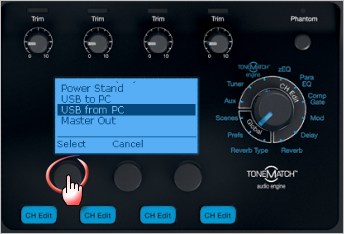
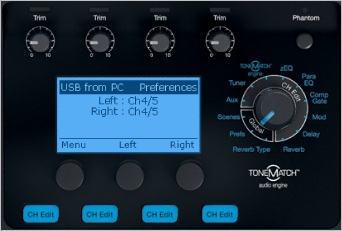
Press the middle button Left to change the routing of the Left channel

- Turn to select Channel 4/5, Press
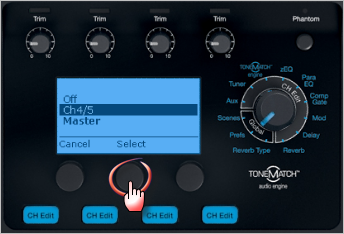
- If you want to route the the Right Channel to Channel 4/5
Press the right button Right to change the routing of the Right channel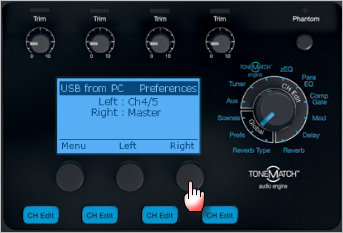
- Turn to select Channel 4/5, Press
- Here is the final result


Monitor input levels
- Turn the Rotary Selector to Global section and Prefs
- Press the first button, Menu
- Turn the Menu to Input Level.
- Press the first button to view the Input Levels
USB and Channel 4/5 Analog at the same time
You can connect the USB input to T1® Channel 4/5 for a stereo source (computer) AND an analog input to T1® Channel 4/5 at the same time. While it is unlikely you would play both sources simultaneously, you can raise and lower the outputs at the source. This allows you to control the sources applying ToneMatch® Presets, EQ, and volume using the Channel 4/5 Vol control.
Analog Connection

Latency and Digital Audio Workstation
USB audio requires a fairly complicated driver stack and hence we have decided to operate with the Windows standard drivers. That's fairly rugged but also not particularly fast, so processing sounds in real time on the PC and sending back to the T1 may or may not work depending how the computer is configured, what operating system is running, and what other processes are going on at the same time. See also: Latency and The L1®
Digital Media players and USB host
The T1 ToneMatch Audio Engine is only a USB client and requires a USB host (= PC). That means you cannot connect an MP3 player directly to the T1 digitally. The best way to connect is analog through Ch 4/5.
Stereo or Mono
Hilmar answers [8]
Tom Munch asked: Can channels 4 & 5 be assigned separately to the Aux & Master outs to send to 2 L1's?
Not really. 4/5 are immediately summed to mono and treated the always the same. You could route the left USB channel to the master, and the right USB channel to 4/5, turning the 4/5 channel volume all the way down and using a pre-fade AUX feed for 4/5 to get it out the Aux.
That's certainly a little convoluted but would enable you to route a USB source to two different L1s.
No Reverb from USB
From page 30 of the T1 ToneMatch® Audio Engine Owner's Guide (62 pages)
T1 ToneMatch Audio Engine Service Manual

Work Around
- Hard wire Master Output to Channel 4 input
- Channel 4 Aux Level 100% | Tap: Pre
- Channel 4 Vol off (Mute too to be safe but not critical)
- Prefs: USB to PC set to Aux
Source: ST discussion in the Forum
ASIO
From Chuck-at-Bose
- I'd like to offer some clarification that may or may not help. Sound cards, including the T1, depend upon 'drivers' to do what they do. ASIO/WDM/MME aren't really drivers, but driver access protocols. ASIO usually results in the lowest amount of round-trip latency (all things being equal) because, unlike the others, it bypasses the operating system (e.g. Windows) kernel...
- FWIW, I have used the T1 very successfully for recording and playback with SONAR 8 PE on my PC using WDM and ASIO. I got the best results (lowest latency, fewest dropouts, etc.) using ASIO4all. Given the zillions of variables among hardware configs, operating systems, etc., your mileage may vary. I think it's worth stating that the T1 excels as an interface for an L1 system and though it happens to work great as a basic sound card (record/playback/re-amp, etc.), there are lots of soundcards out there that do more than these basics. Their value, in my experience, is commensurate with their price tag...
- 'Hope this helps...
- Chuck [9]
USB Controller (Master) / Controllee (Slave)
USB is structured to have a controller (called a Master, Type A connector, usually a computer) and a multitude of controllees (called slaves, Type-B or Mini-B connector, i.e. T1 ToneMatch Audio Engine, Zoom H4, USB Sound Card, USB to Blutooth adapter, etc). The controllees cannot communicate with each other. A Bluetooth adaper and T1 ToneMatch® Audio Engine are in that category they will not communicate unless one or the other makes a major hardware/software change and adds the capability to become a master.
— Adapted from this post by TRoberts
Routing Effects
|
This article addresses some interesting options you have for routing your signal through the T1® to process effects more than once. For ideas on how you can work with an external effects unit see: T1 ToneMatch® Audio Engine / Insert for External Effects |
There are several less than obvious things you can do with effects through the T1 ToneMatch Audio Engine.
Parallel Effects
If you want to swap between two sets of effects or run two sets of effects at the same time (for example: two delays, two modulation effects, two reverbs) try this.
Assume that you are using Channel 1 as the input where you want to do this:
- Set the effects you want on Channel 1
- Take a ¼ inch jack cable from the Channel 1 PreAmp Out to Channel 2 input
- Add the second layer of effects you want to Channel 2
- Now use the FX Mute buttons for Channels 1 and 2 to set which banks of effects will be used
- Channel 1 only
- Channel 2 only
- Channel 1 and Channel 2 in parallel
Serial Effects
If you want to run some effects and then add more effects in series then take the output of one or more T1 ToneMatch Audio Engine Channels to the Aux Output, then take the Aux Output and use that as the input to another T1® Channel
Assume that you are using Channel 1 as the input where you want to do this:
- Set the effects that you want on Channel 1
- Set the Aux tap to Pre
- Take a ¼ inch jack cable from the Aux Out to Channel 2 input
- Apply effects that you want applied to the output of Channel 1
- Now use the FX Mute buttons for Channels 1 and 2 to set which banks of effects will be used
- Channel 1 only
- Channel 2 only
- Channel 1 and Channel 2 in series
Foot Switch to Mute Effects
From Andy-at-Bose UK
First up hook up your vocal mic to, say, Channel 1 on the T1®. Next take a jack lead and connect it to the PRE AMP out on Channel 1. Take this lead and run it through either a keyboard style volume pedal or a make or break style footswitch. Run the signal from the pedal/footswitch into another T1® channel and set this channel up with the chosen vocal effects but make them 100% effect. Adjust the effected channel volume to get the desired blend of dry vocal to effected vocal. The pedal/footswitch will determine how much or if any signal will go to channel 2 and therefore whether or not an effect is added.
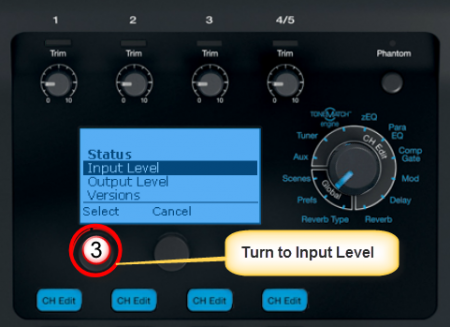
Input / Output Levels
Input Level
- Turn the Rotary Selector to Global section and Prefs
- Press the first button, Menu
- Turn the Menu to Input Level.
- Press the first button to view the Input Levels
Output Level
- Turn the Rotary Selector to Global section and Prefs
- Press the first button, Menu

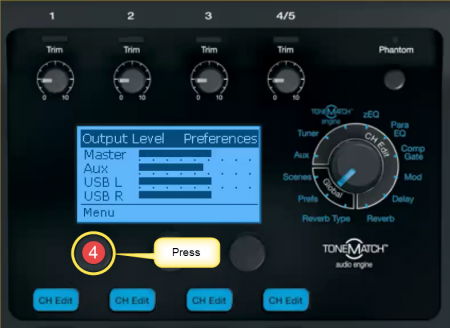
- Turn the Menu to Output Level.
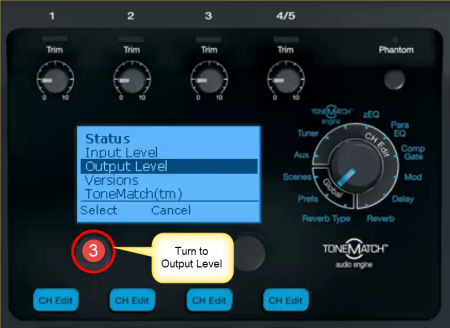
- Press the first button to view the Output Levels


Cables
From T1 to Model II
Overview


The T4S and T1 ToneMatch Audio Engine uses a digital connection to the L1 Pro and L1 Model 1SL1 Model II Power Stands. This is labeled ToneMatch®. The T8S can connect to only the L1 Pro systems via the ToneMatch port.
The connecting cable has a male Ethercon connection at each end that looks like this.

CAT5 or CAT6 or CAT7 or CAT8 cable
If your ToneMatch® cable gets damaged or lost you can use a computer network cable type CAT5 or CAT6 or CAT7 or CAT8 cable. There's no compelling reason to choose higher category cables. All should work.
The T4S and T1 ToneMatch Audio Engine come with a Pro Ethercon cable, with robust metal connector shells and an almost memoryless 18' black cable.

However, in a pinch, should you forget the cable, or if say a huge Hammond B3 gets dropped on the cable and severs it, you can use and ordinary Ethernet cable and it will work fine.
Later in that discussion Hilmar-at-Bose tells us:
Any CAT5 (or CAT5e, CAT6, or CAT7 or CAT8) cable will work just fine without any degradation at least initially. The downsides are that most ethernet cables don't coil particularly well and that the connectors wear out over time. After a a few hundred uses you may notice the occasional drop out, at which point it's time to get a new one.
It's certainly a quick and cheap way to get a spare for an emergency.
- Bose recommends you do not exceed a fifty foot cable run.
Convert Cat-5/6/7/8 to Ethercon
NE8MC EtherCon® Cable Connector Carriers (retrofit over an existing RJ-45 Connector).
Example vendor http://www.fullcompass.com/product/255589.html
Cable Length
Up to 50 feet
A technical note from Bill-at-Bose [10]
A 33 or 50 footer will not cause any problems, either with the digital audio (ones and zips) or the power.
The technical reason follows, for those who are interested : A 24 gauge wire (the size typically used in ethernet cables) has about 2.5 Ohms of resistance per 100 feet. The T1 draws roughly 1/4 Amp on each of two supply wire pairs (+/-18V nominal).
For a 50 foot run, each pair of wires (made up of a plus and minus lead) totals 100 feet. A quarter Amp of current across 2.5 Ohms gives, per Ohm's law, a voltage drop of less than one volt (V=IR = 0.625 Volts). Because of the margin we built into the system, it can handle this voltage drop easily.
In fact, although we don't recommend it and can't guarantee it, the digital audio has been tested up to 100 feet in average conditions (for example, no undervoltage on the AC supply at the gig), and quite happily continued to make music.
Over 50 feet
MikeZ-at-Bose added in a later discussion:[11]
Bill at Bose stated you could run 50' of ethernet cable no problem at all. Success at distances longer than that would start to depend on outside factors, for instance the voltage of your power source.
Another option for you is to run the T1 ToneMatch Audio Engine off of the optional power supply, and then run a balanced line from the Master Out on the T1 ToneMatch Audio Engine to the balanced 'analog input' on the L1 Model II. This method would be able to transmit over a hundred feet, perhaps much more.
- ¼ Inch Tip-Ring-Sleeve (balanced) to ¼ Inch Tip-Ring-Sleeve (balanced)
A balanced connection is preferred and will provide better noise rejection over greater distances than the unbalanced connection.
![]()
- ↑ MikeZ-at-Bose talks about the preamps in the L1 Model I and the T1®
- ↑ MikeZ-at-Bose talks about the preamps in the L1 Model I and the T1®
- ↑ MikeZ-at-Bose -T1® Preamp Out Muting
- ↑ MikeZ-at-Bose talks about the T1™ Tuner
- ↑ MikeZ-at-Bose
- ↑ Hilmar-at-Bose in the Stereo Operation discussion Bose Message Boards
- ↑ Hilmar-at-Bose in the Stereo Operation discussion Bose Message Boards
- ↑ Hilmar-at-Bose Channels 4/5 as stereo?
- ↑ Chuck-a-Bose in 2 t1s for stereo in the Bose Message Board
- ↑ Bill-at-Bose talks about cable lengths
- ↑ MikeZ-at-Bose talks about T1 cable lengths
Power Supply
This is the power supply for the ToneMatch mixers (T1 ToneMatch Audio Engine and T4S/T8S ToneMatch® Mixers).
The T8S ships with a ToneMatch power supply because the T8S cannot draw power from an L1 Model 1S or L1 Model II Power Stand.
You will need the ToneMatch power supply to power your T1 or T4S mixer when running with an L1 Classic, L1 Model I, L1 Compact, S1 Pro System or non-Bose equipment. You will need a one of these if you have two ToneMatch mixers running into a single L1® Model II or L1® Model 1S. — details below the picture.
If you connect your T1 ToneMatch Audio Engine or T4S mixer to a L1 Model II or L1 Model 1S then the T1 ToneMatch® Audio Engine or T4S draws its power through the ToneMatch cable.
If you connect your ToneMatch mixer to an an L1 Classic, L1 Model I, L1 Compact or S1 Pro System or non-Bose equipment then you will need the ToneMatch power supply
If you are attaching two ToneMatch mixers to a single L1® Model II or L1 Model 1S then you will need this power supply to support the second ToneMatch mixer - the one connected to the Power Stand Analog Input.
See: Connecting Two T1®s to a Model II for details.
5 foot of cord from the T1 to the switching power supply, and a removable 6 foot cord from the power supply to the wall. This is very similar to a laptop power supply.
Microphone Stand Bracket (optional)
|
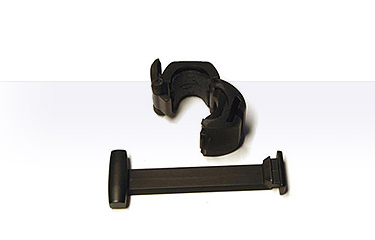
T1 Microphone Stand Bracket is no longer available - As of January 2020 There is an optional microphone stand bracket for the T1 ToneMatch Audio Engine. This is actually two pieces.
The T1 ToneMatch Audio Engine sits on that mounting bar. |
Documentation
Here is an excerpt from the T1 ToneMatch® Owners Manual - page 10.

Owner Comments and Alternatives
- T1 mic stand adapter, thoughts and questions - Owners talking about the microphone stand bracket.
- Sight Lines and the T1® - Owners talking about placement of the T1® on the stage using the Microphone Stand Bracket.
Hints
- The bracket that sits parallel to the floor has a bevel on the top. The bevel should run down, facing you. If the bevel runs down away from you, the bracket is upside down and the T1 ToneMatch® Audio Engine will not sit properly on top of it.
- Secure the ToneMatch® cable to your microphone stand, above the T1 ToneMatch® Audio Engine. This will help keep it secure on the bracket and help to keep it from hitting the floor if it becomes dislodged from the bracket.
- If you use a microphone stand with a wider than usual diameter, try removing the inserts in the clamp. — Source: dberch on the Forum
Securing the T1® to the Bracket
- The bracket that sits parallel to the floor has a bevel on the top. The bevel should run down, facing you. If the bevel runs down away from you, the bracket is upside down and the T1 ToneMatch® Audio Engine will not sit properly on top of it.
- correct - bevel running down, facing you

- incorrect (upside down)- bevel on opposite side, away from you

This is how I secure the T1® to the T1® Microphone Stand Bracket[1]
- There is a velcro strap on the black ToneMatch cable.
- I use the velcro to secure the ToneMatch cable to the microphone stand just above the Microphone Stand Adapter (the thing that clamps around the mic stand).
- Then I insert the ToneMatch cable into the T1®. It locks into place.
- At this point, most people would put the T1® on the bracket and attach the other cables.
- I insert all the other cables into the T1® before I put it on the bracket. I do it this way because I have all my cables strapped to the microphone stand (I don't take them off between gigs). So there's no hanging stress from those either.
- Finally, I set the T1® on top of the bracket.

In the picture above, I am using all the inputs and the cables are heavy. But since I have all the cables secured by a velcro strap, there's no chance that the T1® will come off the microphone stand bracket.

The white cable is a network cable (Cat-5) instead of the ToneMatch® cable
— source
Here's how I have one of my microphone stands setup. The T1® Microphone Stand Bracket is attached and I never remove it.
All the cables are also strapped to the microphone stand. I leave the cables attached all the time. This saves a great deal of time during setup and teardown.

I used a white background so that you could see the wires. Normally they don't stand out like this visually. Notice that even if the T1® were to get knocked off the bracket the cables are acting as safety tethers.
- View from the Back

- Ready to Pack Up
You can see that the cables are strapped to the microphone stand.

- Packed, ready to zip up

The black bag is one of the original Cylindrical Radiator® bags that came with my L1®. Years ago I got some heavy duty bags for the Cylindrical Radiator® and it turns out that the stock bags work great for holding microphone and light stands.
- Remember to pack the Bracket (arm) in the T1® Lid.

Comments? Please join the discussion on the Bose L1® Forum
Where to get it
Click the picture below.
T1 ToneMatch Audio Engine without L1
Should you or should you not use a ToneMatch preset when using the ToneMatch Mixer[2] or T1 ToneMatch Audio Engine with other systems?
ToneMatch® presets optimize the sound of a microphone or instrument when used with an L1 system. So this might lead you to conclude that a ToneMatch preset shouldn't be used with other systems.
But that wouldn't be quite right.
If that other system had a similar "voicing" or tonal response as the L1 then you would expect the ToneMatch® preset to be of value with that other system.
There is potentially a class of systems that fit this description. The L1 system is voiced to make high quality commercial recordings sound the best we know how. Some studio systems are voiced the same way, as they are where those recordings were mixed.
Thus, on some studio systems, you should expect ToneMatch® presets to be of value.
Other systems, including PA speakers and monitor speakers are voiced in an almost random and widely varying way, in our experience. Thus, as MikeZ points out, it's impossible to say whether a ToneMatch® preset will help or hurt.
With best regards,
Ken
Source: Using the T1® without the L1® on the Bose® Pro Portable PA Community
MikeZ Comment to which Ken refers above.
The whole thing with using the ToneMatch Mixer[2] or T1 ToneMatch Audio Engine with other systems is that we don't really know how it's going to sound since all big house systems are different. Generally, folks have reported the presets work well - so I think you will be fine with them. If the presets are not working, you can always go Flat using the Acoustic Guitar zEQ for adjustments (last preset in the Acoustic Guitar bank). And you'll still have all of the effects and tools in the T1 at your disposal.
Source: Using the T1® without the L1® on the Bose® Pro Portable PA Community
T1 ToneMatch Audio Engine Power Supply Required
This is the power supply for the ToneMatch mixers (T1 ToneMatch Audio Engine and T4S/T8S ToneMatch® Mixers).
The T8S ships with a ToneMatch power supply because the T8S cannot draw power from an L1 Model 1S or L1 Model II Power Stand.
You will need the ToneMatch power supply to power your T1 or T4S mixer when running with an L1 Classic, L1 Model I, L1 Compact, S1 Pro System or non-Bose equipment. You will need a one of these if you have two ToneMatch mixers running into a single L1® Model II or L1® Model 1S. — details below the picture.
If you connect your T1 ToneMatch Audio Engine or T4S mixer to a L1 Model II or L1 Model 1S then the T1 ToneMatch® Audio Engine or T4S draws its power through the ToneMatch cable.
If you connect your ToneMatch mixer to an an L1 Classic, L1 Model I, L1 Compact or S1 Pro System or non-Bose equipment then you will need the ToneMatch power supply
If you are attaching two ToneMatch mixers to a single L1® Model II or L1 Model 1S then you will need this power supply to support the second ToneMatch mixer - the one connected to the Power Stand Analog Input.
See: Connecting Two T1®s to a Model II for details.
Microphone into Channel 4/5
You can use four microphones with a T1 ToneMatch Audio Engine even though there are only 3 XLR inputs. Channel 4/5 can be used if you have an impedance matching transformer. Note that if your microphone requires phantom power, then you will need to supply that too as there is no phantom power on T1 ToneMatch® Audio Engine Channel 4/5.
 or
or 
Dynamic Microphone
Microphone ⇒ microphone cable ⇒ Lo-to-High impedance matching transformer.

I used the microphone above and set the trim for T1® Channel 3 and then I use the same microphone with the impedance matching transformer in T1® Channel 4/5. The picture below shows that I was able to get the same input level on Channels 3 and 4 by using a higher trim setting on Channel 4/5. Please note: Your settings will probably be different depending on your microphone and your vocal style. The picture is to show you that the trim setting for Channel 4/5 will probably be higher than Channel 3. This does not affect the sound quality.

Different Adapter / Same Results
Note: This adapter also has an impedance matching transformer built into it.

Condenser Microphone
The microphone shown here is a clip-on instrument microphone, but if you are using a vocal microphone the same connections would apply.
Note: the Isomax device shown below is a standalone phantom power supply. You will not need this unless your microphone requires phantom power.

- Condenser microphone
- Phantom power supply
- xlr cable
- Lo to Hi Impedance matching transformer
- [sweetwater.com/store/detail/LittleIMP--whirlwind-little-imp-lo-z-xlr-to-hi-z-1-4-inch-inline-impedance-matcher Whirlwind Little IMP Lo-Z XLR to Hi-Z 1/4" Inline Impedance Matcher]
- CA-321 | 3 PIN FXLR TO M1/4" TS TRANSFORMER BARREL ADAPTOR
- LoZ to HiZ Transformer Cable - 6 foot
Note: the phantom power supply is only required if your microphone requires phantom power (e.g. condenser microphone). Most dynamic microphones will not require you to use a phantom power supply.
Field Report:
I just tried this out.
Small diaphragm condenser microphone
to
external phantom power supply
to
a low to high impedance matching transformer for the microphone (click the picture for details)
toT1® Channel 4/5
I had to turn the input trim higher on Channel 4/5 than when I plugged the microphone directly into Channel 1,2,3 - but it worked.
NOTE - you have to have the impedance matching transformer.
— Source: String Quartet - Bun
Display Panel
Outdoors
Q: Please talk about using the T1 ToneMatch Audio Engine outdoors. Will I be able to see /read the display? A: Should be no problem. The LCD display on the T1 is "transflexive". In dark conditions the blue backlight will shine through the "transmissible" part so everything is easily visible. In bright sunlight, it becomes "reflexive" just like a piece of paper. The backlight may wash out (i.e. it will not look really blue anymore) but it's still clearly visible. [3]
Headphones
If you want to listen to the T1® through headphones - just connect to the headphones to the T1® ¼ inch Master Output.
At that point you will have sound coming from both the headphones and the Model II (if you have one). If you are using a Classic or Model I, then you will be replacing the output to the L1® with the headphones, and you can skip down to Mono (below)
To mute the sound out of the L1 Model II,
- turn the Rotary Selector to Prefs
- set the menu to Master Out
- set the Master Out to Pre Master Volume
Turn down the Master Volume knob. This will allow you to hear the T1® through the headphones with no sound coming from the Model II.
You will control the volume you hear with the individual T1® Channel Volume controls.
Mono
In the headphones you will be hearing mono, with the channels (left and right) 180° out of phase. This will not sound odd, and there will be no interaction between the channels because the sound from the left and right transducers (headphones) are not mixing in the air.
- ↑ Original discussion about using the T1® Microphone stand adapter
- ↑ 2.0 2.1 T4S ToneMatch mixer or T8S ToneMatch mixer or T1 ToneMatch Audio Engine
- ↑ Hilmar-at-Bose talks about the transflexive display on the T1®
Compatibility with Other Members of the L1® Family of Products
Cylindrical Radiator®s

Cylindrical Radiator®s are not interchangeable across models
Specifically (and without exception)
- The Cylindrical Radiator speaker sections of the L1 Classic, the L1 Model I and L1 Model 1S and the L1 Model II are not compatible with each other.
- The Cylindrical Radiator speaker sections of the L1 Classic can only be used with the Classic PS1 power stand (no orange markings on the input/output panel).
- The Cylindrical Radiator speaker sections of the L1 Model I (orange markings on the back of both sections) can only be used with the Model I PS1 power stand (orange markings on the input/output panel).
- The Cylindrical Radiator speaker sections of the L1 Model II can only be used with the L1 Model II power stand.
- The Cylindrical Radiator speaker sections of the L1 Model 1S can only be used with the L1 Model 1S power stand.
T1 ToneMatch® Audio Engine, T4S/T8S ToneMatch® Mixers
- The ToneMatch mixers can be used with the
PackLite® power amplifier Model A1

- The PackLite® power amplifier model A1 can be used with
B1 Bass Module

- The B1 Bass Module can be used with the
B2 Bass Module

- The B2 Bass Module can be used with the
- L1 Classic Normal Mode only
- L1 Model I Normal Mode only
- L1 Model 1S all modes
- L1 Model II all modes but L1® Model II Power Stand Firmware version 1.4 or later required
Design Team
In 23 years at Bose, the L1 Model II and T1 ToneMatch Audio Engine are the most lovingly designed products I have ever had the fortune to work on. More care by more experienced people went into this than anything I've been involved in.
The most minute details were studiously created. As one tiny but important example, a propriety light pipe was designed so that the light from volume knob indicators smoothly wrapped around the knob from top to side, giving the musician a clear indication of volume from any angle. The color and intensity of the light was carefully designed so that it was visible in an extraordinarily wide range of stage lighting conditions.
Here is a picture of some members of the design team when we reached the point in May of 2006 of having the proprietary folding mechanism for the Model II power stand and industrial design for the new Articulated Array speaker finally finished.
Ken-at-Bose[1]

- ↑ Ken-at-Bose April 4, 2007 Help choosing between the Model I and the Model II