Difference between revisions of "PS1 Powerstand / Daisy Chain"
m |
m |
||
| (17 intermediate revisions by the same user not shown) | |||
| Line 1: | Line 1: | ||
| − | On the relatively rare occasion where you might need to connect the output from one {{PS1}} to another {{PS1}} | + | {{Model I icon}}{{Classic icon}} |
| + | <table><tr><td>__TOC__</td><td>On the relatively rare occasion where you might need to connect the output from one {{PS1}} to another {{PS1}}. | ||
| + | Here are some ways to approach it. | ||
| + | </td></tr></table> | ||
| + | === Two {{PS1}}s for one Vocal === | ||
You can | You can | ||
| − | * Run your | + | * Run your microphone into the first {{l1 nl}} PS1 Powerstand (let's say - Channel 1). |
| − | * In Channel 1 | + | * In the Channel 1 section run an XLR cable from the Channel 1 Line Out |
| − | * At the other end of the cable connect a [[Pad]]. The people-at-Bose usually recommend a -20 dBu pad | + | * At the other end of the cable connect a [[Pad]]. The people-at-Bose usually recommend a -20 dBu pad. Some owners have reported success with a -10 dBu pad. |
| + | ** {{Why Use a -20 dB Pad}} | ||
* Connect the [[Pad]] to the second {{PS1}} Channel 1 or 2. | * Connect the [[Pad]] to the second {{PS1}} Channel 1 or 2. | ||
* On the first {{PS1}}, set the input trim appropriately. | * On the first {{PS1}}, set the input trim appropriately. | ||
* Choose the best preset for your microphone. | * Choose the best preset for your microphone. | ||
| − | * On the second {{PS1}}, the input trim should be similar to what you set on the first one. | + | * On the second {{PS1}}, the input trim should be similar to what you set on the first one, but check the trim o/l light for a solid green light (occasional red flickers are okay). |
* On the second {{PS1}}, use the same preset as you used for the first one. | * On the second {{PS1}}, use the same preset as you used for the first one. | ||
| Line 15: | Line 20: | ||
Arrows indicate the direction the signal is flowing. | Arrows indicate the direction the signal is flowing. | ||
| − | * Position the two {{L1}}s '''at least 20 feet apart''' to avoid the possibility of odd phase effects in the audience. More detail: [[Phase Cancellation]] | + | * Position the two {{L1}}s '''at least 20 feet apart''' if possible to avoid the possibility of odd phase effects in the audience. More detail: [[Phase Cancellation]] |
* [[PS1 Powerstand Connections/Interactive|Close up view of the Input Panel]] | * [[PS1 Powerstand Connections/Interactive|Close up view of the Input Panel]] | ||
| + | |||
| + | === Two {{PS1}}s for Mono Tracks (or one side of stereo pair) === | ||
| + | In this example, we are using Channel 2 so that you leave Channel 1 available for another input like a vocal. | ||
| + | |||
| + | You can | ||
| + | * Run your input into the first L1™ PS1 Powerstand (let's say - Channel 2). | ||
| + | * In Channel 2 section run an XLR cable from the Channel 2 Line Out | ||
| + | * At the other end of the cable connect a [[Pad]]. The people-at-Bose usually recommend a -20 dBu pad. Some owners have reported success with a -10 dBu pad. | ||
| + | ** {{Why Use a -20 dB Pad}} | ||
| + | * Connect the [[Pad]] to the second {{PS1}} Channel 2. | ||
| + | * On the first {{PS1}}, set the input trim appropriately. | ||
| + | * Choose the best preset for your microphone. | ||
| + | * On the second {{PS1}}, the input trim should be similar to what you set on the first one, but check the trim o/l light for a solid green light (occasional red flickers are okay). | ||
| + | * On the second {{PS1}}, use the same preset as you used for the first one. | ||
| + | * For prerecored music or tracks or keyboards you want {{B1}}s as close together as possible, and the L1™s close together -or- at least 20 feet apart. | ||
| + | |||
| + | [[Image:DaisyChainTracksOn2.png]] | ||
| + | |||
| + | * [[PS1 Powerstand Connections/Interactive|Close up view of the Input Panel]] | ||
| + | |||
| + | |||
| + | === XLR Female to ¼ Inch Tip-Sleeve Male === | ||
| + | Here is another method - use a cable with a XLR Female to ¼ Inch Tip-Sleeve Male from a Powerstand Line OUT to Channels 1, 2, 3 or 4 on a second Powerstand. | ||
| + | |||
| + | [[Image:XlrFtxM.png]] | ||
---- | ---- | ||
| + | |||
<references/> | <references/> | ||
[[category:PS1 Powerstand]] | [[category:PS1 Powerstand]] | ||
| − | [[ | + | [[Category:L1® System]] |
| + | [[Category:Daisy Chain]] | ||
Latest revision as of 09:45, 26 May 2011
| On the relatively rare occasion where you might need to connect the output from one PS1 Power Stand (Classic) / Model I to another PS1 Power Stand (Classic) / Model I.
Here are some ways to approach it. |
Two PS1 Power Stand (Classic) / Model Is for one Vocal
You can
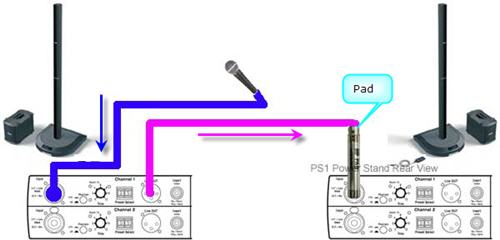
- Run your microphone into the first L1® PS1 Powerstand (let's say - Channel 1).
- In the Channel 1 section run an XLR cable from the Channel 1 Line Out
- At the other end of the cable connect a Pad. The people-at-Bose usually recommend a -20 dBu pad. Some owners have reported success with a -10 dBu pad.
- Why use a -20 dBu Pad?
- The XLR connects to a balanced low impedance input stage with a lot of gain. The 1/4" input is unbalanced, has about 20 dB less overall gain but a very high input impedance. [1]
- Connect the Pad to the second PS1 Power Stand (Classic) / Model I Channel 1 or 2.
- On the first PS1 Power Stand (Classic) / Model I, set the input trim appropriately.
- Choose the best preset for your microphone.
- On the second PS1 Power Stand (Classic) / Model I, the input trim should be similar to what you set on the first one, but check the trim o/l light for a solid green light (occasional red flickers are okay).
- On the second PS1 Power Stand (Classic) / Model I, use the same preset as you used for the first one.
Arrows indicate the direction the signal is flowing.
- Position the two L1 s at least 20 feet apart if possible to avoid the possibility of odd phase effects in the audience. More detail: Phase Cancellation
- Close up view of the Input Panel
Two PS1 Power Stand (Classic) / Model Is for Mono Tracks (or one side of stereo pair)
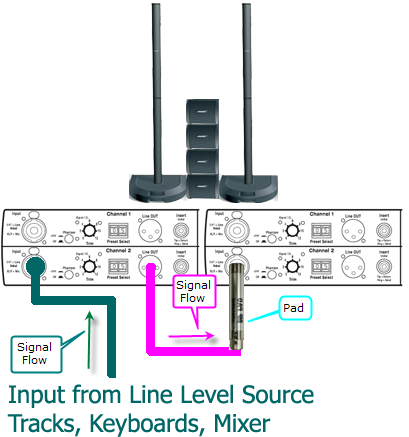
In this example, we are using Channel 2 so that you leave Channel 1 available for another input like a vocal.
You can
- Run your input into the first L1™ PS1 Powerstand (let's say - Channel 2).
- In Channel 2 section run an XLR cable from the Channel 2 Line Out
- At the other end of the cable connect a Pad. The people-at-Bose usually recommend a -20 dBu pad. Some owners have reported success with a -10 dBu pad.
- Why use a -20 dBu Pad?
- The XLR connects to a balanced low impedance input stage with a lot of gain. The 1/4" input is unbalanced, has about 20 dB less overall gain but a very high input impedance. [2]
- Connect the Pad to the second PS1 Power Stand (Classic) / Model I Channel 2.
- On the first PS1 Power Stand (Classic) / Model I, set the input trim appropriately.
- Choose the best preset for your microphone.
- On the second PS1 Power Stand (Classic) / Model I, the input trim should be similar to what you set on the first one, but check the trim o/l light for a solid green light (occasional red flickers are okay).
- On the second PS1 Power Stand (Classic) / Model I, use the same preset as you used for the first one.
- For prerecored music or tracks or keyboards you want B1 Bass Modules as close together as possible, and the L1™s close together -or- at least 20 feet apart.
XLR Female to ¼ Inch Tip-Sleeve Male
Here is another method - use a cable with a XLR Female to ¼ Inch Tip-Sleeve Male from a Powerstand Line OUT to Channels 1, 2, 3 or 4 on a second Powerstand.


