Difference between revisions of "Stereo Mini to 1/4"
m |
m (updated {{#Click) |
||
| (4 intermediate revisions by 2 users not shown) | |||
| Line 8: | Line 8: | ||
** {{T1 nl}} Channel 4/5 | ** {{T1 nl}} Channel 4/5 | ||
| − | + | [[File:StereoMiniTo14.gif|link=http://www.amazon.com/HOSA-CMP159-Stereo-Phone-Y-Cable/dp/B000068O3C/ref=pd_sim_e_1/178-7040482-5196650|280px|Hosa CMP159]] | |
| − | + | Source: [http://www.amazon.com/HOSA-CMP159-Stereo-Phone-Y-Cable/dp/B000068O3C/ref=pd_sim_e_1/178-7040482-5196650 Hosa CMP159] | |
| − | Source: http://www.amazon.com/HOSA-CMP159-Stereo-Phone-Y-Cable/dp/B000068O3C/ref=pd_sim_e_1/178-7040482-5196650 | ||
If you cannot locate a cable like the one above, you can accomplish the same thing with the combined cable and adaptors below. | If you cannot locate a cable like the one above, you can accomplish the same thing with the combined cable and adaptors below. | ||
| Line 17: | Line 16: | ||
<html><a href="http://www.amazon.com/HOSA-CMP159-Stereo-Phone-Y-Cable/dp/B000068O3C/ref=pd_sim_e_1/178-7040482-5196650" target="_blank"><img src="http://bose.infopop.cc/eve/forums/a/ga/ul/7571019813/inlineimg/Y/pRS1C-2265310w345%5B1%5D.jpg"> </a></html> | <html><a href="http://www.amazon.com/HOSA-CMP159-Stereo-Phone-Y-Cable/dp/B000068O3C/ref=pd_sim_e_1/178-7040482-5196650" target="_blank"><img src="http://bose.infopop.cc/eve/forums/a/ga/ul/7571019813/inlineimg/Y/pRS1C-2265310w345%5B1%5D.jpg"> </a></html> | ||
| − | and attach each coloured end to one of these, then connect to any of the ¼ inch inputs for {{Model I}} or {{Classic}} Channels 1/2/3/4. If you are using a {{T1}} then you can use Channels 1,2,3 or 4/5. | + | and attach each coloured end to one of these, |
| + | <html><a href="http://www.radioshack.com/product/index.jsp?productId=2103711" target="_blank"><img src="http://toonz.ca/bose/wiki/images/e/ef/RCAFemaleto14Male.jpg"></a></html> | ||
| + | |||
| + | then connect to any of the ¼ inch inputs for {{Model I}} or {{Classic}} Channels 1/2/3/4. If you are using a {{T1}} then you can use Channels 1,2,3 or 4/5. | ||
If you are using the this kind of source as backing tracks, you will probably run these two connections to {{Model I}} or {{Classic}} Channels 3 and 4. In this case you will need to control volume and tone control from the sound source. You will not have much control through the {{L1}}. | If you are using the this kind of source as backing tracks, you will probably run these two connections to {{Model I}} or {{Classic}} Channels 3 and 4. In this case you will need to control volume and tone control from the sound source. You will not have much control through the {{L1}}. | ||
| Line 23: | Line 25: | ||
If you are using a {{T1}} you will probably use Channel 4/5. | If you are using a {{T1}} you will probably use Channel 4/5. | ||
| − | < | + | <!-- |
| − | |||
-= or =- | -= or =- | ||
If you prefer not to use two Channels you can use this (occasionally controversial approach of summing to mono without electronics to support it). This approach let's you merge both Stereo outputs to a single output. You can run this to Channel 2 and control it with the {{R1}}. The controversy arises because you are connecting two outputs together. See [http://www.rane.com/note109.html Why Not Wye]. | If you prefer not to use two Channels you can use this (occasionally controversial approach of summing to mono without electronics to support it). This approach let's you merge both Stereo outputs to a single output. You can run this to Channel 2 and control it with the {{R1}}. The controversy arises because you are connecting two outputs together. See [http://www.rane.com/note109.html Why Not Wye]. | ||
| − | (With at {{T1}} Channel 4/5 makes it easy to use two inputs and control them as a single channel 4/5. The | + | {{Classic icon}} {{Model I icon}} |
| + | |||
| + | (With at {{T1}} Channel 4/5 makes it easy to use two inputs and control them as a single channel 4/5. The following notes apply only to the {{Model I}} and {{Classic}} | ||
Attach coloured ends to this: | Attach coloured ends to this: | ||
| Line 49: | Line 52: | ||
(disclosure: I have nothing to do with Radio Shack but they have decent pictures). | (disclosure: I have nothing to do with Radio Shack but they have decent pictures). | ||
| − | <br> <noinclude> | + | <br> |
| + | --> | ||
| + | <noinclude> | ||
[[Category:Adapter]] | [[Category:Adapter]] | ||
</noinclude> | </noinclude> | ||
Latest revision as of 03:18, 17 June 2017
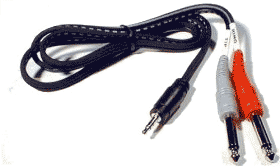
Connection: Stereo Mini (headphone or line-out source) to two Mono ¼ inch
Plug this into your MP3 Player/computer/minidisk/iPod (headphone or line out jack)
- (black end to MP3 Player) and
- coloured ends to
- PS1 Power Stand (Classic) / Model I Channels 1 and 2 OR Channels 3 and 4 OR
- T1 ToneMatch® Audio Engine Channel 4/5
Source: Hosa CMP159
If you cannot locate a cable like the one above, you can accomplish the same thing with the combined cable and adaptors below.
and attach each coloured end to one of these,

then connect to any of the ¼ inch inputs for L1 Model I or L1 Classic Channels 1/2/3/4. If you are using a T1 ToneMatch Audio Engine then you can use Channels 1,2,3 or 4/5.
If you are using the this kind of source as backing tracks, you will probably run these two connections to L1 Model I or L1 Classic Channels 3 and 4. In this case you will need to control volume and tone control from the sound source. You will not have much control through the L1 .
If you are using a T1 ToneMatch Audio Engine you will probably use Channel 4/5.

