Difference between revisions of "T1 Compatibility With L1 Pro Systems"
m |
m |
||
| (6 intermediate revisions by the same user not shown) | |||
| Line 1: | Line 1: | ||
;Question: Can I use the {{T1}} with the {{L1PS}}s? | ;Question: Can I use the {{T1}} with the {{L1PS}}s? | ||
[[File:T1 to L1 Pro.jpg|600px|right]] | [[File:T1 to L1 Pro.jpg|600px|right]] | ||
| − | ;Answer: Yes using two connections | + | ;Answer: Yes using two connections |
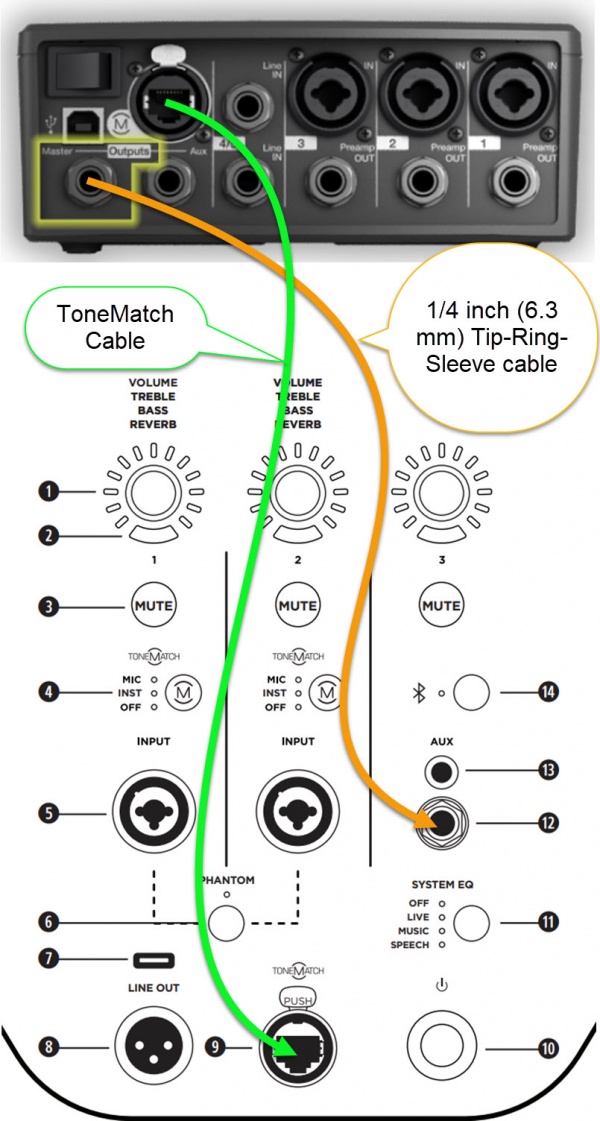
| + | # ToneMatch port supplies power to the {{T1}} | ||
| + | # An analog cable from the {{T1}} Master Output to one of the L1 Pro channels (preferably channel 3) | ||
| + | |||
| + | ;Connections and initial settings | ||
| + | # On the L1 Pro, turn off the system and turn down the volume on all channels | ||
| + | # On the {{T1}}, turn the Master Volume off | ||
# Power: Connect the {{L1P}} ToneMatch port to the {{T1}} ToneMatch port using the ToneMatch cable | # Power: Connect the {{L1P}} ToneMatch port to the {{T1}} ToneMatch port using the ToneMatch cable | ||
# Audio: Connect the {{T1}} Master Output to the {{L1P}} channel 3 unless you are already using it for Bluetooth or another sound source. This leaves channels 1 and 2 open for other sound sources. | # Audio: Connect the {{T1}} Master Output to the {{L1P}} channel 3 unless you are already using it for Bluetooth or another sound source. This leaves channels 1 and 2 open for other sound sources. | ||
| Line 9: | Line 15: | ||
#***Turn off Reverb | #***Turn off Reverb | ||
#***Set Bass and Treble to 12:00 o'clock | #***Set Bass and Treble to 12:00 o'clock | ||
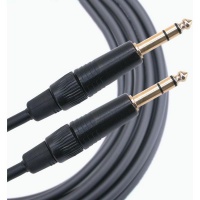
| − | #* For best results, use a 1/4 inch (6.3 mm) Tip-Ring-Sleeve cable for a balanced connection | + | #* '''For best results''', use a 1/4 inch (6.3 mm) Tip-Ring-Sleeve cable for a [[Balanced_vs_Unbalanced#Balanced_Connections_Preferred_When_Possible|balanced connection]] [[File:14trstotrs.jpg|200px|right]] |
| + | |||
| + | ;Power up and gain staging | ||
| + | : Summary: Set the L1 Pro channel volume and the {{T1}} Master Volume to 12:00 o'clock and adjust from there as necessary | ||
| + | ;Details | ||
| + | # Turn on the L1 Pro (normally you would turn on the power amplifier last, but you need it turned on to power the {{T1}}) | ||
| + | # On the {{T1}} | ||
| + | #* Attach a signal source to one of the {{T1}}, e.g., a microphone | ||
| + | #* Turn on the power | ||
| + | #* Turn up the Trim until you see a solid green light on the channel trim | ||
| + | #* Turn up the channel volume to 12:00 o'clock | ||
| + | # On the L1 Pro | ||
| + | #* Turn up the volume on the channel to which you connected the {{T1}} to 12:00 o'clock | ||
| + | # On the {{T1}} | ||
| + | #* Turn up the Master volume to the desired level | ||
| + | ; Why do you need two connections? | ||
<blockquote> | <blockquote> | ||
Regarding T1 compatibility with the L1 Pro systems: The architecture of the T1 ToneMatch differs from that of the T4S and T8S ToneMatch mixers and is not compatible with the L1 Pro’s S/PDIF audio architecture. | Regarding T1 compatibility with the L1 Pro systems: The architecture of the T1 ToneMatch differs from that of the T4S and T8S ToneMatch mixers and is not compatible with the L1 Pro’s S/PDIF audio architecture. | ||
| Line 23: | Line 44: | ||
;Question: Why use a {{T1}} with the {{L1PS}}s? | ;Question: Why use a {{T1}} with the {{L1PS}}s? | ||
;Answer: | ;Answer: | ||
| − | * The L1 Pro32 built-in mixer has ToneMatch Presets, Bass, Treble, and Reverb. If you already own a {{T1}}: | + | * Use the {{T1}} to add three more XLR/Combo jack inputs and channel 4/5 dual input (combines stereo to mono). You give up the third input on the {{L1PS}} but get four inputs — a net gain of three inputs |
| − | * The {{T1}} has more | + | * The L1 Pro32 built-in mixer has ToneMatch Presets, Bass, Treble, and Reverb. <br> |
| + | If you already own a {{T1}}: | ||
| + | * The {{T1}} has more tone control options with zEQ, ParaEQ | ||
* The {{T1}} has more fine-grain control for Reverb (Type/Mix/Brite) | * The {{T1}} has more fine-grain control for Reverb (Type/Mix/Brite) | ||
* The {{T1}} has more effects: Comp/Gate, Mod, Delay | * The {{T1}} has more effects: Comp/Gate, Mod, Delay | ||
| − | |||
---- | ---- | ||
[[Category:T1]] | [[Category:T1]] | ||
[[Category:L1 Pro]] | [[Category:L1 Pro]] | ||
Latest revision as of 10:37, 4 November 2024
- Question
- Can I use the T1 ToneMatch Audio Engine with the L1 Pro System[1]s?
- Answer
- Yes using two connections
- ToneMatch port supplies power to the T1 ToneMatch Audio Engine
- An analog cable from the T1 ToneMatch Audio Engine Master Output to one of the L1 Pro channels (preferably channel 3)
- Connections and initial settings
- On the L1 Pro, turn off the system and turn down the volume on all channels
- On the T1 ToneMatch Audio Engine, turn the Master Volume off
- Power: Connect the L1 Pro[1] ToneMatch port to the T1 ToneMatch Audio Engine ToneMatch port using the ToneMatch cable
- Audio: Connect the T1 ToneMatch Audio Engine Master Output to the L1 Pro[1] channel 3 unless you are already using it for Bluetooth or another sound source. This leaves channels 1 and 2 open for other sound sources.
- If you connect to L1 Pro[1] channel 1 or channel 2
- On the L1 Pro[1] channel:
- Turn off the ToneMatch Preset
- Turn off Reverb
- Set Bass and Treble to 12:00 o'clock
- On the L1 Pro[1] channel:
- For best results, use a 1/4 inch (6.3 mm) Tip-Ring-Sleeve cable for a balanced connection
- If you connect to L1 Pro[1] channel 1 or channel 2
- Power up and gain staging
- Summary: Set the L1 Pro channel volume and the T1 ToneMatch Audio Engine Master Volume to 12:00 o'clock and adjust from there as necessary
- Details
- Turn on the L1 Pro (normally you would turn on the power amplifier last, but you need it turned on to power the T1 ToneMatch Audio Engine)
- On the T1 ToneMatch Audio Engine
- Attach a signal source to one of the T1 ToneMatch Audio Engine, e.g., a microphone
- Turn on the power
- Turn up the Trim until you see a solid green light on the channel trim
- Turn up the channel volume to 12:00 o'clock
- On the L1 Pro
- Turn up the volume on the channel to which you connected the T1 ToneMatch Audio Engine to 12:00 o'clock
- On the T1 ToneMatch Audio Engine
- Turn up the Master volume to the desired level
- Why do you need two connections?
Regarding T1 compatibility with the L1 Pro systems: The architecture of the T1 ToneMatch differs from that of the T4S and T8S ToneMatch mixers and is not compatible with the L1 Pro’s S/PDIF audio architecture.
The T1 ToneMatch is based on S/PDIF, but with a proprietary connection for legacy L1 products which allows them to carry other data such as firmware updates. The T4S and T8S ToneMatch mixers use an updated version of ToneMatch protocol, which is compatible with legacy L1 products, but also fully compatible with S/PDIF. Since the L1 Pro architecture is designed to use standard S/PDIF protocol, the T1 ToneMatch cannot communicate the same way and is unable to send audio via the ToneMatch port.
Although the T1 ToneMatch is unable to send audio it can still receive power from an L1 Pro system via the ToneMatch port. In order for the L1 Pro system to receive audio, users of the T1 ToneMatch would need to connect the analog main out of the T1 to an available input on the L1 Pro system.
- Question
- Why use a T1 ToneMatch Audio Engine with the L1 Pro System[1]s?
- Answer
- Use the T1 ToneMatch Audio Engine to add three more XLR/Combo jack inputs and channel 4/5 dual input (combines stereo to mono). You give up the third input on the L1 Pro System[1] but get four inputs — a net gain of three inputs
- The L1 Pro32 built-in mixer has ToneMatch Presets, Bass, Treble, and Reverb.
If you already own a T1 ToneMatch Audio Engine:
- The T1 ToneMatch Audio Engine has more tone control options with zEQ, ParaEQ
- The T1 ToneMatch Audio Engine has more fine-grain control for Reverb (Type/Mix/Brite)
- The T1 ToneMatch Audio Engine has more effects: Comp/Gate, Mod, Delay

