Difference between revisions of "Mixer Outline Template"
m (Protected "Mixer Outline Template": use as template for new mixers [edit=sysop:move=sysop]) |
m ({{Classic icon}}{{Model I icon}}) |
||
| (3 intermediate revisions by the same user not shown) | |||
| Line 6: | Line 6: | ||
Mixer/Mackie/DFX12 | Mixer/Mackie/DFX12 | ||
--> | --> | ||
| − | <big>'''Make/Model here Mixer'''</big> | + | {{Classic icon}}{{Model I icon}} |
| + | <big>''' Make/Model here Mixer '''</big> | ||
== Summary == | == Summary == | ||
| Line 28: | Line 29: | ||
{{RunTROrTRSUnbalanced}} | {{RunTROrTRSUnbalanced}} | ||
| + | |||
| + | |||
| + | <!-- Remove anything you don't need from the following cables --> | ||
| + | |||
| + | === Cables you can use === | ||
| + | ==== XLR (balanced) to XLR (balanced) ==== | ||
| + | [[Image:XLRXLRMF.png|thumb|XLR to XLR, male to female|right]] | ||
| + | (balanced to balanced) should be fine. This is the same kind of cable you would use to connect a microphone. | ||
| + | |||
| + | |||
| + | [[Image:Pad.jpg]] | ||
| + | |||
| + | === XLR Balanced Output to ¼ inch Phone Jack === | ||
| + | |||
| + | ==== XLR Female to ¼ Inch Tip-Sleeve ==== | ||
| + | [[Image:xlrFtxM.png|XLR Female to 1/4 Inch Tip Sleeve]] | ||
| + | |||
| + | This should work well with any of the ¼ Inch inputs for Power Stand Channels 1, 2, 3, 4. Those inputs are all unbalanced. There is no particular benefit to using this kind of cable as compared to the one below. | ||
| + | |||
| + | ==== XLR (balanced) to ¼ Inch Tip-Ring-Sleeve (balanced) ==== | ||
| + | [[Image:xlrFtrsM.png|XLR female to Tip-Ring-Sleeve]] | ||
| + | |||
| + | This should work well with any of the ¼ Inch inputs for Power Stand Channels 1, 2, 3, 4. Those inputs are all unbalanced, so there is no particular advantage to using this balanced cable compared to an unbalanced cable. There is no particular benefit to using this kind of cable as compared to the one above. | ||
| + | |||
| + | ==== If you use the ¼ inch inputs ==== | ||
| + | Use | ||
| + | * The {{PS1}} Channels 1 or 2 if you want to use the [[Presets/Model I and Classic|Presets]] and the [[R1 Remote]] Tone and Level Controls <br /> OR <br /> | ||
| + | * The {{PS1}} Channels 3 or 4 if you prefer to leave Channels 1 or 2 open for other inputs. You will have to control Tone and relative Level (between the Channels) at your input source, as you do not have this control over Channels 3 and 4 in the {{PS1}} or the [[R1 Remote]]. | ||
| + | |||
| + | |||
| + | |||
| + | |||
Latest revision as of 01:49, 21 December 2008
Make/Model here Mixer
Contents
Summary
Simplest thing that could possibly work.
Use the ¼ inch phone jack (Tip-Sleeve) outputs to
- The PS1 Power Stand (Classic) / Model I Channels 1 or 2 if you want to use the Presets and the R1 Remote Tone and Level Controls
OR - The PS1 Power Stand (Classic) / Model I Channels 3 or 4 if you prefer to leave Channels 1 or 2 open for other inputs. You will have to control Tone and relative Level (between the Channels) at your input source, as you do not have this control over Channels 3 and 4 in the PS1 Power Stand (Classic) / Model I or the R1 Remote.
You can use the XLR Balanced outputs.
Outputs
XLR Balanced +4
The nominal output of the XLR Balanced Outputs is too high for the XLR inputs on the PS1 Power Stand Channels 1 and 2. If you want to use balanced cables from the Mixer to Channels 1/2 on the L1 Classic or L1 Model I you may need to use a Pad to lower the signal level from the mixer.
{{#Click:Pad|Image:Pad.jpg|Attenuation Pad}}
XLR Balanced with built-in-pad
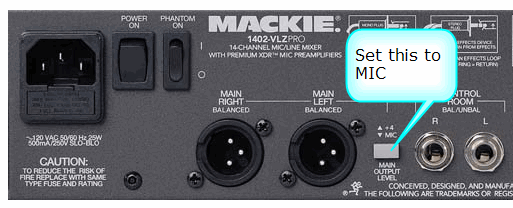
If the Mixer has a button, switch or adjustment that allows you to attenuate (turn down) the output of the balanced XLR main outs, try the setting with the lower output.
Here is an example (Mackie 1402 VLZ)
Otherwise you may need to use a Pad for each output channel.
¼ Inch with suitable output
for PS1 Powerstand Channel 1 or 2 inputs
You can use TS (Tip Sleeve) unbalanced cables, or TRS (Tip Ring Sleeve) balanced cables, but since the ¼ inch phone connections at the Bose Classic and Model I Power Stand are unbalanced there is no particular benefit using balanced cables.
¼ Inch Tip-Sleeve (unbalanced) to ¼ Inch Tip-Sleeve (unbalanced)
This should work fine.
¼ Inch Tip-Ring-Sleeve (balanced) to ¼ Inch Tip-Sleeve (unbalanced)
This should work fine.
¼ Inch Tip-Ring-Sleeve (balanced) to ¼ Inch Tip-Ring-Sleeve (balanced)
This should also work, but likely no better than a simple ¼ Inch Tip-Sleeve to Tip-Sleeve cable. This is because the ¼ Inch input on the Bose System is Tip-Sleeve (unbalanced) anyway.
Cables you can use
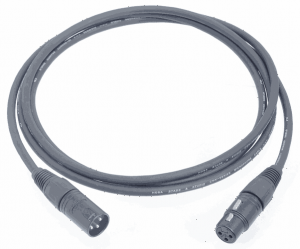
XLR (balanced) to XLR (balanced)
(balanced to balanced) should be fine. This is the same kind of cable you would use to connect a microphone.
XLR Balanced Output to ¼ inch Phone Jack
XLR Female to ¼ Inch Tip-Sleeve
This should work well with any of the ¼ Inch inputs for Power Stand Channels 1, 2, 3, 4. Those inputs are all unbalanced. There is no particular benefit to using this kind of cable as compared to the one below.
XLR (balanced) to ¼ Inch Tip-Ring-Sleeve (balanced)
This should work well with any of the ¼ Inch inputs for Power Stand Channels 1, 2, 3, 4. Those inputs are all unbalanced, so there is no particular advantage to using this balanced cable compared to an unbalanced cable. There is no particular benefit to using this kind of cable as compared to the one above.
If you use the ¼ inch inputs
Use
- The PS1 Power Stand (Classic) / Model I Channels 1 or 2 if you want to use the Presets and the R1 Remote Tone and Level Controls
OR - The PS1 Power Stand (Classic) / Model I Channels 3 or 4 if you prefer to leave Channels 1 or 2 open for other inputs. You will have to control Tone and relative Level (between the Channels) at your input source, as you do not have this control over Channels 3 and 4 in the PS1 Power Stand (Classic) / Model I or the R1 Remote.
Links:
- [ Manual]
- link to an image from the manual
- link to an image from the manual
More Notes


