Difference between revisions of "Effects for the PS1 Powerstand"
(table formatting for TOC) |
m (Summary of Lines Out from the Power Stand) |
||
| (2 intermediate revisions by the same user not shown) | |||
| Line 42: | Line 42: | ||
{{:Half Insert}} | {{:Half Insert}} | ||
| + | ==== Custom Cable TRS to TS ==== | ||
There is a workaround to avoid the "[[Half Insert|half-way]]" insert cable. If your handy with a soldering iron you can make a cable with one 1/4" [[TRS]] (tip ring sleeve, stereo) and one normal 1/4" (mono) plug. On the [[TRS]] end connect the tip and the ring together, then simply proceed like you would with an ordinary guitar cable (on both ends: wire shield goes to sleeve, and wire core goes to tip). The [[TRS]] end goes into the PS1 insert, the [[TS]] into the input of your effects unit. Be sure to label the cable properly. | There is a workaround to avoid the "[[Half Insert|half-way]]" insert cable. If your handy with a soldering iron you can make a cable with one 1/4" [[TRS]] (tip ring sleeve, stereo) and one normal 1/4" (mono) plug. On the [[TRS]] end connect the tip and the ring together, then simply proceed like you would with an ordinary guitar cable (on both ends: wire shield goes to sleeve, and wire core goes to tip). The [[TRS]] end goes into the PS1 insert, the [[TS]] into the input of your effects unit. Be sure to label the cable properly. | ||
| Line 54: | Line 55: | ||
This will give you the same thing. These cables come in different lengths, so you can choose what you need. | This will give you the same thing. These cables come in different lengths, so you can choose what you need. | ||
| + | |||
| + | |||
| + | |||
| + | == Summary of Lines Out from the Power Stand == | ||
| + | {{#lst:PS1 Powerstand Connections / Line Out|Connections}} | ||
| + | |||
---- | ---- | ||
<references/> | <references/> | ||
| − | + | [[Category:Effects]] | |
[[Category:Effects PS1 Powerstand]] | [[Category:Effects PS1 Powerstand]] | ||
[[Category:PS1 Powerstand]] | [[Category:PS1 Powerstand]] | ||
Latest revision as of 10:34, 8 July 2010
Contents |
Hilmar-at-Bose wrote [1]
Two Options
There are two distinctly different ways to connect effects. It is important to understand what the difference between these methods is, so you can choose the right one for your setup.
Serial
The first method is often called "serial". All effects are connected in a chain and the signal is processed sequentially in each effects processor. Nearly all stomp boxes for guitar work that way. A typical example would be and overdrive followed by a reverb. In a serial effects hookup the order in which effects matters, e.g. it makes a big difference whether you run first through the overdrive and then the reverb or first through the reverb and then through the overdrive.
Parallel
The second method is referred to as "parallel". This is mainly implemented in conventional mixers through the Aux or Effect Send/Return connections and controls. Here every effects processor gets the original (unprocessed) signal as an input. The output of all effects processors is then added together and summed with the original clean signal. One point of note is that in the parallel connection, there is always a component of the original signal present in the output. A typical example would be reverb and a delay which are used for vocals.
Which one should I use ?
Choosing the proper connection method depends on your application. There are some effects that MUST be hooked up in serial. Examples are an equalizer or a compressor or limiter. The parallel method mixes the original signal with the processed version and in the case of the equalizer that would generate highly undesirable interference and potential phase cancellation. It would also defeat the purpose of the compressor. Furthermore, many digital effects processors have an internal processing delay, which is applied to the signal even if no effect is applied. Mixing this delayed output with the original signal can result in unintended comb filtering.
Serial
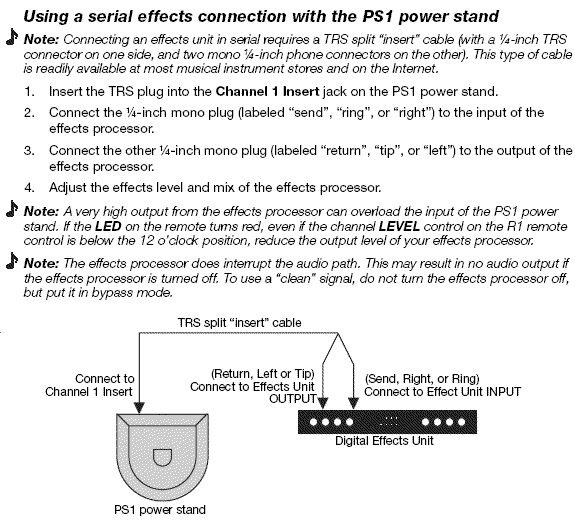
Using serial effect connection with the PS1 Power Stand (Classic) / Model I.
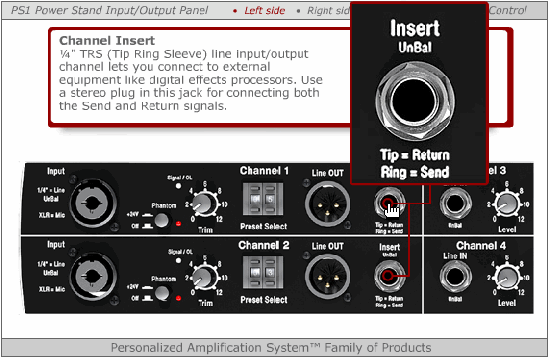
To connect one or more effects serially simply use the insert jack on the PS1 Power Stand (Classic) / Model I . You probably will need an “insert” cable that has one TRS (stereo) 1/4” connector on one side and 2 mono 1/4” connectors on the other side.
These are available at your local music store or from any music instrument internet retailer such as this. The mono 1/4” plug labeled “send” or “ring” connects to the input of your effects processor and the one labeled “return” or “tip” to the output.
Parallel
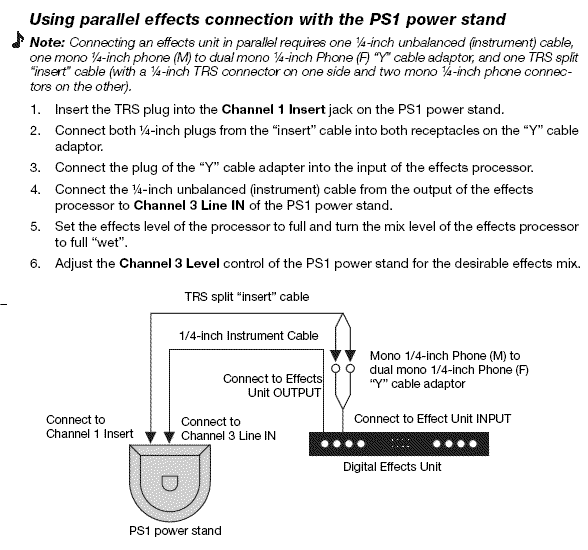
Using parallel effect connection with the PS1 Power Stand (Classic) / Model I.
Half Insert Method
To connect an effects processor in parallel with the original signal you can half-insert a normal 1/4" plug into the PS1 Power Stand (Classic) / Model I insert jack (that means insert to the first “click” but not all the way) and connect that to the input of your effects processor. The output can be returned into either Channel 3 or Channel 4 in the power stand. If you want to hook-up more than one effects processor in parallel you may need to add a small mixer to your system.
Custom Cable TRS to TS
There is a workaround to avoid the "half-way" insert cable. If your handy with a soldering iron you can make a cable with one 1/4" TRS (tip ring sleeve, stereo) and one normal 1/4" (mono) plug. On the TRS end connect the tip and the ring together, then simply proceed like you would with an ordinary guitar cable (on both ends: wire shield goes to sleeve, and wire core goes to tip). The TRS end goes into the PS1 insert, the TS into the input of your effects unit. Be sure to label the cable properly.
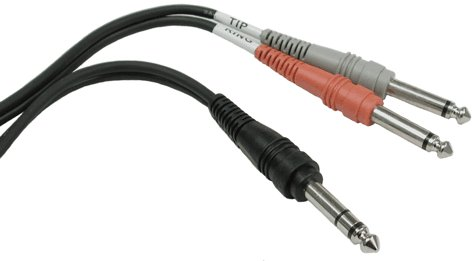
If your not comfortable making a cable like this yourself you can buy a regular "insert" cable, like this
Typical Insert Cable Hosa STP204
and cascade it with a TS "Y-cable", like this
This will give you the same thing. These cables come in different lengths, so you can choose what you need.
Summary of Lines Out from the Power Stand
PS1 Connections Lines Out
Line Out (XLR balanced) for Channels 1 and 2
- post trim (+4 dBu nominal)
Insert Send
- post trim,
- post channel volume
SPDIF Data OUT
- Post trim
- Input Trim
- R1 Remote Channel volume
- Insert returns
- Pre
- Preset
- Tone controls
- R1 Remote Master volume.
- SPDIF is channels 1 & 2 only.
The Data OUT is a SPDIF output with a sampling rate of 48KHz.
Set your recording software as below if given the options
- 24 Bit
- 48 KHz
- S/PDIF (RCA)
See: Recording Through the PS1 — Message Board Discussion.


