Difference between revisions of "PS1 Powerstand / Daisy Chain"
m |
m |
||
| Line 16: | Line 16: | ||
* To avoid the possibility of odd phase effects in the audience, you want to have the two L1™s at least 20 feet apart. | * To avoid the possibility of odd phase effects in the audience, you want to have the two L1™s at least 20 feet apart. | ||
| + | * [[PS1 Powerstand Connections/Interactive|Close up view of the Input Panel]] | ||
More detail: | More detail: | ||
Revision as of 20:15, 19 November 2006
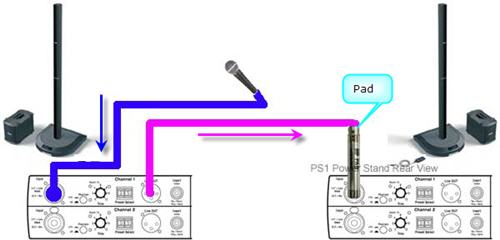
On the relatively rare occasion where you might need to connect the output from one PS1 Power Stand (Classic) / Model I to another PS1 Power Stand (Classic) / Model I:
You can
- Run your mic into the first L1™ PS1 Powerstand (let's say - Channel 1).
- In Channel 1 insert an XLR cable from the Channel 1 Line Out
- At the other end of the cable connect a Pad. The people-at-Bose usually recommend a -20 dBu pad, but some have reported success with -10 dBu
- Connect the Pad to the second PS1 Power Stand (Classic) / Model I Channel 1 or 2.
- On the first PS1 Power Stand (Classic) / Model I, set the input trim appropriately.
- Choose the best preset for your microphone.
- On the second PS1 Power Stand (Classic) / Model I, the input trim should be similar to what you set on the first one.
- On the second PS1 Power Stand (Classic) / Model I, use the same preset as you used for the first one.
Arrows indicate the direction the signal is flowing.
- To avoid the possibility of odd phase effects in the audience, you want to have the two L1™s at least 20 feet apart.
- Close up view of the Input Panel
More detail: Phase Cancellation
