Difference between revisions of "TC-Helicon VoiceSolo FX150"
m (→{{T1}}) |
m (→Connecting Directly to a Power Stand) |
||
| Line 40: | Line 40: | ||
If you don't have a T1® you can try connecting your input sources (microphone, guitar) to the {{PAGENAME}} and running the output directly to a {{Model II}} or {{Model 1S}} Power Stand Analog Input. You will need an XLR to ¼ inch jack Tip-Ring-Sleeve adapter. See the detailed notes below for the Compact for information about adapter and cables. | If you don't have a T1® you can try connecting your input sources (microphone, guitar) to the {{PAGENAME}} and running the output directly to a {{Model II}} or {{Model 1S}} Power Stand Analog Input. You will need an XLR to ¼ inch jack Tip-Ring-Sleeve adapter. See the detailed notes below for the Compact for information about adapter and cables. | ||
| + | |||
| + | [[Image:Analog Input 3.png|300px]] | ||
=== {{Compact}} === | === {{Compact}} === | ||
Revision as of 06:36, 30 April 2015
|
This article is an editorial and expresses the opinion and experience of the author. Please post comments in the discussion page.
|
|
The TC-Helicon VoiceSolo FX150 is an personal monitor system that attaches to a microphone stand. The L1 systems were designed to be positioned behind the performer and when used that way, there is no need for a monitors. For more more information on that concept see: The L1® Approach and the History Of Amplification. The TC-Helicon VoiceSolo FX150,like many other products from TC-Electronics has a feature called Adaptive Tone (activated by the Voice Tone button).
Note: Using a vocal microphone with Voice Tone AND a Bose Preset for a vocal microphone and reduce gain-before-feedback. |
Usage Examples
T1 ToneMatch Audio Engine
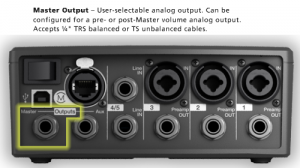
If you are using a T1 ToneMatch Audio Engine connected to a L1 Model II or L1 Model 1S then the simplest approach is to connect your microphone and other sources directly to the T1 ToneMatch Audio Engine as you normally would, and then connect the T1 ToneMatch® Audio Engine Master output to the TC-Helicon VoiceSolo FX150 channel 1 input.T1 Preamp Outputs
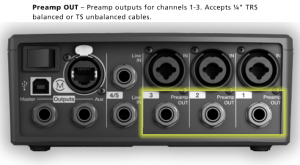
The T1 Preamp Outputs are post-trim only. That is: there is no signal processing at the Preamp Outputs. There are no Presets, EQ, or effects. So there is no particular advantage to using the Preamp outputs as the source for the TC-Helicon VoiceSolo FX150 unless you want to use the TC-Helicon VoiceSolo FX150 effects. The disadvantage is that you will not be hearing the mix that is going to the Power Stand (what the audience will hear).Connecting Directly to a Power Stand
If you have a T1® you will have far more control and more effects if you use the T1®.
Use the T1® as your main processor and run the T1® Master Output to the TC-Helicon VoiceSolo FX150.
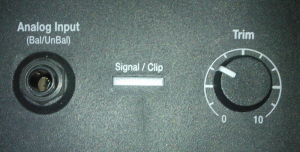
If you don't have a T1® you can try connecting your input sources (microphone, guitar) to the TC-Helicon VoiceSolo FX150 and running the output directly to a L1 Model II or L1 Model 1S Power Stand Analog Input. You will need an XLR to ¼ inch jack Tip-Ring-Sleeve adapter. See the detailed notes below for the Compact for information about adapter and cables.
L1 Compact
If you are not using a T1 ToneMatch Audio Engine you can connect your vocal microphone and instrument directly to the TC-Helicon VoiceSolo FX150. Then connect the VoiceSolo FX150 XLR output to an XLR to ¼ inch jack Tip-Ring-Sleeve cable, and connect that to Compact Channel 2. Set the ToneMatch switch Line Level (down position).TC-HeliconVoiceSolo FX150 to L1® Compact
Do not connect the TC-Helicon VoiceSolo FX150 to Compact Channel 1 because Compact Channel 1 has a built-in Preset for Vocal Microphones.


