Difference between revisions of "Kemper Player with XSONIC Airstep"
m (→Rig Buttons) |
m (→Airstep Bank 2 – Stomp Mode Control (Kemper Profile Player)) |
||
| Line 326: | Line 326: | ||
<thead> | <thead> | ||
<tr> | <tr> | ||
| − | <th> | + | <th> </th> |
<th>Effect Button 1</th> | <th>Effect Button 1</th> | ||
<th>Effect Button 2</th> | <th>Effect Button 2</th> | ||
| Line 351: | Line 351: | ||
<td>Toggle Mode</td> | <td>Toggle Mode</td> | ||
</tr> | </tr> | ||
| + | <tr><td style="colspan:6"><strong>Toggle On</strong></td> | ||
| + | </tr> | ||
<tr> | <tr> | ||
| − | <td><strong>Message 1 | + | <td><strong>Message 1</strong></td> |
<td> | <td> | ||
| − | |||
Message Type: MIDI<br /> | Message Type: MIDI<br /> | ||
Output Interface: ALL<br /> | Output Interface: ALL<br /> | ||
| Line 363: | Line 364: | ||
</td> | </td> | ||
<td> | <td> | ||
| − | |||
Message Type: MIDI<br /> | Message Type: MIDI<br /> | ||
Output Interface: ALL<br /> | Output Interface: ALL<br /> | ||
| Line 372: | Line 372: | ||
</td> | </td> | ||
<td> | <td> | ||
| − | |||
Message Type: MIDI<br /> | Message Type: MIDI<br /> | ||
Output Interface: ALL<br /> | Output Interface: ALL<br /> | ||
| Line 381: | Line 380: | ||
</td> | </td> | ||
<td> | <td> | ||
| − | |||
Message Type: MIDI<br /> | Message Type: MIDI<br /> | ||
Output Interface: ALL<br /> | Output Interface: ALL<br /> | ||
| Line 390: | Line 388: | ||
</td> | </td> | ||
<td> | <td> | ||
| − | |||
Message Type: MIDI<br /> | Message Type: MIDI<br /> | ||
Output Interface: ALL<br /> | Output Interface: ALL<br /> | ||
| Line 399: | Line 396: | ||
</td> | </td> | ||
</tr> | </tr> | ||
| + | <tr><td style="colspan:6"><strong>Toggle Off</strong></td> | ||
| + | </tr> | ||
<tr> | <tr> | ||
| − | <td><strong>Message | + | <td><strong>Message 1</strong></td> |
<td> | <td> | ||
| − | + | Message Type: MIDI<br /> | |
| − | + | Output Interface: ALL<br /> | |
| − | + | MIDI Type: Control Change<br /> | |
| + | MIDI Channel: 1<br /> | ||
| + | CC Number: 75<br /> | ||
| + | CC Value: 0 </td> | ||
<td> | <td> | ||
| − | |||
Message Type: MIDI<br /> | Message Type: MIDI<br /> | ||
Output Interface: ALL<br /> | Output Interface: ALL<br /> | ||
| Line 475: | Line 476: | ||
|} | |} | ||
--> | --> | ||
| + | |||
=== Notes === | === Notes === | ||
* '''Toggle Mode On''' lets the Airstep track internal switch state, so LEDs reflect effect status (assuming Kemper doesn’t override). | * '''Toggle Mode On''' lets the Airstep track internal switch state, so LEDs reflect effect status (assuming Kemper doesn’t override). | ||
Revision as of 08:57, 17 September 2025

Contents
MIDI Connection
USB Wired Connection

Connecting the Airstep USB-C to the Kemper USB-B port works. If you don't have this cable, you can get it from XSONIC in their Airstep Cable Pack
Connecting the Airstep USB-C to the Kemper USB-A does not work. The Kemper freezes.
Bluetooth MIDI Connection
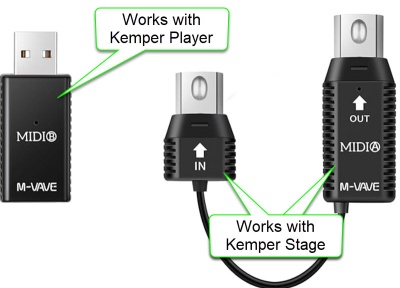
This works to connect to the Kemper Profile Player USB-A port.
The XSONIC Airstep finds the M-VAVE USB-A automatically.
I've read that the WIDI Bud Pro works but I have not tried it.
Rig Buttons
These settings will emulate the behaviour of the Kemper Remote or Kemper Stage.
Switch A
| Field | Value |
|---|---|
| Name | Rig/Slot 1 |
| Toggle Mode | Off |
| LED Display | Normal Mode |
Message 1
| Field | Value |
|---|---|
| Trigger | Release |
| Message Type | MIDI |
| Output Interface | ALL |
| MIDI Type | Control Change |
| MIDI Channel | 1 |
| CC Number | 50 |
| CC Value | 1 |
Message 2
| Field | Value |
|---|---|
| Trigger | Release |
| Message Type | MIDI |
| Output Interface | ALL |
| MIDI Type | Control Change |
| MIDI Channel | 1 |
| CC Number | 50 |
| CC Value | 0 |
Switch B
| Field | Value |
|---|---|
| Name | Rig/Slot 2 |
| Toggle Mode | Off |
| LED Display | Normal Mode |
Message 1
| Field | Value |
|---|---|
| Trigger | Release |
| Message Type | MIDI |
| Output Interface | ALL |
| MIDI Type | Control Change |
| MIDI Channel | 1 |
| CC Number | 51 |
| CC Value | 1 |
Message 2
| Field | Value |
|---|---|
| Trigger | Release |
| Message Type | MIDI |
| Output Interface | ALL |
| MIDI Type | Control Change |
| MIDI Channel | 1 |
| CC Number | 51 |
| CC Value | 0 |
Switch C
| Field | Value |
|---|---|
| Name | Rig/Slot 3 |
| Toggle Mode | Off |
| LED Display | Normal Mode |
Message 1
| Field | Value |
|---|---|
| Trigger | Release |
| Message Type | MIDI |
| Output Interface | ALL |
| MIDI Type | Control Change |
| MIDI Channel | 1 |
| CC Number | 52 |
| CC Value | 1 |
Message 2
| Field | Value |
|---|---|
| Trigger | Release |
| Message Type | MIDI |
| Output Interface | ALL |
| MIDI Type | Control Change |
| MIDI Channel | 1 |
| CC Number | 52 |
| CC Value | 0 |
Switch D
| Field | Value |
|---|---|
| Name | Rig/Slot 4 |
| Toggle Mode | Off |
| LED Display | Normal Mode |
Message 1
| Field | Value |
|---|---|
| Trigger | Release |
| Message Type | MIDI |
| Output Interface | ALL |
| MIDI Type | Control Change |
| MIDI Channel | 1 |
| CC Number | 53 |
| CC Value | 1 |
Message 2
| Field | Value |
|---|---|
| Trigger | Release |
| Message Type | MIDI |
| Output Interface | ALL |
| MIDI Type | Control Change |
| MIDI Channel | 1 |
| CC Number | 53 |
| CC Value | 0 |
Switch E
| Field | Value |
|---|---|
| Name | Rig/Slot 5 |
| Toggle Mode | Off |
| LED Display | Normal Mode |
Message 1
| Field | Value |
|---|---|
| Trigger | Release |
| Message Type | MIDI |
| Output Interface | ALL |
| MIDI Type | Control Change |
| MIDI Channel | 1 |
| CC Number | 54 |
| CC Value | 1 |
Message 2
| Field | Value |
|---|---|
| Trigger | Release |
| Message Type | MIDI |
| Output Interface | ALL |
| MIDI Type | Control Change |
| MIDI Channel | 1 |
| CC Number | 54 |
| CC Value | 0 |
Summary of Kemper MIDI Logic (Slots + Morph)
- CC#50–54: Load Slots 1–5 in Performance Mode or Rigs 1–5 in Browser Mode.
- Morph Triggering: If the same CC is sent again (with value 1–127), Morph is engaged.
- Morph Release: Sending value 0 disengages Morph.
- Momentary vs Latching: Controlled by the Rig’s internal “Momentary” setting.
Why Your Airstep Setup Works
- Press = CC#50–54 value 1 → Loads Rig or Slot
- Release = CC#50–54 value 0 → Ends Morph (if Momentary is enabled)
- Repeated Presses → Toggle Morph (if Momentary is disabled)
- Single Button Logic → Matches Kemper Stage/Remote behavior exactly
Kemper MIDI Documentation
- If Rig Button Morph is activated in System Settings, and the PROFILER receives subsequent control changes #50-#54 following the initial Slot load, these will trigger Morphing.
So, the same button could be used to first load a Rig, and then act as a Morph Button for that Rig. To support all functions, values 1-127 should be sent when the button is hit, and value 0 should follow when the button is released. The setting of the “Momentary” option in Rig Settings determines whether the Morphing latches the morph sound and base sound, or if it immediately returns to the base sound as soon as you release the button.
Effects Stomps
Airstep Bank 2 – Stomp Mode Control (Kemper Profile Player)
When I use both the Airstep and the Airstep Lite, I use the Airstep for Rig buttons (above) and the Airstep Lite for Effects Buttons (below)
CC# 75-78 to map to Effects buttons 1-4, and the last button set to Tuner on/off. I did this instead of using CC# 17-22, which map to Modules A-D, because sometimes I use the Kemper Profile Player without the Airstep, and I wanted to use the Kemper Player mapping instead of the Profiler mappings. If I change the Effects buttons 1-4 on the Player, I wanted the Airstep to match.
| Effect Button 1 | Effect Button 2 | Effect Button 3 | Effect Button 4 | Stomp (e.g. Tuner) | |
|---|---|---|---|---|---|
| Toggle Mode | On | On | On | On | On |
| LED Display | Toggle Mode | Toggle Mode | Toggle Mode | Toggle Mode | Toggle Mode |
| Toggle On | |||||
| Message 1 |
Message Type: MIDI Output Interface: ALL MIDI Type: Control Change MIDI Channel: 1 CC Number: 75 CC Value: 127 |
Message Type: MIDI Output Interface: ALL MIDI Type: Control Change MIDI Channel: 1 CC Number: 76 CC Value: 127 |
Message Type: MIDI Output Interface: ALL MIDI Type: Control Change MIDI Channel: 1 CC Number: 77 CC Value: 127 |
Message Type: MIDI Output Interface: ALL MIDI Type: Control Change MIDI Channel: 1 CC Number: 78 CC Value: 127 |
Message Type: MIDI Output Interface: ALL MIDI Type: Control Change MIDI Channel: 1 CC Number: 31 CC Value: 127 |
| Toggle Off | |||||
| Message 1 |
Message Type: MIDI Output Interface: ALL MIDI Type: Control Change MIDI Channel: 1 CC Number: 75 CC Value: 0 |
Message Type: MIDI Output Interface: ALL MIDI Type: Control Change MIDI Channel: 1 CC Number: 76 CC Value: 0 |
Trigger: Release Message Type: MIDI Output Interface: ALL MIDI Type: Control Change MIDI Channel: 1 CC Number: 77 CC Value: 0 |
Trigger: Release Message Type: MIDI Output Interface: ALL MIDI Type: Control Change MIDI Channel: 1 CC Number: 78 CC Value: 0 |
Trigger: Release Message Type: MIDI Output Interface: ALL MIDI Type: Control Change MIDI Channel: 1 CC Number: 31 CC Value: 0 |
Notes
- Toggle Mode On lets the Airstep track internal switch state, so LEDs reflect effect status (assuming Kemper doesn’t override).
- CC#75–79 are fully valid and can be assigned to any effect slot in Kemper’s MIDI settings.
- You can remap these CCs in Kemper’s System Settings to match your preferred stomp layout.
Airstep Configuration – Kemper Profiler Player Looper Control
Use the Airstep Preset for KPA Looper. It works, mimicking the Profiler Foot Controller and the Kemper Stage. For each function (e.g. Rec/Play/Overdub), there is a table with five rows. Each row represents an Airstep "Message". All the values are the same except for the second row in each table (88,89,90,91,92,93)
What follows is the documentation in case you want to reassign the buttons. In my case, I never use "Reverse" so I replaced it with "Undo".
Rec/Play/Overdub
- Switch Name: Rec/Play/Overdub
- Toggle Mode: Off
- LED Display: Normal Mode
| Message | Trigger | CC# | Value | Description |
|---|---|---|---|---|
| 1 | Press | 99 | 125 | NRPN MSB (Looper) |
| 2 | Press | 98 | 88 | NRPN LSB (Rec/Play/Overdub) |
| 3 | Press | 6 | 0 | Data Entry MSB |
| 4 | Press | 38 | 1 | Data Entry LSB (Execute) |
| 5 | Release | 38 | 0 | Data Entry LSB (Reset) |
Stop/Erase
- Switch Name: Stop/Erase
- Toggle Mode: Off
- LED Display: Normal Mode
| Message | Trigger | CC# | Value | Description |
|---|---|---|---|---|
| 1 | Press | 99 | 125 | NRPN MSB (Looper) |
| 2 | Press | 98 | 89 | NRPN LSB (Stop/Erase) |
| 3 | Press | 6 | 0 | Data Entry MSB |
| 4 | Press | 38 | 1 | Data Entry LSB (Execute) |
| 5 | Release | 38 | 0 | Data Entry LSB (Reset) |
Trigger
- Switch Name: Trigger
- Toggle Mode: Off
- LED Display: Normal Mode
| Message | Trigger | CC# | Value | Description |
|---|---|---|---|---|
| 1 | Press | 99 | 125 | NRPN MSB (Looper) |
| 2 | Press | 98 | 90 | NRPN LSB (Trigger) |
| 3 | Press | 6 | 0 | Data Entry MSB |
| 4 | Press | 38 | 1 | Data Entry LSB (Execute) |
| 5 | Release | 38 | 0 | Data Entry LSB (Reset) |
Reverse
- Switch Name: Reverse
- Toggle Mode: Off
- LED Display: Normal Mode
| Message | Trigger | CC# | Value | Description |
|---|---|---|---|---|
| 1 | Press | 99 | 125 | NRPN MSB (Looper) |
| 2 | Press | 98 | 91 | NRPN LSB (Reverse) |
| 3 | Press | 6 | 0 | Data Entry MSB |
| 4 | Press | 38 | 1 | Data Entry LSB (Execute) |
| 5 | Release | 38 | 0 | Data Entry LSB (Reset) |
Half Speed
- Switch Name: Half Speed
- Toggle Mode: Off
- LED Display: Normal Mode
| Message | Trigger | CC# | Value | Description |
|---|---|---|---|---|
| 1 | Press | 99 | 125 | NRPN MSB (Looper) |
| 2 | Press | 98 | 92 | NRPN LSB (Half Speed) |
| 3 | Press | 6 | 0 | Data Entry MSB |
| 4 | Press | 38 | 1 | Data Entry LSB (Execute) |
| 5 | Release | 38 | 0 | Data Entry LSB (Reset) |
Undo
- Switch Name: Undo
- Toggle Mode: Off
- LED Display: Normal Mode
| Message | Trigger | CC# | Value | Description |
|---|---|---|---|---|
| 1 | Press | 99 | 125 | NRPN MSB (Looper) |
| 2 | Press | 98 | 93 | NRPN LSB (Undo) |
| 3 | Press | 6 | 0 | Data Entry MSB |
| 4 | Press | 38 | 1 | Data Entry LSB (Execute) |
| 5 | Release | 38 | 0 | Data Entry LSB (Reset) |