Difference between revisions of "T1 ToneMatch® Audio Engine / Gain Staging / DJ"
m |
m (→Gain Staging Channel 4/5 for DJ Application / Backing Tracks) |
||
| (16 intermediate revisions by the same user not shown) | |||
| Line 1: | Line 1: | ||
{{T1 icon}} | {{T1 icon}} | ||
| + | <html><style>html {max-width:966px} </style></html> | ||
| + | <table><tr> | ||
| + | <td valign="top" width="450">__TOC__</td> | ||
| + | <td valign="top" style="padding:10px">If you have follow up questions to this article please post a note in the Bose forum: [http://bose.infopop.cc/eve/forums/a/tpc/f/3976055944/m/9360072676 Bose Forum T1® - Set input trim on Channel 4/5 for DJ Console] | ||
| + | </td> | ||
| + | </tr></table> | ||
== Gain Staging Channel 4/5 for DJ Application / Backing Tracks == | == Gain Staging Channel 4/5 for DJ Application / Backing Tracks == | ||
| + | |||
| + | <html> | ||
| + | <!-- | ||
| + | <div id="jquery_jplayer_video_22701135269347439" class="jp-jplayer" style="width: 100%; height: auto;"> | ||
| + | <img id="jp_poster_0" style="width: 100%; height: auto; display: none;" src="https://www.bosepro.community/g/portable/fileSendAction/fcType/0/fcOid/22701135268974159/primaryPicture/true/filePointer/22701135269347439/fodoid/22560397758347150/imageType/LARGE/inlineImage/true/frame/FIRST/thumbnail.jpg"> | ||
| + | --> | ||
| + | <video id="jp_video_0" preload="metadata" controls="true" style="max-width: 100%; height: auto;" src="https://www.bosepro.community/g/portable/fileSendAction/fcType/0/fcOid/22701135268974159/filePointer/22701135269347439/fodoid/22560397758347150/stream/true/T1%20Backing%20Tracks.mp4" title="T1 Backing Tracks.mp4"></video> | ||
| + | <!-- </div> --> | ||
| + | </html> | ||
| + | |||
These instructions apply if you are using | These instructions apply if you are using | ||
* a DJ Console or | * a DJ Console or | ||
| − | * an analog source for backing tracks | + | * an analog source for backing tracks. |
| + | * If you are using a different input channel (1, 2, 3) the same principles apply. | ||
| + | |||
| + | Note: If you are using a stereo source use {{T1}} Channel 4/5 using the Analog Inputs on the back. | ||
| + | Note: If you are connecting by [[USB]] you do not have to set the trim control. When connecting by USB the trim light will be inactive. | ||
| − | |||
[[Image:T1 Channel 45.png]] | [[Image:T1 Channel 45.png]] | ||
| − | + | ||
This is typically a one-time operation. You can do this in silence until the last stage where you bring up the Master Volume. | This is typically a one-time operation. You can do this in silence until the last stage where you bring up the Master Volume. | ||
| − | Do this with the T1® Master Volume all the way off, and the Channel volume all the way off. | + | Do this with the T1® Master Volume all the way off, and the Channel volume all the way off. You do not need to hear the music to set the trim. |
| + | [[Image:T1 All Off.png|596px]] | ||
Your first adjustment for any input to your {{T1}} is the Trim setting. The exact position of the Trim will vary depending on signal strength of your input source. The correct setting for any particular source may be different from your other sources. | Your first adjustment for any input to your {{T1}} is the Trim setting. The exact position of the Trim will vary depending on signal strength of your input source. The correct setting for any particular source may be different from your other sources. | ||
| Line 45: | Line 65: | ||
| + | === Output Meter === | ||
| + | :A really helpful feature on the T1 is to go to the Prefs/Output Level menu and see where you are relative to maximum output. | ||
| + | |||
| + | [[Image:T1 Prefs Output Levels Master.png]] | ||
| − | + | When you have turned up the Master Volume to reach the maximum output on the meter, you should be running at the maximum possible without clipping or distortion. | |
| − | + | From this point on you can control the volume at the source (mixer or DJ Console). | |
| Line 55: | Line 79: | ||
[http://bose.infopop.cc/eve/forums/a/tpc/f/3976055944/m/9360072676 Bose Forum T1® - Set input trim on Channel 4/5 for DJ Console] | [http://bose.infopop.cc/eve/forums/a/tpc/f/3976055944/m/9360072676 Bose Forum T1® - Set input trim on Channel 4/5 for DJ Console] | ||
| − | |||
---- | ---- | ||
| Line 61: | Line 84: | ||
[[Category:Gain]] | [[Category:Gain]] | ||
[[Category:DJ]] | [[Category:DJ]] | ||
| + | [[Category:T1 Videos]] | ||
Latest revision as of 14:45, 11 March 2019
| If you have follow up questions to this article please post a note in the Bose forum: Bose Forum T1® - Set input trim on Channel 4/5 for DJ Console |
Gain Staging Channel 4/5 for DJ Application / Backing Tracks
These instructions apply if you are using
- a DJ Console or
- an analog source for backing tracks.
- If you are using a different input channel (1, 2, 3) the same principles apply.
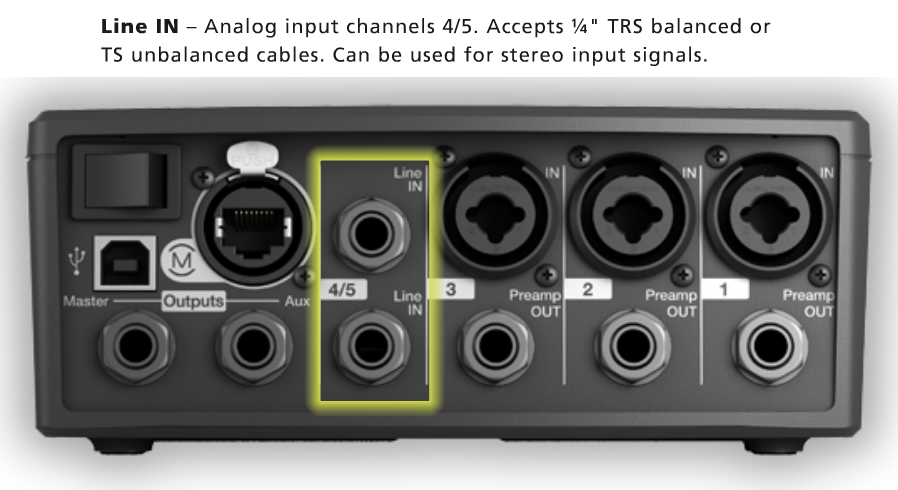
Note: If you are using a stereo source use T1 ToneMatch Audio Engine Channel 4/5 using the Analog Inputs on the back. Note: If you are connecting by USB you do not have to set the trim control. When connecting by USB the trim light will be inactive.
This is typically a one-time operation. You can do this in silence until the last stage where you bring up the Master Volume.
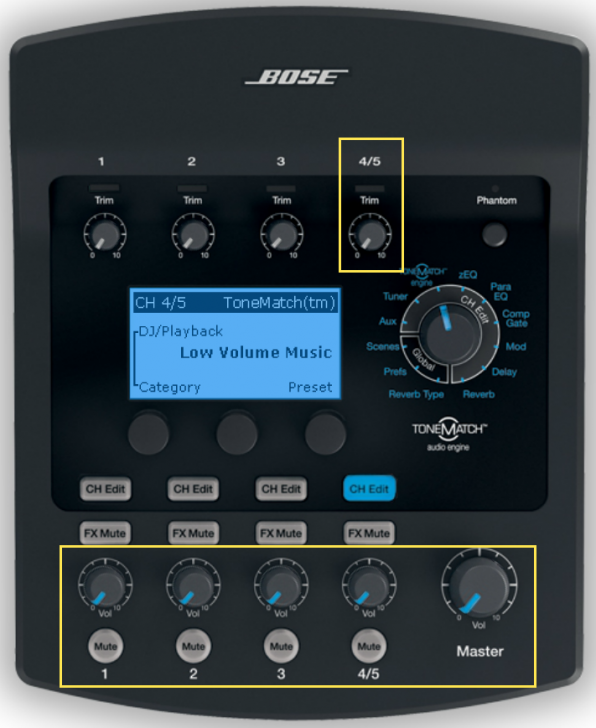
Do this with the T1® Master Volume all the way off, and the Channel volume all the way off. You do not need to hear the music to set the trim.
Your first adjustment for any input to your T1 ToneMatch Audio Engine is the Trim setting. The exact position of the Trim will vary depending on signal strength of your input source. The correct setting for any particular source may be different from your other sources.
Set Up Your Source
Set up your DJ console to the highest output level you will use during a show - that is ⇒ the maximum, highest output recommended in the DJ console manual. Make sure that there is no sign of clipping.
Play some music. There will be no sound. That's okay for now.
Set Input Trim
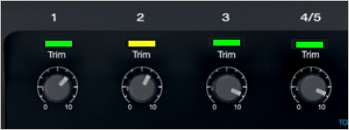
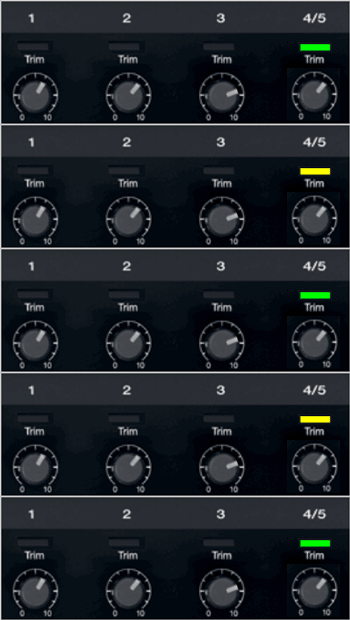
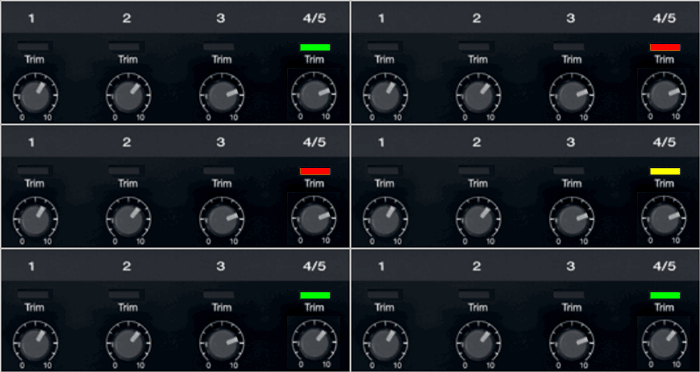
Turn the Trim setting up until the Trim Light is solid green with occasional flickers of yellow. Use the Trim lights as your guide. (The exact position of the Trim knob is not important).
If you see flickers of red (below), turn the Trim down. You are definitely nearing or in compression. Turn the Trim down until there are no red flickers.
That's it for setting the trim for that Channel and you should not need to change it unless you change DJ Consoles.
Bring up the volume on Channel 4/5 to 12:00 o'clock.
Now you can bring up the Master Volume to the required volume for the situation.
Output Meter
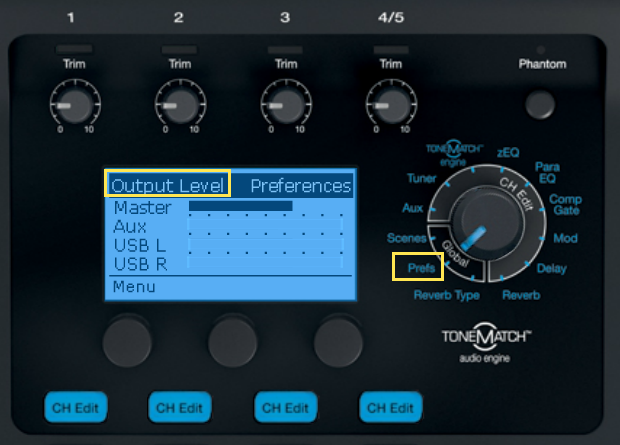
- A really helpful feature on the T1 is to go to the Prefs/Output Level menu and see where you are relative to maximum output.
When you have turned up the Master Volume to reach the maximum output on the meter, you should be running at the maximum possible without clipping or distortion.
From this point on you can control the volume at the source (mixer or DJ Console).
If you have comments or questions about this article please post a note in the
Bose Forum T1® - Set input trim on Channel 4/5 for DJ Console

