Difference between revisions of "Sandbox"
m |
m (Multimedia viewer) |
||
| (29 intermediate revisions by the same user not shown) | |||
| Line 1: | Line 1: | ||
{{Please leave this line alone and write below (this is the coloured heading)}} | {{Please leave this line alone and write below (this is the coloured heading)}} | ||
| + | <meta name="keywords" content="example, keyword, etc"></meta> | ||
| + | <meta name="description" content="page description"></meta> | ||
| + | == Add This == | ||
| + | {{#widget:AddThis | ||
| + | |page_name={{PAGENAME}} | ||
| + | |page_url={{fullurl:{{PAGENAME}}}} | ||
| + | |account_id=bosel1 | ||
| + | |logo_url= | ||
| + | |logo_background=FFFFFF | ||
| + | |logo_color=FFFFFF | ||
| + | |brand=Bose L1 Wiki | ||
| + | |options=favorites, email, digg, delicious, more | ||
| + | |offset_top=0 | ||
| + | |offset_left=0 | ||
| + | }} | ||
| + | |||
| + | == Multimedia Viewer == | ||
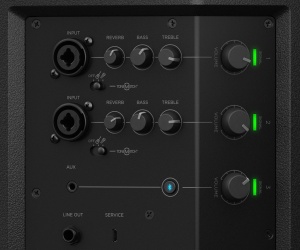
| + | [[File:S1_Pro_IO_Panel_1024.jpg|thumb]] | ||
| + | |||
| + | |||
| + | == Articles == | ||
| + | <div id="articlecount" style="font-size:85%;">[[Special:Statistics|{{NUMBEROFARTICLES}}]] articles in [[English language|English]]</div> | ||
| + | |||
| + | == Labelled Section Transclusion== | ||
| + | |||
| + | === {{Model II nl}}: Can I run a Stereo Source to the Power Stand === | ||
| + | |||
| + | {{#lst:L1® Model II|Stereo Source to Power Stand Analog Input}} | ||
| + | |||
| + | === Lower Section Only === | ||
| + | {{#lst:L1 Cylindrical Radiator® loudspeaker|Lower Half Only}} | ||
| + | |||
| + | |||
| + | Link to a category page. [[:Category:B1|Articles about the B1]] | ||
| + | |||
| + | === Click === | ||
| + | {{#Click:{{PAGENAME}}|T1 Channel 45.png|T1 Channel 4/5}} | ||
| + | |||
| + | === Including a Category Page in an article === | ||
| + | {{:Category:Feedback}} | ||
| Line 9: | Line 49: | ||
{{#Click:Digitech Vocalist Live 2 - Alternative Method to Connect to a T1®|Image:VocalistLive2.jpg|90px|Read the article on how to connect the Digitech Vocalist Live 2 to a T1®}} | {{#Click:Digitech Vocalist Live 2 - Alternative Method to Connect to a T1®|Image:VocalistLive2.jpg|90px|Read the article on how to connect the Digitech Vocalist Live 2 to a T1®}} | ||
| − | + | {{#Click:Downloads|Image:Downloads green arrow.gif|update your system}} | |
==== Usage ==== | ==== Usage ==== | ||
Add to a page: | Add to a page: | ||
| Line 15: | Line 55: | ||
Width (90px) and caption are optional. Target may be an internal or external link, but internal links take precedence. | Width (90px) and caption are optional. Target may be an internal or external link, but internal links take precedence. | ||
| − | |||
| − | |||
| − | |||
| − | |||
| − | |||
| − | |||
| − | |||
| − | |||
| − | |||
| + | {{#Click:T1 ToneMatch® Audio Engine#Aux_Output|Image:T1AuxOutput.png|T1 Aux Output}} | ||
{{T1 no link}} | {{T1 no link}} | ||
| Line 214: | Line 246: | ||
== Streaming Video == | == Streaming Video == | ||
| − | |||
| − | |||
| − | |||
| − | |||
| − | |||
| − | |||
| − | |||
| − | |||
| − | |||
| − | |||
| − | |||
| − | |||
| − | |||
| − | |||
| − | |||
Latest revision as of 04:36, 25 November 2018
Edit this page
This "sandbox" page is to allow you to carry out experiments. Please feel free to try your skills at formatting here. If you want to learn more about how to edit a wiki, please read this introduction or the tutorial at Wikipedia.
To edit, click here or "edit" at the top of the page, make your changes in the dialog box, and click the "Save page" button when you are finished.
Content added here will not stay permanently; this page is cleaned regularly.
Testing Area
<meta name="keywords" content="example, keyword, etc"></meta> <meta name="description" content="page description"></meta>
Add This
{{#widget:AddThis |page_name=Sandbox |page_url=//toonz.ca/bose/wiki/index.php?title=Sandbox |account_id=bosel1 |logo_url= |logo_background=FFFFFF |logo_color=FFFFFF |brand=Bose L1 Wiki |options=favorites, email, digg, delicious, more |offset_top=0 |offset_left=0 }}
Multimedia Viewer
Articles
Labelled Section Transclusion
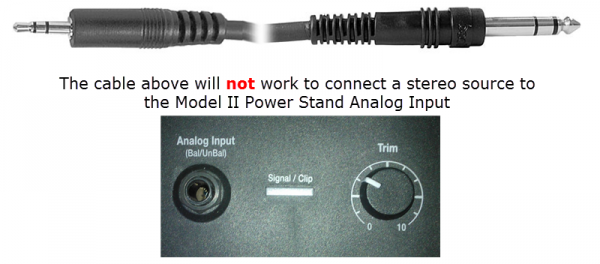
L1® Model II: Can I run a Stereo Source to the Power Stand
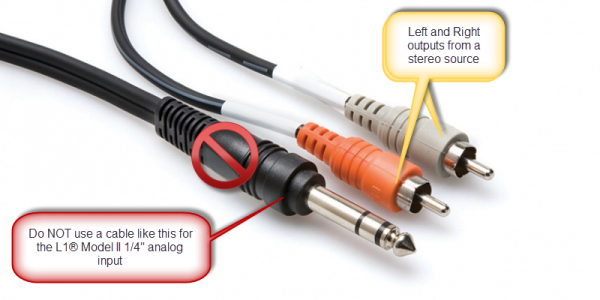
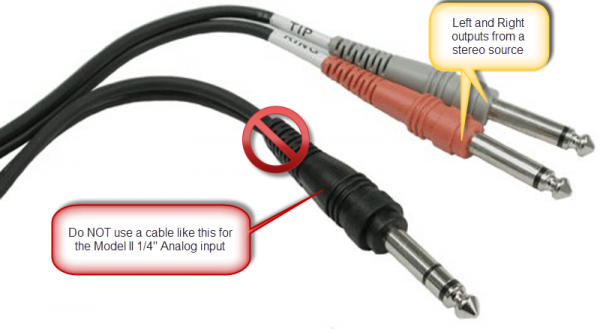
A ¼ inch Tip-Ring-Sleeve connector carrying a stereo signal should not be used with the analog input on the Model II.
Even though a ¼ inch Tip-Ring-Sleeve connector can carry a stereo signal this is not how this physical connection is used on the Sandbox Power Stand.
The analog input on the Model II is balanced, and will therefore subtract the Left and Right signals on a stereo cable and you will hear an L-R (Left minus Right) signal in the Model II.
You cannot 'get through the gig' this way if you are a DJ or if you need to run prerecorded music or have stereo inputs.
Using a Mixer
If you are using a mixer instead of a T1 ToneMatch Audio Engine use the mixer to create a mono output and send that to the Model II Power Stand Analog input.
- If there is a stereo/mono switch then use it and send the mono output to the Model II Power Stand Analog input.
- If there is a Left/mono output then use that and send it to the Model II Power Stand Analog input.
- If there is no way to create a mono output then pan all your mixer inputs all the way to one side (e.g. Left) and then take the mixer for that side (e.g. Left) output and send it to the Model II Power Stand Analog input.
Lower Section Only
Q: Can I run with only the lower section of the L1 Cylindrical Radiator® loudspeaker?
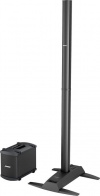
A: From a technical standpoint it is safe to operate the system with only the lower section of the Sandbox , however the spatial and spectral performance of will be greatly reduced, so this has only a very limited application. - Hilmar-at-Bose[1]
Correcting the Tone
Try inserting a ¼ inch connector in the Bass Line Out of the Power Stand. This will cause the internal logic to reduce the Bass output, and this should give you a better overall tonal balance when running with only one section of the Sandbox.
For very detailed notes about this see Half Stack.
Link to a category page. Articles about the B1
Click
{{#Click:Sandbox|T1 Channel 45.png|T1 Channel 4/5}}
Including a Category Page in an article
Scroll down to see Articles about Feedback.
What is feedback and how does it occur?
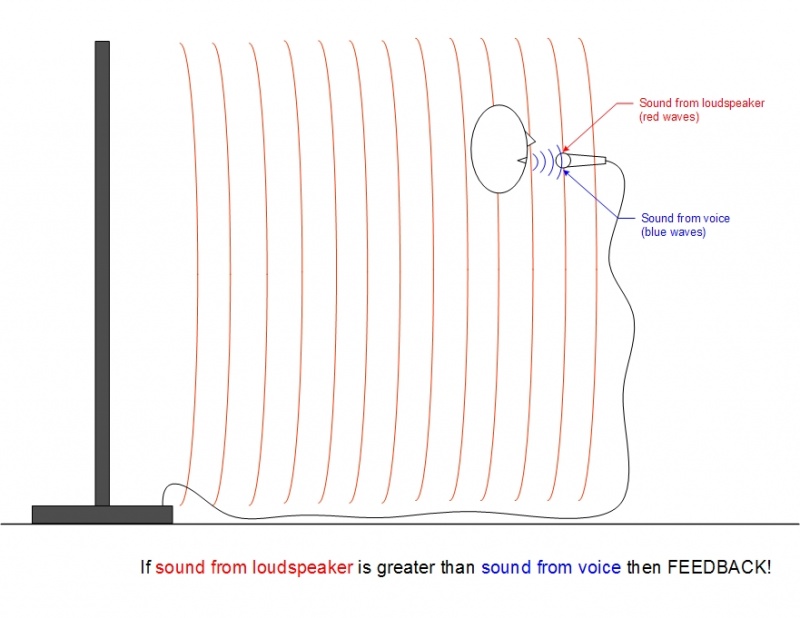
Feedback occurs when the sound from the loudspeaker (or loudspeakers if a microphone is connected to more than one) is louder at the microphone than the sound of the voice.
This fundamental fact is shown in the figure below.
More generic explanation
Definitions:
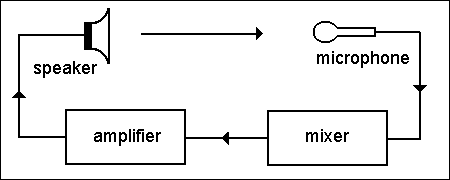
- Audio feedback (also known as the Larsen effect after the Danish scientist, Søren Larsen, who first discovered its principles) is a special kind of feedback which occurs when a sound loop exists between an audio input (for example, a microphone or guitar pickup) and an audio output (for example, a loudspeaker). In this example, a signal received by the microphone is amplified and passed out of the loudspeaker. The sound from the loudspeaker can then be received by the microphone again, amplified further, and then passed out through the loudspeaker again. — audio feedback: Wikipedia
- Audio feedback is the ringing noise (often described as squealing, screeching, etc) sometimes present in sound systems. It is caused by a "looped signal", that is, a signal which travels in a continuous loop. — feedback: MediaCollege.com
Articles about Feedback
Top Level Heading
Some text
Click Image extension
{{#Click:Digitech Vocalist Live 2 - Alternative Method to Connect to a T1®|Image:VocalistLive2.jpg|90px|Read the article on how to connect the Digitech Vocalist Live 2 to a T1®}} {{#Click:Downloads|Image:Downloads green arrow.gif|update your system}}
Usage
Add to a page:
{{#Click:Target|Image:Example.png|90px|Caption is here.}}
Width (90px) and caption are optional. Target may be an internal or external link, but internal links take precedence.
{{#Click:T1 ToneMatch® Audio Engine#Aux_Output|Image:T1AuxOutput.png|T1 Aux Output}}
T1 ToneMatch® Audio Engine
Sub Heading
Some more text. This is the Sandbox (example of a magic word)
{{PAGENAME}}.
More in Magic Words ← this is an internal page link!
[[{{PAGENAME}}#Magic Words|Magic Words]]
Sub Sub Heading
Some more text
Sub Sub Heading
Some more text
Another Sub Heading
Some more text
Bullets
- Wikis are fun
- Wikis are easy
- Less coding that is needed for most forums
Numbered Bullets
- Wire up the PS1 Powerstand connections
- Connect the B1
- Insert the L1™ Cylindrical Radiator sections
- Turn down the R1 Remote Master Level
- Power on the System
Italics
Bold
Link to an external image (just type in the URL) like this image from the Bose Site

No special codes - just the address of the image.
Magic Words
There are currently 944 articles and 4,348 users.
There are currently {{NUMBEROFARTICLES}} articles and {{NUMBEROFUSERS}} users.
Template with Parameters
Hover your mouse over this text
PAS L1™
Email Link
Templates for L1™ components
{{A1}} becomes PackLite® power amplifier model A1
{{A1 EB}} becomes PackLite® power amplifier model A1 Extended Bass Package
{{B1}} becomes B1 Bass Module
{{L1}} becomes L1
{{L1 CR}} becomes L1 Cylindrical Radiator® loudspeaker
{{PS1}} becomes PS1 Power Stand (Classic) / Model I
{{PAS}} becomes Bose® Personalized Amplification System™ family of products
{{Classic Manual}} becomes L1® Classic Owner's Guide (a link to the owners guide)
{{Model IManual}} becomes L1® Model I Owner's Guide (a link to the owners guide)
{{Model II Manual}} becomes L1® Model II Owner's Guide (a link to the owners guide)
{{T1 Manual}} becomes T1 ToneMatch® Audio Engine Owner's Guide (62 pages)
T1 ToneMatch Audio Engine Service Manual (a link to the owners guide)
{{L1}} becomes L1
{{L1 no link}} becomes L1®
{{T1}} becomes T1 ToneMatch Audio Engine
{{T1 no link}} becomes T1 ToneMatch® Audio Engine
{{T1 nl}} becomes T1 ToneMatch® Audio Engine
Templates (more)
{{Bose}} becomes Bose®
{{forum}} becomes Bose® Pro Portable PA Community
Linked Image Example
only works for links to internal wiki pages
<linkedimage> wikipage=The Bose® L1® Wiki tooltip=Main Page img_src=L1doubleWA1.gif img_width=138px img_height=200px img_alt=Sampletext </linkedimage>
<linkedimage> wikipage=The Bose® L1® Wiki tooltip=Main Page img_src=L1doubleWA1.gif img_alt=No width or height specified </linkedimage>
LiveSaver Test
http://meta.wikimedia.org/wiki/LiveSaver
Test for Inclusion
Cliff-at-Bose wrote[2]
Depends on the wall construction. Most drywall will reinforce midbass (like 100-250 Hz) and let the deeper octave or so pass right on thru giving you little reinforcement from reflection. So if you push your bass boxes up against the wall, you'll tend to get a lot of midbass with a typical drywall-constructed wall. And, yeah, then it will be muddy. Most walls don't reflect sound uniformly with frequency, so you get a change in spectrum you probably don't want no matter what. One possible exception to this is, say, 6" thick concrete with a 1/4" thick lining of steel. Oh, and don't take my word for it either. Do it yourself and see what you hear. Also, aiming the individual bass boxes won't have much effect as they are so much smaller than the wavelengths they are producing that they are virtually omni. For instance, a 125Hz wavelength is on the order of 8 feet. A pair of b1's on each side of your ps1 will give you a hotter midbass down the middle and not so off to the side. Here, you've essentially made a crude bass array. So, my experience with all this tells me that the most consistant way to set the bass up, gig to gig, is to lump the bass boxes together and keep them away from the walls. You won't get the extra bass boost from the walls, but if you did, it wouldn't be wideband. I think you'll always do better not asking the wall to help. You know what they say about free help (you get what you pay for). This works for bass players, dj's and so on.
Thickbox
Labeled Section Transclude
test captcha
Sectional Transclude Test
Model I
Model II
T1 ToneMatch™ Audio Engine
PackLite® power amplifier Model A1
Search
| Sandbox | L1™ Unofficial Users' Guide |
Linked Image Test
Streaming Video
Soapbox
Silverlight
