Difference between revisions of "ToneMatch Mixer Scenes"
m |
m (ST moved page T1 ToneMatch® Audio Engine / Scenes to ToneMatch Mixer Scenes) |
||
| (10 intermediate revisions by the same user not shown) | |||
| Line 1: | Line 1: | ||
| − | {{T1 icon}} | + | {{T1 icon}}{{T4S icon}}{{T8S icon}} |
| − | You can save all your | + | You can save all your ToneMatch Mixer settings as a Scene. Think of it as a snapshot. You can have up to ten User Scenes. |
| + | Note: Scenes created with a {{T1}} are not compatible with {{T4S}}/{{T8S}}. Although functionally similar there are too many differences (e.g., Reverb parameters, Panning, Aux routing). | ||
| + | |||
| + | === Videos === | ||
<html> | <html> | ||
| − | + | <details> | |
| − | + | <summary>Quick Demo on T4S</summary> | |
| − | + | <iframe width="560" height="315" src="https://www.youtube.com/embed/yzT2v5Coy5c" frameborder="0" allow="accelerometer; autoplay; encrypted-media; gyroscope; picture-in-picture" allowfullscreen></iframe> | |
| − | + | </details> | |
| − | + | <details> | |
| + | <summary>Quick Demo on T1</summary> | ||
| + | <iframe width="560" height="315" src="https://www.youtube.com/embed/Yljc9TdIxzs" title="YouTube video player" frameborder="0" allow="accelerometer; autoplay; clipboard-write; encrypted-media; gyroscope; picture-in-picture" allowfullscreen></iframe> | ||
| + | |||
| + | |||
| + | |||
| + | |||
| + | </details> | ||
</html> | </html> | ||
| − | A Scene captures all your | + | A Scene captures all your settings except input trim and channel and master volume controls. |
| + | |||
| + | [[Image:T1 Scenes Settings not included.png|300px|right|Settings not captured in a Scene]] | ||
| + | |||
| − | It's easy to create and recall Scenes so use them to back up your settings so can recall them when you need them. | + | It's easy to create and recall Scenes so use them to back up your settings so you can recall them when you need them. |
{{:T1 ToneMatch® Audio Engine / Scenes Documentation}} | {{:T1 ToneMatch® Audio Engine / Scenes Documentation}} | ||
| + | |||
| + | === T4S/T8S USB A Playback and Scenes === | ||
| + | {{T4S/T8S USB A Playback and Scenes}} | ||
---- | ---- | ||
| Line 22: | Line 38: | ||
[[Category:T1]] | [[Category:T1]] | ||
[[Category:Scenes]] | [[Category:Scenes]] | ||
| + | [[Category:T4S]] | ||
| + | [[Category:T8S]] | ||
Latest revision as of 15:11, 18 April 2023
You can save all your ToneMatch Mixer settings as a Scene. Think of it as a snapshot. You can have up to ten User Scenes.
Note: Scenes created with a T1 ToneMatch Audio Engine are not compatible with T4S ToneMatch mixer/T8S ToneMatch mixer. Although functionally similar there are too many differences (e.g., Reverb parameters, Panning, Aux routing).
Contents
Videos
Quick Demo on T4S
Quick Demo on T1
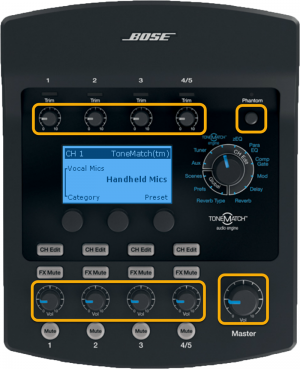
A Scene captures all your settings except input trim and channel and master volume controls.
It's easy to create and recall Scenes so use them to back up your settings so you can recall them when you need them.
Working with Scenes
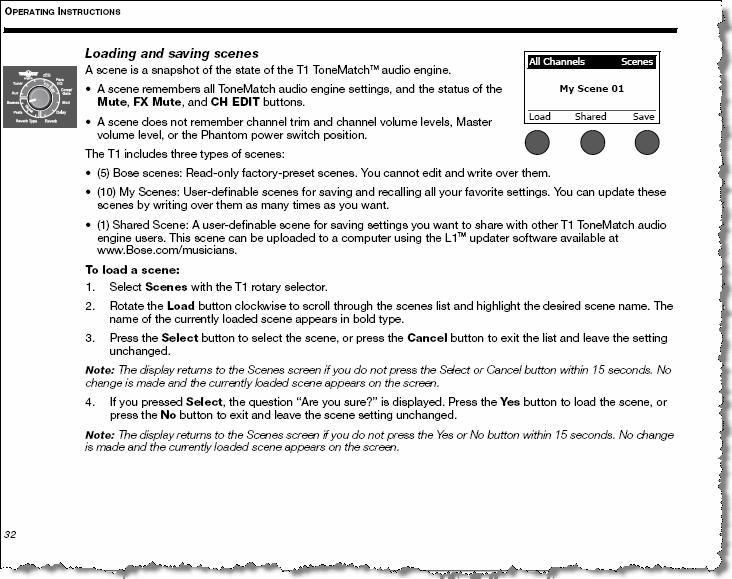
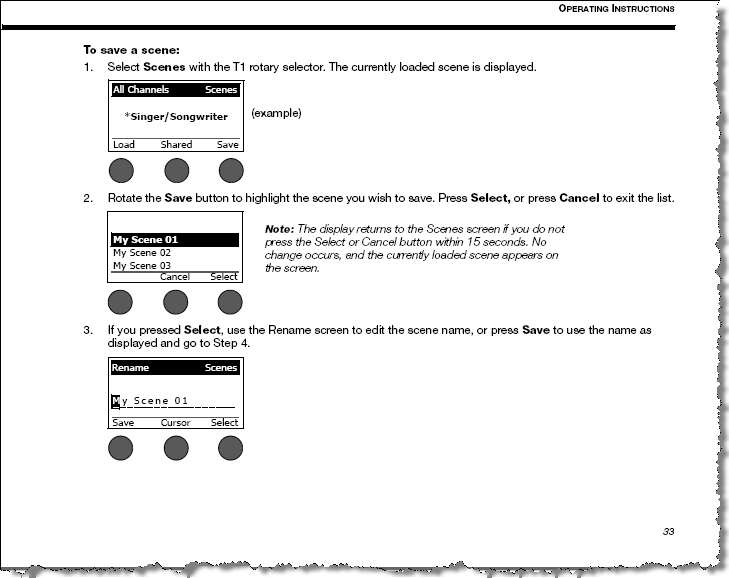
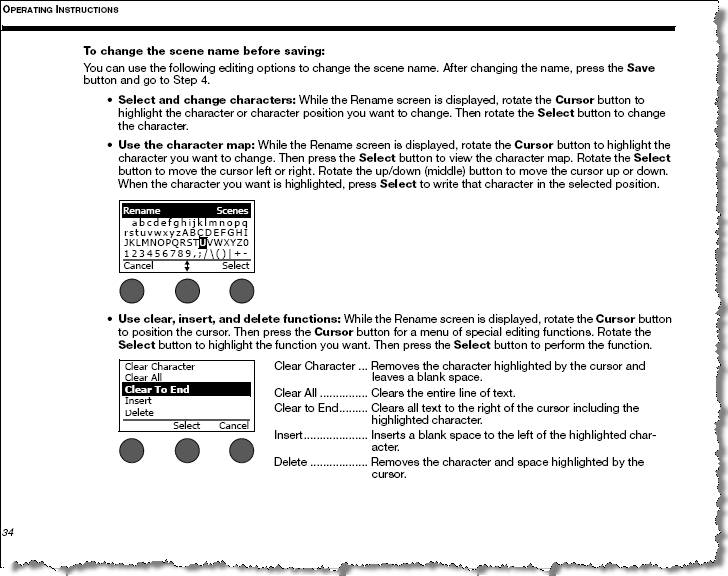
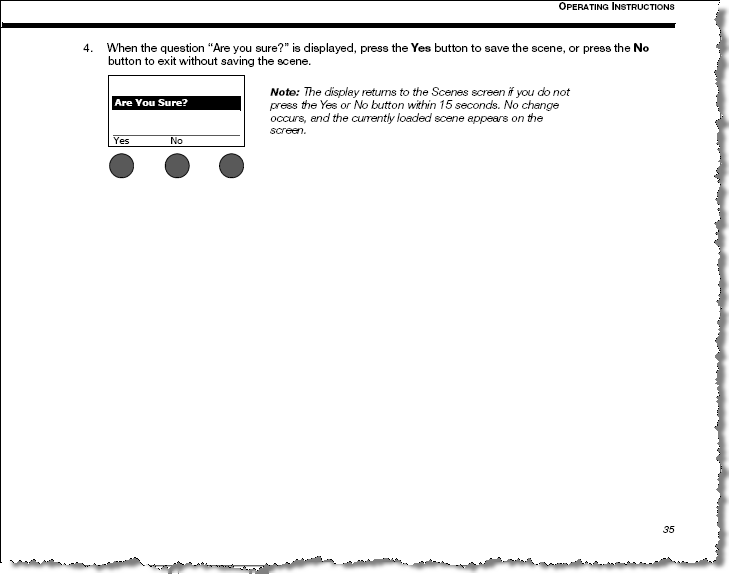
T1® Scenes - Screen shots of the T1 ToneMatch® Audio Engine Owner's Guide (62 pages)
T1 ToneMatch Audio Engine Service Manual - pages 32, 33, 34, 35
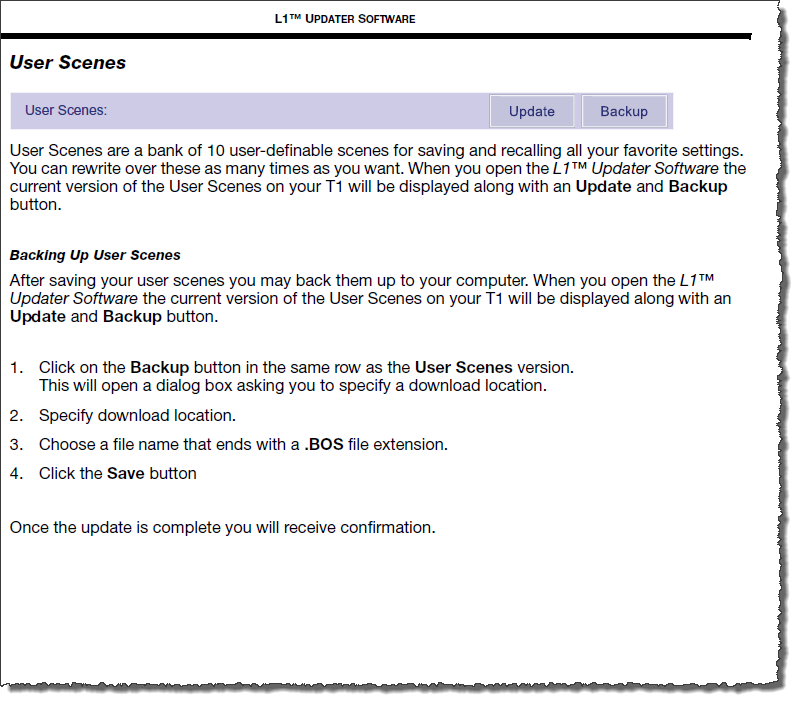
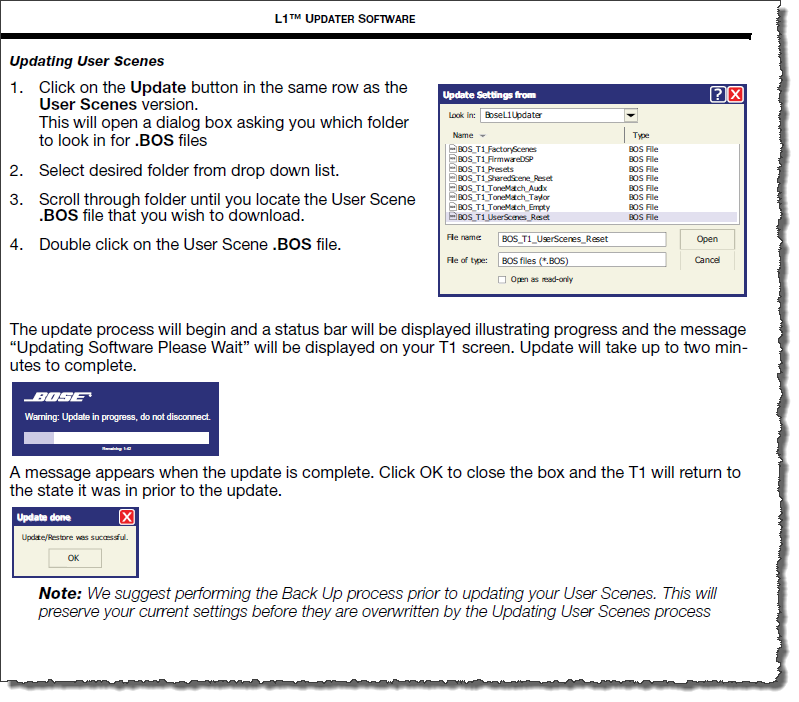
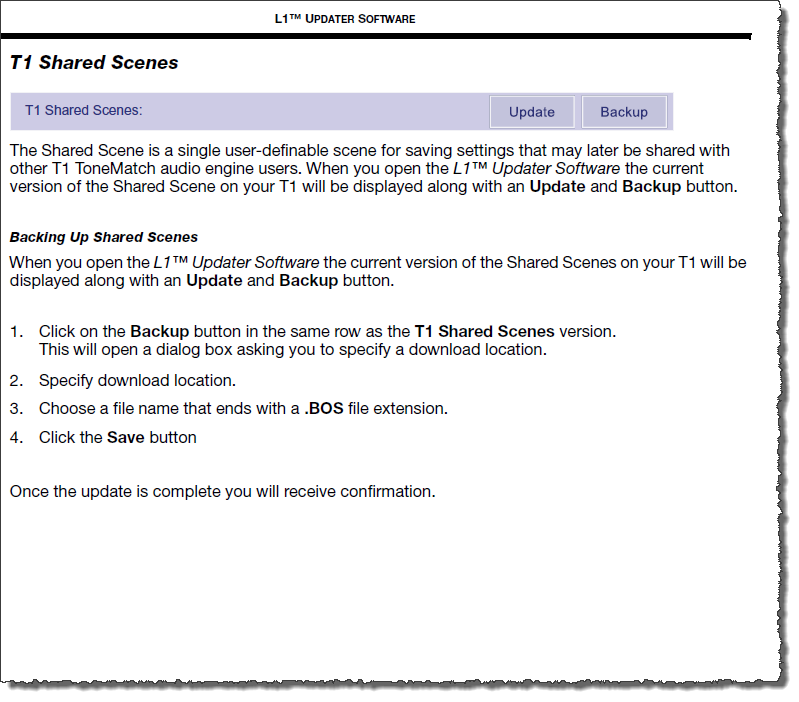
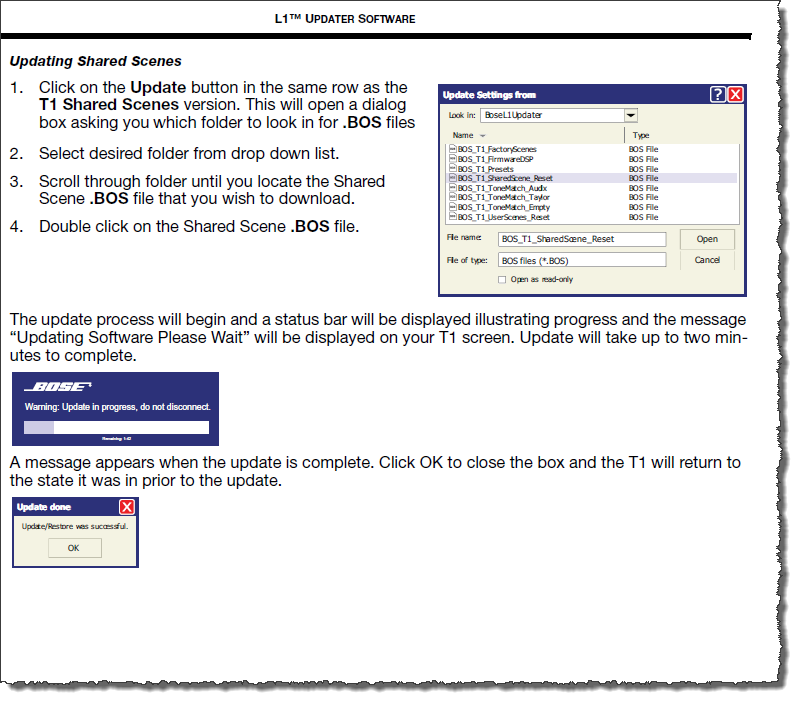
Save and Retrieve Your Scenes
In the L1® Updater software, Saving is called "Backup" and retrieving is "Download"
Get the L1® Updater Software
These are the latest versions of the ToneMatch Updater application.
ToneMatch® Updater Software application. (two versions available)
- PC ToneMatch® Updater Software application for PC
- MAC ToneMatch® Updater Software application for MAC (Supports OSX 10.7 through 10.15.x)
If you have questions please see ToneMatch Updater discussion.
- To update your L1 Model II with a T1 ToneMatch Audio Engine use the older version of the L1 Updater software
- L1® Updater Software application. Note: This is required to do any updates for the T1 ToneMatch® Audio Engine and L1® Model II Power Stand. (Two versions available)
macOS Issues
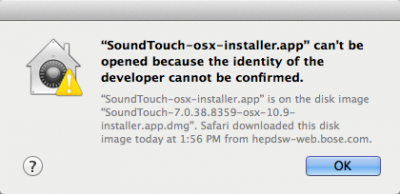
[Filename] can't be opened because the identity of the developer cannot be confirmed
If you see "[Filename] can't be opened because the identity of the developer cannot be confirmed" message displayed
Mac OSX users may see this message when trying to install a Bose app. If this message appears, try the following:
Mac users may need to hold the Control key (Ctrl) when opening the file.
Various versions of the Mac OS cannot identify Bose as a developer. The Mountain Lion version of OS X (10.8) includes a feature called Gatekeeper to protect users from installing applications of non-Apple identified developers. The Mavericks version of OS X (10.9.5) temporarily cannot identify Bose as a developer as well.
To open the application, follow these steps:
- Press and hold the Control key while clicking on the application icon
- Note: Do not use Launchpad to do this. Launchpad doesn’t allow you to access the shortcut menu
In the menu that appears, select Open at the top of the list
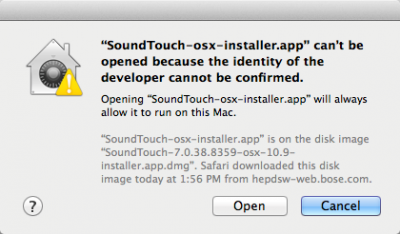
A confirmation window will appear. Select Open
Without Control click:
With Control click:
More information on Gatekeeper can be found at http://support.apple.com/kb/HT5290
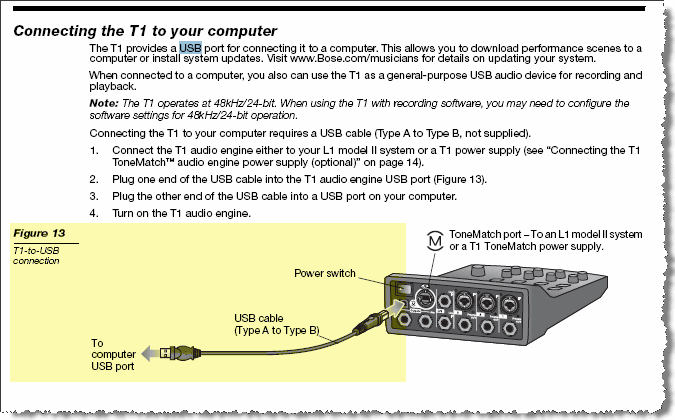
Connection from Computer to T1 ToneMatch® Audio Engine
Here is an excerpt from the T1 ToneMatch® Audio Engine Owner's Guide (62 pages)
T1 ToneMatch Audio Engine Service Manual
Here is a close up of the ends of the cable.
{{#Click:http://www.amazon.com/Belkin-F3U133-10-Hi-Speed-Cable-Feet/dp/B00004Z5M1%7CImage:USBAtoUSBB.jpg%7COrder on Amazon}}
Using the ToneMatch Mixer and the ToneMatch Updater to backup your scenes
User Scenes
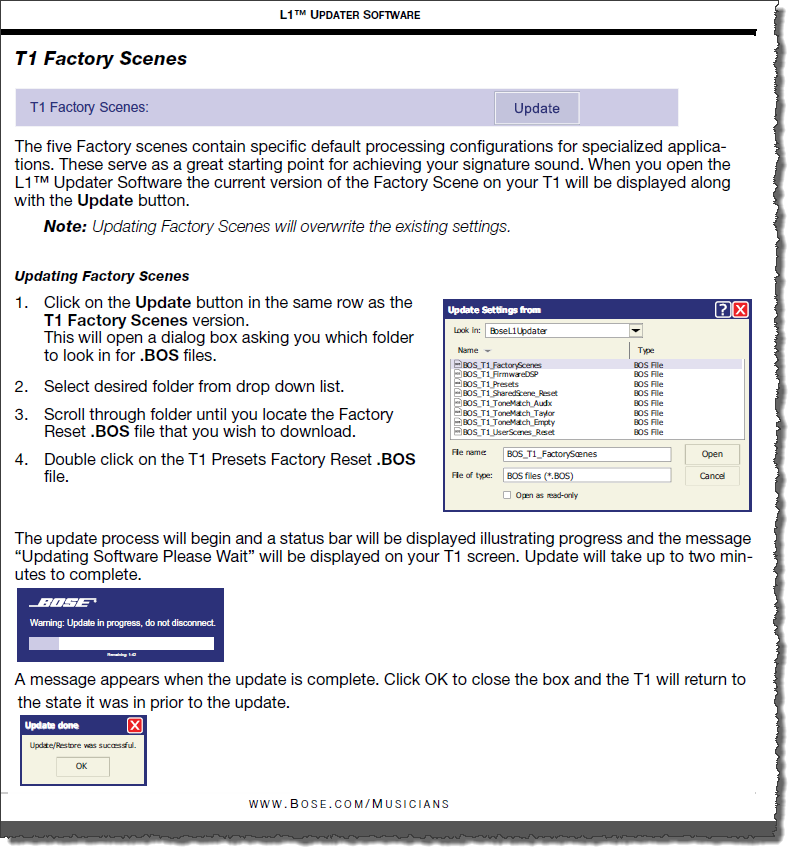
Factory Scenes
T4S/T8S USB A Playback and Scenes
- Why do USB A playback settings for volume and mute change when I change Scenes?
- Scenes are a snapshot of all the ToneMatch mixer settings at the time when you save the Scene including settings for USB A Playback.
- Exceptions
- Trim and Volume controls are not included in the Scene.
- If you are playing a song via USB A playback, the song will continue to play when you switch Scenes
- If you have Scenes with different settings for USB A Playback volume, switching from Scene to Scene will load the different settings for USB A Playback
- Example
- Scene: User Scene One
- Setting USB A Playback volume: Mute
- Setting USB A Playback volume: Mute
- Scene: User Scene Two
- Setting USB A Playback volume: 25%
- Setting USB A Playback volume: 25%
- Scene: User Scene Three
- Setting USB A Playback volume: 50%
If you switch from User Scene Three to User Scene Two while using USB A Playback, the volume will change from 50% to 25%.
If you switch from User Scene Three to User Scene One while using USB A Playback, the volume will change from 50% to Mute.
If you switch from User Scene Two to User Scene One while using USB A Playback, the volume will change from 25% to Mute.

