Difference between pages "In Ear Monitors for an L1 User" and "Bose L1 Pro8 Compared to L1 Compact"
(Difference between pages)
m |
m |
||
| Line 1: | Line 1: | ||
| − | {{ | + | <html> |
| + | <style> | ||
| + | table.greyGridTable { | ||
| + | border: 2px solid #FFFFFF; | ||
| + | width: 100%; | ||
| + | text-align: left; | ||
| + | border-collapse: collapse; | ||
| + | } | ||
| + | table.greyGridTable td, table.greyGridTable th { | ||
| + | border: 1px solid #FFFFFF; | ||
| + | padding: 3px 4px; | ||
| + | } | ||
| + | table.greyGridTable tbody td { | ||
| + | font-size: 13px; | ||
| + | color: #000000; | ||
| + | } | ||
| + | table.greyGridTable tr:nth-child(even) { | ||
| + | background: #F4F4F4; | ||
| + | } | ||
| + | table.greyGridTable thead { | ||
| + | background: #FFFFFF; | ||
| + | border-bottom: 4px solid #333333; | ||
| + | } | ||
| + | table.greyGridTable thead th { | ||
| + | font-size: 15px; | ||
| + | font-weight: bold; | ||
| + | color: #000000; | ||
| + | text-align: center; | ||
| + | border-left: 2px solid #333333; | ||
| + | } | ||
| + | table.greyGridTable thead th:first-child { | ||
| + | border-left: none; | ||
| + | } | ||
| − | + | table.greyGridTable tfoot { | |
| + | font-size: 14px; | ||
| + | font-weight: bold; | ||
| + | color: #333333; | ||
| + | border-top: 4px solid #333333; | ||
| + | } | ||
| + | table.greyGridTable tfoot td { | ||
| + | font-size: 14px; | ||
| + | }</style> | ||
| + | </html> | ||
| − | | | + | <table class="greyGridTable"> |
| + | <tr><td colspan="3">{{ST Social}}</tr> | ||
| + | <tr> | ||
| + | <th style="width:15%">Feature</th><th style="width: 40%">Bose L1 Pro8</th><th style="width: 40%">Bose L1 Compact</th><tr> | ||
| + | <td style="background:#FFFFFF"> </td> | ||
| + | <td style="background:#FFFFFF">[[File:L1 Pro8 51x200.jpg|55px]] </td> | ||
| + | <td style="background:#FFFFFF">[[File:L1 Compact Collapsed and Extended.jpg|height:280px]] </td> | ||
| + | <tr><td></td><td></td></tr> | ||
| + | <tr> | ||
| + | <td>Horizontal dispersion | ||
| + | </td> | ||
| + | <td>180 degrees | ||
| + | </td> | ||
| + | <td>180 degrees | ||
| + | </td> | ||
| + | </tr> | ||
| − | + | <tr> | |
| + | <td>Vertical dispersion | ||
| + | </td> | ||
| + | <td>40 degrees (+/- 20 degrees) | ||
| + | </td> | ||
| + | <td>40 degrees (+/- 20 degrees) | ||
| + | </td> | ||
| + | </tr> | ||
| − | + | <tr> | |
| − | + | <td>Output | |
| − | + | </td> | |
| + | <td>112 dB / 118 dB peak | ||
| + | </td> | ||
| + | <td>106 dB / 112 dB peak | ||
| + | </td> | ||
| + | </tr> | ||
| − | + | <tr> | |
| + | <td>Audience | ||
| + | </td> | ||
| + | <td>Up to 100 people | ||
| + | </td> | ||
| + | <td>Up to 100 people | ||
| + | </td> | ||
| + | </tr> | ||
| − | |||
| − | |||
| − | |||
| − | |||
| − | |||
| − | + | <tr> | |
| − | + | <td>Speaker Array | |
| + | </td> | ||
| + | <td>Eight 2.00" (51 mm) high-excursion drivers mounted in a curved Articulated Array® | ||
| + | </td> | ||
| + | <td>Six 2.00" (51 mm) high-excursion drivers mounted in a curved Articulated Array® loudspeaker | ||
| + | </td> | ||
| + | </tr> | ||
| − | + | <tr> | |
| + | <td>Woofer | ||
| + | </td> | ||
| + | <td>One 7"x 13" neodymium racetrack transducer in the power stand | ||
| + | </td> | ||
| + | <td>One 8" (203 mm) low-frequency driver mounted in a ported bass enclosure in the power stand | ||
| + | </td> | ||
| + | </tr> | ||
| + | <tr> | ||
| + | <td>Low Frequency | ||
| + | </td> | ||
| + | <td> | ||
| + | <ul><li>45 Hz - 3dB</li></ul> | ||
| + | </td> | ||
| + | <td> | ||
| + | <ul> | ||
| + | <li>65 Hz - 3dB</li> | ||
| + | <li>50 Hz - -10 dB</li> | ||
| + | </ul> | ||
| + | </td> | ||
| + | </tr> | ||
| − | + | <tr> | |
| + | <td>Crossover | ||
| + | </td> | ||
| + | <td> | ||
| + | 200 Hz | ||
| + | </td> | ||
| + | <td> | ||
| + | 400 Hz | ||
| + | </td> | ||
| + | </tr> | ||
| − | |||
| − | |||
| − | |||
| − | + | <tr style="xdisplay:none;"> | |
| + | <td>Power to speakers | ||
| + | </td> | ||
| + | <td>Biamped | ||
| + | <ul><li>80 Watts RMS mid-high array</li><li>240 Watts RMS sub</li><li>320 Watts total</li></ul> | ||
| + | </td> | ||
| + | <td>Biamped | ||
| + | <ul><li>65 Watts RMS mid-high array</li><li>65 Watts RMS sub</li><li>130 Watts total</li></ul> | ||
| + | </td> | ||
| + | </tr> | ||
| − | + | <tr> | |
| + | <td>Weight | ||
| + | </td> | ||
| + | <td>Total system weight 18 kg (39.8 lb) | ||
| + | <ul> | ||
| + | <li>Power Stand: 14 kg (30.9 lb)</li> | ||
| + | <li>Mid-High array and extension: 4 kg (8.9 lb) </li> | ||
| + | </ul> | ||
| + | </td> | ||
| + | <td>Total system weight 13.4 kg (30.2 lb) | ||
| + | <ul> | ||
| + | <li>Power Stand: 11.2 kg (24.6 lb)</li> | ||
| + | <li>Extensions (each): 1.1 kg (2.3 lb) </li> | ||
| + | </ul> | ||
| + | </td> | ||
| + | </tr> | ||
| − | + | <!-- | |
| + | <tr style="display:none"> | ||
| + | <td>Multiple orientations | ||
| + | </td> | ||
| + | <td><html> | ||
| + | <ul><li><details><summary>Elevated Surface</summary> | ||
| + | Position the S1 Pro on a surface. This projects sound clearly and evenly throughout the audience, and ensures that audience members enjoy the full frequency range of the system. | ||
| + | </details> | ||
| + | </li> | ||
| − | = | + | <li style=""><details><summary>Tilt-Back</summary> |
| − | + | For performances where your audience is close to you, tilt the S1 Pro onto its back edge. For best results, the performer should stand or sit to one side of the loudspeaker to avoid blocking sound from the audience. | |
| + | </details> | ||
| + | </li> | ||
| + | <li><details><summary>Monitor</summary> | ||
| + | To use the S1 Pro as a personal floor monitor, place it on the ground horizontally, in front of and pointing toward the performer. Tilt the loudspeaker onto its side edge. | ||
| + | </details> | ||
| + | </li> | ||
| + | <li><details><summary>Speaker Stand</summary> | ||
| + | Place one or two S1 Pro systems on speaker stands (sold separately) for general-purpose sound reinforcement. | ||
| + | Monitor </details> | ||
| − | + | </li> | |
| − | + | </ul> | |
| − | + | </html> | |
| − | + | </td> | |
| + | <td> | ||
| + | <ul> | ||
| + | <li>Table Top (no extensions)</li> | ||
| + | <li>Floor with both extensions <br> (no speaker stand required)</li> | ||
| + | <li>Floor with one extension</li> | ||
| + | </ul> | ||
| + | </td> | ||
| + | </tr> | ||
| + | --> | ||
| + | <tr> | ||
| + | <td>ToneMatch® Presets | ||
| + | </td> | ||
| + | <td>Channels 1 and 2<br>Full suite of ToneMatch Presets available in the ToneMatch mixers, built-in. Set using the L1 Mix App. | ||
| + | </td> | ||
| + | <td>Channel 1 | ||
| + | <ul> | ||
| + | <li>Fixed: Microphone</li> | ||
| + | </ul> | ||
| + | Channel 2 | ||
| + | <ul> | ||
| + | <li>Acoustic Guitar</li> | ||
| + | <li>Line Level (flat)</li> | ||
| + | </ul> | ||
| + | </td> | ||
| + | </tr> | ||
| + | <tr> | ||
| + | <td>Dimensions H x W x D | ||
| + | </td> | ||
| + | <td>200.5 × 31.8 × 44 cm<br> | ||
| + | (78.9 × 12.5 × 17.3 in 39.8 lb) | ||
| + | </td> | ||
| + | <td>41.8 x 33.9 x 42.6 cm<br> | ||
| + | (78.5 x 13.25 x 16.75 in (24.6 lbs) | ||
| + | </td> | ||
| + | </tr> | ||
| + | <tr> | ||
| + | <td>Battery | ||
| + | </td> | ||
| + | <td>No | ||
| + | </td> | ||
| + | <td>No | ||
| + | </td> | ||
| + | </tr> | ||
| + | <tr> | ||
| + | <td>Connections | ||
| + | </td> | ||
| + | <td> | ||
| + | Channels 1 and 2 <br>Combo Jacks<br> | ||
| + | XLR / 6 mm (1/4" Tip-Ring or Tip-Ring-Sleeve) balanced / unbalanced | ||
| + | <br> | ||
| + | Channel 3/Aux Input | ||
| + | <ul> | ||
| + | <li>6 mm (1/4" Tip-Ring or Tip-Ring-Sleeve) balanced / unbalanced</li> | ||
| + | <li>3 mm (1/8" Tip-Ring-Sleeve) accepts stereo or mono input</li> | ||
| + | <li>Bluetooth input</li> | ||
| + | </ul> | ||
| + | </td> | ||
| + | <td> | ||
| + | Channel 1: <br> | ||
| + | XLR balanced | ||
| + | Channel 2: | ||
| + | <ul> | ||
| + | <li>6 mm (1/4" Tip-Ring or Tip-Ring-Sleeve) balanced / unbalanced</li> | ||
| + | <li>3 mm (1/8" Tip-Ring-Sleeve) accepts stereo or mono input</li> | ||
| + | <li>Two RCA unbalanced phone plug</li> | ||
| + | </ul> | ||
| + | </td> | ||
| + | </tr> | ||
| + | <tr> | ||
| + | <td>Tone Controls | ||
| + | </td> | ||
| + | <td>Channels 1 and 2 | ||
| + | * Bass / Treble | ||
| + | Channel 3 | ||
| + | * None | ||
| + | </td> | ||
| + | <td>Channel 1 | ||
| + | * Bass / Treble | ||
| + | Channel 2 | ||
| + | * None | ||
| + | </td> | ||
| + | </tr> | ||
| + | <tr> | ||
| + | <td>Line Out | ||
| + | </td> | ||
| + | <td>XLR balanced | ||
| + | </td> | ||
| + | <td>¼ inch (6mm) jack: Nominal +2.2 dBu, Max +20 dBu<br>Note: Using a TS unbalanced cable will result in a drop in the audio level of -6dBu. | ||
| + | </td> | ||
| + | </tr> | ||
| + | <!-- | ||
| + | <tr> | ||
| + | <td>Crossover Frequency | ||
| + | </td> | ||
| + | <td>200 Hz | ||
| + | </td> | ||
| + | <td>400 Hz 4th order Butterworth | ||
| + | </td> | ||
| + | </tr> | ||
| + | --> | ||
| + | <tr> | ||
| + | <td>Bluetooth input | ||
| + | </td> | ||
| + | <td>Yes: Channel 3 <br>Supports Bluetooth 5.x | ||
| + | </td> | ||
| + | <td>No | ||
| + | </td> | ||
| + | </tr> | ||
| + | <tr> | ||
| + | <td>Reverb | ||
| + | </td> | ||
| + | <td>Channels 1 and 2 Yes<br>Channel 3 None | ||
| + | </td> | ||
| + | <td>No | ||
| + | </td> | ||
| + | </tr> | ||
| + | <tr> | ||
| + | <td>ToneMatch Port | ||
| + | </td> | ||
| + | <td>Yes full support for T4S/T8S<br>power only for T1 | ||
| + | </td> | ||
| + | <td>No | ||
| + | </td> | ||
| + | </tr> | ||
| + | <tr> | ||
| + | <td>[[L1 Pro System EQ|System EQ]] | ||
| + | </td> | ||
| + | <td>Yes<br>[[L1 Pro System EQ|Live/Music/Speech/Off]] | ||
| + | </td> | ||
| + | <td>No | ||
| + | </td> | ||
| + | </tr> | ||
| + | <tr> | ||
| + | <td>Scenes | ||
| + | </td> | ||
| + | <td>Yes<br>Store/recall system settings via Bose L1 Mix App | ||
| + | </td> | ||
| + | <td>No | ||
| + | </td> | ||
| + | </tr> | ||
| + | <tr> | ||
| + | <td>Bose L1 Mix App | ||
| + | </td> | ||
| + | <td>Yes<br>Wireless control over volume, tone, reverb and system EQ | ||
| + | </td> | ||
| + | <td>No | ||
| + | </td> | ||
| + | </tr> | ||
| + | <tr> | ||
| + | <td>[[Throw Over Distance|Sound Projection]]</td> | ||
| + | <td colspan=2>[[File:Throw Over Distance L1 Compact L1 Pro8.jpg|1366px|link=Throw Over Distance|Click for full discussion]] | ||
| + | </td> | ||
| + | </tr> | ||
| + | <!-- | ||
| + | <tr> | ||
| + | <td> | ||
| + | </td> | ||
| + | <td> | ||
| + | </td> | ||
| + | <td> | ||
| + | </td> | ||
| + | </tr> | ||
| − | + | --> | |
| − | |||
| − | |||
| − | |||
| − | |||
| + | <!-- | ||
| + | <tr> | ||
| + | <td> | ||
| + | </td> | ||
| + | <td> | ||
| + | </td> | ||
| + | <td> | ||
| + | </td> | ||
| + | </tr> | ||
| + | <tr> | ||
| + | <td> | ||
| + | </td> | ||
| + | <td> | ||
| + | </td> | ||
| + | <td> | ||
| + | </td> | ||
| + | </tr> | ||
| + | --> | ||
| + | </table> | ||
---- | ---- | ||
| − | [[Category: | + | [[Category:L1 Pro]] |
| + | [[Category:Compact]] | ||
| + | [[Category:Comparison]] | ||
Latest revision as of 15:04, 12 June 2021
| Feature | Bose L1 Pro8 | Bose L1 Compact |
|---|---|---|
 |
 |
|
| Horizontal dispersion | 180 degrees | 180 degrees |
| Vertical dispersion | 40 degrees (+/- 20 degrees) | 40 degrees (+/- 20 degrees) |
| Output | 112 dB / 118 dB peak | 106 dB / 112 dB peak |
| Audience | Up to 100 people | Up to 100 people |
| Speaker Array | Eight 2.00" (51 mm) high-excursion drivers mounted in a curved Articulated Array® | Six 2.00" (51 mm) high-excursion drivers mounted in a curved Articulated Array® loudspeaker |
| Woofer | One 7"x 13" neodymium racetrack transducer in the power stand | One 8" (203 mm) low-frequency driver mounted in a ported bass enclosure in the power stand |
| Low Frequency |
|
|
| Crossover |
200 Hz |
400 Hz |
| Weight | Total system weight 18 kg (39.8 lb)
|
Total system weight 13.4 kg (30.2 lb)
|
| ToneMatch® Presets | Channels 1 and 2 Full suite of ToneMatch Presets available in the ToneMatch mixers, built-in. Set using the L1 Mix App. |
Channel 1
Channel 2
|
| Dimensions H x W x D | 200.5 × 31.8 × 44 cm (78.9 × 12.5 × 17.3 in 39.8 lb) |
41.8 x 33.9 x 42.6 cm (78.5 x 13.25 x 16.75 in (24.6 lbs) |
| Battery | No | No |
| Connections |
Channels 1 and 2
|
Channel 1: Channel 2:
|
| Tone Controls | Channels 1 and 2
Channel 3
|
Channel 1
Channel 2
|
| Line Out | XLR balanced | ¼ inch (6mm) jack: Nominal +2.2 dBu, Max +20 dBu Note: Using a TS unbalanced cable will result in a drop in the audio level of -6dBu. |
| Bluetooth input | Yes: Channel 3 Supports Bluetooth 5.x |
No |
| Reverb | Channels 1 and 2 Yes Channel 3 None |
No |
| ToneMatch Port | Yes full support for T4S/T8S power only for T1 |
No |
| System EQ | Yes Live/Music/Speech/Off |
No |
| Scenes | Yes Store/recall system settings via Bose L1 Mix App |
No |
| Bose L1 Mix App | Yes Wireless control over volume, tone, reverb and system EQ |
No |
| Sound Projection | 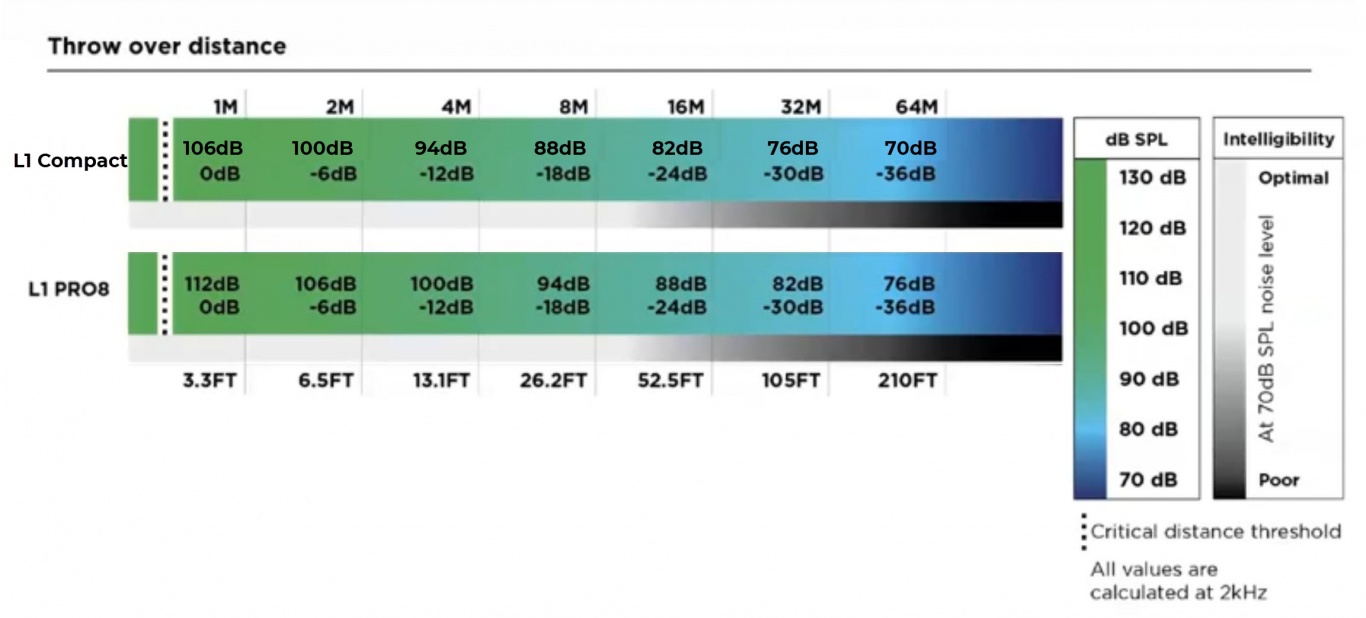
|
|