Preowned L1 Model II Considerations


 The L1 Model II is the flagship of the L1 line of Bose Portable PA equipment. Built to last, if you find one in good condition, it should serve you well. If you are considering purchasing a pre-owned L1 Model II or L1 Model 1S here are some things to consider. This list is not exhaustive, but it is a place to start.
|
Listening Test
Listen to the system running full-range pre-recorded music at full stage volume.
Cylindrical Radiator®
Physical Inspection

Check the Cylindrical Radiator® sections under good light for dents and scratches. These won't affect the operation of the unit, but it's good to find these now instead of under stage lights later.
Check the ends of the Cylindrical Radiator® sections.
When the system is fully assembled, look at it from the side to make sure the Cylindrical Radiator® stands straight. If it doesn't then it's likely the bayonet is bent.
Drivers
There are 24 drivers in the L1 Model II Cylindrical Radiator® (12 in the L1 Model 1S).
Play some music and listen carefully for sound from all drivers. Listen for rattles and buzzes.
L1 Model II
General Inspection
Check for signs of wear and tear, scratches or dents in the Cylindrical Radiator®s, the Power Stand, and B1 Bass Module or B2 Bass Module bass modules.
Legs
Make sure the legs open and close smoothly.
Check that the legs are not wobbly or loose.
Check that when the legs are fully extended, the Power Stand is stable and level.


Periodic Maintenance
Check the inside of the Power Stand well for signs of excessive wear and dirt or debris.
There have been isolated incidents where Model II owners have had difficulty removing the Cylindrical Radiator® from the Power Stand.
- I would encourage all users that are concerned with this happening to them to add a drop of locktite to the (2) screws identified in the attached diagram.
- Thank you
- Neil — Source

Connectors
Check the connectors in the Power Stand and the Cylindrical Radiator® sections. Make sure the connectors are seated properly (not pushed in or misaligned). The pictures below are from an L1 Model I but they are still useful.
Inspecting for damaged connectors in the PS1 Powerstand boot.

Fan
Fan runs constantly
Starting with units manufactured in late 2014 and later (shipped with Firmware version 1.5), the fan now runs quietly, constantly, while the Power Stand is powered on. This is completely normal.
This is how to read the Serial Number to tell if your system was shipped with Firmware version 1.5 or later.
Note: The grayed out characters may be different on your system.

If the underlined numbers are greater than 4284 then the unit was likely shipped with Firmware version 1.5, after October 2014.
Note: There is no user installable update for units with earlier serial numbers. The earlier hardware is not compatible with firmware version 1.5.
Fan prior to October 2014
Q: The fan in the Power Stand comes on when I strike a chord on my Guitar. Is this normal? A: Your unit is functioning properly - no problem.
- The fan in the Model II Power Stand comes on when the input signal level goes over a certain limit, regardless of what the internal temperature of the unit is. That way, the unit never gets too hot to where a fan needs to be on constantly. Whatever you do, please don't cover up the fan port.[1]
There is a Firmware Update that addresses the fan behaviour. See: Model II Power Stand Firmware Updates - Fan behaviour
Analog Input
Connect a mono sound source to the Analog Input. Test. Turn the trim control up and down and listen for scratchy noise.
Analog Input
The Analog input is a ¼ inch balanced input jack. Do not connect a stereo source to this input.

Analog input trim (volume, or gain) control
There is a trim control for the analog input. Turn this off (fully counter-clockwise) unless you have something connected to the Analog Input.

- Setting the Trim Control
- Set the Trim control on the power stand to the 0 (zero) position.
- Connect the audio source to the Analog Input
- Adjust the volume of the source device output to the reference or nominal output level.
- On analog consoles this may be marked as unity or 0 dB.
- On digital consoles this may be marked as -18 dBFS[2][3]. The exact value (-18 dBFS to -20 dBFS) may vary depending your location[4].
- Refer to the manual for the source device for details.
- If the source device does not have metering or indicators, set the output as high as you can without hearing distortion or seeing red indicator lights.
- While playing/singing as loud as you will during your performance, increase the Trim level so that the Signal/Clip indicator glows green or yellow. Occasional flickers of red are okay.
- If the Signal/Clip indicator glows solid red or you hear distortion, decrease the Trim level so that it glows only green or yellow.

Cases and Bags
Check the cases and bags for damage or wear and tear.
Power Stand Firmware
If the system comes with a B2 Bass Module and the Bass Level Switch works in all three positions, you have the latest firmware. If the system comes with a B1 or the B2 Bass Level Switch does not work, check the firmware.
What version is your Power Stand?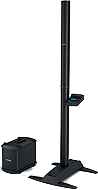
- Turn the Rotary Selector to Prefs
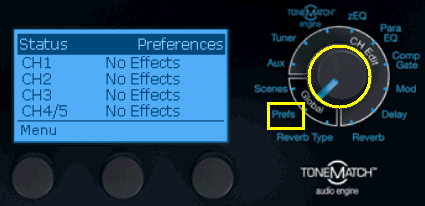
- Press the first button
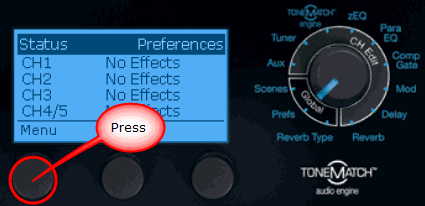
- Turn the first button until you see Power Stand

- Press the button
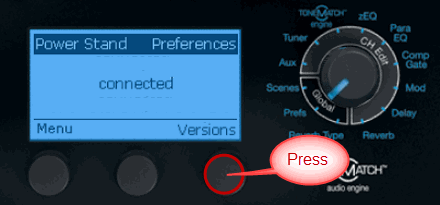
- The version is displayed.
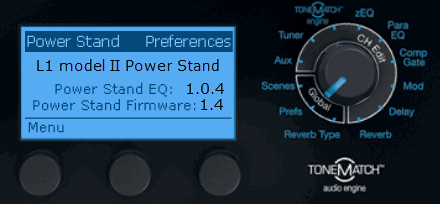
The latest versions add support for the  B2 Bass Module
The latest Power Stand EQ: 1.0.4
The latest Power Stand Firmware: 1.4
If you have Power Stand Firmware 1.4 or 1.5 you do not need to update your Power Stand.
1.5 Some Model II Power Stands have been shipped with version 1.5 - if you have this, you are fine. Do NOT update your Power Stand.
1.4 If you are at 1.4 - that is the latest user-updateable version. Do NOT update your Power Stand.
If you do not have version 1.4 or 1.5 update your firmware at this link:
L1® Model II Power Stand Firmware Updates.
Bass Module
Cables
Does the unit come with the original Bose (blue) cable for the bass module(s). Check for damage.


B2
If the system you are considering has a B2 Bass Module consider these points
B2 Bass Level Switch
If the system has a B2 Bass Module check that the B2 Bass Level switch works in all three positions. If it does, then the L1 Model II Power Stand firmware is up to date.

The B2 bass module includes a switch allowing you to select the appropriate level of bass output for your application.
There are three settings:
| Switch Position | Application |
|---|---|
| + | Bass voicing designed for DJ/Music playback applications Similar to four B1s |
| Normal | Bass voicing ideal for bass guitar or live sound application when mic'ing a kick drum Similar to two B1s |
| - | Bass voicing which is perfect for acoustic guitar and vocal Similar to oneB1 |
- Note
- You must use the Bose B2 or B1 cable (or compatible four-conductor NL4) cable to ensure the correct operation of the B2 Bass Level Switch
- Bose B1 and B2 cables are NL4 cables
You can use cables that are functionally equivalent.
What you need as a 4-wire Speakon, i.e. all 4 pins of the NL4 plugs need to be connected. The pins are named 1+, 1-, 2+, and 2-. The connection is one-to-one, for example, 2+ on one plug goes to 2+ on the other plug.
The wires inside the cable are usually arranged in a square pattern. Very long cable work a little bit better if the two signal pairs are connected diagonally like this[5]:
| 1+ | 2+ |
| 2- | 1- |
- 2+ and 2-
The Power Stand detects resistors in the Bass Module across (2+ and 2-) that identify if the Bass Module is a B1 or B2.
- If B1, then adding a second B1 is detected and the Power Stand responds accordingly.
- If B2, the setting on the Bass Level switch changes the resistance and the Power Stand responds accordingly.
See Bass Line Out for more detail.
ToneMatch Mixer
Firmware
Here is how to tell.
What version level is your T1 ToneMatch® Audio Engine? (T1® for short) 
- Turn the Rotary Selector to Prefs
- Press the first button
- Turn the first button until you see Versions
- Press the button
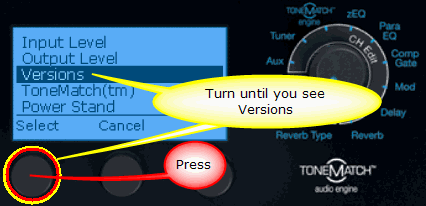
- The versions for the firmware will be displayed. The versions shown below are sample values.
See:T1 ToneMatch® Audio Engine Firmware Updates for the latest firmware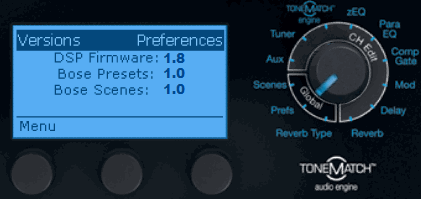
- See:T1 ToneMatch® Audio Engine Firmware Updates for the latest firmware
Right now the latest T1® firmware is 1.8.
What have you got?
Notes: What version of the T1® Firmware do I have?
- ↑ MikeZ-at-Bose Model II Fan Noise
- ↑ dBFS
- ↑ dBU vs dBFS
- ↑ dBFS Analog Levels
- ↑ Source: Hilmar-at-Bose