T1 ToneMatch® Audio Engine / Digital Delay for Second L1®
Contents
|
The original discussion that led to this page is 2 Model II and 1 T1® If you are familiar with the L1® Software Updater program, you can download and apply a Shared Scene. See Download Shared Scene. |
Here are some notes on how to use your T1® to drive a main L1™ at the front of the house and a second L1™ farther back. The goal is to provide sound in a long room, in this case approximately 50 feet wide by 250 feet long. The room may be three quarters full or we may need only provide coverage out to about 200 feet.
Terms
- Main L1® is the one at the front of the house centered on the 50 foot wall.
- Secondary L1™ is the one farther back, approximately 100-125 feet down the long wall.
Connections and Setttings
T1® Inputs
- 1 Microphone
- 2 Microphone / Instrument or Mixer
- 3 Used for Digital Delay processing
- 4/5 USB input from Computer
T1® Outputs
- Tonemate® (Ethercon Connection) goes to the Main L1®.
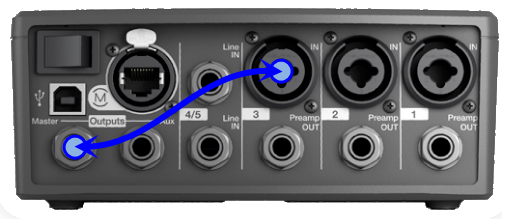
- Main ¼ inch output goes to Channel 3 input.
- Aux ¼ inch output goes to Secondary L1™ Analog Input
Ordinary connections
Connect inputs for Channels 1, 2 and 4/5 in any way you like. Ensure that the setting for Aux is Mute for all.

Channel 3 - Used as Delay Channel - Settings
We are using Channel 3 to process to create a delayed version of the Main output, and direct it to the Aux output and from there to the Secondary L1®
Turn level down, Ch 3 Mute
We are setting the Level to zero and we will not change this while using Channel 3 for Digital Delay processing. We are setting the Mute as an additional precaution.

Settings for Channel 3
- Turn on Channel 3 CH Edit
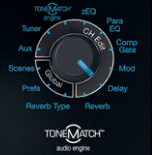
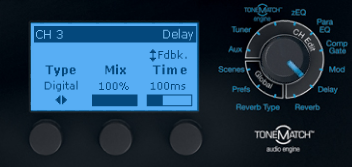
- Turn the main Selector to Digital Delay

Digital Delay – Mix and Time
Set the Mix to 100%. This way we are outputting the delayed signal only.
We are setting the Time to 100ms to start. We will fine tune the time setting by ear later.

Digital Delay – Fdbk (feedback)
- Press the third button to switch from Time to Fdbck.
- Rotate the button to set the Fdbk to 0%. We only want to hear the delayed signal once.

Channel 3 Aux
- While still working with the CH 3 Edit lit turn the main selector to Aux.
- Set the Level to 100% so we send the full signal to the Aux output.

Aux – Tap Setting
- Press the Tap (middle) button, then turn set it to Pre: With EQ & FX then press it to select your choice.

Main Out (¼ inch) to Channel 3 Input
Run a short 1/4 inch patch cord from the analog Main Out to Channel 3 input.
Summary
The result of all these settings is the analog Main output is flowing through to Channel 3. Channel 3 is delayed 100ms once. The delayed signal is routed to Aux. The original signal is discarded, but that's okay because the original sources are still flowing through to the Main output through the ToneMatch™ port.
Positioning the Secondary L1™
You are going to have to position the Secondary L1™ based on the room layout, sight lines, access requirements and what you hear when you set it up. In this particular case, try for about half-way between the Main L1™ and the back of the area you are required to fill. If you can put it in the middle of the 50 foot width of the room and aim it toward the back, that would be good.
If you cannot hit the 'ideal' we can still compensate by setting the Delay Time (see next section).
Fine Tuning the Delay Time
Tech Note: Distance in feet x .91 milliseconds = delay in milliseconds
Working on the assumption that the second L1™ is approximately 110 feet, the delay would be 100 milliseconds. We just used 100 as a preliminary setting.
Put the second L1™ approximately halfway down the area to be covered by your two L1™s. Aim it away from the main &L1™. We want to avoid overlapping the sound fields of the the two L1™s.
Turn up the T1™ Master level and you should hear your inputs through the Main L1™. Turn up the Secondary L1&trade Analog Input until you can hear both L1™s.
Have someone stand close to the second L1™. This is your 'listener'.
Use a child's "clicker" or something that produces a sharp, short clicking sound to send a "click" through a microphone into the T1™. MikeZ-at-Bose suggested a metronome for this source.
Edit Channel 3, Digital Delay Time setting. Adjust the time until the listener hears only one click instead of two. The means that you have synchronized the sound from both L1™s for people who are in the overlap area of the two sound fields.
Here is a Shared Scene you can load into your T1 ToneMatch Audio Engine. If you have been following along and have set up our T1™ with the settings above, you do not need to download this Shared Scene. I just included this as a convenience in case you wanted to try the Shared Scene system.
This scene has very generic settings for Channels 1,2 and 4/5 and the settings discussed in this article for Channel 3.
Please read the entire article before using this Shared Scene. It is provided as a convenience to save you some time is you want to have the same settings.
Warning
This is an experimental file and I strongly recommend that you back up all your scenes before loading this one, just in case you overwrite something by accident. I have tested this and it works in my environment, but I cannot accept responsibility for any issues you may have when you apply it to your T1™
You will need to understand how to use the L1 Software Updater program to load this Shared Scene.
|
ToneMatch® Updater Software application. (two versions available)
If you have questions please see ToneMatch Updater discussion.
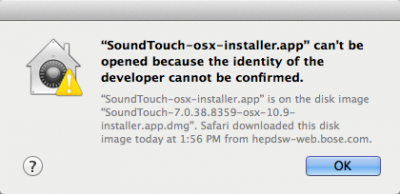
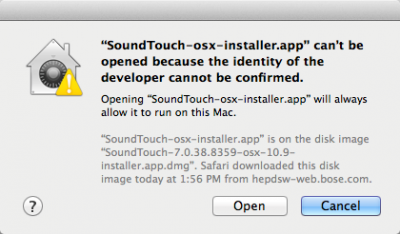
macOS Issues[Filename] can't be opened because the identity of the developer cannot be confirmedIf you see "[Filename] can't be opened because the identity of the developer cannot be confirmed" message displayed Mac OSX users may see this message when trying to install a Bose app. If this message appears, try the following: Mac users may need to hold the Control key (Ctrl) when opening the file. Various versions of the Mac OS cannot identify Bose as a developer. The Mountain Lion version of OS X (10.8) includes a feature called Gatekeeper to protect users from installing applications of non-Apple identified developers. The Mavericks version of OS X (10.9.5) temporarily cannot identify Bose as a developer as well. To open the application, follow these steps:
In the menu that appears, select Open at the top of the list A confirmation window will appear. Select Open Without Control click:
With Control click: More information on Gatekeeper can be found at http://support.apple.com/kb/HT5290
|
Warning
After you update the T1 ToneMatch Audio Engine or L1 Model II firmware, if you see a window on the PC that says the update was not successful, you should:
- turn the L1 and T1 off
- wait three seconds
- then turn the L1 and T1 back on
Do this before trying the update again!
This allows the L1 and T1s to re-establish a good copy of the software.
Source: If your firmware update is not successful - Caution
Download the file
Supporting Notes
Here is an excerpt of an article called the Digital Delay Advantage
How to Synchronize Your Signals
In the 1930s, engineers synchronized the low and high frequency speakers in movie theaters by feeding a sharp click through the system. They moved the speakers until they could only hear a single sharp click coming from both speakers. You can use this same method with a common child’s toy called a clicker.
Pressing the thin metal strip makes a loud sharp click. A clicker is especially useful when synchronizing the direct sound from the performer with the sound from the loudspeakers.
Source: The Digital Delay advantage
