Wiki Team
L1® Wiki Project Team
2006 08 23 Wednesday
Most of what you need to know about navigating the wiki is on the main page (The Bose® L1® Wiki). For some background on the project see The Bose L1® Wiki Project.
The plan is to incorporate this into our online community by linking into the wiki (this site) when people need reference material, and to continue to build up the knowledge as we go along.
To get back to this page, in the menu (at the left) click Wiki Team.
How you can help
- Create your account (when you get there click Create an account ) (30 seconds max)
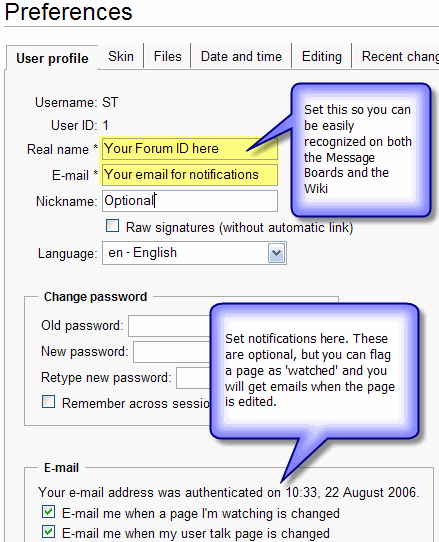
- After you create your account go to the top menu and click preferences Preview of what you will see
Take a look around
There are a couple of easy ways to find things.
The sort of expected navigation approach using the navigation links on the left side of the page
- go to the Users Guide OR
- type a key word into the Search box (also on the left side) OR
- click the link for a random page (You can do that as many times as you want for a fast flash around the wiki)
- You can find all the articles where you are mentioned by doing a search by your firstname or your forum ID.
- If you want to experiment with the editing process try the Sandbox
Any comments you have would be great
Add a comment by clicking the discussion tab at the top of any page. Then click the + tab that will appear to add a new comment.
Please sign your comments with four tilde symbols ~~~~ and the system will insert your name, date and time.
Let's use the discussion feature to do the same thing for the overall project - right here on this page.
Edits
- Fix anything you see that looks like it needs fixing.
- Hit the edit tab on any page that looks like it needs help, and give it a shot.
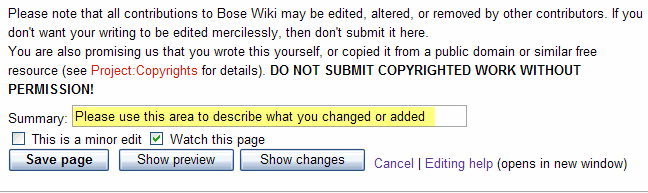
- Please use Summary and Show Preview before Save Page
It looks like this: Please use Summary and Show Preview before Save Page
- Suggestion Save your work on your machine before you hit Save Page. We are on the web and sometimes there are temporary connection problems. I usually have a copy of Notepad running when I'm creating posts on the forum for this very reason. OK - so before you hit Save Page click in the editing window, use Ctrl-a (select all), Ctrl-c (copy to clipboard), paste it into Notepad. Then if anything bad happens, you still have your copy.
- If you want to experiment with the editing codes try the Sandbox
- PLEASE keep image uploads small. If you can link to them it would be much better as my server connection is not very fast. It is fine for text and images under 50k but it gets sluggish beyond that. If you have a large image you want to display here, for now - please drop me a note in the discussion page and I'll contact you.
- thanks ST 04:38, 24 August 2006 (GMT-7)
New Articles
To add a new article, look at this list of all articles and you'll get an idea of the naming convention. Not hard wired, but I think you'll get the feel for it.
There are several ways to create a new article:
- Create a link in an existing page to your (as yet uncreated page) [[My New Article]]. This will appear in red like this:
Red links are for pages that do not yet exist. Follow a red link to create the article. This is a good way to make sure that there is at least one article that links to yours.
- Type the name of your new article in the "search" box in the left margin, then click "Go". If there is not already an article with that name there will be a link in red, near the top of the page called "create this page".

Click the red link and a new editing window will appear. That's it, you are creating your new article.
- You can use the form below (replace "My New Article" with the name of your article)
You can also check out this Video Tutorial for Creating an Article
Templates for L1® components
When referring to components of the L1® System please use these templates {{ some code }} . The templates will be automatically expanded in the text with a link to a page defining the term.
If you use these templates it can save an incredible amount of time if there is a change in the name of the products. For example - when the L1™ became L1®, I just had to change the template for {{L1}} and all the places where we had use the template, were updated.
All Templates
Here is a List of all Templates but you will probably find the list below more useful.
Commonly Used Templates
| Template | Displays as |
|---|---|
| {{A1}} | PackLite® power amplifier model A1 |
| {{A1 EB}} | PackLite® power amplifier model A1 Extended Bass Package |
| {{B1}} | B1 Bass Module |
| {{Classic}} | L1 Classic |
| {{Classic Manual}} | L1® Classic Owner's Guide (a link to the owners guide) |
| {{L1}} | L1 |
| {{L1r}}{{L1 nl}} / {{L1 no link}} | L1® |
| {{L1 CR}} | L1 Cylindrical Radiator® loudspeaker |
| {{Model I}} | L1 Model I |
| {{Model I Manual}} | L1® Model I Owner's Guide (a link to the owners guide) |
| {{Model II}} | L1 Model II |
| {{Model II Manual}} | L1® Model II Owner's Guide (a link to the owners guide) |
| {{PAS}} | Bose® Personalized Amplification System™ family of products |
| {{PS1}} | PS1 Power Stand (Classic) / Model I |
| {{T1}} | T1 ToneMatch Audio Engine |
| {{T1 nl}} or {{T1 no link}} | T1 ToneMatch® Audio Engine |
| {{T1 Manual}} | T1 ToneMatch® Audio Engine Owner's Guide (62 pages) T1 ToneMatch Audio Engine Service Manual (a link to the owners guide) |
| {{T1r}} | T1® |
Templates for other things
| Template | Displays As |
| {{Bose}} | Bose® |
| {{BoseFAQ}} | ==Bose Official Frequently Asked Questions== |
| {{forum}} or {{mb}} | Bose® Pro Portable PA Community |
| {{A1 icon}} | |
| {{B1 icon}} | |
| {{Classic icon}} | |
| {{Model I icon}} | |
| {{Model II icon}} | |
| {{T1 icon}} |


Categories
Categories are optional, but extremely powerful and easy to use. They allow us to tie related pages together.
As you create or edit a page, you can add any number of categories. For example if you are creating a page about a microphone technique you would add this.
[[Category:Microphone]]
Uploading Files
Hint: I find it easier to write the article first and add the images after.
- Put the [[Image:MyImageName.jpg]] tag in the article first.
- Save the article
- There will be a link to the 'nonexistent' image.
- Click the link and the wiki will take you to the image upload page with the 'Destination filename' already filled in with the name you specified in the tag. (Where it says "Please put a name here e.g. Plane-wave.jpg in the image below).
- Browse to the file on your local hard drive
- Add some notes about the image (so we can find it with Search later
- Upload the file.

It's Live
Please remember that the site is basically live and public now so for any really goofy stuff, try to do that in the Sandbox page and I'll clean it up later.
Create Your Account
(30 seconds max)
Look for Create account / login at the top right of the screen.
After you create your account go to the top menu and click preferences
Now that you have seen the video, you can click on Log in /create account at the top of the screen and create your own account.
Optional - Change your Preferences
