Difference between revisions of "T1 ToneMatch® Audio Engine"
m (® replaces ™ - still much to update on this page.) |
m (® replaces ™ - still much to update on this page.) |
||
| Line 4: | Line 4: | ||
__TOC__</td> | __TOC__</td> | ||
<td valign="top">[[Image:005 Bose T1.gif|Bose T1™]] | <td valign="top">[[Image:005 Bose T1.gif|Bose T1™]] | ||
| − | '''<big> | + | '''<big>T1® Fix</big>''' |
{{:T1 ToneMatch™ Audio Engine / Blue Screen Fix}} | {{:T1 ToneMatch™ Audio Engine / Blue Screen Fix}} | ||
| Line 24: | Line 24: | ||
* [http://www.bose.com/controller?event=VIEW_STATIC_PAGE_EVENT&url=/musicians/popups/l1_m2_presets.jsp T1 ToneMatch® Presets] (official version - opens in tiny window). | * [http://www.bose.com/controller?event=VIEW_STATIC_PAGE_EVENT&url=/musicians/popups/l1_m2_presets.jsp T1 ToneMatch® Presets] (official version - opens in tiny window). | ||
| − | * [[T1 | + | * [[T1 ToneMatch® Audio Engine / FAQ]] |
| − | *{{:T1 | + | *{{:T1 ToneMatch® Audio Engine / Video}} |
| − | *{{:T1 | + | *{{:T1 ToneMatch® Audio Engine / Simulation}} |
This is an online simulator that lets you interact with all the controls on the {{T1}} | This is an online simulator that lets you interact with all the controls on the {{T1}} | ||
</td></tr></table> | </td></tr></table> | ||
| Line 36: | Line 36: | ||
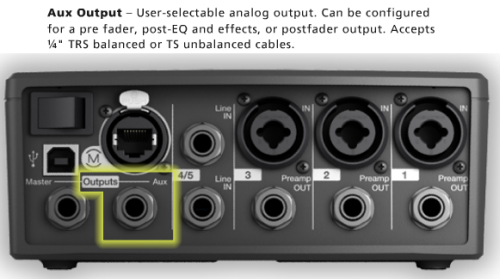
== Aux Output == | == Aux Output == | ||
| − | {{:T1 | + | {{:T1 ToneMatch® Audio Engine / Aux}} |
== Effects == | == Effects == | ||
Revision as of 11:44, 23 February 2008


T1® Fix T1 ToneMatch™ Audio Engine / Blue Screen Fix Downloads
Announced March 29, 2007
This is an online simulator that lets you interact with all the controls on the T1 ToneMatch Audio Engine |
Documentation
Aux Output
Overview

The output of any of the Channels 1, 2, 3, 4/5 can be sent to the Aux out. You can take the Aux out to provide a separate mix for recording or running to another L1 or separate amplification system.
Tap points where you can set the output to the Aux.[1]
- Dry: After Preamp: The completely dry (no processing) signal is routed directly from the preamp stage.
- Pre: With EQ & FX: The signal is routed from the preamp stage with applied processing.
- Post: After Fader: The signal is routed after the Channel volume control with applied processing.
Excerpt from the T1 ToneMatch® Audio Engine Owner's Guide (62 pages)


Setting the Tap Point
Setting the Aux Output to
- Dry: After Preamp
- Pre: With EQ & FX
- Post: After Fader

Press to access Tap menu.

Select
- Dry: After Preamp
- Pre: With EQ & FX
- Post: After Fader (note that channel Volume and Mute button also affect Aux)


No Reverb on Aux
Q: Why is there no Reverb on the Aux output of the T1 ToneMatch Audio Engine?
A: Hilmar-at-Bose writes[2]
- The T1 ToneMatch Audio Engine has lots of different effects units and normally they are unique to each channel. That means that the T1® has 4 individual dynamic processors, 4 modulators (chorus flanger, phaser, etc.) , 4 EQs, 4 delay processors, etc. The only exception is the reverb, which is shared by all channels.
- The AUX is also a per-channel control. That means if you turn up the AUX of channel, you expect to hear signals from channel 1 and only from channel 1. However, the output of the reverb processor contains the reverb portions of all 4 channels. If we add that to the Aux, you'd hear the reverb portions of all 4 channels and not only the channel that you are interested in. In most cases, this is probably not what you want.
- If you are familiar with conventional mixing consoles, you will find that the situation is quite similar. You can only route to an AUX output effects that are specific to a channel (normally these would be connected to the insert loop of this channel). The "shared" effects typically come into the board through an AUX return, which is not channel specific.
The discussion continues in the Message Board
Reference: page 52 of the T1 ToneMatch® Audio Engine Owner's Guide (62 pages)
Problem: Aux output does not sound right.
What To Do:
- Check if the Aux output is configured for the desired tap point for each input channel. Refer to “Routing input signals to the Aux output” on page 26.[1]
Note: No reverb comes from the Aux output even if the tap point is Pre or Post.
- Verify that each input assigns the desired signal level to the Aux output.
Aux Out to a S1 Pro System
The Aux Out is balanced mono and suitable to connect to the S1 Pro System Channel 1 or 2.
For best results use a 1/4 inch (6 mm) Tip-Ring-Sleeve cable. A 1/4 inch (6 mm) Tip-Sleeve cable will have up to -6dB lower signal and be more susceptible to line noise.
- Applicability
- This article applies to connecting the T1 ToneMatch Audio Engine Master Output or Aux Output to the S1 Pro System

- Power for the T1 ToneMatch Audio Engine
- If your T1 ToneMatch Audio Engine is connected to an L1 Model 1S or L1 Model II, the T1 ToneMatch Audio Engine will get power from the Power Stand. If it not, you will need a ToneMatch Power Supply to run the T1 ToneMatch Audio Engine.
- Cables

- The T1 ToneMatch Audio Engine Analog Outputs and the S1 Pro System 1/4 inch (6.3 mm) inputs are balanced. For best results use a 1/4 inch (6.35 mm) Tip-Ring-Sleeve cable for a balanced connection. You can use a 1/4 inch (6.35 mm) Tip-Sleeve cable, but you will lose up to -6 dB in signal strength and you may pick up line noise.
On the S1 Pro System, for each channel you are connecting to the T1 ToneMatch Audio Engine use these settings while you are setting up.

- Reverb OFF
- Bass at 12:00 o'clock
- Treble at 12:00 o'clock
- ToneMatch switch OFF
You can adjust the Reverb, Bass, and Treble after you get your basic sound working.
Gain Staging
- Using a Bose device as the source
When connecting a ToneMatch Mixer[3] or an S1 Pro System Line Out to an S1 Pro System channel 1 or channel 2
Set the volume control to 10:00 o'clock with 1/4 inch (6.3 mm) Tip-Ring-Sleeve
- The signal strength from a ToneMatch Mixer[3] or an S1 Pro System Line Out is sufficient to achieve the maximum usable volume from the S1 Pro System
- Control the overall volume from the ToneMatch Mixer[3] or the first S1 Pro System. If you use an XLR cable, set the volume control to 9:00 o'clock

- Using a third-party source (not a Bose device as the source)
For each channel you are using on the S1 Pro System
- Turn the channel volume off
- Connect your sound source
- Adjust the volume of the source device output to the reference or nominal output level.
- On analog consoles this may be marked as unity or 0 dB.
- On digital consoles this may be marked as -18 dBFS[4][5]. The exact value (-18 dBFS to -20 dBFS) may vary depending your location[6].
- Refer to the manual for the source device for details.
- If the source device does not have metering or indicators, set the output as high as you can without hearing distortion or seeing red indicator lights.
- While playing/singing as loud as you will during your performance, bring up the channel volume until you see solid green on the channel indicator light. Occasional flickers of red are okay. If you see solid red or you hear distortion, turn down the volume.
Combo Inputs
- S1 Pro Channels 1 and 2 have combo inputs that accept
- XLR (balanced mono)
- Microphone or Line-Level inputs
- 1/4 inch (6.3 mm) Tip-Ring-Sleeve connection (balanced mono)
- Line-Level inputs
- 1/4 inch (6.3 mm) Tip-Sleeve connection (unbalanced mono)
- Line-Level inputs and instruments (e.g. guitars, keyboards, guitar processors, loopers)
- When using a third-party device (e.g., mixer or another line-level source) should I use the XLR or 1/4 inch inputs?
- The S1 Pro 1/4 inch Tip-Ring-Sleeve inputs are best suited for line-level balanced inputs. This is a better match for the signal level.
- The S1 Pro XLR inputs are best suited for microphones.
When the S1 Pro Channel input lights hit red or you hear distortion, the signal is clipping and you've reached the maximum usable volume. From the source, if the XLR outputs are line-level and the 1/4 inch Tip-Ring-Sleeve outputs are line-level, it won't matter which type of cable you use. They'll both get the job done, although the volume control setting will be lower with the XLR connection. That doesn't indicate more headroom. The maximum usable volume is the same either way.
Connecting a Mixer to an S1 Pro system
Article from Bose Connecting an S1 Pro to a mixer
[[Category:S1}}
Aux Out to a separate System
Aux Out to Headphones
The Aux Out is balanced mono intended to be connected to the balanced input of another device at line-level. This may also work with headphones but the volume will be very low and likely not loud enough to be heard over live stage volume.
If you connect to a stereo input, the signals for Left and Right may cancel out. This might not be an issue for headphones as the Left and Right signals are not combined.
Aux Out to In-Ear-Monitors
The Aux Out is balanced mono intended to be connected to the balanced input of another device at line-level. This may also work with headphones but the volume will be very low and likely not loud enough to be heard over live stage volume.
If you use an In-Ear-Monitor system that has built-in amplification, this may work.
If you connect to a stereo input, the signals for Left and Right may cancel out. This might not be an issue for headphones as the Left and Right signals are not combined.
Input Directed to Aux Out Only
To direct an input exclusively to Aux see: T1 ToneMatch® Audio Engine / Aux to a Separate System
Effects
Overview from Hilmar-at-Bose
T1 ToneMatch™ Audio Engine/Effects
Compressor
T1 Tonematch™ Audio Engine/Compressor
Detailed Listing
Please see Effects
Gain Staging
Bill-at-Bose [7] talks about setting the gain on a T1 ToneMatch Audio Engine.
One difference in gain staging the T1 and the Classic is that the T1 has a three-stage trim LED. It lights up green when signal is present, yellow when you are getting pretty loud (8 to 10 dB of headroom left), and red when you dangerously close to or at full scale.
In a way, the yellow trim on the T1 is similar to how you treat the red on the Classic. Some yellow during peaks is good on the T1, just like some red on the Classic is good.
If the T1 trim is going red, you should back off, you are definitely nearing or in compression.
A really helpful feature on the T1 is to go to the Prefs/Output Level menu, and see where you are relative to maximum output.
Power Stand Input Setting


When using the Classic or Model I [8] The T1 has more input capability then the Model 1,s so you should be able to use the T1 as the only control for your system. We have a recommended trim setting for connecting the T1 to a Model 1 input Ch 3 or Ch 4
Note: New recommendation is 3 see below.
With this setting you will not distort or clip the Model 1 no matter what you do on the T1. You can even use the Model 1 without the remote.
The T1 ToneMatch Audio Engine controls are a heck of a lot faster then the R1 controls. There is no perceivable lag.
Input setting recommendation now 3
MikeZ-at-Bose wrote[9] Bill-at-Bose and I have revisited this.
For these conditions:
- T1 going into model I/Classic into Ch 3/4
- balanced OR unbalanced 1/4" cable
- remote unplugged, OR, master volume on remote at 12 o clock
- proper gain staging required on the T1 itself
I'm going to revise the original recommendation of 2 for Ch 3/4 to 3 - under the above conditions.
This will give you the same gain going into the L1 Classic/model I as if you were going through the digital ethercon input on a model II.
If you are using the remote on your M1/CL, then you will need to compensate a bit. If you running the remote master volume at max, then stick with 2on Ch 3/4. I would recommend against running the master volume below 12 o'clock when using a T1.
Hopefully this is helpful - please ask away with any questions for clarification.
MikeZ
Excerpt from the T1 ToneMatch Audio Engine Manual - page 20 - Note: this recommended input setting is now 3. See the note above.

Connect 2 T1™s to a Model II
T1 ToneMatch™ Audio Engine / Connections to Model II
Preamps
Comparison to Model I and Classic
MikeZ-at-Bose tells us:[10]
... (the preamps on the Model I are)... exactly the same as the Classic.
On the T1 ToneMatch Audio Engine they're different, but are designed to the same standard as the L1 Classic preamps.
Functionally they are basically the same in terms of frequency response, input impedance, noise performance, max gains etc.
The difference comes in how we get there. I'll try not to go into horribly boring detail. The name of the game is trade offs, and in the end the design constraints dictate the *best* type of circuit used for *this* particular situation. Here are a couple of the many factors that dictate the differences:
Gain structure. The internal components of the T1 ToneMatch Audio Engine are different that the L1 Model I / L1 Classic and need to have signals fed to them in certain ways. Different designs are more suited to the levels needed than others.
Physical layout of the circuit on the board. There are four channels in a tighter space in the T1 ToneMatch Audio Engine. Again, certain designs lend themselves to be better at this than others.
After evaluating all of the factors that go into the design of a preamp we are using another proven circuit that relies more on discrete transistors rather than op-amps. It fits our needs better for this design situation. The preamp design itself is not necessarily any better or worse. There are *many* ways to skin the cat of preamp design to achieve a desired performance.
Will it sound different? No...I certainly cannot hear a difference playing through it. Can't measure one either.
Hope this sheds some light on it.
MikeZ[11]
Preamps Out

The preamp outputs are before everything except the Trim control in the signal chain. - MikeZ-at-Bose[12]. This means that these are post-trim, and nothing else (e.g. Muting) has any effect on the signal at the preamp outs.
Presets
- ToneMatch™ Presets for the T1™ (downloadable presets that are not installed at the factory)
- T1 ToneMatch™ Presets (includes downloadable lists with cross-references to Version 2 presets).
Tuner
T1 ToneMatch™ Audio Engine / Tuner
USB (Computer Interface)
T1 ToneMatch™ Audio Engine / USB
Cables
From T1 to Model II
Ken-at-Bose[13]
The T1 ToneMatch™ audio engine comes with a really nice Pro Ethercon cable, with robust metal connector shells and an almost memoryless 18' black cable.
However, in a pinch, should you forget the cable, or if say a huge Hammond B3 gets dropped on the cable and severs it, YOU CAN USE ANY ORDINARY CAT 5 ETHERNET CABLE and it will work fine until you replace you nice fancy T1 cable.
Later in that discussion Hilmar-at-Bose tells us:
Any CAT5 (or CAT5e, CAT6, or CAT7) cable will work just fine without any degradation at least initially. The downsides are that most ethernet cables don't coil particularly well and that the connectors wear out over time. After a a few hundred uses you may notice the occasional drop out, at which point it's time to get a new one.
It's certainly a quick and cheap way to get a spare for an emergency.
Convert Cat-5 Cat-6 to Ethercon
NE8MC EtherCon® Cable Connector Carriers (retrofit over an existing RJ-45 Connector).
Example vendor http://www.fullcompass.com/product/255589.html
Cable Length
Up to 50 feet
A technical note from Bill-at-Bose [14]
A 33 or 50 footer will not cause any problems, either with the digital audio (ones and zips) or the power.
The technical reason follows, for those who are interested : A 24 gauge wire (the size typically used in ethernet cables) has about 2.5 Ohms of resistance per 100 feet. The T1 draws roughly 1/4 Amp on each of two supply wire pairs (+/-18V nominal).
For a 50 foot run, each pair of wires (made up of a plus and minus lead) totals 100 feet. A quarter Amp of current across 2.5 Ohms gives, per Ohm's law, a voltage drop of less than one volt (V=IR = 0.625 Volts). Because of the margin we built into the system, it can handle this voltage drop easily.
In fact, although we don't recommend it and can't guarantee it, the digital audio has been tested up to 100 feet in average conditions (for example, no undervoltage on the AC supply at the gig), and quite happily continued to make music.
Over 50 feet
MikeZ-at-Bose added in a later discussion:[15]
Bill at Bose stated you could run 50' of ethernet cable no problem at all. Success at distances longer than that would start to depend on outside factors, for instance the voltage of your power source.
Another option for you is to run the T1 ToneMatch Audio Engine off of the optional power supply, and then run a balanced line from the Master Out on the T1 ToneMatch Audio Engine to the balanced 'analog input' on the L1 Model II. This method would be able to transmit over a hundred feet, perhaps much more.
Optional AC Power Adaptor
5 foot of cord from the T1 to the switching power supply, and a removable 6 foot cord from the power supply to the wall. This is very similar to a laptop power supply.
Display Panel
Outdoors
Q: Please talk about using the T1 ToneMatch Audio Engine outdoors. Will I be able to see /read the display? A: Should be no problem. The LCD display on the T1 is "transflexive". In dark conditions the blue backlight will shine through the "transmissible" part so everything is easily visible. In bright sunlight, it becomes "reflexive" just like a piece of paper. The backlight may wash out (i.e. it will not look really blue anymore) but it's still clearly visible. [16]
Design of Visual Components
Quoting Ken-at-Bose[17]
In 23 years at Bose, the L1™ model II and T1 ToneMatch™ audio engine are the most lovingly designed products I have ever had the fortune to work on. More care by more experienced people went into this than anything I've been involved in.
The most minute details were studiously created. As one tiny but important example, a propriety light pipe was designed so that the light from volume knob indicators smoothly wrapped around the knob from top to side, giving the musician a clear indication of volume from any angle. The color and intensity of the light was carefully designed so that it was visible in an extraordinarily wide range of stage lighting conditions.
- ↑ 1.0 1.1 Aux Tap Points from page 26 of the T1 ToneMatch® Audio Engine Owner's Guide (62 pages)
- ↑ Hilmar-at-Bose writes about No Reverb on Aux
- ↑ 3.0 3.1 3.2 T4S ToneMatch mixer or T8S ToneMatch mixer or T1 ToneMatch Audio Engine
- ↑ dBFS
- ↑ dBU vs dBFS
- ↑ dBFS Analog Levels
- ↑ Bill-at-Bose Talks about Gain Staging in the Bose® Musicians Community Message Boards
- ↑ Hilmar-at-Bose talks about setting inputs [1]
- ↑ MikeZ-at-Bose talks about the input setting on the Model I or Classic Power Stand with the T1™
- ↑ MikeZ-at-Bose talks about the preamps in the L1 Model I and the T1™
- ↑ MikeZ-at-Bose talks about the preamps in the L1 Model I and the T1™
- ↑ MikeZ-at-Bose -T1™ Preamp Out Muting
- ↑ Ken-at-Bose Steal this computer cable!!
- ↑ Bill-at-Bose talks about cable lengths
- ↑ MikeZ-at-Bose talks about T1 cable lengths
- ↑ Hilmar-at-Bose talks about the transflexive display on the T1™
- ↑ Ken-at-Bose speaks about development of the T1 ToneMatch™ audio engine