T1 ToneMatch® Audio Engine / Stereo Output to Two F1 Systems
Contents |
This article will primarily be of interest to DJs. You can run a two signals (for example stereo tracks) through a single T1 ToneMatch Audio Engine out to two F1 Model 812 Flexible Array Loudspeakers. How you do that will depend on your input, USB or Analog. Both of these methods involve sending one track to the Main output, and one track to the Aux output. In this article we will use an Analog input (Traktor S8 DJ controller). If you have questions or comments about this article please join the conversation in the Bose Professional Portable Systems forum - Traktor S8 to T1® to Two F1 Systems in Stereo Related Articles: |
Analog
Summary
In this case you connect one half of the stereo pair to one T1® Channel (1, 2 or 4/5) and let that be amplified through the T1® Main output. Then connect the other half of the stereo pair to another T1® Channel. In this example I did that on Channel 3. By routing Channel 3 exclusively to the T1® Aux output, you can keep the Stereo channels left and right separated.
Once you get the balance set you will probably want to control the overall volume from the sound source. It is not really convenient to do that in the T1® because there is no shared volume control for both Master and Aux outputs.
Overview
Once you have things connected and you have set up the levels, you will use the Traktor S8 to control the volume. You can alter the overall sound using the T1® Presets and zEQ.
You will need a T1 ToneMatch® Audio Engine Power Supply to power the T1 ToneMatch Audio Engine.
- You will use the T1 ToneMatch Audio Engine if you prefer the sound of the T1® Presets and/or zEQ and/or ParaEQ and/or prefer to run your microphone through the T1®. If you won't be using these features of the T1 ToneMatch Audio Engine it is probably simpler to run directly from the Traktor S8 to the F1 Model 812 Flexible Array Loudspeaker stacks. No T1 ToneMatch Audio Engine would be required.
[/LIST]
Connections to the T1® for Stereo Output
- Use T1® Channel 2 for Traktor LEFT Main Output.
- Use T1® Channel 3 for Traktor RIGHT Main Output.

Do not use Channel 4/5 because this will convert everything to Mono
- The T1® MAIN output will be LEFT.
- The T1® AUX output will be RIGHT.
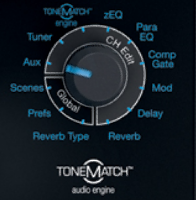
Settings on the T1®
When when you first set this up there will probably be no sound from the T1 ToneMatch Audio Engine AUX output. We have to route the signal on Channel 2 through to the Aux output.

Using Aux to send a signal exclusively to a second System
Using a T1 ToneMatch Audio Engine with two L1 s, you may want to send an input to one System, but not the other.
In this example, we are taking an input in Channel 3, and sending it to Aux, and not to Main.
- Set the Selector to Aux
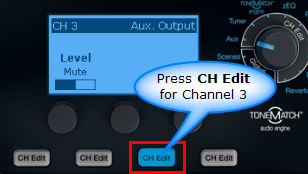
- Press CH Edit for Channel 3
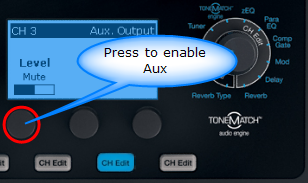
- Press button 1 to enable Aux
- Press button 2 to see the Tap menu
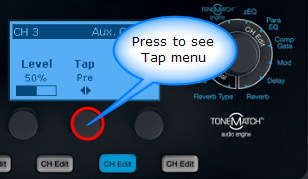
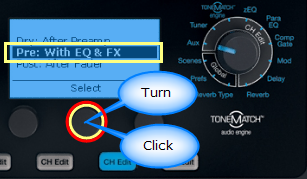
- Turn the Tap setting to Pre: With EQ & FX. Press the button to Select.
- Set the Channel Volume to 0 (zero).
I set the Volume to 0 to avoid unwanted consequences of accidentally hitting Mute. Just to be safe, I also Mute the channel.
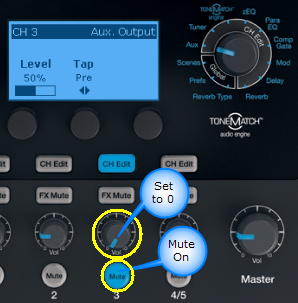
- Adjust Aux Volume if necessary.
You will probably end up at or near 100%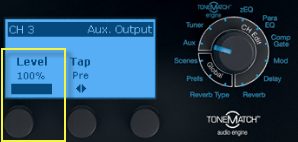


At this point you should have the RIGHT channel coming through the Aux output.
Connecting the T1 ToneMatch Audio Engine to the F1 Model 812 Flexible Array Loudspeaker
For the LEFT side: Connect the T1® Master Output to F1 Model 812 Channel 1. Set the Volume to 12 o'clock. You can set the F1 Model 812 Flexible Array Loudspeaker EQ switch to FULL RANGE or WITH SUB. Choose whatever sounds best to you.
Connect the F1 Model 812 Line Out to the F1 Subwoofer Channel 1 input.
For the RIGHT side: Connect the T1® Master Output to F1 Model 812 Channel 1. Set the Volume to 12 o'clock. You can set the F1 Model 812 Flexible Array Loudspeaker EQ switch to FULL RANGE or WITH SUB. Choose whatever sounds best to you.

Connect the F1 Model 812 Line Out to the F1 Subwoofer Channel 1 input.
Gain Staging
This is how you will set the various controls along the signal path to get the most from the equipment.
Analog Source to T1 ToneMatch Audio Engine
This is typically a one-time operation. You can do this in silence until the last stage where you bring up the Master Volume.
Do this with the T1® Master Volume all the way off, and the Channel volume all the way off. You do not need to hear the music to set the trim.

Your first adjustment for any input to your T1 ToneMatch Audio Engine is the Trim setting. The exact position of the Trim will vary depending on signal strength of your input source. The correct setting for any particular source may be different from your other sources.

Set Up Your Source
Set up your Mixer or DJ console to the highest output level you will use during a show - that is ⇒ the maximum, highest output recommended in the manual. Make sure that there is no sign of clipping.
Play some music. There will be no sound. That's okay for now.
Set Input Trim
Turn the Trim setting up until the Trim Light is solid green with occasional flickers of yellow. Use the Trim lights as your guide. (The exact position of the Trim knob is not important).
If you see flickers of red, turn the Trim down. You are definitely nearing or in compression. Turn the Trim down until there are no red flickers.
Connecting the F1 Model 812s to the F1 Subwoofers

Volume Controls
- Set Channel 2 and 3 Volumes to 12:00 o'clock. Set the Master Volume all the way off.
- Turn on the power of all F1 systems.
- On the F1 Model 812 Flexible Array Loudspeaker and F1 Subwoofer set all Channel 1 Volumes to 12:00 o'clock.
Now bring up the T1 ToneMatch Audio Engine Master Volume.
At this point you can make all of your adjustments by ear. If you turn up the T1 ToneMatch Audio Engine Master Volume to 12:00 o'clock, and you need more volume, you can probably turn up to 3:00 o'clock without issues.
If you need more volume, on the F1 Model 812 Flexible Array Loudspeaker systems you can turn up the Channel 1 Volume controls. Note: This is calibrated differently than the trim controls on the T1 ToneMatch Audio Engine.
You can turn up until the Signal/Clip light is solid red, and then turn down a little bit until you flickers of red. Flickers up to a second or so are okay. It is fine if you have to turn up the Volume well beyond 12:00 o'clock.
To adjust the overall amount of bass with the F1 Subwoofer Volume control.
After you have the spectral balance and maximum volume available you can manage the volume in the room from your mixer.