PS1 Powerstand
Contents
|
How to Tell the Difference Between Bose Portable PA ModelsThis is how to tell which L1®, S1 Pro, or F1 unit you have.
Compatibility with Other Members of the L1® Family of ProductsCylindrical Radiator®sCylindrical Radiator®s are not interchangeable across modelsSpecifically (and without exception)
T1 ToneMatch® Audio Engine, T4S/T8S ToneMatch® Mixers
PackLite® power amplifier Model A1
B1 Bass Module
B2 Bass Module
|
||||||||||||||||||||||||||||||||||||||||||||||||||||||||||||||||||||||||||
Connections
- Interactive view of the connections
- PS1 Powerstand Connections
- PS1 Powerstand/Signal Flow for information about how your input signal flows through the PS1 Power Stand (Classic) / Model I
- Preventing Incorrect Connections
What do the LEDs mean?
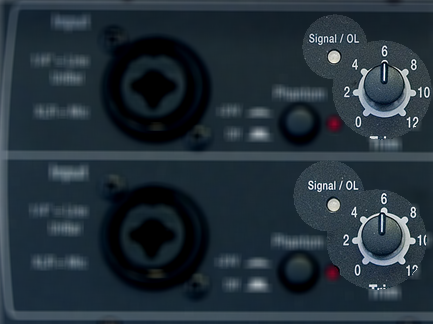
Signal/OL LEDs: Channels 1 and 2
There are two LEDs on the PS1 Power Stand (Classic) / Model I near the Trim knob labelled Signal/OL -- one for Channel 1 and another for Channel 2.
These LEDs indicate when the signal level channel's preamplifier reaches certain important thresholds. The trim controls located near the LEDs adjust the amount of gain in the preamplifier.
- The LEDs turn from off → green when the signal level exceeds a small amount.
- The LEDs turn from green → red when the signal reaches a level that's about 10 dB below a level that would clip the preamp and cause objectionable distortion.
When the LED is off (but you are playing an instrument you think is connected to the PS1 or singing/talking into a microphone you think is connected): Increase the level of the trim control. If the LED still does not turn green or red, check instrument/microphone and cables to the PS1.
When you see green only: This indicates that there's some signal in the channel but not enough. While singing or playing the loudest you ever plan to in the performance, increase the trim level until the LED is only flickering red. This is the optimal gain.
When you see red most of the time: Decrease the trim level until you see only flickering red. This is the optimal gain.
Phantom Power LEDs: Channels 1 and 2
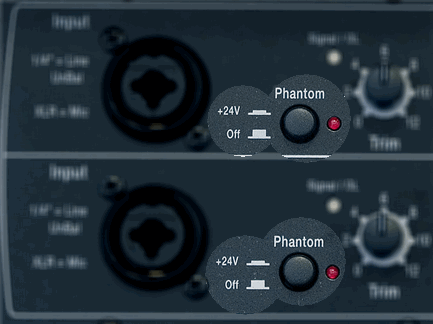
The LEDs near the Phantom Power button are either off or red when phantom power is turned on. — more information about Phantom Power
Power / System Status LED
This LED normally is a steady green when the power is on.
If it is not lit or if it is yellow/amber, contact Support.
Note: This LED may briefly flicker yellow /amber when the power is first turned on; this is normal. Within a couple of seconds, it should settle to a steady green.
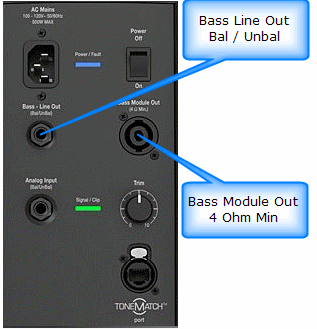
Bass Line Out and B1 behavior
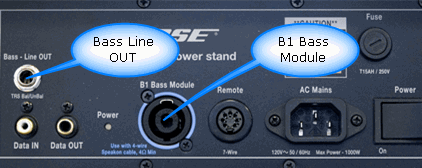
The behavior of the bass line out and B1 Bass Module outputs on the L1 Classic / L1 Model I / L1 Model II are based on the philosophy that adding B1 Bass Modules should give the user more dynamic range (can play louder) but should not alter the tone of the instrument, including tone adjustments made using the R1 Remote, the T1 ToneMatch Audio Engine or other tone-shaping equipment.
This philosophy is notably different from other manufacturers, who take the approach that it's okay (or desirable) that adding more bass speakers causes the instrument tone to become "bassier".
With this philosophy in mind, here is how the bass line out and B1 outputs work.
No cable plugged into the Bass Line out
| B1s connected | Output | EQ | Bass Signal Gain | Notes |
|---|---|---|---|---|
| 1 | 40Hz-180Hz | B1 specific EQ | Reference Level | |
| 2 | 40Hz-180Hz | B1 specific EQ | Reference Level -6 dB | Why? Because when you add a second B1, if you did not change the signal strength you would get 6 dB more bass relative to the mids and highs. This would alter the tone of the instrument. To keep the tone the same, while still allowing the more dynamic range (system can play louder by 6 dB) the signal level must be reduced by 6 dB. |
Cable connected to the Bass Line Out
| B1s connected | Output | EQ | Bass Signal Gain | Notes |
|---|---|---|---|---|
| 0 | 40Hz-180Hz | Flat EQ | Reference Level -6 dB | |
| 1 | 40Hz-180Hz | B1 specific EQ on Bass Line Out and B1 Out | Reference Level - 6 dB | If you are using a PackLite® power amplifier model A1 Extended Bass Package this is a total of 3 B1s (2 on the A1 and 1 on the Power Stand) |
| 2 | 40Hz-180Hz | B1 specific EQ on Bass Line Out and B1 Out | Reference Level -12 dB | If you are using a PackLite® power amplifier model A1 Extended Bass Package this is a total of 4 B1s (2 on the A1 and 2 on the Power Stand) |
With More Than 4 B1s
The Power Stand does not measure the exact number of PackLite® power amplifier model A1s, so there is a slight error if you use anything but 1,2, or 4 B1s.
For 6 B1s you will be 3.5 dB bass heavy, for 8 B1s it'll be 6 dB heavy.
B2 EQ
Bass Line Out: Model II post firmware 1.4 with System EQ 1.04
September 2012
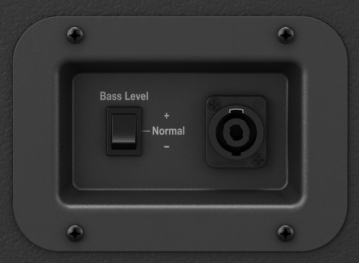
- Bose released Model II Power Stand Model II firmware 1.4 with System EQ 1.04 to support the B2 Bass Module with the three position Bass Level Switch ( + Normal - ). Note: Support and behaviors for B1(s) is unchanged.
- The behavior of the bass line out with the B2 Bass Module Bass Module outputs on the Model 1S and Model II are based on the philosophy that adding B2 Bass Modules should give the user more bass output immediately. This changes the tonal balance as soon as you add a second B2 using an PackLite® power amplifier model A1 connected to the Bass Line Out. This is unlike the behaviour with B1 bass modules where the signal is attenuated as you add more B1s to maintain the tonal balance at lower volume levels.
- Note: If no bass modules are detected at the Bass Module Output the Bass Line Out EQ will be set to the B2 curve with the B2 switch set to Normal.
- — Source Craig-at-Bose
No cable plugged into the Bass Line out
| B2 Bass Modules connected | Output | EQ | Bass Signal Gain | Notes |
|---|---|---|---|---|
| 1 | 40Hz-200Hz | B2 specific EQ as set by the B2 Bass Level Switch ( + Normal - ) is present at the Bass Module Out and the Bass Line Out | Reference Level | There are three B2 EQ settings possible using the B2 Bass Level Switch ( + Normal - ) |
Cable connected to the Bass Line Out
| B2 Bass Modules connected | Output | EQ | Bass Signal Gain | Notes |
|---|---|---|---|---|
| 0 | 40Hz-200Hz | B2 EQ as though B2 attached and B2 Bass Level Switch set to Normal position | Reference Level | This presents the B2 EQ with the B2 Bass Level Switch set to the Normal position. (No resistance detected between the 2+ and 2- pins of an NL4 plug) |
| 1 | 40Hz-200Hz | B2 specific EQ as set by the B2 Bass Level Switch ( + Normal - ) is present at the Bass Module Out and the Bass Line Out |
Reference Level | If you are using a PackLite® power amplifier model A1 Extended Bass Package this is a total of two B2s (one on the A1 and one on the Power Stand) |
Powered Subwoofers
The Model II is an integrated system that supports Bose B1 and B2 bass modules. Connecting powered subwoofers to the Model II Power Stand Bass Line Out is not supported because EQ curves for the B1 or B2 are present at the Bass Line Out. This may or may not result in good results with a powered subwoofer.
If you want to use a powered subwoofer, connect your signal source to the subwoofer and connect the subwoofer high pass filter output to the L1® (any model).
Output if no B1 Bass Modules detected at the Bass Module Output (powered output) the signal at the Bass Line Out is:
- 40-180 Hz with B2 EQ applied if you have the current L1® Model II Power Stand Firmware Updates
- If you do not have the current firmware the signal at the Bass Line Out is: 40-180 Hz Bandpass (that is: NO B1 EQ) [1]
- The system Crossover for the Cylindrical Radiator®s is 180 Hz
If one or two B1 Bass Modules is detected or emulated using resistors across NL4 2+ / 2- pins
- 40-180 Hz with different EQ curves
- The system Crossover for the Cylindrical Radiator®s is 180 Hz
For details on how to do this see: Activating B1 EQ Curves and Using a Different Sub
- Note — Operation of the B2 with the Model I/Classic is only supported with the B2 Bass Level Switch set to Normal.
- See: Is the B2 Bass Module Compatible with the L1® Classic or Model I
Bass Module Output (powered output)
For the sake of those attaching third party passive speakers (an unsupported application), the output characteristics are the same as for the the B2 Bass Module (section immediately above).
- ↑ Hilmar-at-Bose intelligent crossover
A) When there are no bass sources attached, lower the crossover and try to get as much bass out of the L1 as is reasonably feasible (110 Hz) in this case
B) If there are bass sources bring the crossover up to 180 Hz (where the L1 starts to get really efficient) AND adjust the bass gain so that the overall spectral balance is maintained no matter how many bass sources are attached.
Original Source - Hilmar-at-Bose
Use the proper cables
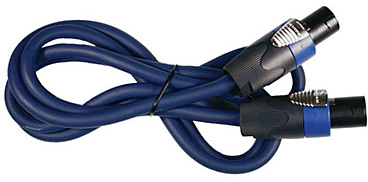
Warning - Use Blue B1 Cables NL4 cables with your L1 Classic / L1 Model I / L1 Model 1S L1 Model II
If you are using a B1 Bass Module with your Power Stand it is ESSENTIAL for proper operation that you use the BLUE cable supplied with the B1 Bass Module or B2 Bass Module. This is required so that the L1 Classic/L1 Model I/L1 Model 1S/L1 Model II Power Stand can correctly identify when there are bass modules connected to it and if so, how many.
Please click the picture above for ordering information.
- Note
- The B2 Bass Level Switch will not change the sound of the B2 Bass Module if you are not using the correct cable.
See: PS1 Power Stand / Bass Line Out for details about how the Power Stand adapts to the number of bass modules are connected to it.
You may also use high quality NL4 cables (four conductor cables).
Alternate and longer cables for B1s
Phantom Power
Hilmar-at-Bose posted a great message about phantom power (and why the Bose system is 24 volts)[1].
Let me add some technical ramblings to the 48/24 discussion. Condenser microphones require phantom for a couple of reasons
a) power an internal pre-amp
b) supply polarization voltage to the capsule
c) run an internal DC-DC converter that in turn fuels either preamp, capsule or both
Most condenser mics fall in category a). In this case, reducing the phantom from 48V to 24V has virtually no effect. In theory you can get higher voltages out of a 48V supply, but at this point you would clip the input of you mic preamp anyway.
In category b), the effect of dropping the phantom is that the overall sensitivity of the mic goes down by 6 dB. On the other hand, the max SPL goes up by 6dB. In general, you will simply have to turn up the trim a little more, but there shouldn't be any other effects.
Case c) is basically hit or miss. Either it works just fine or it doesn't work at all. I don't think there is any in-between.
Again, most mics these days fall in category a) and that's one of the reason why the the International Engineering Consortium (IEC) in it's standard 61938 (1996) in section 7.4.5. explicitly recommends
- quote: Although 12V and 48V systems are still in use, 24V systems are preferred for new developments
and that's why we've chosen 24V.
Leaving it in the bag
It is okay to do this if you like (and personally I find it a lot quicker for setup/teardown)
Heat
Hilmar-at-Bose speaks about the heat [2]
The PS1 does have fans, but they are only kicking in when you work the system pretty hard. The power amps are very efficient, and a nice side effect of high efficiency, is that there is a lot less heat to get rid off. So unless you are hitting it very hard, the fans will be off and at that kind of volume level, the fans are pretty much inaudible.
Leaving the system inside the bag is perfectly fine. The vents are above the mixer section and if the bag is open enough so you an insert any cables, than its also open enough to get appropriate ventilation.
If possible you should avoid exposing the PS1 (or any kind of electronics for that matter) to direct blazing sunlight. That can generate enormous amounts of heat inside the system to the point where it actually has to shut down (to protect some of the internal components). As a general rule, if it's too hot for you as the performer, than it's probably also too hot for the system. Finding a little shade will certainly help in a scenario like this.
Access Door / Flip Up Panel
Cliff-at-Bose talks about the door [3]
"I took my cover off right away and couldn't even tell you where it is right now. The carry bag for the PS1 seems to do a good job of keeping things clean in storage, the trunk, in transit. For the upper L1 section, turn it upside down, grab it by the bayonet, lower it into the bag and the bayonet should tuck into the top just fine.
Preventing Incorrect Connections
Cover Unused Inputs
To avoid mishaps at a gig cover or plug the unused inputs on your PS1 Powerstand. This picture shows white nylon caps in the lesser used inputs of a L1 Classic Powerstand. The L1 Model I does not have the inputs in the white area near the top right.
Here is a link to the full sized version of the image.
This tip is from Dan Cornett - see Dan's original tip about plugs for unused inputs
No Sound
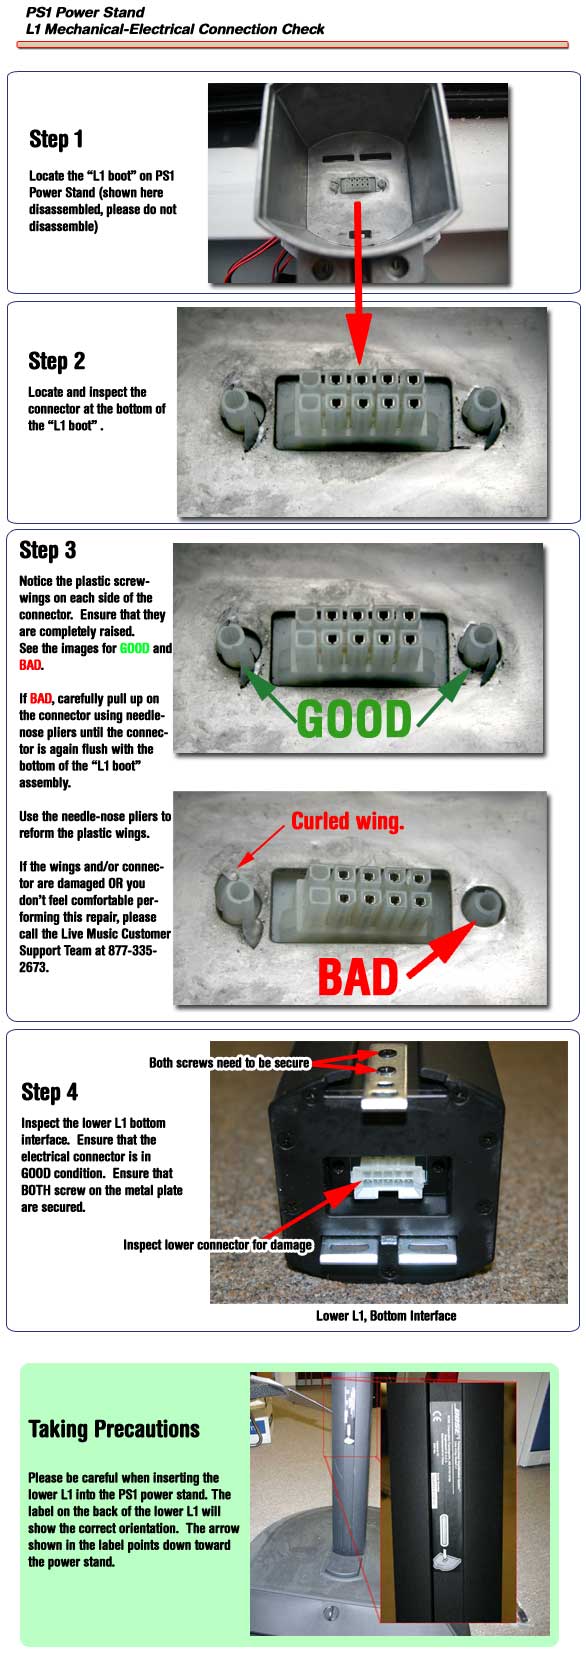
Damaged Connections in the L1® boot
Inspecting for damaged connectors in the PS1 Powerstand boot.
Obstructions in the L1® boot
Look down the well - Thanks to Joseph for this one [4]
Set up my Bose as usual just before an early gig tonight and except for the sub-woofer (B1 Bass Module), there wasn't any sound coming out from the line array when plugging in the guitar directly (without the usual PODxt Live in front of it).
Whool! I was definitely started to freak... I surely didn't want to pull my van around again and have to get out the Roland Keyboard back-up amp.
The anguish I was going through just imagining having to use anything other then the Bose was excruciating.. to think that I might have to play the next run of back to back gigs (five of 'em to be exact) without my baby Bose...:-(
Trouble shooting all possibilities, nothing-nada was happening ... no beauteous guitar sound whatsoever!...
The one thing I did notice however, was that the pole was wobbling just a tiny bit. Whenever I would take it apart and put it back together again, there seemed to be the slightest, almost imperceptible of wobbles.
Finally, after taking it apart and putting it back together again for the third time I looked into the power base (PS1 Power Stand (Classic) / Model I) fitting and saw one of my picks lying there. Sure 'nuff... the pick was blocking the connection. This thin little pick was just enough to prevent the Bose from making full contact.
So be forewarned guitarists ... stray picks can be a threat to your total Bose sound fulfillment.
More Troubleshooting
There are several different forms of "trouble". At least initially, let's break them down into Acoustics, Gear, Venue, Power.
— Source: Troubleshooting - Wikipedia Bose Official Frequently Asked Questions |
Acoustics
Feedback
Feedback happens when the sound from the loudspeaker enters the microphone or instrument with pickup only to be re-amplified. With the L1 it is typically easier to manage unwanted feedback because you typically have fewer loudspeakers, and fewer microphones to manage per System. ... full article
Hearing Yourself
Hearing Yourself can be a challenge, especially if you are not the only performer playing through the L1 you are using. But even if you have you own L1 there can be challenges on stage. If this is your issue see: Hearing Yourself
Bass Regeneration
Bass Regeneration is a special class of feedback, or regeneration, that exists in all live amplification systems. It is a very insidious and hard-to-confront phenomenon, but it is responsible for a lot of bad sound. Resonances of all kind, including those of musical instruments and those of large “boomy” rooms will also contribute to bass regeneration. ... full article
Gear
No Sound
- Check the power (System on, power indicator green)
- Check your sound source
- Volume control on the sound source
- Batteries (e.g. Sound cuts out)
- Cables
- On/Off switch if there is one on the cable
- Signal Path
- Connect your sound source directly to the L1® system. That is: eliminate everything between your instrument or microphone and the L1® System.
- L1 Classic or L1 Model I try Power Stand Channels 1 or 2.
- L1 Classic or L1 Model I remove anything connected to the Channel 1 or Channel 2 insert points.
- L1 Model II and a T1 ToneMatch Audio Engine try Channels 1,2,3
- L1 Model II and no T1 ToneMatch Audio Engine try the Analog Input. Your signal source must NOT be stereo. See Model II - Stereo Source to Power Stand Analog Input?
- Connect your sound source directly to the L1® system. That is: eliminate everything between your instrument or microphone and the L1® System.
- Damaged B1 Bass Module Cables. See: B1 Cable Connections
Low Sound
You can hear the sound but it is not loud enough.
Bass sounds fuzzy
Warning - Use Blue B1 Cables NL4 cables with your L1 Classic / L1 Model I / L1 Model 1S L1 Model II
If you are using a B1 Bass Module with your Power Stand it is ESSENTIAL for proper operation that you use the BLUE cable supplied with the B1 Bass Module or B2 Bass Module. This is required so that the L1 Classic/L1 Model I/L1 Model 1S/L1 Model II Power Stand can correctly identify when there are bass modules connected to it and if so, how many.
Please click the picture above for ordering information.
- Note
- The B2 Bass Level Switch will not change the sound of the B2 Bass Module if you are not using the correct cable.
See: PS1 Power Stand / Bass Line Out for details about how the Power Stand adapts to the number of bass modules are connected to it.
You may also use high quality NL4 cables (four conductor cables).
Alternate and longer cables for B1s
Does not Respond to R1 Remote
- Check connections (See PS1 Powerstand Connections/Interactive for close up view of input panel).
- Power Stand
- Remote — try both top and bottom
- Make sure input sources are NOT plugged into Channel 1 or Channel 2 Insert points
Sound Drop Outs - Intermittent
Intermittent sound can result from:
- poor connection to the B1 Bass Module. Check the wires in the Speakon connectors. See: B1 Cable Connections
- poor connection to the R1 Remote. Reseat the connections at both ends.
- On the L1 Classic or L1 Model I check that the Presets buttons are completely on a Preset. If you have recently changed Presets, go up an then back down again to make sure you are completely dialed in. See: Preset 56.5 hint from DJ Argyx.
Sound Drop Outs - at High Volume
From Bill-at-Bose[5]
Hilmar[6] and I looked into sound dropouts further to find the root cause, and found the rather subtle issue that, depending on the wire gauges and how the wires were paired in the cable, loud bass signals (in the speaker pair of wires) in extra long cables could capacitively couple into the sensing pair of wires. When it happened, the L1 "thought" you were changing your B1 Bass Module configuration and would mute.
So we looked at capacitance per foot with different wire guages, and with twisted vs untwisted pairs in the same cable, and looked at our sensing algorithm, and did two things to solve the problem:
We had Mark at Audiopile.net send us some samples to our new spec, we checked them, and they worked well. This gave a method for our customers who needed a long B1 cable to get one that worked.
The second thing we did was redesign the L1 software so that it could "filter out" the effects of momentary crosstalk and not cause the problem. That way future L1's would not have the issue.
Intermittent Drop Outs Using the T1 ToneMatch Audio Engine and L1 Model II
The user manual states 5 amps or greater, so six amps is a good approximation. For that reason, we recommend only up to two L1 Model IIs on a single 15A circuit breaker in the US.
A quick review of four POSSIBLE causes of audio cutting out follows. That will help us determine what is going on.
Bass Module Cable
If there is a non-Bose B1/B2 cable, OR if the B1/B2 cable has a defective, loose connection, audio can intermittently mute. It may happen with loud music because the speaker will be vibrating and shake the loose connection. This will sound like a clean muting of all audio for a second or so. There will be no visual indication.
Fixable by tightening the screws in the connector.
For more details see: Sound Fading In and Out
Power Issues
Very low, out-of spec, AC power (less than ~105 VAC on a 120V system, or less than around ~215 V on a 230 V system. The manual states 110 and 220 for good measure) coupled with high signal level. This can be caused by a low power source, or one where the outlets are a very long distance from the electrical panel, extra equipment on the same electrical branch, power sags or dropouts, long or multiple extension cords, or small gauge extension cords.
In this case, loud music increases the current draw, and the voltage drop over the extension cord will lower the voltage enough to cause a reset of the ToneMatch Mixer[7], or the L1 Model II Power Stand.
If the ToneMatch Mixer[7] resets, the LEDs (input trim level, mute LEDs) will turn off. The LCD display will remain lit, but be blank until the unit restarts. The L1 Model II Power Stand can reset but it does not show on the indicators.
In either case, the answer is to ensure the power supply is solid and dedicated to the audio equipment, and to have as short cords as possible with large wires. Also be aware that separate wall outlets may still be on the same breaker.
If there are intermittent voltage sags or outages in your area (as there are in parts of Florida, for example), it is possible that some equipment that does not use a lot of power (like mixers) will continue to operate, and equipment requiring high power, like amplifiers, may not be able to produce audio.
Those outages can happen any time, but are less likely to repeat, or unlikely to happen only at loud parts of the music.
More: Power Considerations
Overheating
If the L1 Model II Power Stand overheats, it may shut down. This can happen under direct sunlight outdoors when the temperature exceeds the maximum operating temperature. Check the access to the fan is clear (opening at the front of the power stand) and that legs are on a flat sturdy surface. If the power stand is on a carpet, it may sink down and obscure the vents on the bottom.
Defective Unit
Defective units: If the items above are not the cause, then either the ToneMatch Mixer[7] or power stand may be defective, and you should contact customer service.
Volume Spikes
Sound Jumps - Spikes - and returns to normal volume.
R1 Remotes (Version 1)
2004-early 2005
Some users reported unexplained, momentary jumps in volume (spikes). This was tracked down the an issue with the R1 Remote.
Check the R1 Remote.
Look on the back. If there is not a designation "Model R1 '.ver 2'
you probably have an older remote.
Solution - call Support and get a new R1 Remote.
Call Support
Telephone the Bose Live Music Product & Technical Support Team (877) 335-2673 (U.S. and Canada only)* Hours of operation Monday-Friday: 9:00 AM - 9:00 PM ET
Workaround
Hilmar-at-Bose[8] ... a temporary workaround. Simply keep the channel volume and the master volume on the remote at or above the 12 o'clock setting. The easiest way to get there is to set the volumes to about 2 o'clock and dial in the trims on the powerstand so that the playing volume is about right. That gives you some space on the remote to back it up some and also plenty of head-room when things get a little "hot" during the night. That should eliminate all problems with the spike. That also means that you can use the remote and you do not need to peg the settings at 12 o'clock. I know that this is an inconvenience and we are working full throttle to get the issue finally resolved for all affected users.
Hiss
If you have all settings on the PS1 Power Stand (Classic) / Model I set straight-up (including the R1 Remote), with nothing connected, you may hear an audible hiss within 4-8 feet.
The reason: At these settings the System is running wide-open at full power with no input signal. If you use a microphone or a recorded source playing with these settings - the System would be extremely loud. When you provide an input signal source with appropriate trim settings the hiss should be inaudible.
Solution: Use the R1 Remote to lower the Master Level when you have no input signal source.
Note: It is recommended that you use the R1 Remote.
Related Discussions
- hiss with no inputs
- white noise issues
- white noise issues Bill-at-Bose
Popping Sounds on Shutdown
There are a couple of things you can do.
- Remove the Cylindrical Radiator® and B1 Bass Modules before turning off the Power Stand. You will not harm the Power Stand, and it will be easier to access the cables.
- If you are using a L1 Model I or L1 Classic, on the R1 Remote, turn down the Master Level.
Hum
You want to isolate the source of the hum, but this can be tricky because hum is usually the result of two or more devices interacting.
Start with the L1 fully assembled, no inputs, all settings on the R1 Remote straight up. If there is no hum then turn down the Master Level.
- Connect a sound source (simplest possible signal chain - for example microphone only).
- Turn up the Master Level
Keep adding items to the signal chain until you hear the hum. When you get the hum, remove the source and make sure that the hum goes away. When you are sure you know what is causing the hum, check that the source of the hum is connected to the same power source as the PS1 Power Stand (Classic) / Model I
- Try a DI with a ground lift between the device that causes the hum and the PS1 Power Stand (Classic) / Model I
Cell Phone
Do not leave your cell phone on or near the PS1 Power Stand (Classic) / Model I. If there is an incoming call, the ring may be amplified through the loudspeaker.
Computer
See: Computer/Sounds if you have a computer in your signal chain.
Venue
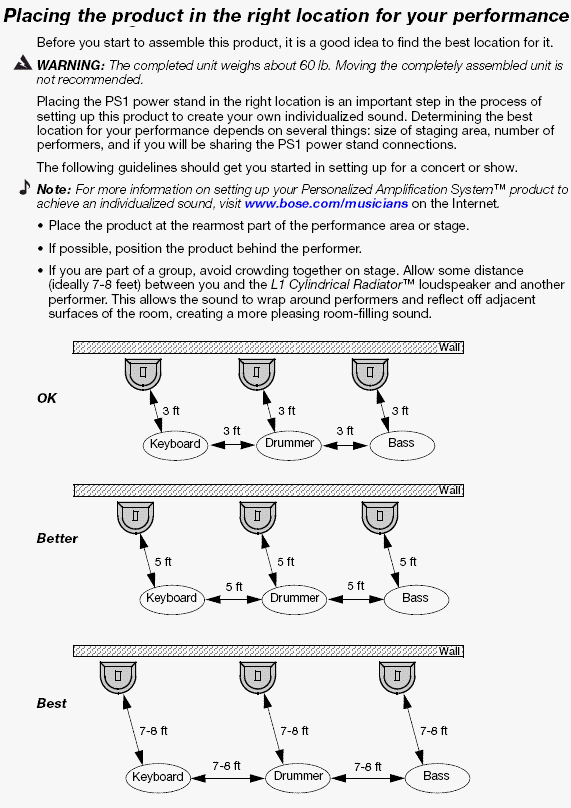
Small Stage
When offered a chance to play, one of my first questions is about the size and position of the stage. If you find that your show is going to be compromised by a small or awkwardly positioned stage, just ask:
- For more space
- If you may set-up in a better position in the room
- For permission to remove false walls, decorative railings, hanging obstructions, and anything that can be handled with a screwdriver, or is otherwise easily restored.
In an ideal situation you will have
- A minimum of eight feet of stage depth (more if you have a large room) and
- A minimum of four-six feet of stage width for each player
- If you have four (or more) performers then you might want width as above and stage depth at least 50%-75% of the width. The farther apart the players are, the more you will want some depth behind you everyone can hear one another.
Examples (minimums - width x length):
- Two performers: 8' x 8'
- Four performers: 16' x 8'
- Minimum: Width: 4 x 4' = 16' Depth 50% of Width = 8'
- Better: Width: 4 x 6' = 24' Depth 50% of Width = 12'
- Six performers: 24' x 12'
- Minimum: Width: 6 x 4' = 24' Depth 50% of Width = 12'
This makes for a tolerable stage, you will probably want a little more room, but you should be able to make this work.
Notes from Page 9 of the Bose® Personalized Amplification System™ family of products Owner's Guide
This is the owners guide for the L1 Classic copyright © 2005
Odd Stage Position
If placed in a corner, ask if you can be placed in the center of a wall. If the "short" wall in a rectangular room is wide enough, then that is probably your best choice for the wall behind you (if the long wall is not greater than 100 feet).
Power Considerations
Introduction
This information pertains to AC power sources for your L1 Model II, L1 Model 1S, L1 Compact, F1 Model 812 Flexible Array Loudspeaker, L1 Classic, L1 Model I
Reviewed and updated May 27, 2019.
Electrical Power
As a general note, we want to remind you that all electrical equipment must deal with poor power conditions and power outages. Hardware and software designs can be sophisticated in this regard and we put enormous effort in this area.
At a certain point, if the voltage drops too low from the wall circuit, or there is a power outage, contemporary digital electronics including ours will start a reset sequence. Assuming the AC power recovers, the reset sequence with digital electronics usually takes a few seconds. If that few seconds is longer than the power outage, it can be a frustrating wait.
There are practical things that musicians can do that will minimize the chance of an interruption in their performances – practices that are valuable to know and use in general for all stage equipment.
- Use AC extension cords that are as short as possible. Do not use a 100’ cord when a 25’ cord will do.
- Do not use thin-gauge or flimsy extension cords. Good cords are worth the extra expense.
- Avoid the practice of stringing AC extension cords together: if you have 20’ to the wall socket, use one 25’ cord rather than 3 x 8’ cords. The reason is that the electrical connectors at the junction between cords can introduce extra resistance, especially if they are bent or corroded.
- Split power-hungry equipment (amplifiers and lights) over as many different power circuits as you can. Lots of power-hungry equipment loaded onto one circuit will lower the voltage and can cause equipment resets and failures, especially in very loud musical performances.
- Check for non-performance-related equipment on stage circuits that may contain compressors or large motors: refrigerators, air conditioners, snow cone machines, etc. can cause a large drop in the voltage. If possible, move these appliances to other circuits or have them turned off during the performance.
Source: Bill-at-Bose
Surge Protectors
From Hilmar-at-Bose
Surge protectors are not a bad thing, although the Power Stands for the L1 Classic, Model I, Model 1S, Model II and Compact have built-in surge protection.
"Surge" means a lot of voltage coming through the power over a short period of time. That's pretty rare and the main cause is lightning, some accidents involving power lines (mostly on poles) being cut and touching something they shouldn't (e.g. the wrong side of a power transformer) and some really big compressors (e.g. industrial-sides freezers or fridges) turning on or off.
With the exception of lightning and some very bad power accidents, the Power Stand can handle that all fine by itself. With lightning, anything is possible. No piece of equipment that I know will survive a direct hit into a directly connected power line. But then again lightning might strike a few blocks (and transformers) away in which case a surge protector might be able to take the first hit and die quickly enough to protect the attached equipment.
In this regard, even cheap surge protectors will work fairly well and there is only a really small number of cases where a cheap and very expensive surge protector might make a difference.
On a side note, its a good idea to have all equipment that connects to the Power Stand on the same power strip. That helps with ground loops. On the other hand it's not a good idea to turn things on and off with the switch on the power strip. That may cause your fuse to blow (due to the so-called "in-rush current") and might result in pops and clicks.
The proper way to turn things on is to follow the signal, i.e.
- Instruments
- Outboard effects processors
- Power Stand
- External power amps (e.g. third-party power amps)
Turn off in the reverse order.
Source: Hilmar-at-Bose
Power Strips
There is no technical reason why a power strip, a power cord or any sort of power conditioner should make a difference [to the sound or your system]. Our system (and many others too) are designed to deal with all sorts of AC power fluctuation and have high-quality internal regulators. These regulate with much higher precision than any external device could do anyway, so "conditioning" or "cleaning" up the AC power doesn't make any audible difference whatsoever.
Source: Hilmar-at-Bose
Power Conditioning
We do not recommend external voltage regulators[9] because we found that in many cases they cause more harm than help. The amps and power supplies in the L1 use highly efficient switching technology, Many voltage regulators are not a good fit for this technology since they are simply not fast enough.
Source: Hilmar-at-Bose
We Bose designers do not believe that a power conditioner provides more headroom, dynamics, better sound, or more fidelity for our equipment.
There are a number of technical reasons for this that I won't go into online, but a good way to think of it is that we have already put in all the power conditioning required to make the products sound as good as possible.
Source: Bill-at-Bose ST 09:09, 12 August 2008 (EDT)
Reviewed with L1® Support June 16, 2014 ST 11:27, 16 June 2014 (EDT)
Background Information
The following is from a discussion with MikeZ-at-Bose
The power regulator/supply in the L1 takes in the AC wall voltage, whatever it is, and converts it down to much lower DC voltages to run the preamps, DSP's etc. As long as wall voltage is within the range I quoted earlier (90V-135V), the DC voltages that the preamps and DSP's see do not change. As part of the process of converting from AC to DC the power is also filtered. No matter what happens at the wall, the audio portions just see clean DC power. When the voltage goes outside the bounds, the unit just shuts down gracefully.
That's o.k. I like the engineering talk and thanks for your time. : )
I would love to know more about how it works if you have the time, cuz it sounds like you're telling me that in addition to a mixer section and power amps, the L1 base also houses a full voltage regulator and conditioner?
How does it work? Are you using a step-up transformer to regulate voltage? The reason I ask is because the process of simply converting AC to DC is a pretty common practice. : ) There are also many computer power supplies that use the conversion as a cleaning process, but that doesn't mean that the computer doesn't perform better from clean, consistent power.
My toaster is designed to work within a voltage range, since 110v is never guaranteed from your wall. So, I'm curious because I must just not understand. I wish I knew more about the engineering aspect of it. I can only report the facts of what I (and others) hear. Anyway, If you have the time, or the notion....I would be interested in a more in depth description. : ) Thanks
So first, why do we need power regulation or conditioning anyway?...
I just re-read your post and Im glad you mentioned the toaster! The toaster is like most electrical appliances in the world - it isn't very picky about it's power - and we would never notice the difference in performance. All the toaster does is take wall voltage and feed it to the heating element (the portion that glows red). If the wall voltage dips to 100, the power to the element drops proportionally. The toast will toast maybe ~18% slower in this extreme case. Noise on the AC line would have little effect on the element- the element takes a long time to heat up and cool down compared to the speed of the power changes, so it won't care about momentary dips. For example, if a refrigerator kicked in in a poorly wired house, the power may go down to 80V for a tenth of a second. The temperature of the element probably would not change measurably, and the end product (toast) would definitely not suffer.
With audio equipment, we are using our ears to judge the results. We're going to hear and care about sudden dips and changes in wall voltage, unless we regulate the power.
Digital equipment, like a computer, relies on constant voltage levels inside it's microchips to operate. These voltage levels (usually around 3.3 volts DC, or less) dictate the 'ons' and 'offs' at the heart of these devices. If the voltage goes outside a very narrow range, the digital does *not* degrade it's performance - it just ceases to operate.
The L1 has both analog audio portions (preamps, power amps), and digital portions (ToneMatch EQ's, effects in the T1, etc). Both of these portions rely on regulated, constant power to operate well. In the case of the digital portions, it relies on this constant supply of power to operate at all.
The power needed inside the L1 is DC. The amplifiers need around +/- 30V DC, the preamps need around +/- 18V DC, and the DSP's less than 5V.
How's it work?
The L1 uses a low noise switched-mode power supply. These are very light and efficient. Here's an article on how they work: http://en.wikipedia.org/wiki/Switched-mode_power_supply . In a switched mode supply (or switcher), the DC voltage is created from AC by rapidly switching a transistor on and off. The average of these on and off times, after a lot of filtering, becomes the DC voltage (pictures are in the wikipedia article). Regulation is done by varying the amount of the time the transistor is on and off. The switching occurs very fast, always more than 30,000 times per second. Sometimes much more. Switchers are an abstract concept and there isn't really a good analogy that I can think of for how they work.
For our supplies, there is a lot of extra filtering and tighter than usual regulation to make sure none of the artifacts from the wall power are audible. This is a major part of the product's design, and the focus of a lot of testing.
For some more reading on power supplies in general: http://en.wikipedia.org/wiki/Power_supply
Hope this is helpful and answers your questions
MikeZ-at-Bose
Source: MikeZ-at-Bose
Battery Power
Hilmar-at-Bose tells use that battery power is not recommended [10]
A sufficiently sized generator will work with our system although they tend to be fairly noisy.
Car battery converters (so called "inverters") are a little problematic. Most inverters don't work well with our highly-efficient Switch Mode Power Supplies and need to be 2 to 3 times oversized. That draws really big amounts of current from the car battery and the wiring from the battery to the inverter needs to be able to handle that. This is by no means a trivial job, so we recommend against it.
- ↑ Hilmar talks about phantom power voltage 24 vs 48 volts
- ↑ Hilmar-at-Bose speaks about the heat in the Bose® Musicians Community Message Boards
- ↑ Cliff-at-Bose talks about the door in the Bose® Musicians Community Message Boards
- ↑ Thanks to Joseph for this one in the Bose® Musicians Community Message Boards
- ↑ Bill-at-Bose talks about volume dropouts
- ↑ Hilmar-at-Bose
- ↑ 7.0 7.1 7.2 T4S ToneMatch mixer or T8S ToneMatch mixer or T1 ToneMatch Audio Engine
- ↑ Hilmar-at-Bose talks about Volume Spike workaround
- ↑ More about Power Conditioner vs Voltage Regulator
- ↑ Hilmar-at-Bose talks about battery power in the Bose® Musicians Community Message Boards


